JBNeal
-
Posts
7,194 -
Joined
-
Last visited
-
Days Won
81
Content Type
Links Directory
Profiles
Articles
Forums
Downloads
Store
Gallery
Blogs
Events
Everything posted by JBNeal
-
did I mention that I had left the windows down too? they enjoyed decorating the dash, floorboards, door panels, steering wheel, bench seat & back
-
truck picture B-1-B-108: somebody didn't think too much of me parking the '48 under the tree:

-
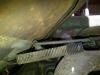
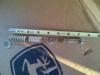
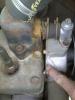
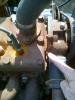
I took some photos the other day of the linkage setup on the '48 with the Ball&Ball on the 218; the '49 1-ton with the Stromberg on the 230 was an almost identical setup (currently partially disassembled for short test runs), as well as the '51 1-ton with the Stromberg on the 230...the return spring is attached to the floorboard with a cotter pin as shown. The return spring has tension on it while at zero throttle. Also shown is how close the throttle linkage on the back of the bell housing gets to the bottom of the cab when the cab mounts are worn and the motor mounts are new. The only other engine setup that I have that is complete is on the '53 Spring Special, and it's a bit of a head scratcher. The engine appears to have been replaced at some point, so I'm not totally sold that the B4B setup is original. The return spring, which is smaller than the ones used on the B-1s & B-3s, is attached at the throttle linkage rod at the pivot linkage as there is no clip present like the ones shown in the manual. This spring is then hooked to the lip on the floor board, not to a cotter pin through the floor board. I could not locate a hole in the floor board for the cotter pin to fit, so I'm kinda wondering if this might have been a running change near the end of B-series production...


-
Good barbecue takes skill not only in meat preparation but in smoking wood choice. Mesquite for smoking requires that it needs to be well seasoned, upwards of 2 yrs is best. Mesquite trees can produce creosote when burned while too green. This can produce a bitter taste in the meat that is being smoked; green oak or pecan can do the same thing but not as severe. When I helped out in barbecue competitions, the best tasting meats were smoked with mesquite, oak or pecan, and most of barbecue joints in the area will smoke with a combination of these woods as they become available. There was a local outfit that sold brisket sandwiches, and his side business was construction & land clearing. So he would have mesquite or pecan coals for smoking, but on occasion he would toss building lumber in the fire box (sometimes with the lead paint still on it while stacked up next to that home-made contraption)...he made a mean brisket, but sometimes ya'd wonder how he made it..... For a little more research information for trip planning, there are two television shows that have some interesting stories that can be followed: Texas Country Reporter and The Day Tripper. They not only give ya places to see but places to eat
-
When it comes to barbecue, there's southern barbecue, then there's Texas barbecue...I've met folks from around the country who will brag on their region's barbecue skill, but then they'll try some of our local fare, and they have all said how much different it is in meat quality & flavor. Those who know will tell ya that pulled pork around here is the scraps we feed the dog, and that good barbecue does not need sauce As for Houston, it can be an adventure, with almost non-stop road construction in some areas that transitions into a parking lot on the highway during certain times of the day with nowhere to go that transitions into an every-man-for-himself super-speedway, where if you're travelling the speed limit, ya might get smoothed right over. I had to through one area several times with a trailer load of equipment, 5 under the speed limit cuz the front of the truck was trying to wander 'round because of the heavy load, and I thought I was a goner there a few times with the close calls from hammer-down 18-wheelers and numerous cut-offs from folks exiting/entering the freeway...them folks all got places to be and the ignorant out-of-towner is in the way. My neighbors lived in & around Houston for 20+ yrs, and their advice was to know where I was going, know where the trouble spots are and how to avoid them, know where all the exits are, and go as fast as the rest of the crowd if you feel you can keep up...there's a lot of stuff to do in & around Houston & Galveston, but getting from point A to B might be more of a vacation story than the destinations
-
I-35 is alllll tore up south of Waco to Temple, lanes are restricted by construction barriers for long stretches so if there's any trouble along the way, most of the highway grinds to a halt...if ya want to stop in Waco, swing by Health Camp on The Circle for a cheeseburger and a shake (they have a banana pudding shake that is delicious, as well as a chocolate cheesecake shake that ain't too shabby)...or a stop in Temple at Clem Mikeska's for some of the best barbecue and catfish in the state, in a very unique setting...in Austin there's some stuff to do on South Congress on occasion, The Capitol is nice looking this time of the year (except when UT is playing up the street, then the neighborhood is littered with drunken idiots)...if you're gonna detour through Brenham, stop by the Blue Bell creamery if they are doing tours, their ice cream is GRRRREAT...if you're gonna drive through Houston...wellllll good luck to ya
-
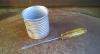
I reckon I can't take full credit for this as a useful tool...at a previous job where we manufactured aerial lifts, there was a guy who had worked there for several decades who ate Vienna sausages every day. The painters would bug him at least once a week for his empties, as the can was the perfect size for various chores: making test mixes, using for touch up paint, cleaning small equipment parts...the guys would get into "colorful discussions" on occasion as to who had dibs 1st for them empties, sometimes there would be feats of strength to settle these dust-ups. So when I had a hankering for them li'l sausages, I keep the cans now cuz WOW they are handy!
-
TOOLBOX ARSENAL: The cleaned out aluminum can that formerly housed Vienna sausages has come in quite handy. When filled half full of gasoline, it can be used to fill an empty Stromberg carburetor that has run dry because the '49 1-ton it is mounted on has a non-functional fuel level sending unit that has led to a couple of instances of needing to walk back to the house because of underestimation of fuel tank contents. The screwdriver helps to access the innerds of the carb
-
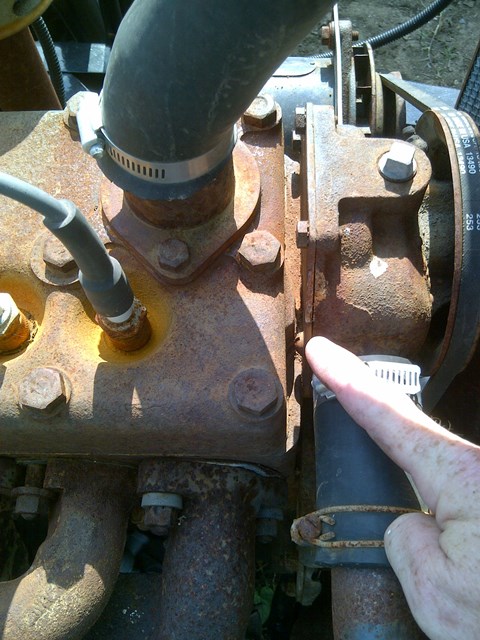
another 10 miles on the odometer from hauling water, and the NORS water pump that I cleaned up and installed back in '04 has started to seep out of the shaft seal. It hasn't completely blown out, but it's just a matter of time until that relic will need to be replaced with that NAPA pump that's been sitting on the shelf. There's also a freeze plug that has started to seep, but not as bad as the water pump issue. I took the truck 1/2 mile up the road to pick up my neighbors' paper while they are out of town, and the flat spots in them old tires were noticeable at 15mph, and started to shake the wax out of my ears when I hit 20mph. So the 1-ton will need quite a bit of work to get it road worthy: cooling system, tires, hydraulic brakes, wiring...but for now, it is doing a decent job in helping to keep my trees growing, my transplanted yard green, and the house foundation afloat
-
that top line goes up, then back down to go under the motor mount, then back up & turns to the frame to line up with the right front brake line that mounts to the frame. It probably doesn't need to go that high, and I didn't use that much line when I replaced the ones on the '48. As for that right side inner fender hole that extra spring is being anchored, that hole was probably there for a couple of other reasons: the blanks used when stamping these left side & right side inner fenders have the same hole patterns, or that hole is used as a mounting point for the fresh air kit duct. A sticking throttle might be indicative of slight wear in the linkage assembly, which can be a cumulative effect: each little part, with a little wear & a little corrosion on it, will bind up when put in certain positions as the factory return spring may not be strong enough to overcome this. There is mention in the shop manual to lubricate all linkages & control cables with light oil periodically to address this. This kind of lubrication is still required on newer vehicles even today...the hood latch on my '02 CTD was sticking a few years ago, so I hit the latch & springs with Liquid Wrench at all the pivot points then worked the oil into the joints by moving the hood up & down almost the full range of its pivot. Then I shut the hood soundly & popped the hood latch from the cab; my hands didn't have that good of a grip on the hood when I opened the hood latch, and that hood dang near caught me under the chin as is sprang open. So good lubrication on the pivot points can do wonders
-
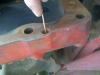
additional information - routing brake and gas lines Vintage Power Wagons has a used brake line tee listed in their catalog, although the pic shown doesn't look quite the same as the ones used on the B-Series.
-
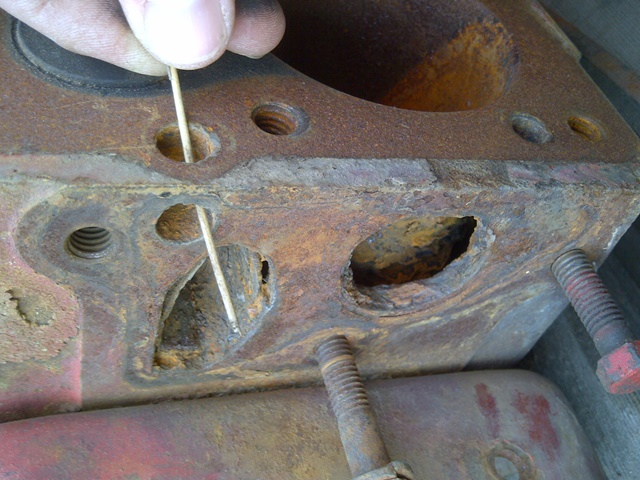
FWIW, notice in the shop manual diagram that the rod 14-11-9 is straight. Also note that the bell crank opening on the throttle shaft is almost the same opening as for the rod 14-14-3, not a small opening for a spring. My guess is that bell crank opening is for a linkage used on a governor as these Ball&Ball carbs were used on different applications, and there is no part number given in the parts manual for this second spring. When all linkages and control cables are within specifications and lubricated adequately, the throttle application is smooth and responsive
-
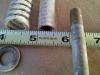
I don't think the original springs, spacers and bolts had any type of plating, they might have been painted black...the zinc plated replacement parts are available at the hardware store & total about $5
-
a few other details are of note, such as the B-1 roof rail vs. the B-3/B-4 roof rail profiles, as well as the door sill cab seal. The B-1s had a seal mechanically attached with clips to holes in the groove in the door, while the B-3/B-4s are mechanically attached to the cab sill that aligns above the door groove.
-
I found the paragraph that speaks of "...a heavy transverse member that was welded to the lock pillars and the underbody pan to provide a rigid tie between lock pillars and underbody." I'm guessing this observation was made from sales literature that was available at the time. I got curious and observed a few differences among the years between the seat base & b-pillar, as well as the rear cab mounts. The rear cab mounts are different for '53, but if anything, they look smaller...if there's a transverse member under there, I sure don't see it while the cab is mounted on the frame. '53 rear cab mount '51 rear cab mount ('48-'52 similar) The filler plate at the seat base changed from early '48 to '49, then again by '51, and again for '53. A hole shows up in this plate by '49, but disappears for the '53s...dunno what its purpose is or why it's only on the driver side. '53 filler plate '51-'52 filler plate '49 filler plate early '48 filler plate
-
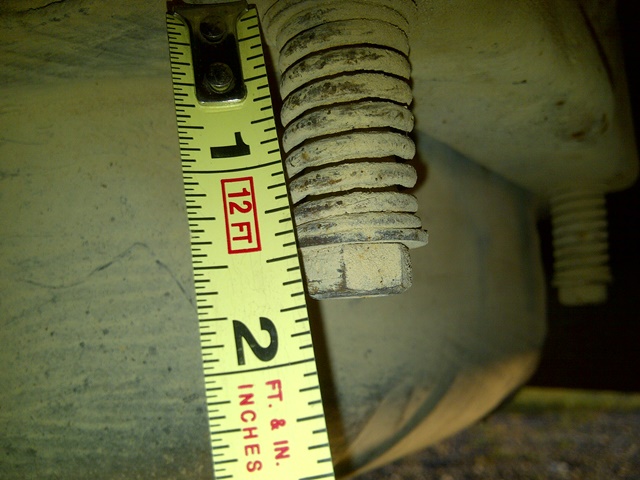
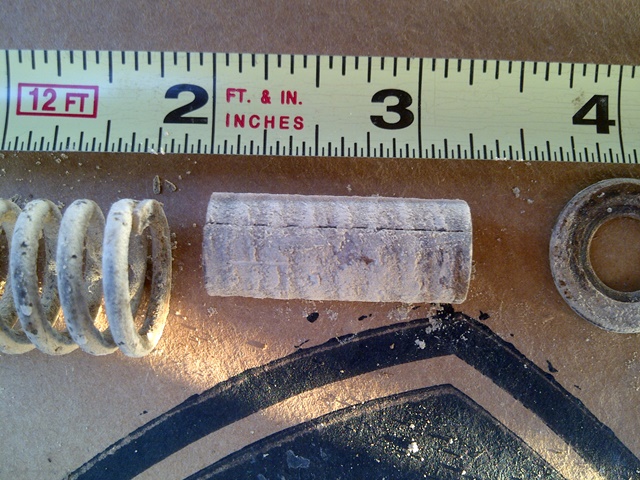
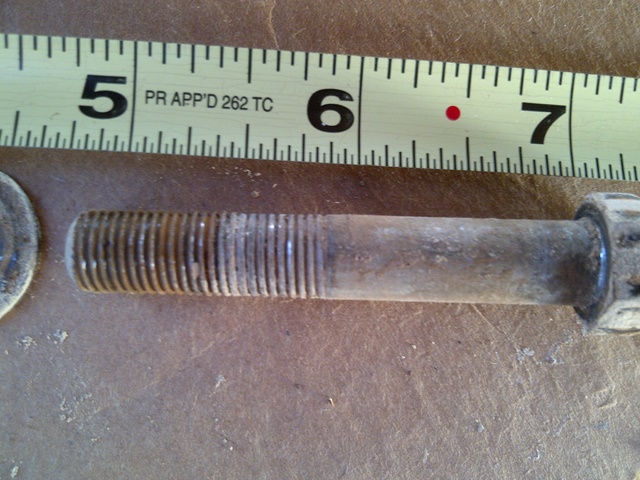
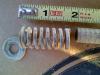
I've been a li'l fuzzy on what is the function of them springs. When I've found them on a truck, they are rusted solid to the bolt/sleeve that they are centered on. The bolts are run up to the sleeve, so the flange of the tank is seated to the frame cross-member all the time. But at any rate, the springs on the '48 are 3/32" wire diameter, about 1-3/4" long, centered on 3/8-24NF X 2-1/4 hex head bolts. I eye-balled the '49 & '51 1-tons and they appeared the same.

-
Availability has been an ongoing issue with the NAPA water pump. I had found out about these water pumps from the article written on Moparforum and I reckon Airtex has a run of new pumps every few years or so when they feel they can maximize profit on them. I'm just glad they are still available
-
if there is air trapped in the block, then coolant is not allowed to pass through that area to allow heat transfer. This can lead to hot spots in the castings, which may lead to cracking. I reckon this is similar to a blocked coolant tube.
-
on the new NAPA water pumps, the bearings are lubricated by the coolant similar to modern water pumps as there is no grease fitting. It's my understanding that the original cooling system was non-pressurized to allow air to escape from the lower reaches of the engine block, 'burping' air to the upper radiator tank. If the system is pressurized, then air gets trapped in the block cooling passages which could lead to hot spots, which might be your elevated temperature readings. From my experience, running 50/50 mix is more than adequate for these cooling systems; richer on glycol falls into the "some is good, more must be better" logic that isn't always justified. As for the running temperature of the engine block and how that equates to stress on the casting, I've seen optional 180 & 195 thermostats listed in the parts books for these flathead engines, and considering how much mass the blocks have, I don't think they are under too much stress if they are running in the 200 range...if anything, higher operating temperatures are supposed to help boil out any moisture in the crankcase to help reduce sludge formation.
-
I've had bias ply on my '48 since '99, have about 10k+ miles on them and they are getting thin in tread. I put them on to keep the truck original, and cussed myself cuz that truck rode so bad for so long...turns out my steering gearbox was out of adjustment (repairs made--problem solved) and the truck rides much better now. They do hang up in ruts or grooves in pavement, they don't corner as well as radials, and the ride is a bit bumpier than on radials. But I like the look of the bias ply on the truck, I'm in no hurry when I drive down the road, and I avoid driving in wet weather because of the combination of increased stopping distances + idiot uninsured drivers who care not to yield to the right of way when entering traffic. And cuz I'm a knuckle-draggin' Neanderthal, I like the fact that I need skill & muscle to jockey my truck down the road...power steering & power brakes are fer sissies
-
pumps are precision machines, and once they start to wear, their efficiency drops, they become less effective, and eventually they just wear out to the point where replacing seals, pump impellers, bearings etc. are ineffective because the casting and/or the backing plate are out of tolerance for the pump impeller to work properly. They sold water pump rebuild kits in the past because the seals would blow out, the impellers would corrode from non-glycol based coolant, and bearings would wear out. But eventually water pump designs changed to where they were more precise castings & machined parts, so rebuilding the pump from a kit might not improve the effectiveness of the pump. That's when they started to just replace the water pump as a unit, because the special tools required were for measurement; if certain areas were out of tolerance, the casting and/or impeller were to be replaced, and then it was just cheaper to recycle the old pump & replace it with new. I reckon some places rebuild water pumps, but they know what to measure and how to take those measurements. Rebuilding those core units might not yield the results ya want if them castings are corroded enough. When I first heard about the NAPA dual application pump, I was interested because they had eliminated the grease fitting and routed coolant through the casting to be used as a lubricant. This meant the bearings would be lubricated as long as there was coolant going through the water pump, so ya never had to worry about them drying up & shelling out or being over-greased & blowing out a seal. The integral heater port is nice, too. I have seen what a failing water pump can do to the radiator & sheet metal of a truck, and back in '88, had to walk 15 miles through ranch country to town for help because of a bad one. The water pump had been leaking in the Suburban, eventually the bearings failed on a lightly trafficked highway one evening, causing the fan to vibrate wildly & eventually fly apart, spinning shrapnel through hoses, radiator cores & tanks, and sheet metal...very expensive repair. And that was on a truck that was less than 5 yrs old at the time...I wouldn't trust an old water pump, even if it was rebuilt, because of the mess it might make. The NAPA water pumps might cost more, but it's like buying peace-of-mind
-
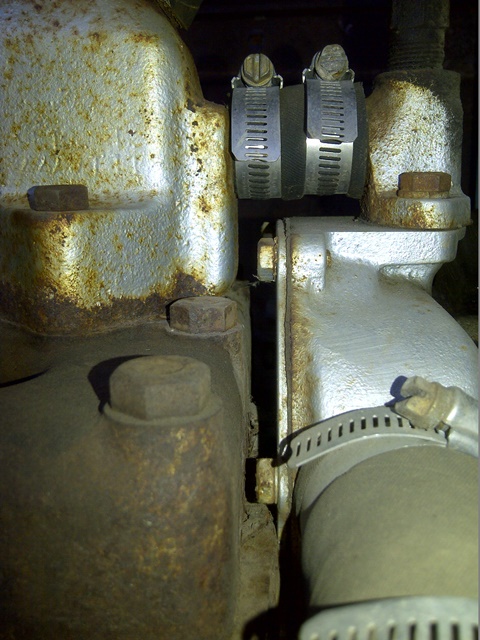
To muddy up the water a li'l bit, confusion as to how to assemble these flatheads has been going on for awhile...when I rebuilt the 218 in the '48, I assumed it was the original engine, as the truck had been in the family since new & no one recalled it ever being worked on. After rebuilding the motor, the internet told me otherwise: I was able to locate the casting date, and the 'original' motor turned out to be from a '55 Plymouth. This 218 has the internal bypass, a NAPA water pump, and an external bypass thermostat housing. I snagged a '50 Plymouth 218 with the external bypass block, but it has an internal bypass thermostat housing. When I rebuilt the '49 230, the gasket set I used had all the internal bypass gaskets, which fit & don't leak (the rear main seals are different, but that's another story). So the internal bypass gaskets supplied with the NAPA water pump will work on external bypass engine blocks because the openings in the gaskets for the internal bypass are sealed over with solid metal on the block.
-
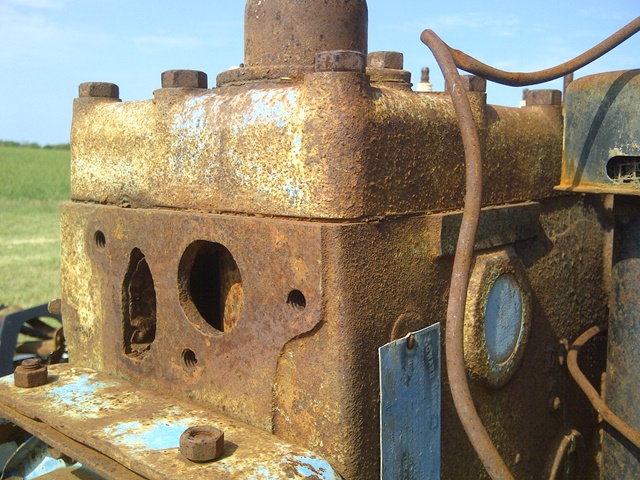
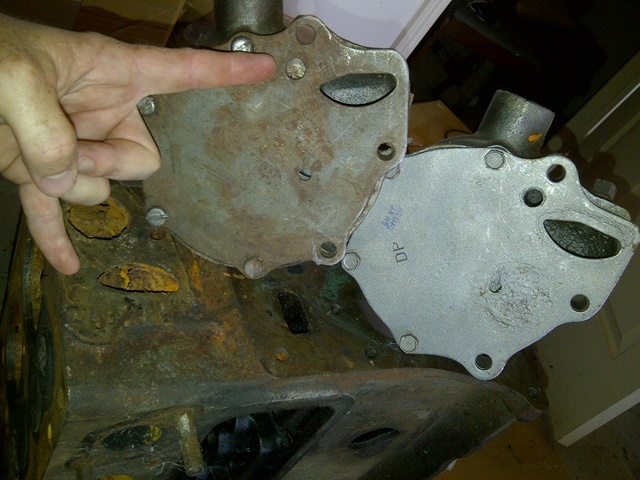
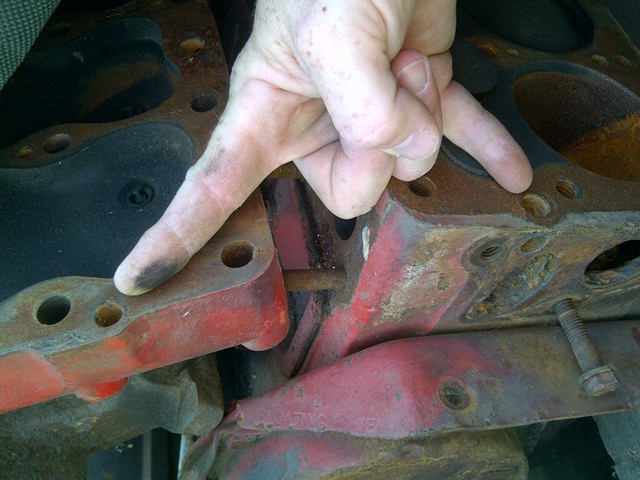
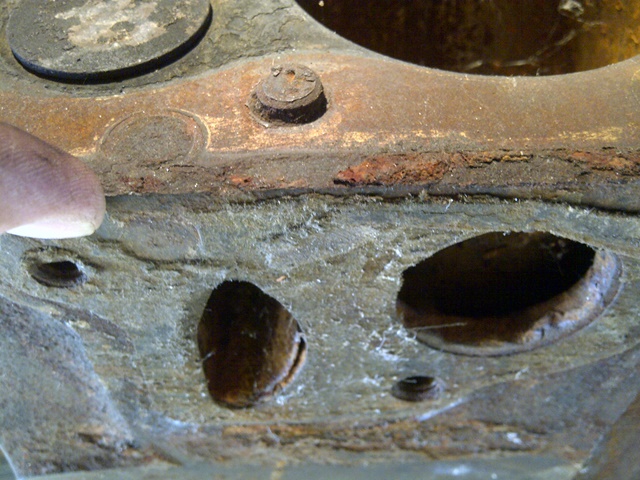
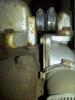
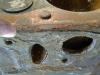
Just to add my 2¢...I've had a few folks ask me about the differences between the internal & external bypass blocks/heads and water pump applications, specifically when installing the newer NAPA water pump which can work with either setup. While going through some boxes of parts I've acquired recently, I found an external bypass water pump with an internal bypass backing plate, as well as a newer NAPA water pump (pictured on the right). The external bypass pump casting does not allow coolant flow through the internal bypass backing plate, and drilling through this area of the casting can be difficult without cracking the rest of the casting. Also shown in this pic is a '50 218 without internal bypass; the location of the internal bypass port would be in the area pointed to in this pic, and a sharp eye may notice that an internal bypass water pump & head gasket have been mounted to this external bypass block. The red block pictured is a '54 230 with the internal bypass. The bypass passage is pointed out in the block & the head; the 'hump' in the head can be seen as well. The assembled engine is a '52 218 with the internal bypass head and thermostat housing (water neck). The fewer parts required made for a more economical assembly; with one less hose to leak, it also is a more reliable assembly.


-
the linings that the brake & clutch shop installed were about 1/8" too long, so when they were riveted to the bands, the ends were contacting the drum, like the tip of a fingernail on a file. After so many revolutions, them ends wore down enough that there was some clearance between them and the drum. But them li'l tips took a while to wear down, so in the meantime they really stunk up the place. The park brakes still work great, and the drums show no discoloration and still brake smoothly when engaged. the brake shoe can be removed without dropping the driveshaft. There's a lock wire & a spring behind the shoe mounting bolt...pay attention to how the brake is installed, ya might want to take some before pics so ya won't have much trouble re-assembling.
-
I took mine to a clutch & brake re-lining shop...the pad they got for the shoe was a li'l thick, so after I made the adjustments so that the brake would hold when engaged, the ends of the pad dragged on the drum for about a hunnert miles, which kinda stunk up the cab...the heat build-up also baked the paint I put on, so that kinda stunk up the cab too