


Sam Buchanan
-
Posts
2,562 -
Joined
-
Last visited
-
Days Won
83
Content Type
Links Directory
Profiles
Articles
Forums
Downloads
Store
Gallery
Blogs
Events
Everything posted by Sam Buchanan
-
Me too! (Turning off the ignition accomplishes same thing as pulling the fuse) We all have varying degrees of risk tolerance. Driving an old car (no crash protection, steering column pointed at your chest, ancient brakes, etc...) in modern traffic is a risk in itself regardless of what kind of fuel system is used......
-

Started the teardown, and now the build up.
Sam Buchanan replied to casper50's topic in P15-D24 Forum
That is cool! Looked (sounded) like a '40's movie when it was coming up the road. -
I understand where you are coming from with your wiring architecture and I considered something similar when converting my P15 to the electric fuel pump. However, examination of the wiring diagram with pressure switch, momentary switch, etc reveals a host of potential failure points. Loss of connectivity at any of those points means the car is dead on the side of the road (or in an intersection!). I decided to keep the pump circuit as simple as possible to reduce single-points-of-failure to the minimum. Priming the carb is no issue since the pump is energized as soon as the key is turned on. The inline fuse can be pulled (easily reached under the dash beside the ignition switch) if maintenance is needed with the car powered up. Every vehicle is a compromise.....I decided to put priority on reliability.
-
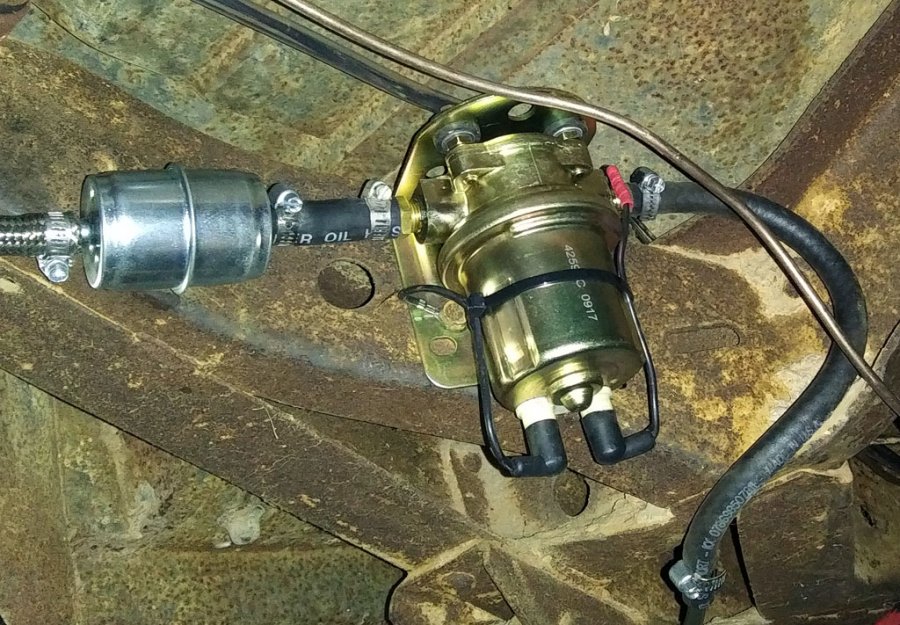
I removed the mechanical pump and installed a 6v Carter pump just ahead of the rear axle. The same pump is also available for 12v and I ran one of those for many years on my kit-car. A 3/8" steel-braided hose connects the new tank to the pump, the rubber hose connects the pump to the new 5/16" fuel line to the carb. I ran a wire from the ignition switch back to the pump, it has a 10a in-line fuse at the switch. The pump works great and no regulator has been needed. I didn't want the pump piggy-backed onto any other circuit since this car is now electric pump dependent.
-
Installing a Spin-on Bypass Oil Filter (photos)
Sam Buchanan replied to Sam Buchanan's topic in P15-D24 Forum
Post deleted. -
Why not drop a bolt into the hole in the shaft so the puller can push against the head.....
-
You guys are doing this all wrong, gotta have the right equipment: P.S. The Awesome Cleaner from the Dollar General really is good stuff, I keep a $1 spray bottle of concentrate in the shop, hangar and camper.
-
On my '48 P15 the bypass oil lines are 3/16" brake lines attached to brass adapters that have 1/8" NPT threads. Yes, the passages in the fittings are small but keep in mind this is a bypass system, not full flow so the volume of oil flowing through the fittings is relatively small. Here are details of a bypass system I installed on my P15: http://p15-d24.com/topic/50622-installing-a-spin-on-bypass-oil-filter-photos/
-
Probably useless to try ordering them in the store, I ordered online. However, you are working with a different engine than in my car so your experience may be different from mine. I'm probably running down a rabbit trail...but is this what you need? https://www.rockauto.com/en/moreinfo.php?pk=125086&cc=1487711&jsn=490 https://shop.advanceautoparts.com/p/felpro-intake-exhaust-manifold-gasket-set-ms-8009-b/19780554-P?searchTerm=ms8009b
-
I ordered a set of Felpro intake and exhaust manifold gaskets from Advance Auto Parts. They are also available from Rock Auto and the usual old Mopar sources.
-
This article in the Technical section of the forum is recommended reading and will answer your question along with providing insight into how these old brakes work: http://p15-d24.com/page/p15d24/tech/brakes.html/ If you don't thoroughly understand how the brakes function and are adjusted, you may end up with brakes that are ineffective at best and downright dangerous at worst.
-
Installing a Spin-on Bypass Oil Filter (photos)
Sam Buchanan replied to Sam Buchanan's topic in P15-D24 Forum
I've found puppy training pads to be a nice addition to the shop when working with old vehicles that aren't completely housebroken: They can be cut up into smaller pieces to catch drips and dribbles when an oil filter is changed. I keep one under the P15's transmission that insists on marking its territory in spite of my training efforts.... Also works for me if I'm in the middle of a repair job I just can't turn loose of !!?!! ? -
Installing a Spin-on Bypass Oil Filter (photos)
Sam Buchanan replied to Sam Buchanan's topic in P15-D24 Forum
Found the Napa Gold 1051 on Napaonline, the longer version is 1050. However, they are twice the price as the WIX filters on Rock Auto. But there is shipping so the price difference may be moot if the Napa filters are available locally. -
Installing a Spin-on Bypass Oil Filter (photos)
Sam Buchanan replied to Sam Buchanan's topic in P15-D24 Forum
Likewise! The hours reading the forum archives has been a tremendous resource for my project. -
Installing a Spin-on Bypass Oil Filter (photos)
Sam Buchanan replied to Sam Buchanan's topic in P15-D24 Forum
Steve, thank you for the read and kind comments. I'm reminded of the old adage...."Paralysis by Analysis"........ The Wix filter mount I have appears to be well machined and no operational issues have popped up. If the casting was defective it would be apparent when test fitting a filter on the bench. It really is a simple component, not much to go wrong. The nipple threads are smooth on the adapter I have and the gasket engages evenly. If oil spillage is a concern, just place a plastic bag around the filter when you initially unscrew it, any excess oil will drain into the bag instead of on the starter that has 70+ years of crud on it....... The original canister filter is certainly a proven design, however, I don't see any operational downsides to the Wix filter installation.........probably best to find something else to worry about. -
Installing a Spin-on Bypass Oil Filter (photos)
Sam Buchanan replied to Sam Buchanan's topic in P15-D24 Forum
Not very, I'm near Huntsville, AL. -
Installing a Spin-on Bypass Oil Filter (photos)
Sam Buchanan replied to Sam Buchanan's topic in P15-D24 Forum
Excellent data point....thanks! -
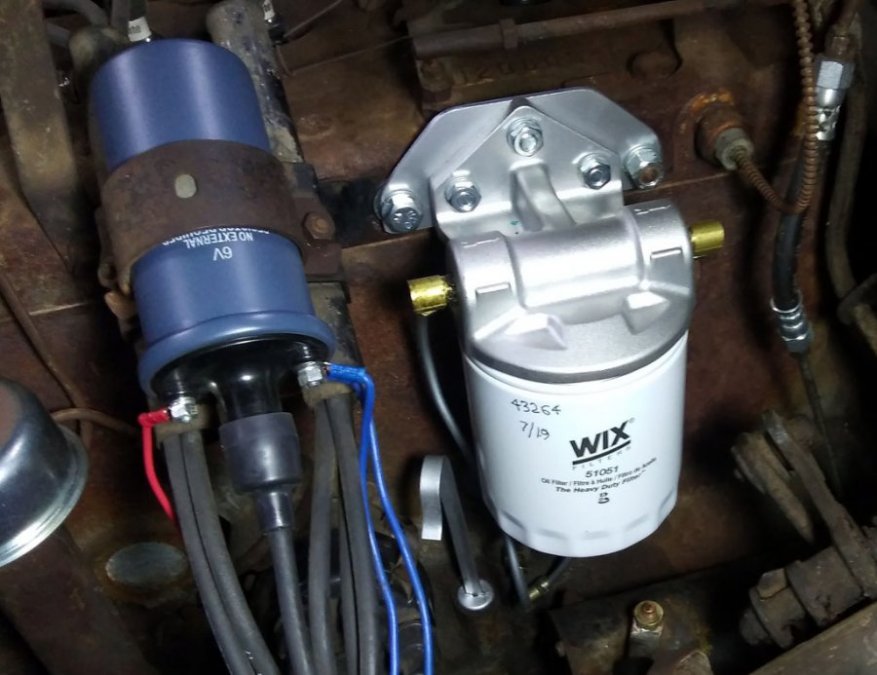
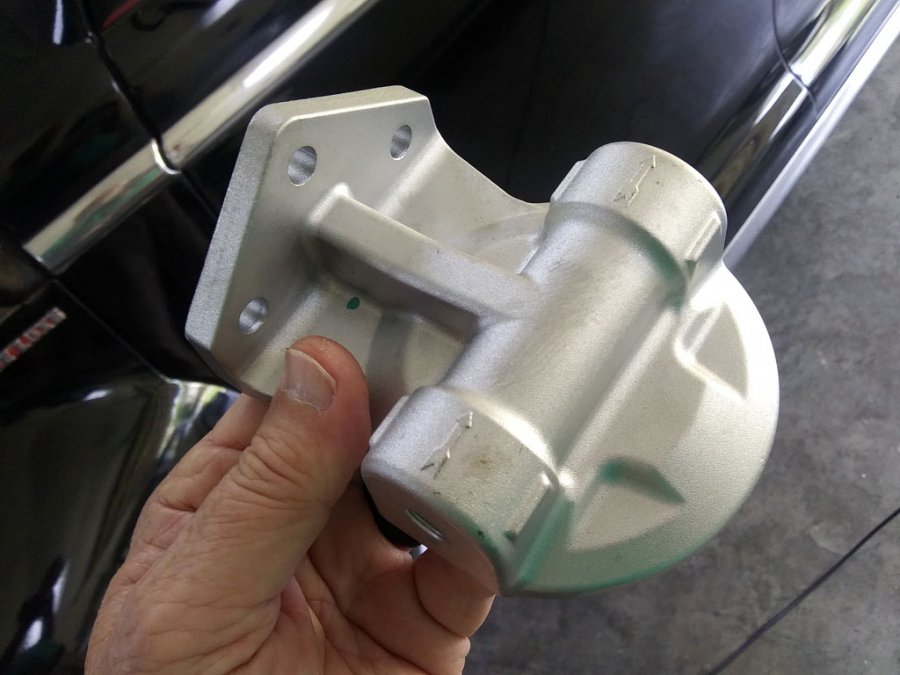
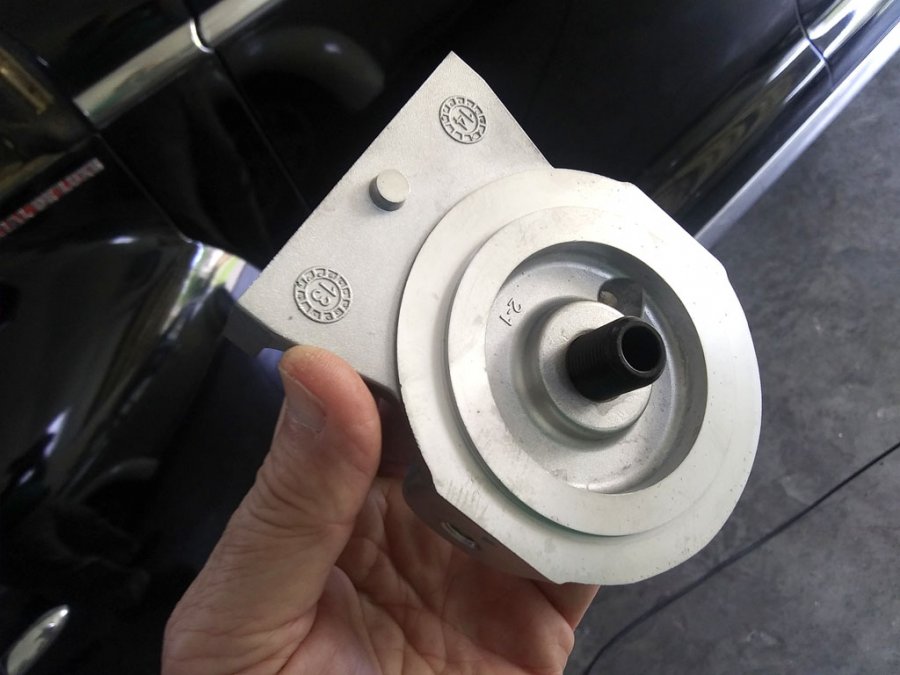
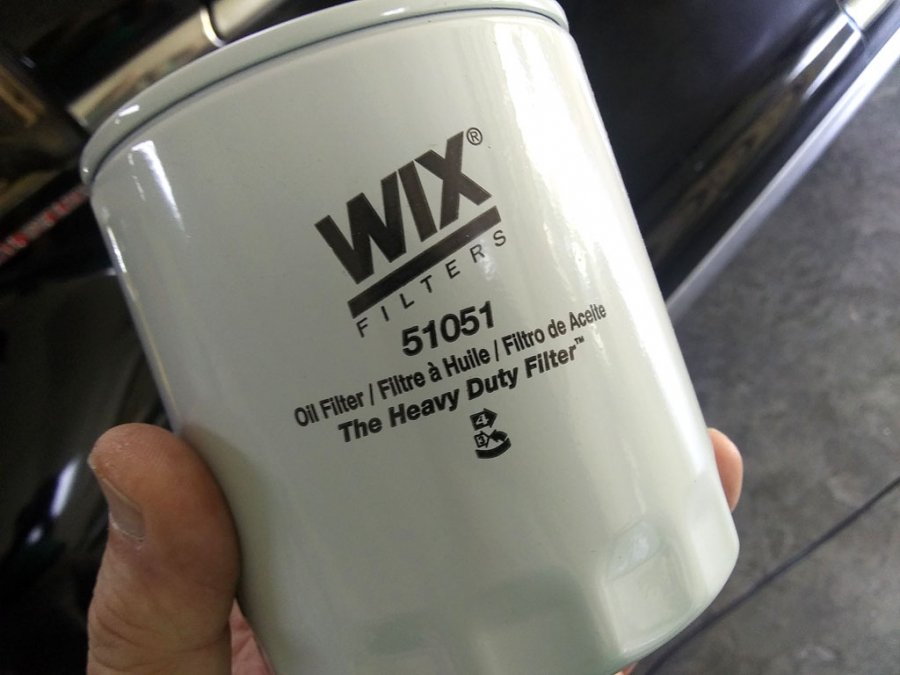
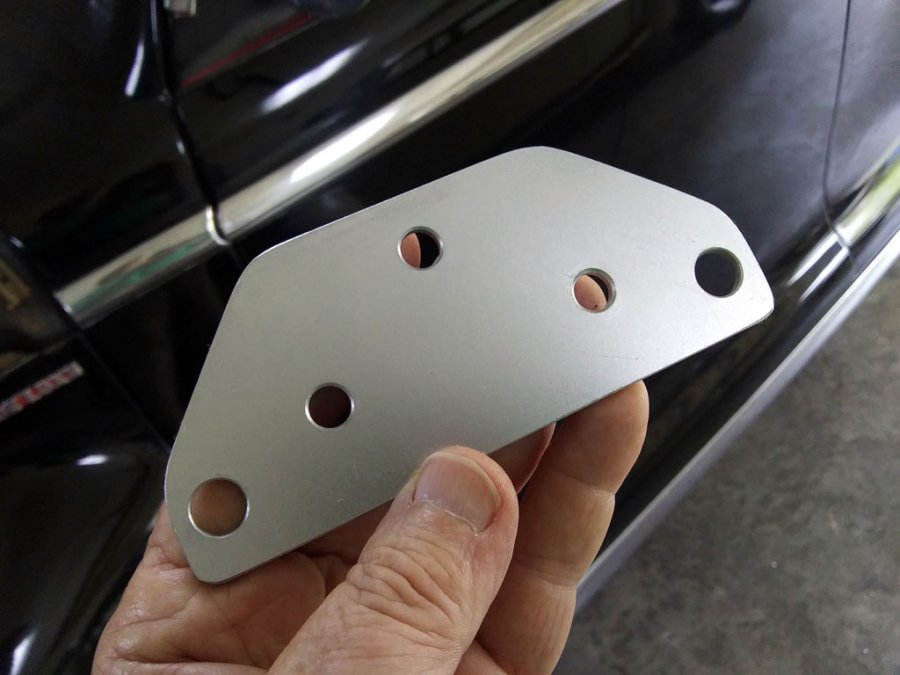
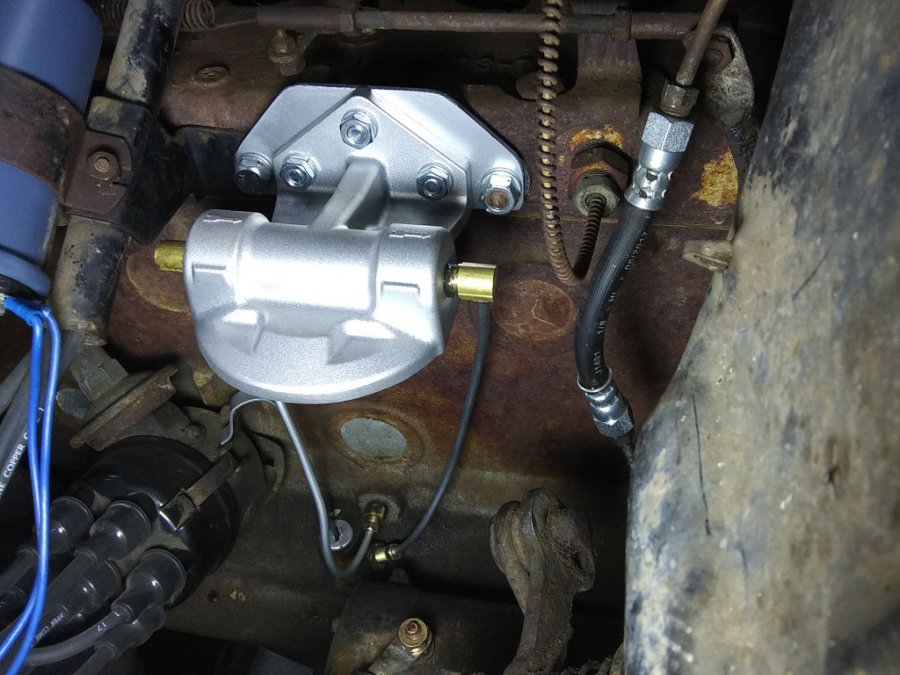
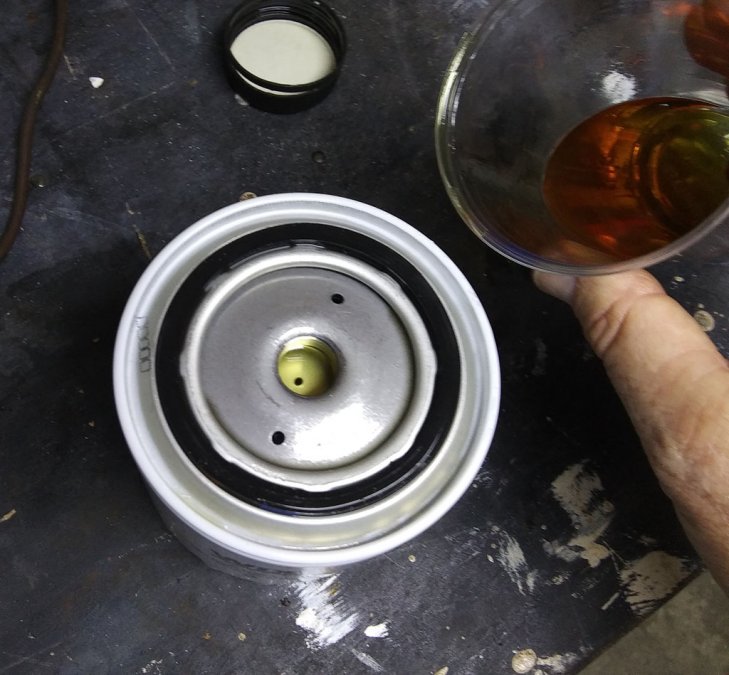
In a previous thread the discussion was centered around whether or not a bypass filter is needed and the best oil for our mature engines. Based on that discussion and pondering this topic for a few days after pulling the oil pan I decided to install a spin-on filter on my non-filtered engine. I've seen a couple of photos on the forum of filter installations but decided to offer a more complete tutorial for the benefit of owners who may want to explore a filter installation. I chose a mount and filter from Wix because they offer a mount and selection of filters that are specifically for bypass operation. Bypass filters are constructed differently from full-flow filters and provide a finer degree of filtration than conventional filters. I sourced the mount and filter from Rock Auto who have not only the filter I use but also the same filter in three additional lengths. I selected the next to shortest due to the confined space around the engine. Here is the mount, part number WIX 24755: Note the arrows indicating the proper direction of flow. This mount is only for bypass installations and has a small 5/8" nipple instead of the more common 3/4" seen on full-flow installations. It also has 1/8" NPT threads that allow 3/16" steel brake lines to be attached with only one 90* adapter. The filter is WIX 51051: The other Wix bypass filters that fit this mount are 51050, 51320, and 51704. A bracket must be fabricated to attach the mount to the engine block. I used 1/8" steel and drilled it for the mount and two studs on the engine head: The two fittings on the engine accept 3/16" brake lines with no modification. I found 12" lines to be ideal for this installation. Accessing the fittings and getting the threads straight deep in the engine compartment is kinda tedious....just consider it a character-building experience. Permatex #2 (non-hardening) gasket sealer was used on the brass fitting where they screwed in the filter mount. I've seen teflon tape used in situations like this but that is risky in oil systems unless you really know what you are doing. A small sliver of tape that breaks loose can create havoc if it plugs an oil passage. A couple of thick washers are behind the bracket to provide clearance for the heads of the bolts securing the filter mount. The threads in the cylinder head are common 3/8" and the nuts on the studs are 3/8" fine thread. One of the studs backed out so I replaced it with a bolt. Prior to installing the filter I filled it with oil. This photo shows the difference between a bypass filter and full-flow---notice the tiny holes through which oil flows in/out of the filter. Filling the filter was very tedious....if I had to do this very often I would rig up some sort of syringe to push oil into the filter instead of spending 1/2 hour adding oil a fraction of an ounce at a time. The filter accepted a cupful of oil before it was satisfied. The finished installation complete with a note on the mileage and date of filter change. The oil lines need to be formed for clearance so the filter can be easily changed. Yes, this is not for those who want a period-correct engine bay, but I like having a modern filter which can be easily sourced through common channels. If my engine is happy....I'm happy.
- 52 replies
-
- 16
-

-

-
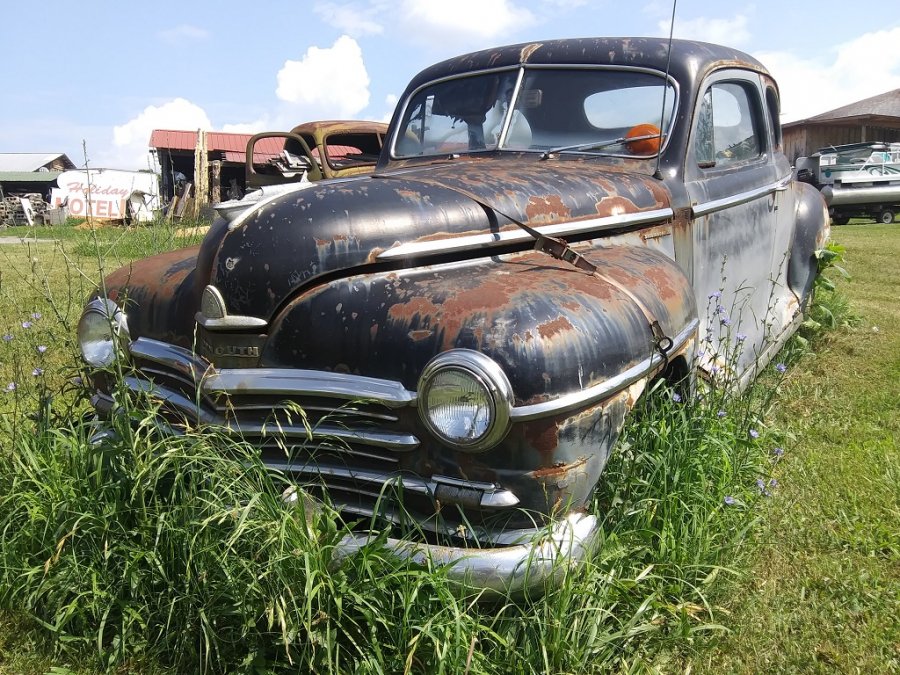
The yard too must have patina my friend....
-
Wow....post a cool photo of somebody's lawn decor....and watch the negative comments fly......tough crowd. ? I suspect the guy just enjoys seeing the old stuff every time he pulls into the lot, the place was overrun with antique archaeology. I'm going to give the feller the benefit of the doubt, hope he enjoys his treasures for as long as he wants.

-
Oh no....have enough projects. I assume this one was either not for sale or the asking price unrealistic......there is a reason those vehicles have taken root.
-
Found today.....somewhere in east Tennessee:
-
Already had about 300 miles with 10W-30 before pulling the pan......hadn't used any oil during that time.....but it did leak some. ?
-
Photo deleted.
-
Anyone used the new HVLP Turbo paint sprayers?
Sam Buchanan replied to MarcDeSoto's topic in P15-D24 Forum
The path to a nice paint job involves water, sandpaper and knowing how to use a good buffer.

