


Sam Buchanan
-
Posts
2,561 -
Joined
-
Last visited
-
Days Won
83
Everything posted by Sam Buchanan
-

LED running lights and halogen headlights for my '47 Super De Luxe
Sam Buchanan replied to 46Chris's topic in P15-D24 Forum
To test the brake switch you can carefully put a jumper across the terminals on the switch (don't touch the jumper to ground), if the brake lights come on you have found your problem. -
LED running lights and halogen headlights for my '47 Super De Luxe
Sam Buchanan replied to 46Chris's topic in P15-D24 Forum
You need to check the brake switch, all associated wiring from headlight switch downstream, the sockets themselves and most important integrity of all ground connections. Forget the flasher until brake and tail lights are good. -
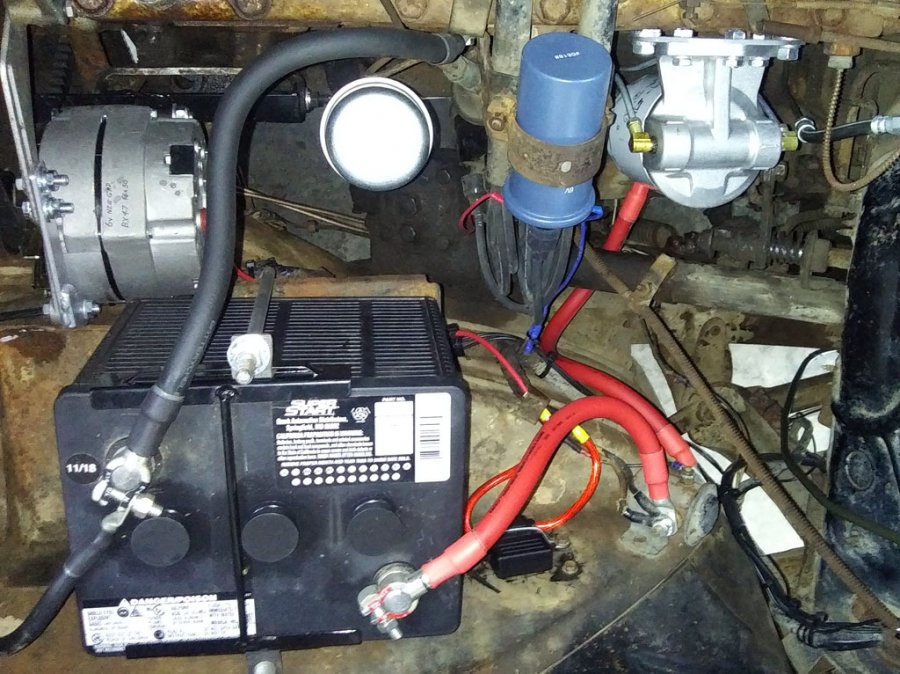
The most reliable and long-term trouble-free solution to your charging problem is here: https://www.ebay.com/str/HowardEnt?_trksid=p2047675.l2563 The installation in my '48 Plymouth is below. This eliminates the old genny and regulator and replaces it with a single-wire alternator.
-
No telling how many motorcycles and VWs I tuned up without a vacuum gauge or dwell meter, probably helped me educate my ears. A few days ago I got out the vacuum gauge for the P15 after the recent discussion, turns out my "earcrometer" tuning was in agreement with the gauge.
-
I'm more concerned about the pounded out bearings..................
-
The quick and dirty way to set idle mixture is to first set idle speed for a slow, reliable idle. Then VERY slowly turn the mixture screw clockwise which makes the mixture more lean. When the idle speed begins to slow down (this can be a very subtle difference) make note of the position of the slot in the screw. Now slowly turn the screw counterclockwise to richen the mixture, once again listening for idle speed to come back up and them begin decaying. Note the position of the screw. Now turn the screw back clockwise until you achieve the smoothest idle, will probably be about midpoint between the two positions you noted. This adjustment needs to be done slowly while listening to very subtle changes in idle speed. Repeat the process until you are sure you have the mixture screw set for smoothest idle. Using a vacuum gauge can be more accurate but a sensitive ear can often get mixture set close to where max vacuum occurs, at least close enough for satisfactory operation. You may need to reset idle speed after getting a good mixture setting. I find mixture needs to be adjusted in spring and fall when ambient temps change from summer/winter. Mixture is dependent on the density of air which changes with temperature. Your modern car does this automatically, we get to pamper our old cars with periodic attention to detail to keep them happy.
-
Some of us are old enough that we just have to stand there and let it dribble.........we are accustomed to that........... 😛
-
The Carter I use is a rotary vane pump and while it doesn't clack-clack like a Facet or similar diaphragm pump it does generate some "turbine" noise. The key to addressing this is two-fold---isolate and ignore. I rubber mounted my Carter after running it hard-mounted for awhile and the only time I hear it is while it is humming in the quiet garage as it primes the carb. Once the mighty 218 is running I no longer hear the pump. It is mounted on the frame just forward of the fuel tank. The Carter rotary pump can be sourced for less than $100.
-
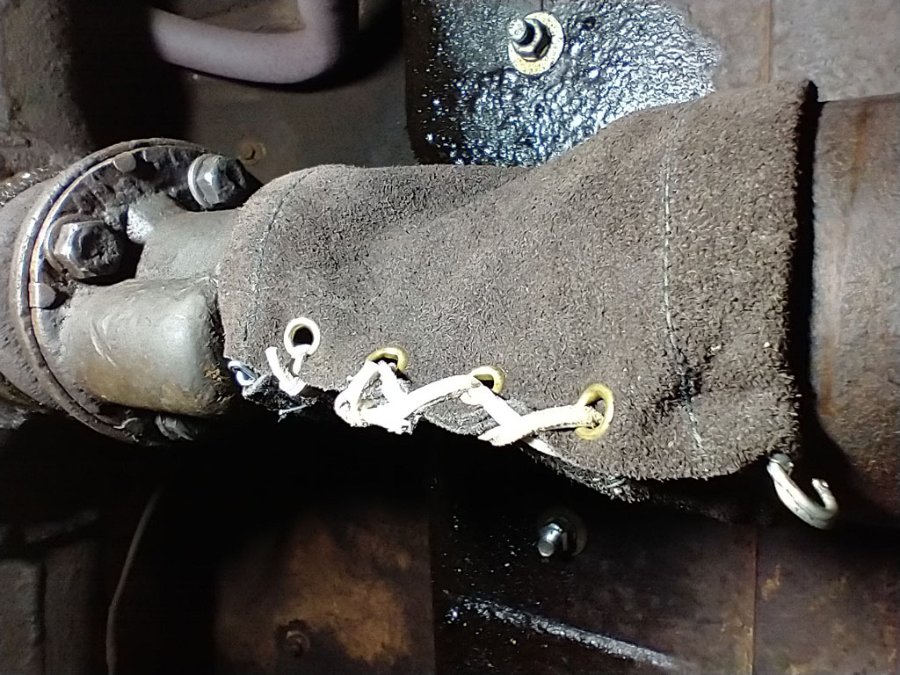
Your boot looks different from mine but it appears your boot is installed backwards. Most likely the large end should be on the driveshaft and the small end around the trunnion. Here is the installation on my P15:
-
Same location on my P15, the Carter 6v pump has been the sole pump five flawless years.
-
My bad....I got your thread mixed up in my head with another thread that is also discussing charging problems.
-
You're going to need to find out why you aren't seeing battery voltage at the regulator BAT terminal................
-
Another 6 volt charging circuit question(s)
Sam Buchanan replied to 1949plymouthdeluxe's topic in P15-D24 Forum
Wouldn’t be a factor if voltage is measured via the BAT terminal and opposite post on the battery or other good ground. -
Another 6 volt charging circuit question(s)
Sam Buchanan replied to 1949plymouthdeluxe's topic in P15-D24 Forum
But the BAT terminal on the regulator should show battery voltage regardless of whether or not the generator is idling or running at full output. If battery voltage isn't present there must be a wiring fault. -
My P15 weighs about the same as a nicely optioned Honda Civic. The old Plymouth looks heavy but isn’t. I suspect the P15 would get opened up like a tin can if involved in a collision with a modern, steel beam reinforced vehicle. Most vehicles these days are trucks or SUVs and they outweigh the Plymouth by a ton……get hit by a 7000lb e-car and not only will we be crushed but burned to a crisp by the lithium battery fire! 🤪
-
Another 6 volt charging circuit question(s)
Sam Buchanan replied to 1949plymouthdeluxe's topic in P15-D24 Forum
Hmmmm......shouldn't the BAT terminal on the regulator show battery voltage regardless of whether or not the regulator or generator is working? That terminal is connected via the ammeter to the battery. -
38plymouth is in Florida, with the density altitude in Florida this time of year 18" might be a pretty decent number. I'm at 592' above sea level but yesterday at mid-day the density altitude was 3800'. Tweaking to get the number as high as possible is certainly worthwhile, but that number could vary depending on local conditions.
-
Yep....no excuse for not hitting Google before posting here............ https://www.seatbeltsplus.com/
-
Current thread with a good report on the Daytona carb: https://p15-d24.com/topic/61881-daytona-parts-co-un2-carburetor/
-
Use a Dremel tool with a cutoff disk to cut the access hole in the floor. The disk won't need to protrude below the floor more than about 1/8" so the tank will be safe. If the floor is flat a nibbler or metal shear might do the job. https://www.harborfreight.com/5-amp-14-gauge-metal-shears-64609.html?utm_source=google&utm_medium=cpc&utm_campaign=12126402660&campaignid=12126402660&utm_content=118355033753&adsetid=118355033753&product=64609&store=3256&gad_source=1&gclid=CjwKCAjwlbu2BhA3EiwA3yXyu_SGxrClWmpk9WrNzNRo0kLkIRDpR3aLZf5xq2mgg-Asp1BT-4hxBRoCWU8QAvD_BwE
-
Thanks for the info, that is interesting and parallels my experience with a full-time electric pump (and mechanical pump block-off plate) for the past five years. The Carter 90091 is also available from Amazon for $20 less than the Summit price: https://www.amazon.com/Carter-P90091-Electric-Fuel-Pump/dp/B07BBDSZP1
-
Excellent feedback! Could you share the tips you received in regard to an electric fuel pump?
-
Impressive!
-
High Quality H4 Headlights for 12v Cars (Cheap!!)
Sam Buchanan replied to Sam Buchanan's topic in P15-D24 Forum
Update to my earlier posts about using solid-state relays for the headlights in the P15: I found there was about a one volt drop across the relays which negates the rational for using relays. I double and triple checked my measurement and something in the solid-state circuitry was causing the drop. I purchased 6v Bosch-style relays and installed them in place of the solid-state modules. They work great, voltage drop from the battery terminals to the headlight side of the new relays is only about one tenth of a volt.....definitely within my idea of acceptable. I used terminal strips for the connections so everything could be quickly returned to the original wiring if a relay failed mid-trip. The relays I purchased: https://www.amazon.com/dp/B07G9VXC1B?ref=ppx_yo2ov_dt_b_fed_asin_title&th=1 Just for an overview, the original headlight wiring from the dimmer switch is coming into view at the bottom of the photo and is connected to the lower terminal block. Coming out of the top of the lower block are the black and white wires to the relays to send the signal voltage to energize the relays via the dimmer switch. Coming in from the top of the upper block are the fused feeds directly from the battery. The heavy wires at the bottom of that block carry battery current to the relays (blue wires) and then back to the block (yellow wires) where the bundle of black wires are connected to the high and low beams.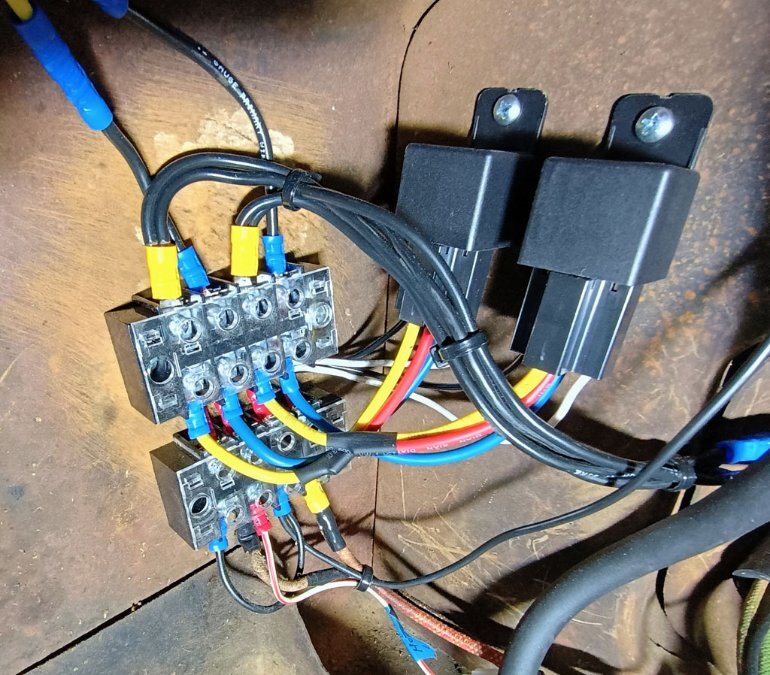
-
High Quality H4 Headlights for 12v Cars (Cheap!!)
Sam Buchanan replied to Sam Buchanan's topic in P15-D24 Forum
To my uncalibrated eyes during the drive home last night they appear to be very close to halogen sealed beams. They are definitely not blue-white.


