


keithb7
-
Posts
3,467 -
Joined
-
Last visited
-
Days Won
193
Content Type
Links Directory
Profiles
Articles
Forums
Downloads
Store
Gallery
Blogs
Events
Everything posted by keithb7
-
Here is my ‘38 ignition key tumbler. Push in the little sprung pin seen here. Slide lock out.

-
-
I’m getting close to that point.
-
Good work there @Crazyred, digging in and getting it done. I went through some similar issues with my '38. I'll share some of my thoughts to give you some ideas to check. Here's how my tiny brain grasps the sujecct matter: When you rebuilt the carb did you soak it somehow, in a cleaner with all the plugs, balls and screws out? At the base of the carb is there an adaptor? There are vacuum passages in there. Mounting gaskets, spacer plates, adaptors, heat shields, etc, have recesses cut away and must be lined up to prevent blocking of the vacuum passages. This passage allows vacuum to sort of get up and around the main throttle valve when it is closed. Via an internal tunnel bored into the carb body. A tiny hole or two, can be seen in the carb wall, right near where the throttle valve contacts the carb wall. Right below the throttle valve, when it is fully closed. This little port, allows fuel to enter into the intake manifold below the throttle valve. This happens at idle when the throttle valve is fully closed. I think you physically adjust how much fuel/air enters into the intake when the main throttle valve is fully closed, by opening and closing the air/fuel mixture screw. This adjustment only tweaks A/F mixture at idle, and just a tad, a hair off idle. As you slowly open up the main throttle valve, the low pressure point (vacuum) travels farther up past this tiny fuel inlet port. The engine really starts sucking in air now. It wants more and will take all you will allow it, until it blows up. Yet we maintain control of air and fuel intake via the carburetor. An engine won't run on air alone of course. So we mix fuel in with it. As precisely as we can. Within the limitations of a carburetor. As the main throttle valve opens, the fuel now enters the carb higher up the throttle body. Possibly 2 different inlets now. Larger openings called jets, allow way more fuel in, compared to the tiny port at idle. These jets are precision drilled holes that allow a specific amount of fuel in. As you open the throttle, linkage connected to the accelerator pump gives it a good squirt of raw fuel. It may have its own inlet, or may force the raw fuel out through the main fuel intake. You may see this happening up high in the intake, further down below the choke. The carb intake necks-down just below the area, speeding up the air flow. Creating more vacuum up in this area. Also atomizing the raw liquid fuel. The top of the fuel bowl is vented to atmospheric pressure. The carb venturi is well below atmospheric pressure. This phenomena causes fuel to flow in the carb through the main jet now. All the parts of the carb, from the intake down, have to be sealed up air tight. All the sandwiched layers, plates, adaptors, etc must have proper gaskets so air cannot enter the carb via any other way, except through the controlled ports. If air enters via some other opening, we then loose control of the incoming air. This takes away vacuum pressure from the ports where we need it. At the idle air mixture screw for example. You twist and turn the idle A/F mixture screw and nothing happens, until you close it all the way and the engine may stumble. That's a good sign of a vacuum leak elsewhere. When you tweak the other screw on your carb, the idle speed screw, you are locking open the main throttle valve. Just moving it slightly and holding it there. As you open that valve, vacuum travels further up into the carb and starts drawing fuel in from the main jet. Some carbs may have an intermediate jet. Its main use is to deliver fuel in the zone between idle and the main jet delivery. If the car runs at higher idle as you turn up the idle speed screw, yet won't at low idle, that is another sign you have an issue with the jetting or internal passages drilled in the carb. Something may be plugged up with foreign material, or you may have a vacuum leak. The stumble showing in your vacuum gauge. I agree with what others have said. I think you have valve sealing issues. Intake valve sealing issues. The intake valve is supposed to be 100% closed and sealed when combustion occurs. This little controlled explosion, will push exhaust gasses out of the cylinder any where it can. An unsealed intake valve would allow gasses to travel back into the intake manifold. Forcing your needle to move in the the opposite direction. This happens quickly of course, with each cylinder that may have a valve leak. The vacuum gauge needle flutters as shown. Have you completed a compression test yet? Both wet and dry? What are the results? Here's an example of a vacuum leak I found at the carb base mounting area. You can also see two vacuum ports, drilled holes, at the right side of this adaptor plate.
-
1 step at a time. Controlled adjustments and tweaks. Reassembly and testing after each step. This allowed me to feel the improvements, or not. The engine miss has finally been alleviated. I took the distributor out again today. Took the breaker plate out removed and cleaned everything up. Must have taken .010” or more off the points to get them closer to closing square. I set the gap at .018”, I rechecked every connection on the breaker plate. Inspected every little thing. Cleaned up the light oil under the distributor cap. Not sure what that’s all about. Will keep an eye on it. Test drove it and experienced excellent results. Tonight is the best its ran since I took ownership. Between the carb air leak, incorrect float level, incorrect fuel pump, internal carb issues addressed, fuel regulator removed, timing set again and again trying different settings, air fuel mixture screw adjusted, dwell tweaked, distributor parts & under cap cleaned, coil wire replaced, she’s feeling really good. I still plan to perform a valve set on this coming Sat morning. I’ll keep burning MMO indefinitely and monitor cylinder #2 psi. Finally, maybe I’ll sleep past 5AM in the morning. Lol. New points are on order. Have been for some time. I'm on the e-bay never-ever waiting plan.
-
Regarding the Distributor driveshaft tang. I’m feeling excessive shaft rotational play when I turn the rotor, when mounted in place in the engine. Looking at the tang where it sits into the oil pump. I don’t like what I see. Wear. Comparing it to a spare distributor shaft, my ‘38 is thinner. I think I’ll need to address this. Its not great. I better go shopping. Comparison and measurements shown. I wonder what the oil pump female end looks like. Hmmm.


-
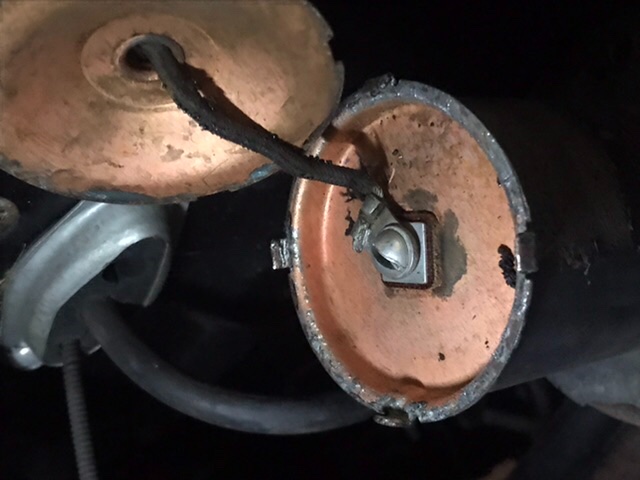
Still chasing the miss. Better with coil wire addressed. Still not done. A couple more things found. What do you folks make of this? Oil film inside my distributor cap. The cap does have a vent hole. On the side. Right under where the cap retainer clip sits. The oil film seems to concentrate near this vent hole. Somehow sucking in oil mist near my crankcase vent tube? Is this even possible? The rest if the distributor seems good. Breaker plate and points, wires etc appear clean and oil free.


-
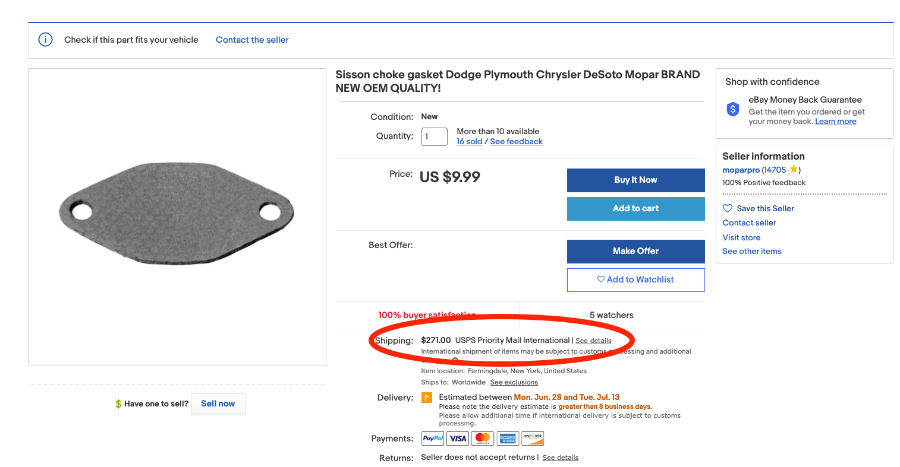
The system certainly seems messed up. I am in Canada. I get quoted $271 US funds to ship it here. Within the USA, the $9.99 gasket sell price includes free, prepaid freight. Before the border closed due to covid, I would drive 3 hours to drop inside the USA border and pick up my parcels. Typically this is what I need to do to get parts at reasonable prices. 4 times or so per year I make the trip into the USA to grab gobs of packages that I have held there at a border town, at a small freight company. The cost savings are ten-fold, compared to ordering parts to my Canadian address, here and there as needed. For the past 16 or so months the border has been closed. Hoping it will re-open soon. I'm won't solely blame the seller. The E-bay system is a bit of a mess. The seller may or may not know much about the freight issues within E-bay. I'd wager 90% of all the vintage Mopars in this world are inside the USA. Those of us here from the UK, NZ, Australia, Scandanavia, Canada, South America, South Africa, and several other places have to find ways to justify the high costs of parts purchases and delivery. @grubby65 That download is fantastic! Thank you very much.
-
I was thinking about RobertKB's posts mentioning the nice greenery. Green car. Green grass. Green leaves...It's summer. I tried Roberts idea. Lots of green out there, be careful. Had a nice evening cruise tonight. Had a beer with some friends. We wait all winter for these days. Enjoy them.

-
- 8
-

-
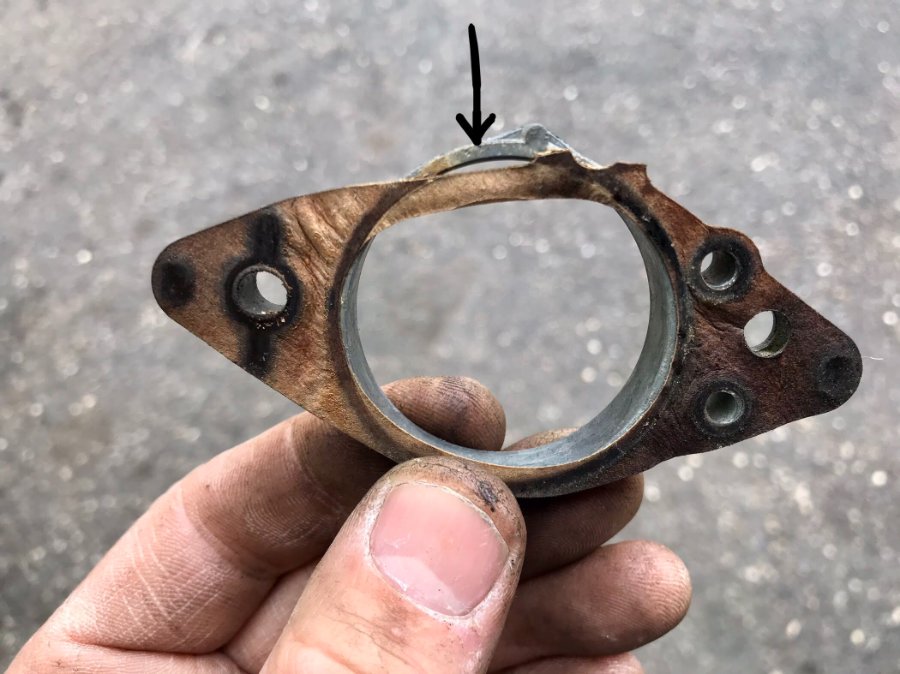
I'd be farther ahead if I cut up 2 or 3 $100 bills and made my own gasket.
-

-
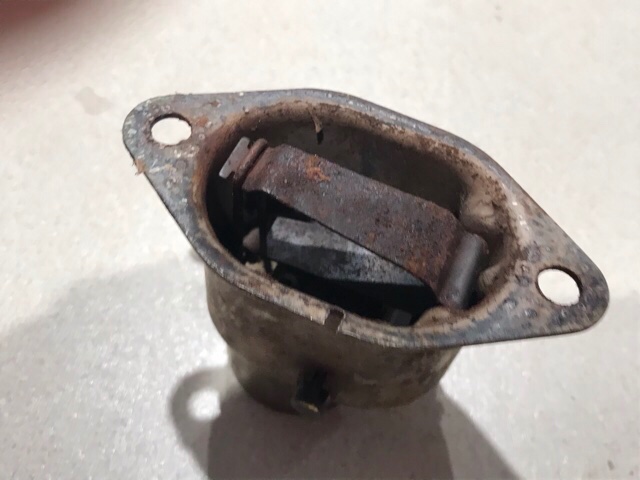
I am interested in learning more about how and why the sisson choke functions. I have a pretty good grasp on the choke operation itself, it's the sisson actuator that I am interested in studying. A sisson is utilized in my 1938 Chrysler. I am not sure it's working, so it seems like a good opportunity to dig in. I studied my shop manual. From what I can decipher is: - 6V is at the starter lug, standing by, directly from the battery - turn the ignition key on. 6V passes thru the ignition switch from the ammeter to the ignition coil. This excites the coil primary windings. 6V also now goes to the fuel gauge. The ammeter is also hooked up to the same lug on the starter, as the battery cable. It's hot all the time waiting for any opportunity to go to ground. -Push the starter button on the dash. This switch now passes thru 6V pulled from the now energized fuel gauge, to the starter solenoid -The starter solenoid is energized and closes a set of contact points (or relay) . These contact points now activate a larger magnet coil, activating the starter to turn, cranking the engine - 6V for the sisson choke is supplied via the relay contacts in the starter solenoid. When the starter button is activated, closing the starter solenoid contacts, the starter is now turning, This is the only time 6v is sent to the sisson choke. - Inside the sisson choke is another coil. It is excited by the 6V via the starter solenoid. The sisson choke coil is grounded via the exhaust manifold. The coil when excited, moves the choke linkage. The choke closes to the pre-set point while the engine is cranking over to start. Questions: - When you let go of the starter button, 6V is cut off to the sisson choke. What keeps the choke engaged? Some sort of internal linkage I assume? - The sisson choke is bolted directly to the exhaust manifold. I assume as it heats up, some type of bi-metallic spring inside the choke housing releases tension on the choke linkage, to open the choke valve at the carb intake? I tried applying 6V directly from battery, via an overlander wire, to the sisson choke. Sparks flew. Choke linkage did not move. Is this a good indicator that there may be an internal ground, allowing high amp draw? Indicating a failed coil inside the sisson choke? I could try it again, leave the wire there and see what melts. Lol. I've got more troubleshooting to do with my muti-meter. Any help is appreciated. Thanks. Keith
-
Standing by with coffee in hand this morning, waiting for pics of the 3rd car. ?
-
Every time the points open the light flashes? Awesome. Easy for troubleshooting power thru the points to ground!
-
She got good bones. Keep going. It only gets better after every little job you complete.
-
For reference, here’s what bad looks like. It is imperative that the wire from the ignition switch cleanly, firmly attaches to the rear of the stock coil. Its hidden under the armor and rear coil cap. Rear cap is easily removable. You can’t have old cloth shield threading away. No exposed bare wire strands. Spare coil and parts that came with the car came in very handy.

-
Suppose a guy took the end cover off the coil. Found some exposed wire strands. Suppose they were intermittently touching and grounding to the metal housing? Maybe, maybe we’re on to something related to a mis-fire here.
-
@Los_ControlI will perform a valve set, however at this point, it won’t include any valve lapping. Valve lapping means the cylinder head comes off. For a valve set, just the valve covers, fender window, and RF wheel comes off. My top cylinder recorded 100 psi. Others about 90. Then #2 at 75. MMO is in the fuel tank. We shall run it as is and see what develops. As mentioned the engine has been laying unused for many of the past 25 years, since it was rebuilt. MMO certainly won’t hurt while I drive it this summer. The cylinder head might come off in the future. Not now. If the head comes off, I start thinking about the oil pan. Unbolt the rod cap on #2 and slide the rod and piston right out the top. Then I’d learn exactly what’s going on. Maybe followed by a hone, rings and reassembly. That’s not happening this cruising season. Unless the engine self-schedules the job. Finding an engine with unknown time in a field and recording 110 psi, is akin to winning the lottery in my opinion. Certainly not a normal occurrence.
-
Keep at it @dwest999 you'll get it sorted eventually. There are several things that can lead to the stumbling engine that does not want to rev up. You mentioned "under load". Are you saying that if the car is idling away, sitting in neutral, if you blip the throttle, it will rev up fine? However it will not rev up when driving the car, moving you and the weight of the car, when the engine has a load? Then it won't rev up? I've been chasing an acceleration stumble in my 38 Chrysler engine for a few weeks now. I'm getting closer, however I am not there yet. More work to do to troubleshoot a few more things. I've got too many other distractions and a full time job, to get it addressed in a timely manner. I too will get it sorted, eventually. Have you done a compression test on your new car car's engine yet? It's a great foundational baseline, that should be done sooner than later. I only say this because I should have done one a while ago on my 38 Chrysler too. Actually, before I forked over the cash to buy it. Lol. Keith
-
A brief update: I put Marvel Mystery Oil in all 6 cylinders and let it soak for a full week. I put extra, extra oil down in #2. I flashed it up this morning. Burned off the oil. Went for a drive. Did a compression test on #2. Still 75 psi. I will add MMO in the fuel tank indefinitely and see if the situation improves. Next step is a full valve set. Will report the results.
-
The vacuum diaphragm can be replaced with a new one. Or is, your issue with the breaker plate, not wanting to rotate? Either can be replaced fairly easily. I'd unbolt the vacuum diaphragm and test it for movement. Try spraying some lubricant in side it. Both ends if you can. Pull a vacuum off of it, see it if the arm moves. Spray some lubricant down in the breaker plate rotate bearing. Does it move easily by hand when you rotate it?
-
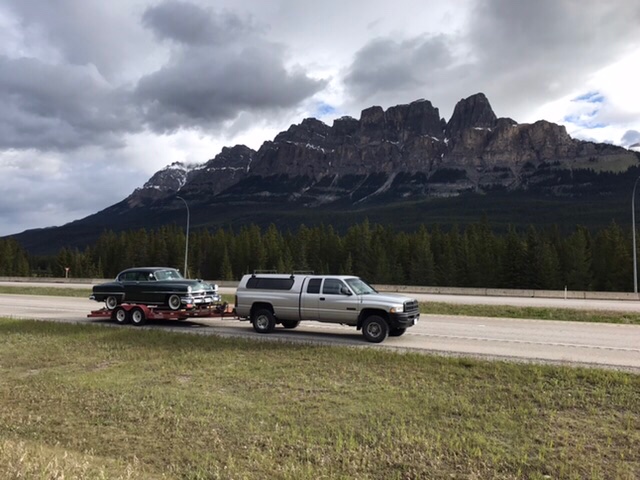
We had so much to talk about and go over the wrap up the sale, I forgot. The new owner will be calling me for support. I’ll be sure to let him know about this site. We just got home. From the time we left our hotel this morning until now at home, just shy of 16 hours. My wife rode shot gun. She helped me unload the car too. She’s a trooper. My 98 Dodge truck with Cummins diesel was rock solid. It tows like a tank. I swear it seems to get better fuel economy towing a 4,000 lb car. Lol. We had an epic road trip. From the Kamloops desert, we headed east thru the Rocky Mountains. Into the flowing foothills of Alberta. You could see the horizon meet the sky over fields of hay and canola there. At other points, the pillars of the Rocky Mountains were touching the sun as we weaved thru the valleys. We followed jade green rivers of the spring melt. One of the best road trips in recent memory.
-
Its a wrap.Its new home, Southern Alberta.

-
Have a look at the check valves. Look at how they are mounted. Note their parts. Do the valves retain properly?
-
You’ll get it sorted Dwest. Quick and easy to block up all 4 corners. You can check wheel movement. Bearings. Clutch driveline brakes etc. I’ve had mine idling in gear, safely blocked up. Bumper butted up against a wall. A mechanic stethoscope in my ears. I probe wheel bearings, pinion, diff, tranny etc while its all turning. Probably more of a strain dealing with the scorned look from your partner....You just bought that for how much? It won’t even limp itself off the trailer?...Really? ?
