Leaderboard


Popular Content
Showing content with the highest reputation on 10/21/2017 in all areas
-
4 points
-
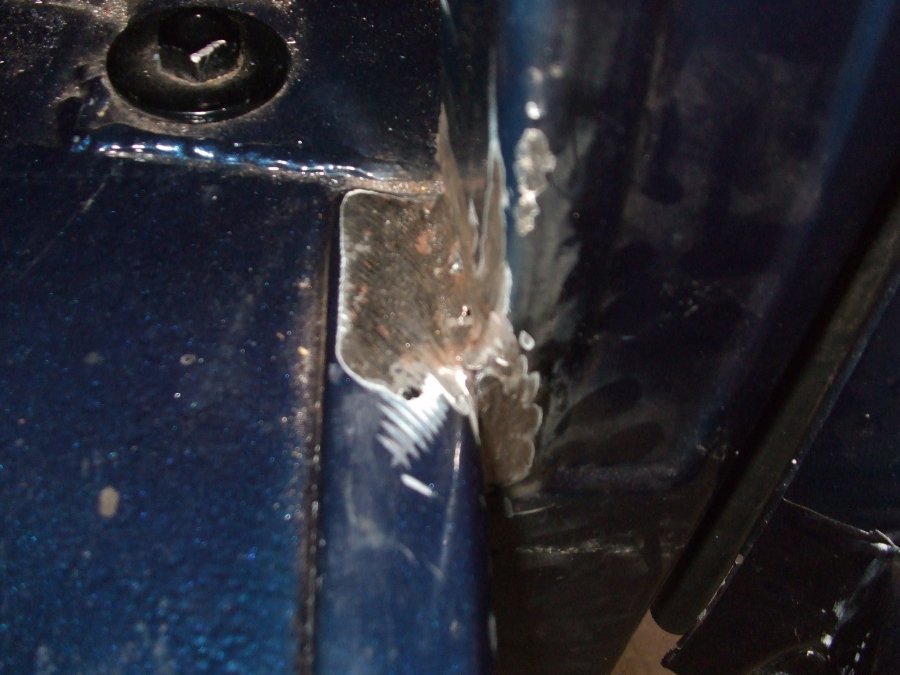
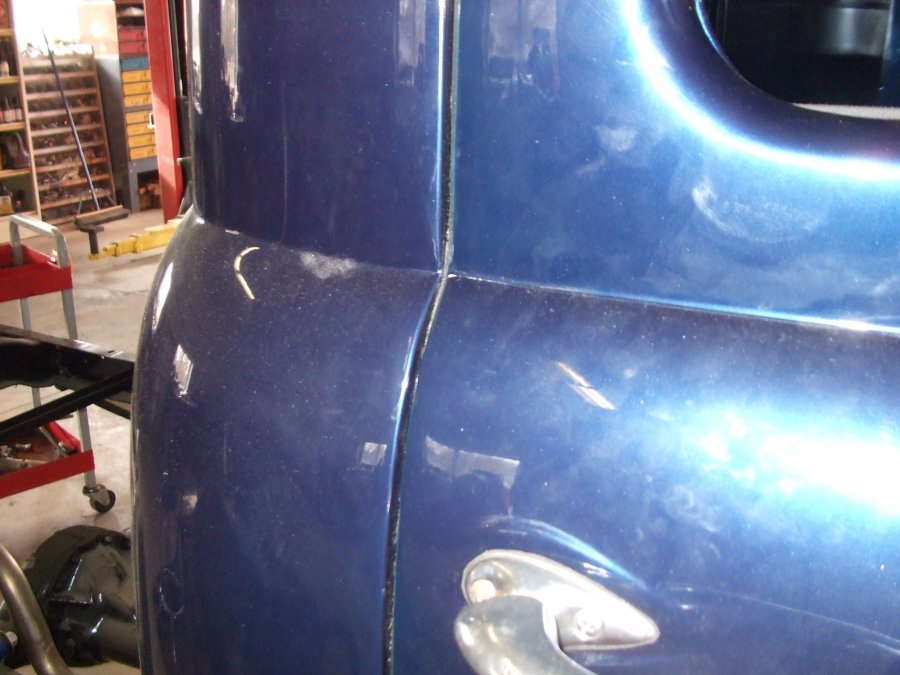
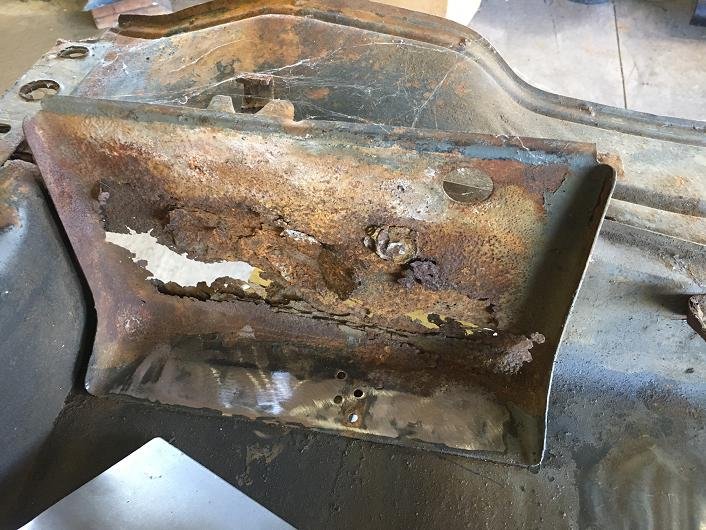
just wanted to mention what i did to fix the problem i had with the door fit that was having me stumped. some were maybe wondering what the heck did i do to fix the door fit because i never did get back. took all the info that was suggested and a big thanks to los_control for the measurements. it has been almost a year since i walked away from it because of work, kids and what not. i just completed the repair last week and it damn near made me sick grinding my new paint job. i ground off the weld at the pillar and floor and tightened down with c clamp to bring pillar against floor, measured and welded. when i clamped it brought the pillar back to where it was originally with a little persuasion to give me the correct gap. pic shows pillar is now against floor with a flush fit. door is installed and fits the way it should.
 3 points
 -
Reg, Great!!! I’m looking forward to it, and I know you’ll be pleased with the head lights. Warmest regards . . . .1 point
-
Reg, YES, that appears to be it. TIP: buy an extra one (or two) for spares. Regards . . . .1 point
-
Reg, Sure—I got them at a local independent auto parts store whose owner (a friend of mine) has a Carquest franchise. I’m sitting here looking at the receipt for those sealed beams right now, and the part number is: CLB H6006. The cost when I ordered them (he doesn’t carry them in stock—not much call for 6v components until I got the ’46 Club Coupe) on the 19th of June, 2015, was $23.99, but I didn’t pay that much for them. I’d guess they’d still be in the $20-25 range. If that part number doesn’t work, let me know. I’ll talk to him and get another number (if there is one) for you.1 point
-
See all that gunk on that pickup screen? I'll never think it's a good idea to dilute that kinda stuff with solvent, put it in suspension with oil, and circulate it through an engine.1 point
-
I can understand, however would like to offer another perspective that I have, from setting my 1953 265 valves. I am not a seasoned pro. However I I did set my valves cold, then later checked and re-set them hot, with the engine running. The exhaust manifold is hot. An average pair of gloves takes care of that easily. It's not messy. Pretty well most of the same steps are taken to set the valves cold or hot. The front wheel comes off. The inner fender window removed. The valve covers removed. Then the feeler gages and wrenches are needed. When cold, the engine must be turned over so that you are setting the valve clearance with the tappet 180 degrees from the top of the cam ramp. I believe TDC gets you there. Once set, the 6 cylinder engine is turned again another 120 degrees to set the next set of valves. In the proper firing order. You carry on, for each cylinder. With the engine hot and running, for example you put your .010 feeler gage in the exhaust valve/tappet gap and measure. If it won't go in the gap, clearance is too tight. If it goes in easily and ticking stops, then its too loose. I found that a proper valve setting, offered a slight tug on the feeler gage. It naturally wanted to slowly, and softly pull the feeler gage into the clearance gap while the engine was running. There is no mess. Oil is not splashing around and getting on everything. The feeling that l developed, of the running engine, the engine pulling the feeler gage in, was solid confirmation that I felt I had it set right. The fine threads on the tappets make for nice easy adjustments. After a few trial and error lessons you get a good feeling how much to turn the threads to make up a 1 or 2 thou adjustment. My engine is running excellent and I feel like I got the valve clearances right. Seems to me that setting the valves cold is a great start. Then put the valve covers back on and the front tire. Go for a drive and come back home hot. Quickly jack up car, pull wheel and valve covers. Access the valves and test the clearances with the car running. Its a nice confirmation. As you know, incorrectly set valves often leads to a mess of related problems. Yes its hot. Messy? I did not have a mess. I found it was way messier pulling the oil filter, sucking the oil out and removing the sludge, than setting hot valves. Good luck whatever you decide to do. I just thought it may be helpful to share my experience. Initially I was intimidated at the thought of sticking my hands in a hot running engine. Near hot exhaust and moving parts with tons of force. In the end I thoroughly enjoyed the new experience.1 point
-
I just had a oil pickup professionally hot tanked and looked really clean........... But I knew I would have to open it up... remove the baffle and screen to properly clean it.... cleanliness a must to protect the bearings...
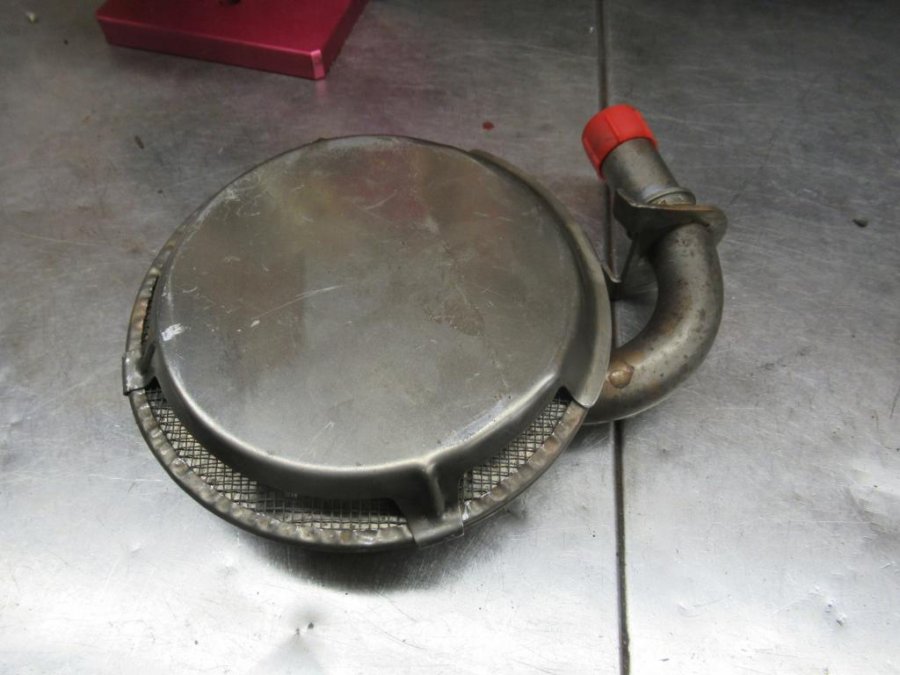
.JPG.338cfd8d306eb82d6c5e29231cd5a780.JPG)
.JPG.6f6d5dc5e86988d0ed48409ed0cfcca5.JPG)
.JPG.7e3267538a2d7574986ad8b8bd394f0f.JPG) 1 point
1 point -
We stopped at the market for a few groceries. A guy I never seen before walked up to me in the store and said he liked the old Dodge and wanted to know what year it was. He commented that it was nice that we seemed to take it out to do every day things, like go to the grocery store. I told him we've put on 6,000 miles since May. He seemed happy to hear that. Just passed the 68,000 mile mark on the car. It had 59,125 miles on it when I bought it back in March of 2016.1 point
-
Mine haven't been used for other's weddings but I sure used them for my own!1 point
-
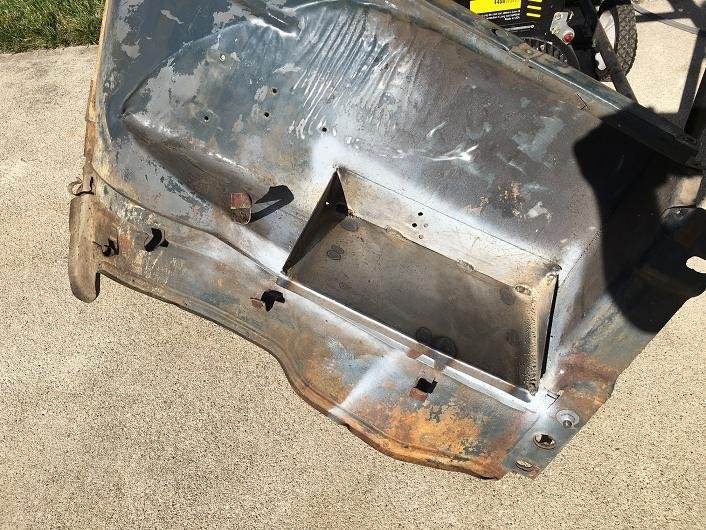
I took a vacation day today from work, and I spent it on the car. I was able to get the inner fenders repaired, sand blasted, epoxy primed, and painted. They came out pretty good. The rust repair was a pretty fun project, especially making the new battery tray. I polished a couple spots on the inner fenders before I started working on them to get the original green/gray/blue color matched. The paint store around the corner from my house was able to get it perfect! I'm happy with the results.


 1 point
 -
The ethanol in modern gas is the culprit for many gas problems. Ethanol eventually breaks down to water and that is death on non-protected parts. If you store any gas engine for a long period, use non-ethanol premium gas in the engine before storing.1 point
-
Our D24 was used in a wedding in Carlsbad, NM when we lived there. Out of the blue a fella came up at a car show and said his daughter wanted a car like ours for her wedding. Sounded like fun, so I said sure. Only downside was that it was SE New Mexico in August (hot), but it was indeed fun. No photos on my part, tho.1 point
-
I use VHT engine paint in cast aluminum color. It holds up well and looks pretty good.
 1 point
 -
if the gas is suspect...don't use it.....repeat don't use it...you may well foul up your valve guides in doing so.....dump the stuff....don't even use in a lawn mower....they have valve guides also....excellent for use in an open 5 gallon tin pail as a night light.....1 point
-
Remove the pickup while you have the pan off because it will be full of crud too. Uncrimp the pickup housing that holds the screen and clean behind it, the screen is easily removed.1 point
-
Very nice !!!1 point
-
Several years ago a forum member gave me this military heavy duty flaring tool. It worked great. Another forum member wanted to borrow it so I sent it to him. He used it and when done he asked me if he could buy it. I told him that I really did not want to part with it but as I was between jobs I could use the money. A week later he sent me an airline ticket and I was in his office interviewing for a job. Best job and best boss I ever had in my life. Carried my up to retirement.1 point
-
Yes, outside the driver's side frame rail is the way it was. The brake line runs on the inside. I saved the clips that support the fuel and brake lines because I wasn't sure you could find them anymore. Also, I am double flaring all my ends. I got a new flaring tool that works SO much better than the old one I had. My old one you had to use your bare hands to twist the thing down and it made really crappy flares because it was always canting off to one side for some reason. So I bought one where you actually put a wrench on the flaring tool and you can get really good leverage and make good flares. Plus, it's quick. Anyway, fuel line's done and I'm on to the next thing. If the car were painted I could drop the engine in.1 point