-
Posts
4,948 -
Joined
-
Last visited
-
Days Won
42
Everything posted by Los_Control
-

it's just around the corner......IWOYTD
Los_Control replied to Plymouthy Adams's topic in Mopar Flathead Truck Forum
I am undecided as usual, think I would like to do some painting today, or I need to remove my water pump, flush the block one last time, install a real water pump gasket and thermostat, T-stat, generator ... button the engine up. Then I want to play with the welder, still teaching myself and past I used .035 flux core and it sucks for sheet metal. I now have gas and .024 wire and need to set it up and play so can patch my fenders. Decisions decisions sigh! First I need to clean the shop and put carpenter tools away -

it's just around the corner......IWOYTD
Los_Control replied to Plymouthy Adams's topic in Mopar Flathead Truck Forum
-
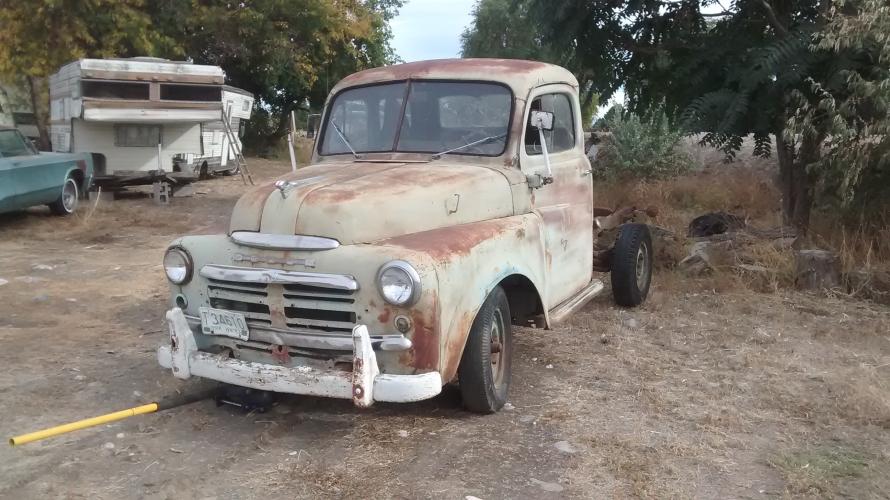
Thats interesting, I have 2 of them, yellow one is a 48-50 1/2 ton converted to a utility trailer, other one is a 49 B1B Is it possible your 3/4 ton used a different style?
-
It has to be a personal hobby or it just wont get done. I actually enjoy it and have future plans. What we envision and just like our cars, our vision is different then others. I sure could use Fabio assistance, seems like just to busy to visit my house.
-
-
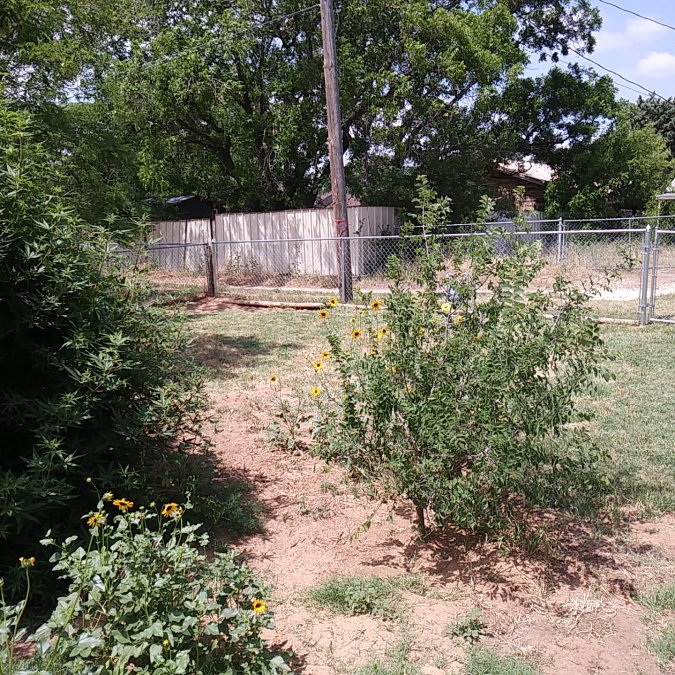
That could be the title of a whole new thread I do appreciate all the love and labor you put in your yarden. As a disabled remodel carpenter, I have seen a lot of nice yards over the time of my career. And realize with my past efforts the dedication to make it work .... My most favorite yard was more like a jungle. All native plants along with bamboo, trees and shrubs ... You would leave the back deck and wander down a path, find a bench to sit on and enjoy. Walk a little further and find a fish pond with a water fall, Little secret spots along the path as it returned back to the house. I really liked that, even though it was downtown Albuquerque, you felt like you were miles away out in the woods. That said, that will be a goal or direction I will be heading in. I bought this house over 2 years ago, and just getting a feel for it. Here in west Texas we cant have nice things. I watched a guy few blocks down redo his yard, within 2 years the lawn is all crab grass like the rest of us. While not attractive, it is a good choice for this area and we really have no choice. This particular area here, I plan to get a wild asparagus patch going. They look pretty gnarly when going to seed and 4' tall, but they offer my favorite veggie. The little tree in the photo Is actually a volunteer from the Large tree across the alley behind it, a pecan tree and looking forward to pecans when ready. I also have 10-15 watermelons growing, going to transplant them in this area and see what they do. I have a issue with black eyed Susan's growing. First year I ran them over with a lawn mower, second year I mowed around them. Dogs and cat loved it, They grow over 6' tall and pets had trails or would have hidey holes to take a afternoon snooze. This year the flowers are trying to take over my yard.
-

'51 Desoto Custom Distributor and Ignitition
Los_Control replied to Tim Larson's topic in P15-D24 Forum
Sometimes they listen, sometimes not. Last year I worked on my neighbors 54 Ford that had a overheating issue ... I fixed that and now it needs a decent tune up. Has a 1990's 302 with FI/AOD trans. Since it had been parked for 12-16 months, I asked him to just drive it and burn the existing 1/2 tank of gas out, put in some fresh gas and drive it some more. Then I will work on a tune up with the fresh gas. It was very drive able, would smoke the tires by accident. Just had a occasional stumble. But year old gas. I drove it over to his house and parked it last summer, has not been started or moved since. Now I really have no desire to work on it again ... Cars sitting is the biggest enemy of them .... they want to be driven to keep them working, and today's fuel is terrible. -
I am really glad he shared the link. After sleeping on it, I realize I must have placed my high bid at $75, and thinking it would need to sell for $80 to beat me. My high bid was not $80. And it sold for $75.59 ... probably a sniper software program at final seconds. I really need to get on the rear brakes, front is finished and master cyl cleaned and working and new lines ran to the T block to the rear. Only thing stopping me from having usable brakes is the drum puller tool. Looks like I will be heading back to the bay, I really want a good original made in USA tool. Have to bid higher. Why do I feel like I need a long hot shower after bidding on ebay ?
-
I dunno, I may have to try again. I am not really disappointed for not winning the bid, although I believe I did set my max bid to $80. Knowing a nice tool will sell for over $100. Next time when searching I should set my bid higher for the right tool. As far as sniper goes, no clue what app it is and I do run linux, most apps wont work anyways. May have to check it out.
-
Like I said, not going to cry about it. All day was only 2 bidders and I was told I am the high bidder. Just a game and not really one I want to participate in. For the auction to jump from $41 to $75 in 30 seconds, just not interested. I think it more likely I wanted to bid $80 and maybe pushed the wrong button ? ... blame it on user error. Either way the handle was beat badly from past use, I imagine the threads are all stretched out. Probably not worth the $75 someone paid for it. At this point I will just purchase a new tool, DCM sells them.
-
I am the same, I put a max bid of $80 yesterday. Today a bid of $75 won .... I really do not care for online auctions and this is the nail in the coffin for me. I am not going to question it, not going to complain, just going to walk away with a smile on my face
-
And just like that. The tool sold for $75.59. In the last few seconds it jumped from $41 to $75. And since I put my max bid at $80, and it sold for $75, I dont really trust the system ... I will just buy a new tool with a push of a buy now button.
-

'51 Desoto Custom Distributor and Ignitition
Los_Control replied to Tim Larson's topic in P15-D24 Forum
I would more suspect the fuel pump not delivering like it should. -

'51 Desoto Custom Distributor and Ignitition
Los_Control replied to Tim Larson's topic in P15-D24 Forum
I am just saying my issue, po moved the oil pump which caused the firing order to be off ... So when I yanked the wires willy nilly and replaced them, distributor was wrong. And the truck would not start. I went through the carb thinking that could be a issue. While I had the carb off, I noticed there was a pool of fuel sitting in the intake. I was worried about this. Once I fixed the firing order, it started right up and I never checked to see if still a pool of fuel in the manifold. Just saying I have seen this, I would ignore it and move forward, not your issue. -

'51 Desoto Custom Distributor and Ignitition
Los_Control replied to Tim Larson's topic in P15-D24 Forum
A fwiw post, I have seen cars sit for months or years, and the fuel pump not pick up and work, last time was a 57 cheby with a 283. Once I started it running off a gravity feed tank, the original pump started working after a few minutes. I think this is caused from a small hole or a weak diaphragm. My neighbor has a 62 cheby with same issue. Have to feed it fuel until it gets going. I told him he needs a new fuel pump, I think he is waiting for me to come over and replace it. Point is, if you can add fuel in the carb and get it to run, you need to look in this direction. I know on my 49 dodge, I pulled the distributor and later found when I installed it I had a different issue. My intake seemed to have a lot of fuel sitting in the bottom. Once I fixed the firing order, it fired right up and ran ok since.No clue if my intake today still has fuel sitting in it, but I would not worry about that. -

'51 Desoto Custom Distributor and Ignitition
Los_Control replied to Tim Larson's topic in P15-D24 Forum
I hate starting fluid and suggest to never use it. For troubleshooting it is awesome. If you spray some and it tries to fire, You now know you have spark and your issue is fuel delivery. From here going forward, I would be looking at fuel. Remove the line from the carb and visually see it pumping fuel. These old cars we do not know what a past owner did. Very possible the fuel lines are clogged up from crap sitting in the tank. The diafram in the pump could have failed, the carb may need to be rebuilt. First thing is to verify fuel going from the pump to the carb. -

can't get close to identifying this yet
Los_Control replied to Plymouthy Adams's topic in Off Topic (OT)
Looks to me like they used it to harvest "YUGE" tomatoes from the vine. Therefore RH is for radical harvester. -
I love it, looks like she is having fun, and thats why we are here in this life.
-
keithb7 Just WOW Just saying that is awesome. I love it and can appreciate the time and effort you put into it. I do have a idea what it takes to maintain that level. I thank you for sharing that.
-

'51 Desoto Custom Distributor and Ignitition
Los_Control replied to Tim Larson's topic in P15-D24 Forum
If you have the correct size socket to fit on the crank bolt, Always a good idea to turn it in the normal direction as if the motor was running. In my experience, often you can just push on the fan belt applying pressure with one hand and spin the fan with the other. What you are fighting is compression. You do not need plugs installed to check spark. The plugs are pretty easy to remove on these engines. And ultimately you want to see spark at the plugs. lay them on the head and crank the engine and check for spark. IMHO, pulling the plugs so you can roll the engine over easily not a terrible waste of time. -
I have to agree with you here. I did the first bid the other day, really would like to simply click the buy now button and be done with it. I walked away with the feeling, that was fun let's not do it again. Then Tom'sB2B posted the link above and here we go again The only buy now links are for new tools at $105. And I assume they will work fine. Probably made off shore ... I would prefer to have a older original tool made in USA. I "feel" it will be a better tool. Looks like this time am stuck with the auction.
-
My bid is $80, I am current high bidder, I really do not care. I think $80 is a fair price for a used tool ... that tool has a lot of beating on it ... And not worth the price of $80. win lose or draw, I wont have to search again. Just get a tool and get er did. So paying a little extra wont kill me, just make life easier. If it sells for more then I offered, someone is a bigger fool then me.
-
You are mean ... I got a bid on it now, but prefer to not get involved All your fault..
-
Sniper Some day we need to meet.. I am just of opinion I would rather buy good used, then cheap new. Good chance I will end up buying cheap $110 new puller. Regardless of which puller I buy, still looking forward to meeting you. Since we are just a few miles apart.
-

Old trucks with old front ends & old grease
Los_Control replied to Los_Control's topic in Mopar Flathead Truck Forum
Just saying, this is the excuse I give to my wife Sonya. And she rolls her eyes and agrees. While I think I should be intelligent enough to not start 10 projects. Here I am living the dream. Sewer needs to be completed, new supply lines run into the house, Porch pickets need to be completed. The kitchen remodel needs completed, I just for some reason can not stop setting up new projects. The 49 dodge needs completed. List goes on of other projects started and not completed. For me just seems normal, I can step in and do every job. Issue is, I am the only employee at this time. I cant do it all. I am either a idiot, or I need to hire a crew and send them out. Being a idiot is not that bad.


