-
Posts
530 -
Joined
-
Last visited
-
Days Won
4
Everything posted by thebeebe5
-
Final look before surfacing the top of the head and re-blasting to make it all look nice. It appears I've uploaded my max for the day.... 3mb per day and all I want to share to the thread would mean postage stamp size images. I'll wait to upload more progress tomorrow.
-
Here's the brass "weld" to the cracked areas off the water passage. I used a die grinder to shape the plug hole area.
-
-
Good question, @Dodgeb4ya, and it's quite flat by straight edge, but I'll have an exact number later today once we cut it. We did a '37 Auburn motor about 1.5 years ago. 8cyl flat head. THAT head came back warped and had to be sent back for straightening. Dropped this head off and gave explicit instructions. Braze it and make sure it's still straight. Nice thing about the brazing process is the temp they heat the head to prior is much lower than welding. So far today I've got it cleaned up in the bead blast cab, used a die grinder to shape the spark plug hole, and surfaced the top of the head. Ended up taking about 0.014" off to get to this point, and I'll just use some silicone on the gasket for the water neck. De-burred the holes and used the die grinder again to clean up outside edges that were cut. Don't want any cut fingers....! Edit: Unable to upload more photos today for whatever reason. I'll check back later and post more progress.
-
Remember how nice my cylinder head looked after I'd glass beaded it...? Well, it's back from the welder...
-
I've had the chain on and off a couple times just checking I have all the right parts etc, but I will certainly document the final installation with pictures. Was even thinking of degreeing the cam for fun and practice. The pistons are uncoated. Any info you may want to borrow should be on the spec card back in this thread. If it's not there I'll try to answer. They're a basic aluminum forging, nothing fancy, but propper for the application. I think I had the first set in a week. They took almost three weeks after returning them to send the correct spec'd pistons.
-
I tried to do a "shade tree" rebuild on my '67 F250 and ended up getting the machine work done at this shop. The owner only does full-on custom work, even if he basically assembles a kit for a customer. Custom meaning each part sourced is carefully measured before use and machine work is meticulous. He wouldn't even take my job if I was going to ball-hone the cylinders (which were in fantastic shape as they were). Through the course of that project in 2013 I learned a LOT about doing careful work. I'm sure it would have run my way, but I sure felt better about having gone through it with such care. Besides, as it's not my real vocation the excersies were fun and I got a great sense of pride in the learning process. Truck runs like a top. I expect the P4 to as well. Definitely anxious to finish up and drive it!!!
-
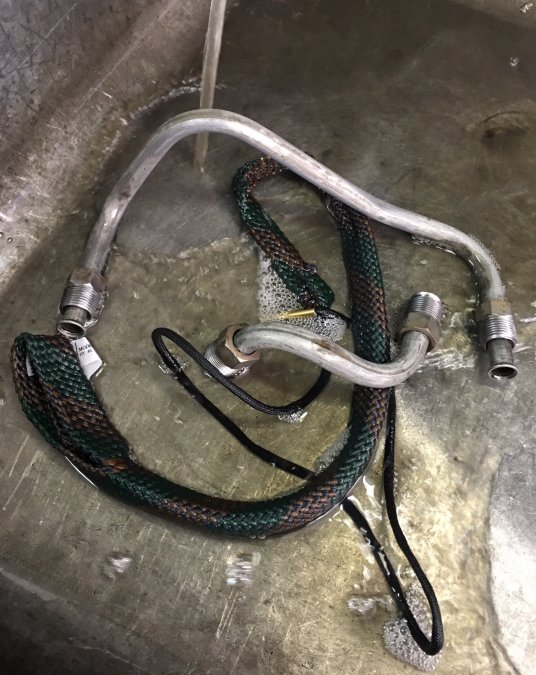
Couldn't think of any other way to properly clean these tubes for the oil pickup..... Necessity is the Mother of invention they say. Everything for the front is sorted out. I'll get it all installed next Saturday. Still plenty to do though....
-
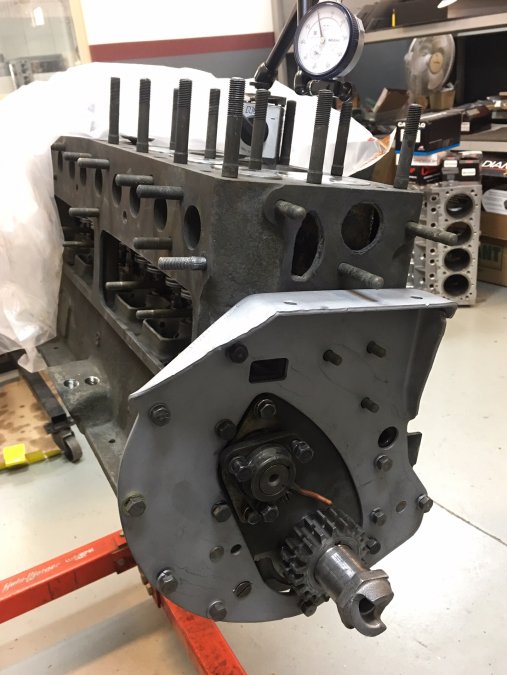
Some progress yesterday. Still waiting to get the head back from the welder's, but had time to get the pistons inatalled and rod caps torqued up, and was also able to get started sorting the front plate parts, gaskets, timing chain bits etc....
-
No more than 5-6lbs. I'll post in my overhaul thread and in the turbo thread.
-
Yeah, JE forged. Will likely pop a turbo on it too and will be really happy to start around 7.3:1 static compression.
-
Good to know. Thanks. More CR is definitely not in my plans. Already raised it with piston for this build. The stock head ought to do fine once it's back, cleaned up and checked for warpage after the welding process.
-
-
Did not, @knuckleharley. I'll be fine welding mine up, but thought if the above would work it'd be kind of cool.
-
Saw this ebay listing this am. Might be a good deal for someone.... was hoping it would be for me since I found a crack in my 201 head Saturday. Contacted the seller and it's definitely a 25" head. But it made me wonder... was "Spitfire" enough information that I should have known it was a 25"? Still really new to these motors and their variants. https://m.ebay.com/itm/Antique-Original-1941-Chrysler-Spitfire-Flathead-Engine-Cylinder-Head/142597268219?_mwBanner=1&ul_ref=https%3A%2F%2Frover.ebay.com%2Frover%2F0%2Fe11051.m43.l1123%2F7%3Feuid%3D41a7fefae11349c483a78ed04fb82290%26bu%3D43210688074%26loc%3Dhttp%3A%2F%2Fwww.ebay.com%2Fulk%2Fitm%2F142597268219%26sojTags%3Dbu%3Dbu%26srcrot%3De11051.m43.l1123%26rvr_id%3D0&ul_noapp=true
-
Yeah, I did follow the instructions. I can post, but don't have them in hand. But here's how they go. They provide two ropes as pictured. They also provide a razor blade, 1/2 a tongue depressor and a thin gauge approximately 0.020" thick to help guide your trimming of excess. They want some contact compression at the seal parting lines. Seal works for inside or outside the block applications. For inside the block or outside the block with a retainer of sufficient thickness they provide a 1/16" diameter (approximately) by 1/4" long roll pin that they want you to drill the block or holder for to act as an anchor so the seal can be held in place without spinning. Drill 1/8" deep and push the pin in place leaving 1/8" protruding to penetrate the seal and keep it in place. As I had a retainer that was too thin to drill they instruct to utilize RTV sealant to keep the seal stationary in leiu of the supplied pin. Use a large socket or pipe or other implement to form the seal to approximate the profile of the crank seal surface. I found that the seal is pliable enough that I had better contact completely around the seal by allowing the crankshaft to form the seal to itself, hence the repeated trial installations. Also, if you have an application that requires the wide rope seal they will send that at no charge per your application requirements. I'll post a picture of the sheet when I can get back to the shop.
-
Brian (the shop owner) and I discussed a clean up head cut once the bottom end was complete, so we located my cylinder head to have a look at it. His sharp eye caught what looked like a crack under the water neck. Figures... He pulled out his magnaflux equipment, and sure enough there's a crack extending down into the #1 plug hole. Being water jacket it should'n't be a problem to have it welded up. That should get done this week and then we can cut the head for a nice gasket seal surface.
-
Once I was satisfied with my end play I cleaned all the caps, bearing halves and crankshaft thoroughly and installed the crank (hopefully! for the final time. Running thin on time today. I'll install the already assembled pistons and rods next time.
-
Once the seal was set up in the seal retainer I took them off and set them aside and tackled the end play. Initially I found I had a 0.00" end play, but my target was going to be 0.004". If material needs to be removed from the thrust bearing when setting end play remove it from the non thrust side of the bearing. I measured the non thrust (or most forward thrust surface) of the bearing and sanded it slowly and carefully on a block until I'd reduced the thickness by 0.003" so as not to go over my target. Reinstalled bearing and crank and found I now had roughly 0.002"+ of end play whereupon I repeated the sanding process. Just took a couple of tries and I'm set right between 4 and 5 mil. Should be good here.
-
Yesterday's progress. Don't feel like I got much done, but there were other jobs going on I was busy with, and any progress is progress. Definitely getting closer... Rear main seal was installed. The machinist Pat wasn't impressed with the included Fel Pro rope seal. I sourced and bought a neoprene seal, but when it arrived it was obvious that the seal halves were not going to mate well and didn't give me any confidence that the seal would keep oil in the engine. Called Jeggs to discuss the product as it looked defective, and I was directed to Tod Fitch's website on installation for a '29 Plymouth.... Nice sidestep. Definitely didn't want to use this seal. Ordered a Best Gasket rope replacement seal and got that installed first. Really impressed with the quality, and it actually includes instructions!! I trial fit the crankshaft a few times until I was sure the seal was making good contact 360 degrees around the seal. It's an interesting seal.... Took the trimmed ends apart and it's like a graphite impregnated plastic weave.... Not sure how else to describe it. Anyway, it went in quite well and I'm reasonably confident it will seal the back of the motor properly for me.
-
I know on my '37 the bellhousing had to be loosened to remove the flywheel. Removed the four nuts and pushed al four flange bolts back to the motor block, and still wouldn't clear the flywheel at the top of the bell. Once the bellhousing was loose it was a balancing act to pull it away from the engine without the flywheel falling to the shop floor. An extra hand or two can help.
-
Cam bearings are cheap. Like, $25/set. Install shouldn't be too time consuming either. I installed mine in under an hour no issues. And as far as valve guides go, if they felt sloppy on disassembly it's likely they're worn out. Mic the stems and guide bores. if there's more than 0.003" I'd see about having silicone bronze liners put in at a machine shop. No need to remove the whole guide. Some good cleaning, judicious parts replacement and careful attention while it's apart now will go a long way....
-
I've heard of folks doing that, @Frank Elder. Also heard of madnetic drain plugs. I wonder if I could afix a magnet to this drain plug. It's obvious someone repaired this pan at some point as the drain plug area has been brazed, but I don't know if it's original or not. Its huge though.... requires a 1 1/4" socket...! I could easily drill it out and press fit a strong "rare earth" magnet in it prior to reassembly....
-
Some of the goop stuck to the back of one of the baffles (factory baffles...? I don't know). All clean now.
-
Have to duck out of the shop early today so time for one more job. The oil pan. It was rusty inside. It was rusty outside. The only thorough way I'll be able to get the rust and leftover goop out is to bead blast it, and if I bead blast it I'd better be prepared to clean it thoroughly. Don't need a left over bead sneaking into the fresh engine. So, I drilled out all the baffles. Brian looked thrilled and thanked me for the extra TIG work I'd created. I've never been accused of not being able to create work. Now that it's clean inside and out I'll just need him to plug weld all the brand new holes shut for me.


