


61spit
-
Posts
112 -
Joined
-
Last visited
Content Type
Links Directory
Profiles
Articles
Forums
Downloads
Store
Gallery
Blogs
Events
Everything posted by 61spit
-
Well gentleman I did it and she's home 1934 Plymouth PE business coupe
61spit replied to Solly's topic in P15-D24 Forum
Beautiful automobile! I'm sure you will find much enjoyment with it. Color is great! -
I could use it. I have lost mine in the process of the rebuild.
-
New guy here: 1949 Plymouth Super Deluxe
61spit replied to 1949plymouthdeluxe's topic in P15-D24 Forum
Do you know when it was overhauled? It could be that it has had detergent oil in it since that time and not that many miles on it since then. Maybe not much build up that could come loose. -
New guy here: 1949 Plymouth Super Deluxe
61spit replied to 1949plymouthdeluxe's topic in P15-D24 Forum
Great looking car! Have fun with the project and keep us posted as you go along. -
Great looking car! I like the color and it appears to be in really good condition. Enjoy the project you have and keep us posted as it progresses.
-
How to operate R-10? Non-Electric Overdrive...
61spit replied to bamfordsgarage's topic in P15-D24 Forum
I think there is supposed to be kick down switch on the carburetor that the linkage hits when the accelerator is pushed all the way down. That kicks the OD out of gear and then when you reach the speed you want and let back off for a second it shifts back into over drive. I think the handle is only to enable the OD or completely disengage it. Isn't used to shift in or out of overdrive on the move. -
No, it's not me.
-
I haven't installed the unit so can't give any feedback on how well it works. Maybe someone else has experience with this unit.
-
Looking good!
-
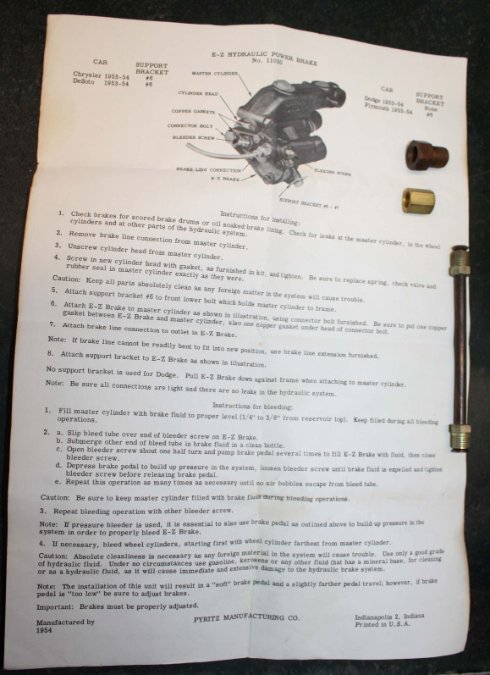
I have no idea about the o-rings inside. It is not a hydro-vacuum unit. It must be increasing the hydraulic advantage from the master cylinder to the wheel cylinders with the same amount of pedal travel. I'm not a hydraulic engineer so don't know what the theory would be behind that. Maybe like the new style floor jacks that have a lot of lift from one stroke on the handle?
-
The instruction sheet is dated 1954 at the bottom so I'm guess that is when it was made. I don't know if there are any rubber parts inside the unit. No rubber parts showing.
-
What about this type of booster unit. E-Z Hydraulic Power Brake.


-
Those are looking good!
-
Had accident with my newly completed 52 Dodge Coronet
61spit replied to Marty C's topic in P15-D24 Forum
Ouch! Good luck on your parts hunt. Hope you find everything to put it back together. -
Great looking project! The fold down seats are really neat. Looks to be pretty complete from the photos. Have fun. I will be following along with the progress you post.
-
I would think you want the float rod travel in the tank to match the full travel of the sending unit. When the arm is at the bottom of its travel in the tank it should also be at the bottom limit of travel on the sending unit. Should be showing empty on the gauge. When the arm is at the top of the tank it should also be at the upper limit of travel on the sending unit. Should be showing full on the gauge. If the arm doesn't travel the full range of the sending unit it can't send the proper signal to the gauge. Just my thoughts on this.
-
Looks like it turned out well. A published article as well. Excellent!
-
What did you build? I have restored a few old tube and fabric aircraft over the years. A 1946 Cub, 1953 Tri-Pacer, 1959 Tri-Pacer and 1 metal - Cessna Aerobat. Never did any welding on any of them. A great art to watch someone skilled at it. Sorry, a bit off topic.
-
What a beautiful automobile. Stunning.
-
Nice work. Thanks for the photo tutorial on how you did things. I'm sure it will help someone in the same situation. Well done.
-
I'm thinking it is the M6 transmission gear box.
-
I had a block that was supposed to have been tanked and cleaned and it didn't look like it at all. I took it back and they baked it and brought it back. Looked like a brand new casting. Perfectly clean and beautiful.
-
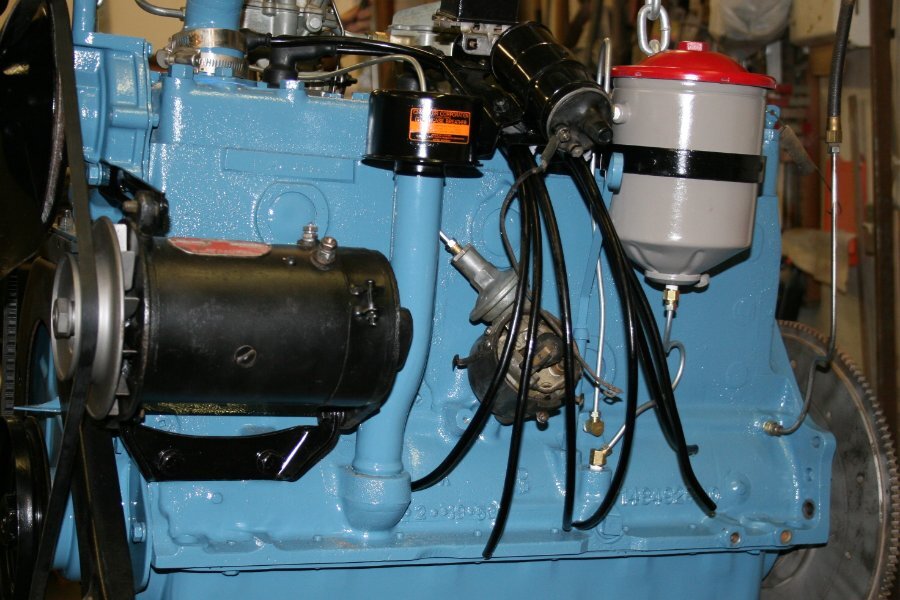
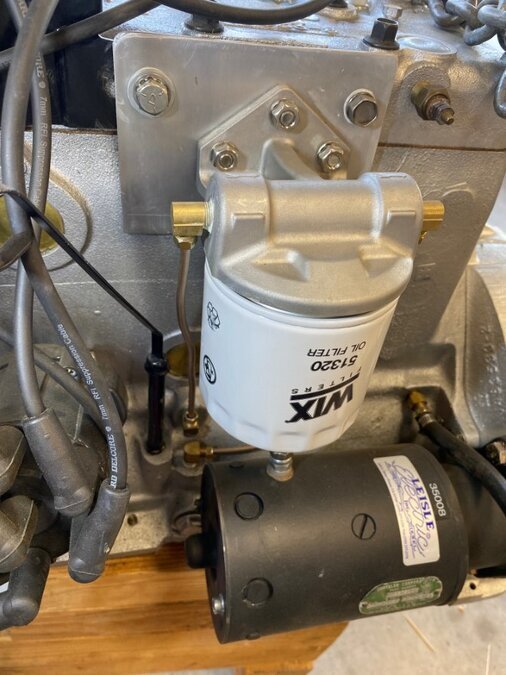
Here is another photo that shows both the oil filter lines and the oil pressure line. My oil pressure gauge line is a hard line up to the flex line and then a hard line through the firewall.
-
If you look at the right side just above the starter there is a rubber hose. I believe that is the oil pressure feed line. It will to up to the firewall and through to the oil gauge on the dash.
-
Isn't that the coolant temperature sending unit in the head? Not oil pressure.

