


bkahler
-
Posts
1,936 -
Joined
-
Last visited
-
Days Won
37
Content Type
Links Directory
Profiles
Articles
Forums
Downloads
Store
Gallery
Blogs
Events
Everything posted by bkahler
-
51 B3B build thread - after all these years
bkahler replied to bkahler's topic in Mopar Flathead Truck Forum
1/4" seems like a reasonable amount of clearance. -
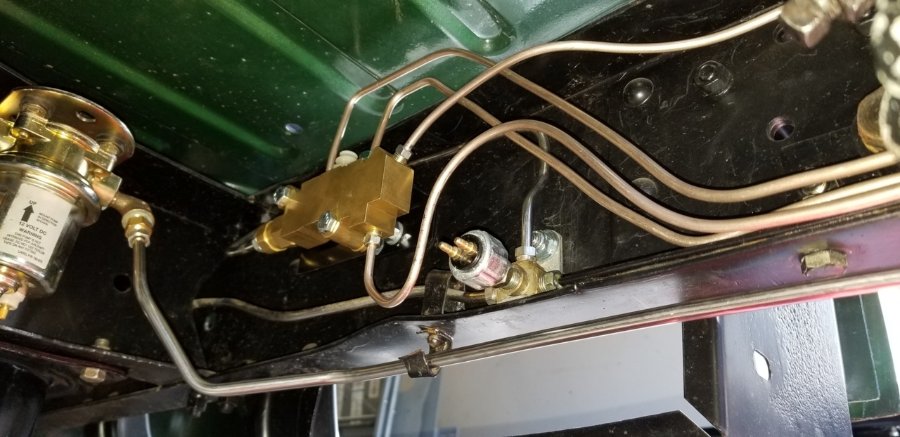
What type of threads are in the T you installed? They make brake line switches with 1/8n NPT threads, and I think they also brake switches with inverted flare threads. Here's a picture of my installation.
-
Yeah, the evidence seems to fit that hypothesis
-
Leaving the rear fenders off would certainly make it easier to fit the running boards. Hanging the doors empty (which seems to be the consensus) would allow me to hang the doors now and means I would have doors AND seat belts to keep me in the cab
-
David, you are 100% correct about what works for one doesn't always work for another. Once the cab is squared away, I'll start with the doors and once done I'll look at the suggestions and see which one makes the most sense based on what I kind of help I have on hand. It could also come down to finding out I don't have the right bolts, or gaskets, or who knows what so rather than stopping I take a different approach so I can keep moving forward. I think the interesting thing is each response has been remarkably similar with what I would consider small details differing. It would be really interesting to know what sequence Dodge used when building these trucks.
-
I have no real definitive answer to that question By design it looks like something should have been there. Dodge apparently have used pedal seals in some of their vehicles and the fact that vendors actually sell a piece that is shaped to fit the opening seems to indicate it should have been there. I'm wondering if Dodge originally intentions of installing a seal but possibly changed their mind due to cost.
-
51 B3B build thread - after all these years
bkahler replied to bkahler's topic in Mopar Flathead Truck Forum
That would be handy if you could do so, thanks! -
51 B3B build thread - after all these years
bkahler replied to bkahler's topic in Mopar Flathead Truck Forum
Merle, that's a good idea and thanks for the tip. I just happen to have a can of dry lube on the shelf. -
51 B3B build thread - after all these years
bkahler replied to bkahler's topic in Mopar Flathead Truck Forum
All motor mounts are new. My guess is the original motor mounts AND rubber cab mounts probably all collapsed at the same rate over the years which is why the throttle issue was not present when I first got the truck. I'm hoping by the time I'm done everything is back in its properly design location. Of course, the odds of that happening are slim, but I can try -
51 B3B build thread - after all these years
bkahler replied to bkahler's topic in Mopar Flathead Truck Forum
My thoughts on the clearance issue are pretty straight forward. I checked the thickness of the new rubber donuts and found the new ones are a little thicker than the original donuts. That measurement was taken while the new ones were still clamped in place by the cab mounting bolts. At this point the only variable would be the amount of sag in the frame support arms for each corner of the cab. My plan is to calculate the amount that each frame support arm has sagged and fabricate a spacer to make up that difference. In theory once those spacers are installed the cab should be really close (or slightly higher) than the original design height. Off hand, I can't think of a reason why this process wouldn't work. I'd like to get this work done before any other sheet metal is installed so I have a fixed foundation to build on. Since I can't drive the truck without the throttle working properly and I can't get the throttle working properly until the cab is raised, guess what I'll be working on next -
51 B3B build thread - after all these years
bkahler replied to bkahler's topic in Mopar Flathead Truck Forum
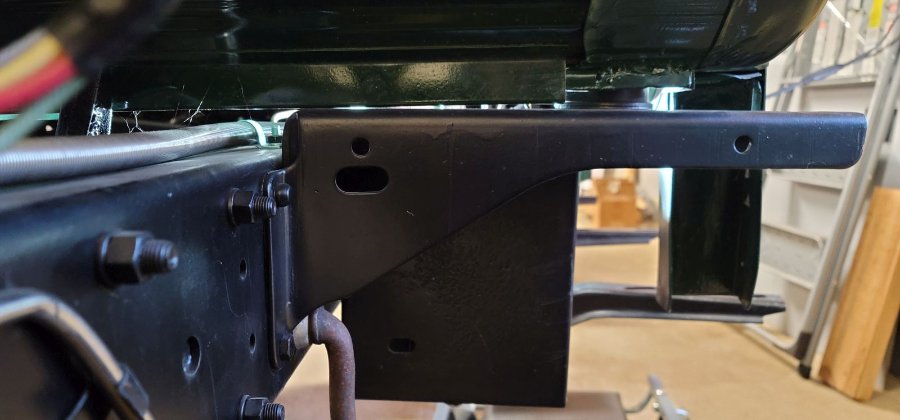
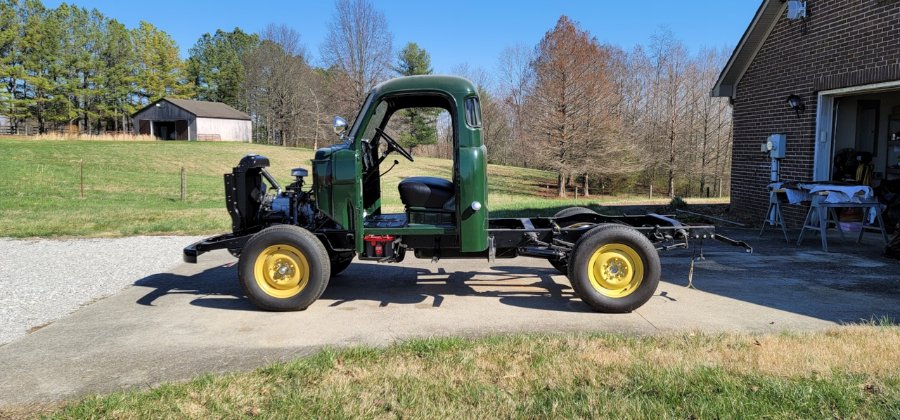
Dave, you hit the nail on the head with your body mount comment. I only looked at the two front mounts and they are both sagging. The drivers side looks to be about 3/16" low and the passenger side is about 5/16" low. You can see in the pictures below just how bad the sagging is. Last night I loosened all of the cab mounting bolts and there was very little change in cab height. The pedal arm still slightly rubbed the bottom of the toe board. I'm sure the added weight of the seats now being in the cab aren't helping anything either. Drivers side: Passenger size: The passenger side cab sheet metal is actually touching the frame support arm causing a slight crease. I compared the old rubber mounts to the originals and the new ones are the same height or slightly taller. I will be sticking with the new rubber mounts. I think my plan of attack will be to determine just how much sag is present in each corner and machine spacers equal to the amount of sag in each corner. In theory this should raise the cab back to it's original height. I would assume this would also level out the cab properly. Adding the spacers should also eliminate any issue with the throttle linkage hitting the toe board. It seems like I take two steps forward on this truck and then one step back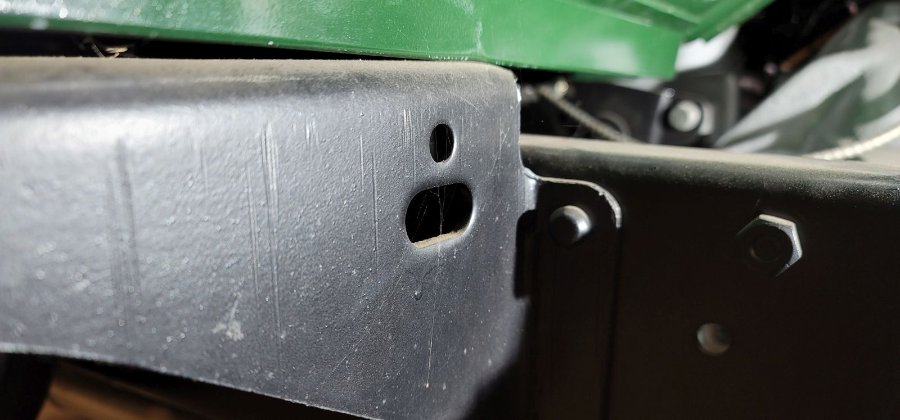
-
Thanks for the links. I'm going to contact one of those vendors and ask for dimensions. If they are close, I might just order one to see how well it will fit.
-
Ok, it sounds like the order of assembly should be something like the following: Doors Fenders Front nose/grille Doghouse (I'm assuming the doghouse is the center section of the hood) Hood panels Inner fenders Front bumper Bed assembly Running boards? Based on lots of pictures I've seen over the years and todays comments I plan on assembling the bed first and then using the gantry crane to lift it up. The truck would then be positioned under the bed and the bed lowered into place. This brings up the question as to what point in the sequence should the running boards be installed, before the bed is lowered down or after the bed is in place? I will have help assembling all of the panels. If I tried to do this all myself then I would just have to pay for another paint job As for the doors, would it be better to assemble the innards with the doors laying on a work surface or after the doors are hung onto the cab?
-
51 B3B build thread - after all these years
bkahler replied to bkahler's topic in Mopar Flathead Truck Forum
The pivot point is definitely under the toe board (angled portion). I spent a lot of time looking at that pivot point when I was fabricating the linkage. Clearance definitely wasn't an issue at the time. Now that the cab is bolted down the arm is hitting. At this point I'm just guessing but my thinking is the rubber collapsed or squished down, possibly due to the rubber not being the same durometer as the original rubber. The new ones may also be shorter than the originals to begin with. Tonight (or real soon now!) I will loosen the cab bolts and see if the issue goes away. Mark, since you've been doing cab work on your truck, can you tell me whether or not the cab sits parallel to the frame? I'm assuming it does which would make it a lot easier to create spacers to raise it to the required height. Los, I'd really not like to mess with the linkage. Other than cleaning it, it's in the same condition it was when it came off the truck years ago. I'll know more this evening. -
I'm getting near the point where the truck has to be assembled from all the various body panels. Currently both of my spare bedrooms are filled with painted body panels and so is my living room. Only the cab is in place at the moment. So, the question is what's the best assembly order? Front grille panel Front fenders Doors OR Front fenders Front grille panel Doors Or Doors Front fenders Grille Panel What about the hood assembly. Does the hood go on before the fenders? So many questions, so little time Suggestions welcome.
-
51 B3B build thread - after all these years
bkahler replied to bkahler's topic in Mopar Flathead Truck Forum
I might actually have two issues causing the throttle linkage to stick. The first is the seal but the second might be caused by the rubber cab mounts. I didn't tighten down the cab bolts until after I completed the throttle linkage installation. I know for a fact the pedal was sticking slightly from day one, but what I found last night was the pivot shaft that runs across the back of the block is now rubbing the bottom of the floorboard where the pivot arm points up. I never checked the linkage actuation after that tightening the cab bolts. I didn't get a picture of the rubbing but it's not just a slight rubbing, the arm actually gets stuck against the floorboard. The rubber mounts are new and were purchased from Vic's. I don't remember if I compared them new mounts to the old mounts for height difference. Before tightening the bolts I'm sure I had at least 1/8" to 1/4" clearance on the pivot arm. Currently my plan is to loosen the cab mounting bolts to see if the rubber relaxes enough to eliminate the interference. If it does, then I need to decide whether to use steel washers to increase the height or use the old rubber mounts. Currently I'm leaning towards steel washers. Brad -
Last night I browsed several Chevy parts sites and couldn't find any reference to gas pedal floorboard seals. I was actually quite surprised to find parts coverage wasn't much if any better than what we have available for our Pilothouse trucks. It's quite possible I just didn't know what to look for.
-
I think in this case I'll start with minimal interference which would be just a big hole. Later if it bugs me enough I'll pop a hole in a rubber sheet and fasten it to the floorboard. Thanks for the feedback.
-
Interesting but not surprising. So there was just a 1-1/2" hole in the floorboard for the pedal stem to pass through?
-
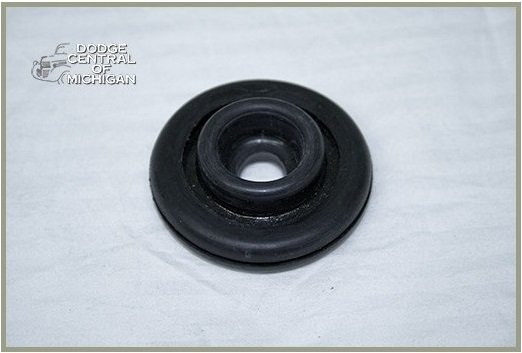
I purchased and installed a Gas Pedal Stem Seal from DCM Classics. I believe this seal is one of the reasons my gas pedal is sticking after being pushed down. Prior to installing the gas pedal stem and seal the rod stem easily slides through the rubber/aluminum bushing but once installed the angle of the stem as it passes through the seal is not very good. This causes binding and rubbing loud enough to hear (when the engine isn't running that is). Based on the size of the floorboard opening there needs to be something there but I'm not convinced this seal is the answer. Am I missing something?
-
Clements Tailgate BBQ 16th Annual Event......
bkahler replied to 48Dodger's topic in Mopar Flathead Truck Forum
I'm sorry to say I won't be able to make it this year either. Too much happening at work and the cost of diesel is just insane. Maybe next year.... -
51 B3B build thread - after all these years
bkahler replied to bkahler's topic in Mopar Flathead Truck Forum
VPW is where I bought my High Volume oil pump for $50 in 1998. I don't remember how much lower the cheaper option was but my engine builder recommended the HV pump so that's what I went with. Edit: Just checked VPWs price for the high volume pump...$249 Ouch! -
51 B3B build thread - after all these years
bkahler replied to bkahler's topic in Mopar Flathead Truck Forum
The trip is still a week or two away. He's finishing up the rear fenders and then needs to reorganize his shop to fit the truck inside. Seat belt installation is now at the top of the list of things to get done. Back in the 80s when I had my CJ5 I don't remember ever using seat belts even with the top down and no doors. However, back then I was invincible, now not so much -
51 B3B build thread - after all these years
bkahler replied to bkahler's topic in Mopar Flathead Truck Forum
I'm relieved to say I had good oil pressure. After reading all of the oil pump problems last year it made me somewhat nervous. I bought the pump 22 years ago and it was the high volume high dollar pump. Money well spent -
51 B3B build thread - after all these years
bkahler replied to bkahler's topic in Mopar Flathead Truck Forum
This turned out to be one strange day. Rolled the truck outside, got things organized and waited for a friend to show up, I figured it would be good to have someone watching things as I pressed the starter pedal. Well to make a long story short, it wouldn't start. Not even a pop. At that point we started looking things over by checking for spark on the first plug wire, nothing, not even a small spark. Pulled the distributor cap and verified the rotor was turning, yep it was. Next we checked for spark by pulling the coil wire from the distributor cap and still got nothing. Started looking inside the distributor and noticed that the wire from the terminal on the outside of the distributor to the points was missing. Naturally this was the problem, right? Well, I made up a small jumper wire with terminals and installed it and figured it would start now. Nope, not even a pop Pulled the points and sanded them and reinstalled and although you could see a really small spark when opening the points the engine still wouldn't fire. At this point we gave up and pushed the truck back into the garage. After stewing on things for an hour or so I went looking for my spare OEM coil. I found it and it had the remnants of the old coil wire stuck in the top so I pulled it out. Looking closer at the coil I realized the opening is rather deep. At this point the light bulb went off and I went and looked at the coil in the truck. Surprise, surprise, I was able to push the coil wire about 3/8" deeper into the coil So at this point I pushed the truck back outside, turned the ignition and and hit the starter. You can probably guess the rest by now. The engine started right up and sounded great. It was actually running at around 2300 rpm which is what I wanted in order to break-in the cam. Let it run for 20 minutes and then started backing the idle screws off on the carburetors. Here's a video of the engine start after I got the idle down to around 1100 rpm. Engine Start Video Running temp at 2300 rpm was 170 using a laser gun. Oil pressure on the gauge was reading around 45-50 psi. The water temp on the gauge was slightly over half way. The numbers were the same after I backed the idle off to 1100 rpm. The overflow tube was dribbling out a little bit of coolant while it was running so I don't know if I over filled the radiator or what might be causing that. That's a problem for another day. I couldn't really tell if the generator was working or not. The battery maintained 12.71 volts the whole time it was running so it might be producing some current but not much. I definitely have to do some adjusting on the carburetor linkage. I couldn't get the idle below 1100 and I'm not sure why. I suspect the dual carburetor setup is going to be interesting to try and get adjusted properly. I've got a few other video snippets I'll be uploading but I have to do some editing because they are not that great. I wasn't expecting the engine to start so I didn't have the camera ready when it did! Ok, on to the next problem.....
