


bkahler
-
Posts
1,947 -
Joined
-
Last visited
-
Days Won
39
Content Type
Links Directory
Profiles
Articles
Forums
Downloads
Store
Gallery
Blogs
Events
Everything posted by bkahler
-
51 B3B build thread - after all these years
bkahler replied to bkahler's topic in Mopar Flathead Truck Forum
I wouldn't say we're over thinking it. It was pretty obvious I had a problem since the throttle linkage was binding on the toe board. Knowing how much and where to raise the cab needed to be worked through. I did notice as I was jacking the front of the cab up off of the frame mounts, it was obvious that the frame was twisting slightly as the weight was removed. Then when I lowered the cab back down you could see the frame twist. There was no movement of the arm support relative to the frame, it was the frame itself that was twisting. Not a lot but enough to cause the droop. I guess I got lucky with my cab and doors, there was no damage to them. Actually even the fenders and front grille were in great shape. However he rear fenders and bed walls are another matter -
51 B3B build thread - after all these years
bkahler replied to bkahler's topic in Mopar Flathead Truck Forum
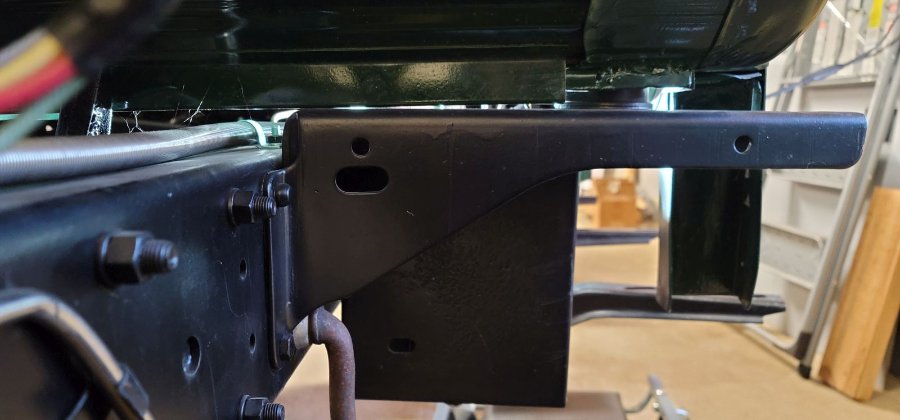
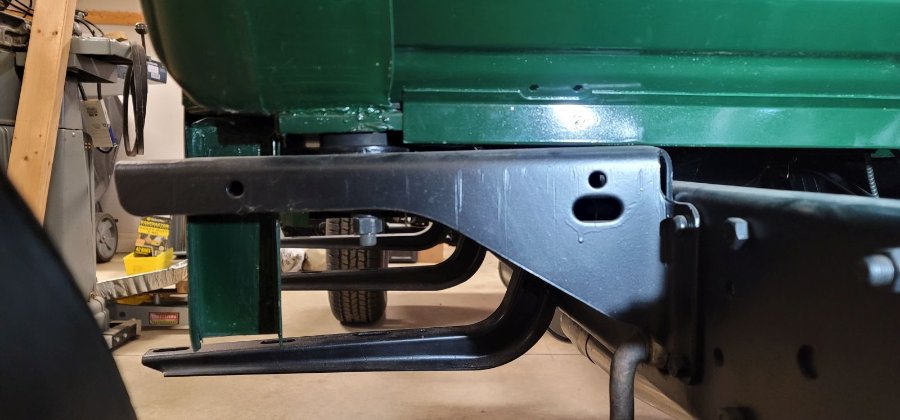
This morning I fabricated two spacers for the front cab mounts. I didn't capture any pictures but they were 2-1/2" in diameter and 5/16" thick. You can see the final results in the pictures below. All four corners of the cab are now tightened down. Passenger side: Pedal linkage clearance. Clearance worked out to about 5/16" at the throttle arm closest approach to the toe board. Drivers side: The gaps between the cab and the frame support arms is just slightly over 1/4" on each side. The throttle linkage works nice and smooth now. I plan on replacing the temporary wire inside the distributor with a proper replacement. After that I plan to go for another engine start to see if I can get the idle down. In looking through the manual I haven't found what the idle speed is supposed to be. Would someone clue me in as to what the idle rpm should be?
-
51 B3B build thread - after all these years
bkahler replied to bkahler's topic in Mopar Flathead Truck Forum
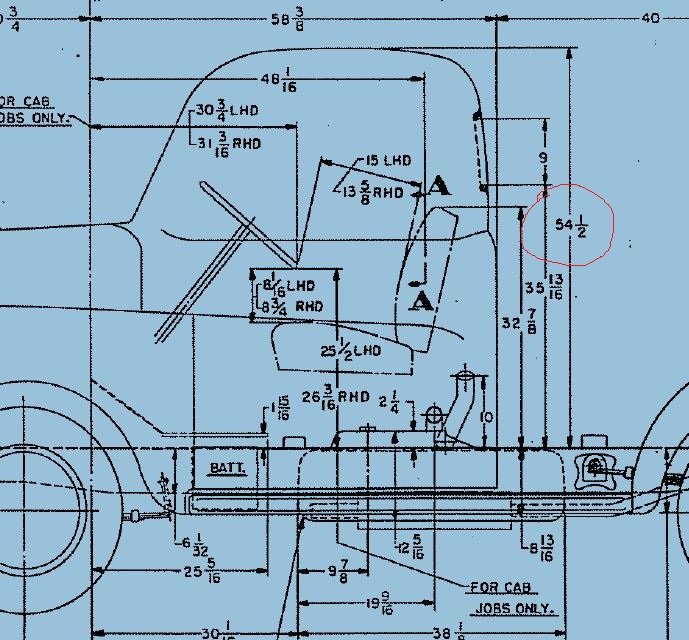
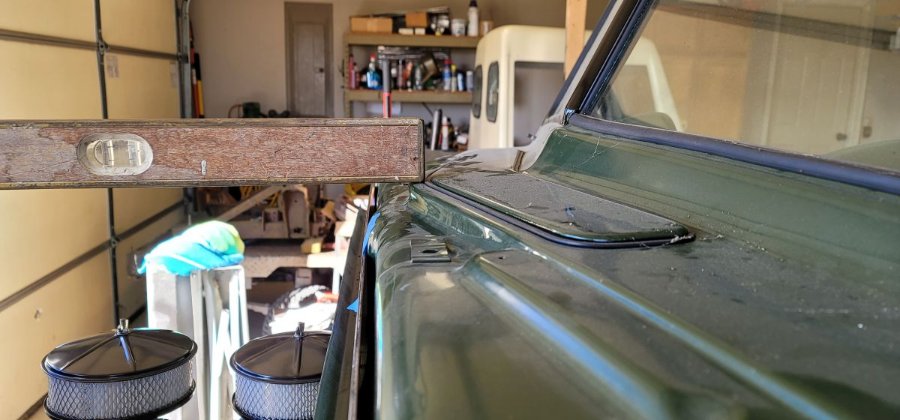
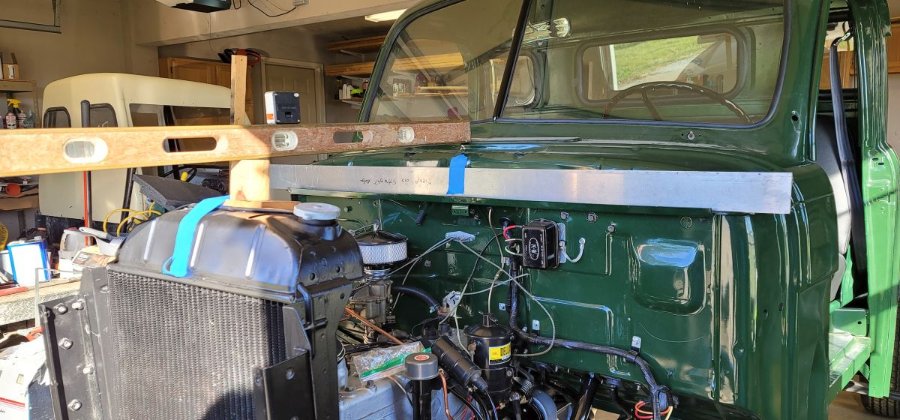
I've been taking some measurements comparing the cab position to the top of the frame and now I have questions Looking at this first drawing, the dimension I have circled in red 54-1/2" is the first number I established. I used a digital angle finder to find a flat plane along the top of the frame relative to how it's sitting and zeroed it out. I then set a long horizontal straight edge on the roof and a straight edge on the frame rails side to side along the back of the cab. The straight edge on top of the cab is pointing to the rear and using the angle finder I got the straight edge to run parallel to the frame. I then measured from the bottom of the straight edge on the frame to the bottom of the straight edge on top of the cab. I came up with 54-9/16". I'd say that's pretty close to spot on. In this next picture there is a dimension of 30-3/4" at the front center of the cowl at what appears to be the very tip just in front of the air vent. That's my best guess anyway. Setting up to measure this one was a little trickier. I set the level to match the zero angle that I used for the frame at the rear. By ensuring the level matched that angle any dimension measured from the frame should be in the same reference as the 54-9/16" measurement I obtained earlier. I then measured from the top of the frame to the top of the aluminum bar and then from the top of the aluminum bar to the bottom of the level. That measurement was 30-1/4". That's telling me I need to raise the front of the cab by 1/2" to bring it up to what the drawing dimension of 30-3/4". My gut feeling is this would be to much. In the picture above I circled a 1-7/8" dimension that is supposed to be from the top of the frame to some point around the zero line of the cab. My problem is I can't seem to figure out where the point on the cab is being referenced at. I'm open to suggestion on what it might be. In the mean time I am going to try to slowly jack up the front of the cab to see what happens when I try to reach the 30-3/4" dimension.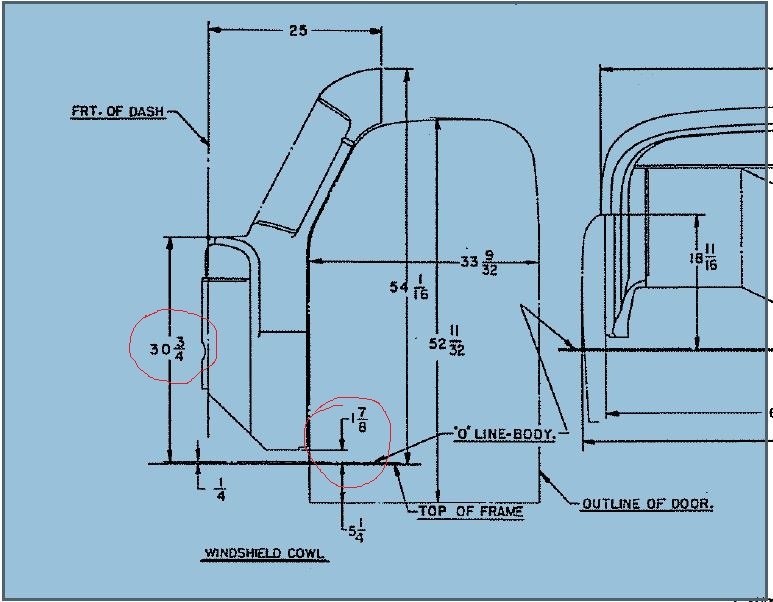
-
A few long nights and a few beers ought to do it....
-
Wow, I know that feeling real well!
-
51 B3B build thread - after all these years
bkahler replied to bkahler's topic in Mopar Flathead Truck Forum
Based on current measurements I'll likely end up with around 5/32" of clearance, possibly a little more. All mounts, engine and cab are new. I do have dual springs installed, the original main spring that runs under the cab toe board and one on each carburetor.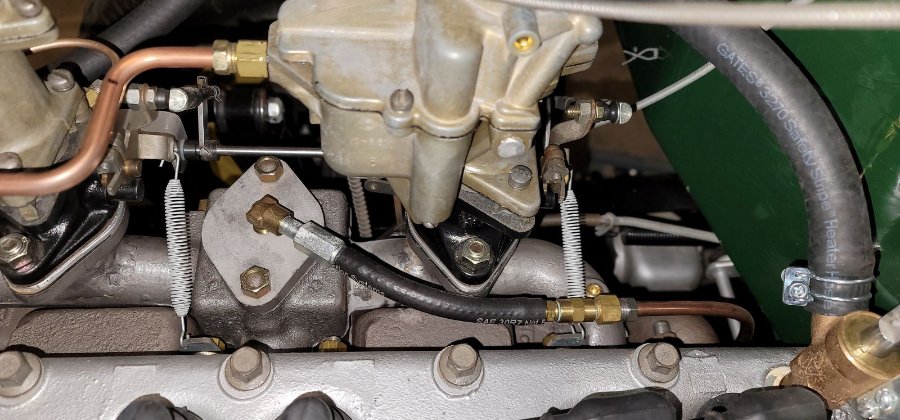
-
51 B3B build thread - after all these years
bkahler replied to bkahler's topic in Mopar Flathead Truck Forum
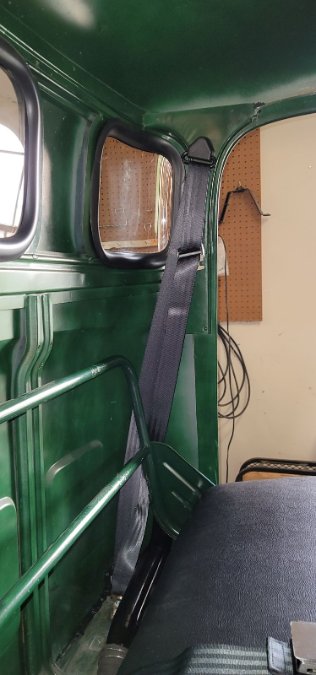
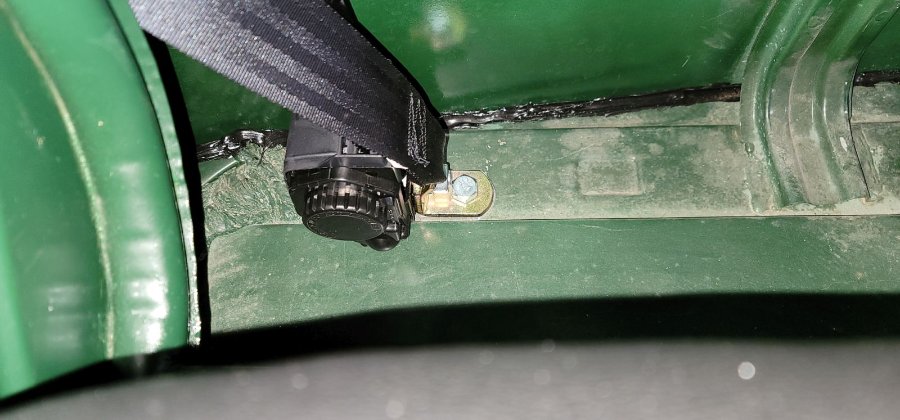
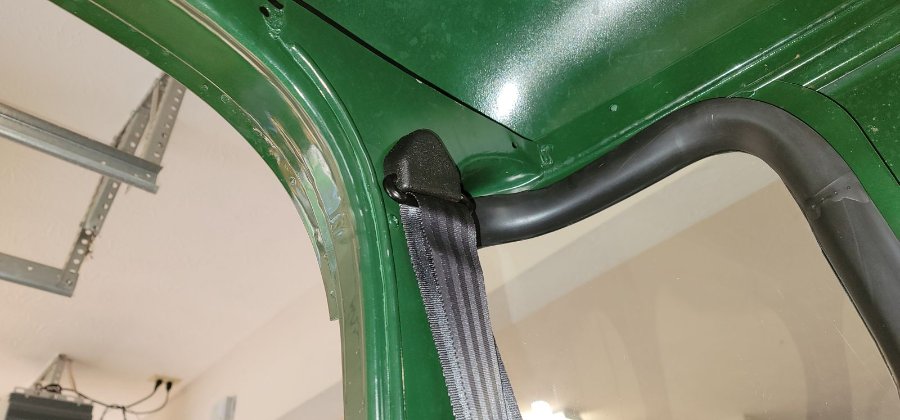
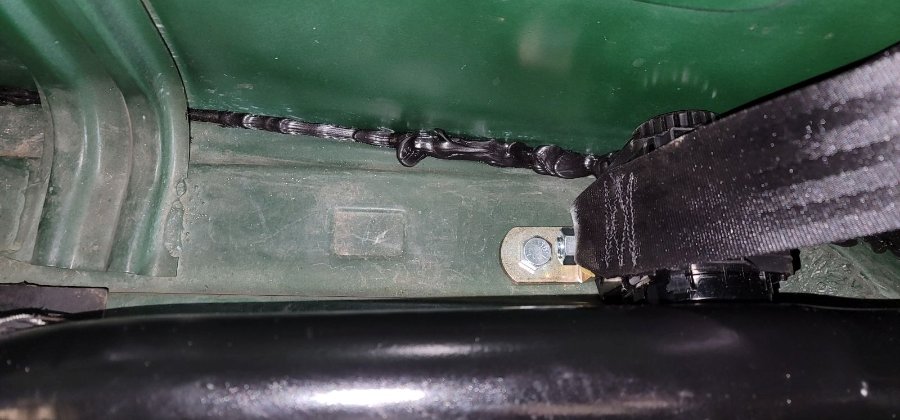
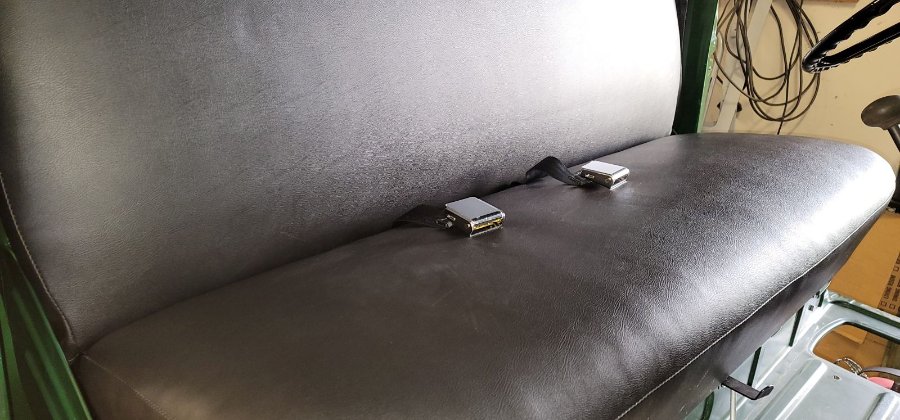
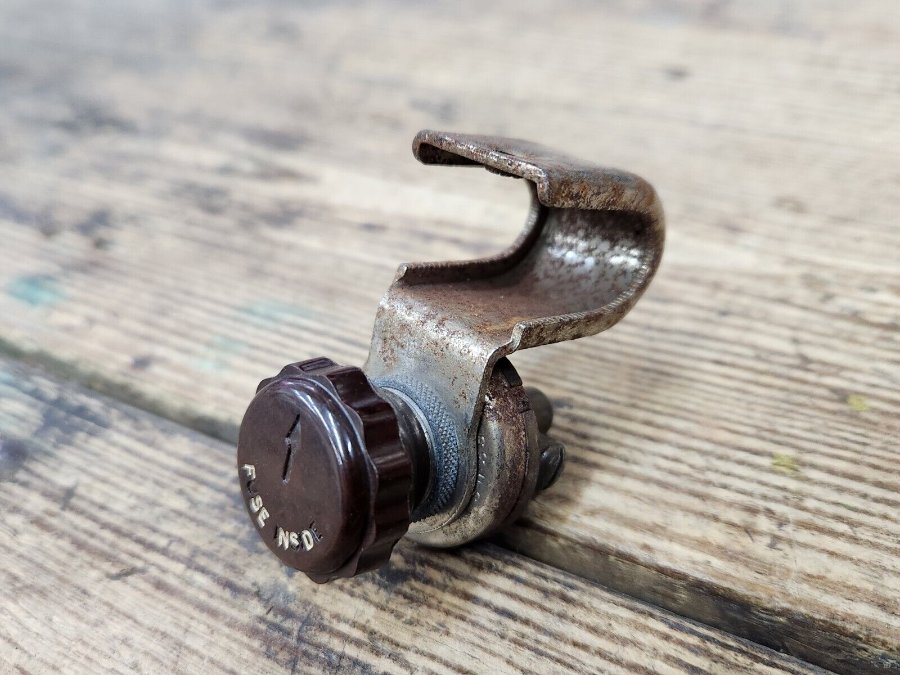
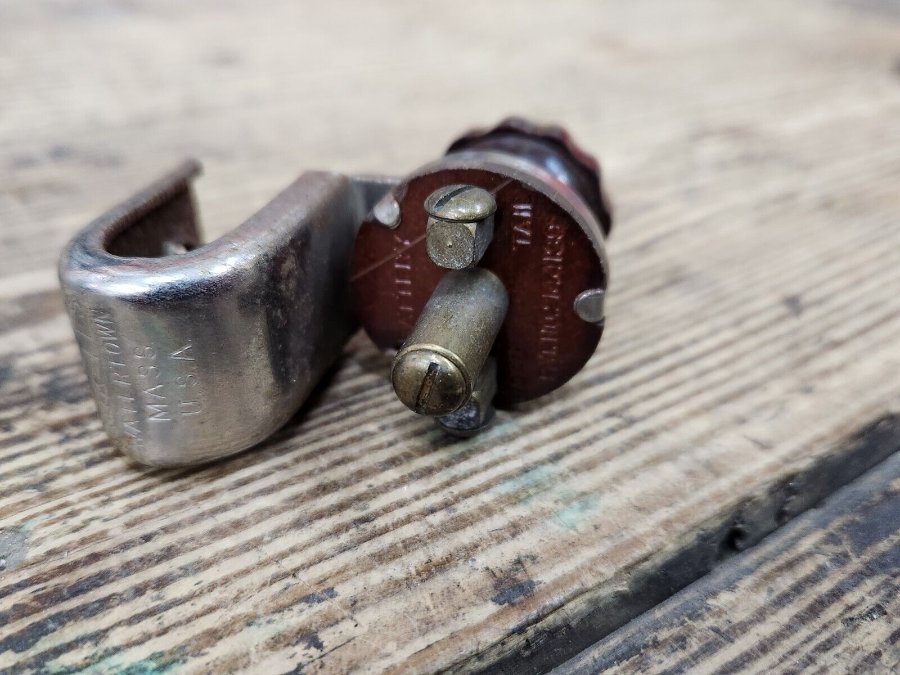
Here's a weekend update. I did an inspection of the engine looking for any signs of leaks and found one, the rear valve cover is weeping oil at the lower left corner. Not sure what's up with that but I'll take a peak at it sometime this week. I finished adjusting the parking brake and connected the pull handle cable. Seems to hold the truck from moving just fine. I still need to install a return spring on the lower pull lever and will do so once I source a spring. I found a nice 2-1/2" x 12 piece of steel round bar that I'll use to make the shims for the cab mounts. I've started taking preliminary measurements but I'm finding it rather difficult to determine where to take measurements from. Right now it looks like I need to raise the drivers front 5/16" and the passenger front 3/8". I haven't really come up with numbers for the rear mounts yet. I figured I would wait until the fronts are installed and then lift the rear to see what looked right. I've been looking for a switch to use as a shutoff for the electric fuel pump so I don't have to let it run all the time. This is what I found. It's period correct and I think it will look just fine attached to the bottom of the dash. I'll dismantle the switch and soak it in Evaporust and then re-assemble. I worked my way through installing the 3-point seat belts. I'm pleased with how they look and appreciate other forum members having posted their installations previously. It's great to have reference pictures for tasks like this. Brad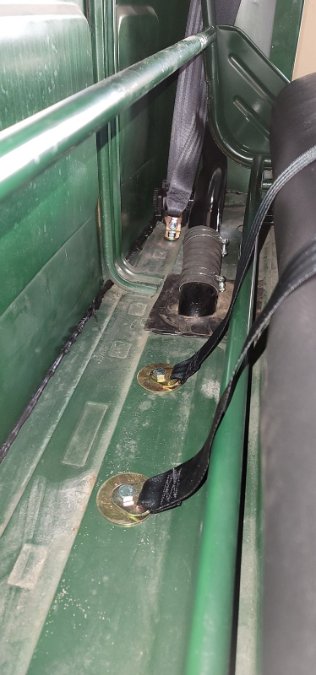
-
I guess that would depend on the shade of sunglasses you're wearing
-
Maybe it was supposed to be brown originally?
-
Several have mentioned bolting the fenders to the front grille and then installing (doghouse). Since I have a gantry crane the process of installing the doghouse would likely be greatly simplified. Special tooling as in alignment jigs? That would make sense. Yep, figured finger tight would be the most logical approach. As long as I don't forget to go back and tighten them later
-
51 B3B build thread - after all these years
bkahler replied to bkahler's topic in Mopar Flathead Truck Forum
It appears this issue is not uncommon for our aging trucks. I'd hate to be driving down the road, hit a bad bump and have the cab settle a little lower. Engine could definitely accelerate out of control -
51 B3B build thread - after all these years
bkahler replied to bkahler's topic in Mopar Flathead Truck Forum
1/4" seems like a reasonable amount of clearance. -
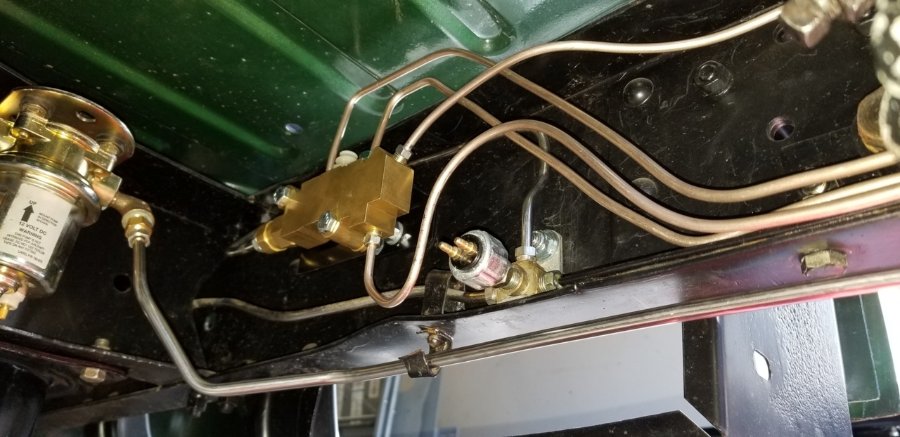
What type of threads are in the T you installed? They make brake line switches with 1/8n NPT threads, and I think they also brake switches with inverted flare threads. Here's a picture of my installation.
-
Yeah, the evidence seems to fit that hypothesis
-
Leaving the rear fenders off would certainly make it easier to fit the running boards. Hanging the doors empty (which seems to be the consensus) would allow me to hang the doors now and means I would have doors AND seat belts to keep me in the cab
-
David, you are 100% correct about what works for one doesn't always work for another. Once the cab is squared away, I'll start with the doors and once done I'll look at the suggestions and see which one makes the most sense based on what I kind of help I have on hand. It could also come down to finding out I don't have the right bolts, or gaskets, or who knows what so rather than stopping I take a different approach so I can keep moving forward. I think the interesting thing is each response has been remarkably similar with what I would consider small details differing. It would be really interesting to know what sequence Dodge used when building these trucks.
-
I have no real definitive answer to that question By design it looks like something should have been there. Dodge apparently have used pedal seals in some of their vehicles and the fact that vendors actually sell a piece that is shaped to fit the opening seems to indicate it should have been there. I'm wondering if Dodge originally intentions of installing a seal but possibly changed their mind due to cost.
-
51 B3B build thread - after all these years
bkahler replied to bkahler's topic in Mopar Flathead Truck Forum
That would be handy if you could do so, thanks! -
51 B3B build thread - after all these years
bkahler replied to bkahler's topic in Mopar Flathead Truck Forum
Merle, that's a good idea and thanks for the tip. I just happen to have a can of dry lube on the shelf. -
51 B3B build thread - after all these years
bkahler replied to bkahler's topic in Mopar Flathead Truck Forum
All motor mounts are new. My guess is the original motor mounts AND rubber cab mounts probably all collapsed at the same rate over the years which is why the throttle issue was not present when I first got the truck. I'm hoping by the time I'm done everything is back in its properly design location. Of course, the odds of that happening are slim, but I can try -
51 B3B build thread - after all these years
bkahler replied to bkahler's topic in Mopar Flathead Truck Forum
My thoughts on the clearance issue are pretty straight forward. I checked the thickness of the new rubber donuts and found the new ones are a little thicker than the original donuts. That measurement was taken while the new ones were still clamped in place by the cab mounting bolts. At this point the only variable would be the amount of sag in the frame support arms for each corner of the cab. My plan is to calculate the amount that each frame support arm has sagged and fabricate a spacer to make up that difference. In theory once those spacers are installed the cab should be really close (or slightly higher) than the original design height. Off hand, I can't think of a reason why this process wouldn't work. I'd like to get this work done before any other sheet metal is installed so I have a fixed foundation to build on. Since I can't drive the truck without the throttle working properly and I can't get the throttle working properly until the cab is raised, guess what I'll be working on next -
51 B3B build thread - after all these years
bkahler replied to bkahler's topic in Mopar Flathead Truck Forum
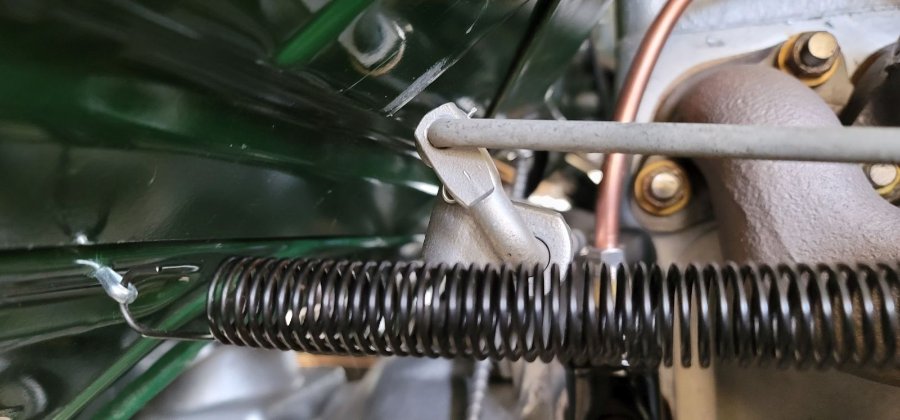
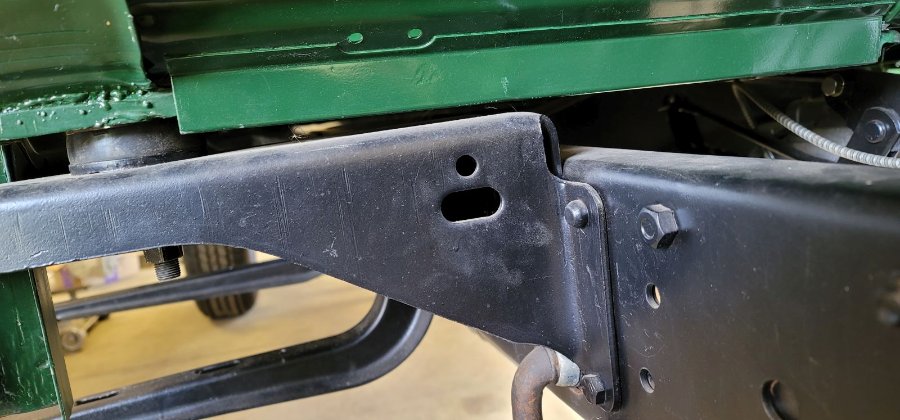
Dave, you hit the nail on the head with your body mount comment. I only looked at the two front mounts and they are both sagging. The drivers side looks to be about 3/16" low and the passenger side is about 5/16" low. You can see in the pictures below just how bad the sagging is. Last night I loosened all of the cab mounting bolts and there was very little change in cab height. The pedal arm still slightly rubbed the bottom of the toe board. I'm sure the added weight of the seats now being in the cab aren't helping anything either. Drivers side: Passenger size: The passenger side cab sheet metal is actually touching the frame support arm causing a slight crease. I compared the old rubber mounts to the originals and the new ones are the same height or slightly taller. I will be sticking with the new rubber mounts. I think my plan of attack will be to determine just how much sag is present in each corner and machine spacers equal to the amount of sag in each corner. In theory this should raise the cab back to it's original height. I would assume this would also level out the cab properly. Adding the spacers should also eliminate any issue with the throttle linkage hitting the toe board. It seems like I take two steps forward on this truck and then one step back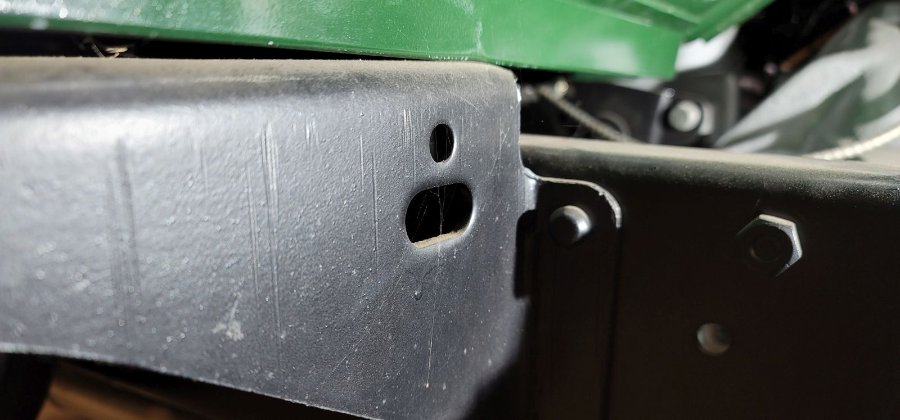
-
Thanks for the links. I'm going to contact one of those vendors and ask for dimensions. If they are close, I might just order one to see how well it will fit.
-
Ok, it sounds like the order of assembly should be something like the following: Doors Fenders Front nose/grille Doghouse (I'm assuming the doghouse is the center section of the hood) Hood panels Inner fenders Front bumper Bed assembly Running boards? Based on lots of pictures I've seen over the years and todays comments I plan on assembling the bed first and then using the gantry crane to lift it up. The truck would then be positioned under the bed and the bed lowered into place. This brings up the question as to what point in the sequence should the running boards be installed, before the bed is lowered down or after the bed is in place? I will have help assembling all of the panels. If I tried to do this all myself then I would just have to pay for another paint job As for the doors, would it be better to assemble the innards with the doors laying on a work surface or after the doors are hung onto the cab?
-
51 B3B build thread - after all these years
bkahler replied to bkahler's topic in Mopar Flathead Truck Forum
The pivot point is definitely under the toe board (angled portion). I spent a lot of time looking at that pivot point when I was fabricating the linkage. Clearance definitely wasn't an issue at the time. Now that the cab is bolted down the arm is hitting. At this point I'm just guessing but my thinking is the rubber collapsed or squished down, possibly due to the rubber not being the same durometer as the original rubber. The new ones may also be shorter than the originals to begin with. Tonight (or real soon now!) I will loosen the cab bolts and see if the issue goes away. Mark, since you've been doing cab work on your truck, can you tell me whether or not the cab sits parallel to the frame? I'm assuming it does which would make it a lot easier to create spacers to raise it to the required height. Los, I'd really not like to mess with the linkage. Other than cleaning it, it's in the same condition it was when it came off the truck years ago. I'll know more this evening.
