


TodFitch
-
Posts
6,309 -
Joined
-
Last visited
-
Days Won
33
Content Type
Links Directory
Profiles
Articles
Forums
Downloads
Store
Gallery
Blogs
Events
Everything posted by TodFitch
-
My wife has been selling things on Etsy. In general shipping by USPS hasn’t been too bad. But there was one package that sat in a post office in Indiana for 5 weeks before being delivered. My wife sends the tracking numbers to the buyers so they can see where the package is too. I am guessing that is why that customer did not complain to Etsy about my wife’s shipping practices. Anyway, regardless of the “normal” USPS delivery times, there can be some really big exceptions.
-
I was under the impression that GM brands varied on being positive or negative ground. I vaguely recall Buick being positive ground in the 1920s or 30s. But am pretty sure Chevrolet was negative ground, at least in the late 1930s. This from memories from decades ago when I helped some people with cars other than Mopar. But my memory could be wrong. And my personal library is pretty limited on things other than Plymouth. The only thing that shows this in my library is my Chilton’s Auto Repair Guide for 1940-53 where the information on voltage regulator specifications shows system polarity. Buick - 1940 through 53, negative ground. Cadillac - 1940 through 42, positive ground. 1946 through 53, negative ground. Chevrolet - 1940 through 53, negative ground. Oldsmobile - 1940 through 53, negative ground. Pontiac - 1940 through 53, negative ground. So at least one GM make used positive ground before the war. I am guessing that my memory of the 1920s Buick being positive ground is correct and that they changed in the 1930s. Interesting to note that the remaining independent makes (Hudson, Kaiser-J, Nash, Packard, Studebaker, Willys, etc.) all seemed to be positive ground.
-
That is probably an AirTex 587 which you can still get new. Here are some listings: https://www.summitracing.com/parts/atx-587 https://www.amazon.com/Airtex-587-Mechanical-Fuel-Pump/dp/B0027ICTHA https://www.ebay.com/itm/Mechanical-Fuel-Pump-Airtex-587-/303797459872 Might even be this one with the picture upside down: https://www.napaonline.com/en/p/CFPB0013P And Then N Now may well have a rebuild kit for less than the retail prices for the above. Fuel pumps are easy to rebuild and given the quality of things, I'd probably trust one I'd rebuilt myself using Then N Now's parts over a new one.
-
That is not the original pump. Similar, but not exactly the same. There is often some numbers stamped on the top of the mounting flange where the pump bolts on to the block. I can't tell from your photo if there is anything there or not. If there is something there it could help identify exactly what the pump is.
-
Then N Now (aka Antique Auto Parts Cellar) is a good company and the rebuild kits come with spring clips that hold the actuating pivot pin in position so it won't walk out (which is a common failure on the current production replacement pumps). There should be some numbers stamped on the existing fuel pump, be sure you send those to to Then N Now so they can supply the correct kit (the pump you have may not be original).
-
I don't think so. The inlet and outlet check valves should see the same flow when gas is pumped by the electric as when the pump itself is doing the work. The spring loaded diaphragm that runs off the cam to pump the gas will be held in the pressurized position. Which actually means there is likely a bit less wear on things like the actuating arm, pivot points, etc.
-
I am considering installing an electric fuel pump back by the tank to cover two situations: Priming the carburetor if the car has been sitting a long while. Quickly recovering from fuel pump vapor lock. I want to run mostly/always on the original mechanical pump so want an electrical pump that would allow the original pump to pull through without too much restriction. I would power it from a momentary contact switch, maybe hidden under the dash. And, of course, it needs to work on a 6v positive ground electrical system. Any recommendations on brand and/or model of pump to look for?
-
Should be a serial number tag on the right front door hinge post. Putting that number into the lookup tool at https://www.ply33.com/Misc/vin should tell you what the car is.
-

Hey! There's no drain plug for the differential on my 48 DeSoto!
TodFitch replied to MarcDeSoto's topic in P15-D24 Forum
Yep. Somewhere, probably in one of my service manuals, I read the way to drain was to remove one of the lower bolts holding the pumpkin on to the axle housing. -
No. With the ignition switch on, simply momentarily touch the end of that red wire you disconnected from the distributor to ground. When you remove the wire from ground the coil should generate a spark. Assuming the end high tension wire from the coil is some place near a ground you should see that spark. Background: The red wire connects to the "points". The points are simply a switch that momentarily grounds the red wire. So by momentarily grounding the red wire itself you are simulating the points. With respect to your ignition switch, you mention one terminal has no wires on it. The unused terminal should have a wire to the gas gauge so that the gauge is powered when the ignition is on. But lets ignore that until you get the ignition sorted.
-
I have used mine a few times. Works pretty nice in situations where you want to be fairly delicate so you don’t want to use a power driver.
-
Agree with @Sniper the 5111 is the modern part number the J11C is the older number. It should work fine in your '34 (its what I am running in my '33). Some folks have had issues with Champion plugs on their newer cars. I tried some AutoLite plugs in mine and was not happy with the result so went back to Champion. Your mileage may vary. With respect to single person trouble shooting the ignition, you can do a lot by yourself under the hood: Disconnect the low tension wire that goes from the coil to the distributor points you should be able to measure battery voltage on that wire when the ignition is on. If you have no voltage you have a problem in the ignition switch, the armored cable to the coil or the coil. If you do have voltage on that wire then disconnect the high tension wire from the coil to the distributor at the distributor and place it close to the engine block. Then momentarily touch the low tension wire to ground. When you remove the low tension wire from ground there should be a spark between the high tension wire and the block. No spark indicates a bad high tension wire or a bad coil. If you have gotten this far then it is time to check the operation of the points. With the low tension wire disconnected, put a continuity tester on the stud where the low tension wire connects, the other end of the tester should be on a good ground. Turn the engine over, the continuity tester should beep each time the points close. If continuous beeping (always grounded) or no beeping (never grounded) then the points are not working properly. If there is a steady stream of beeps from the tester, then the points are working (may not be adjusted properly though). Reconnect the low tension wire and perform the spark test between one of the spark plug wires and the engine head. If no spark then the distributor rotor, distributor cap or spark plug wire is bad. The engine should be statically timed. I do it with a continuity tester between the low tension connection and ground. First crank the engine over to top dead center (TDC) on the #1 cylinder. On the PE the timing mark should be on the vibration damper. On the 1933 models and the 1934 PF it is a mark on the flywheel near the starter, loosen the cover and rotate it back. With the engine at TDC, rotate the distributor until the points just open (continuity tester stops beeping).
-
Not 3,000 pounds, only 2,645 lbs for the heaviest body style in 1933. But still, I get your point. From one bit of 1933 sales literature: And from another: While GM products started getting synchromesh around 1930 starting, I think, with Cadillac, Chrysler was slow to adopt it. The first Plymouth so equipped was in 1935. For 1933 and 34 they tried to rely on the automatic clutch and free wheeling to make shifting as easy as possible. Remember, the high volume competition had mechanical brakes which had the unfortunate tendency to need fairly frequent adjustment to keep the braking action of all wheels the same. So Plymouth brakes were enough better that they could rely on engine braking less. That said, the 1933 DeLuxe Plymouth Six Instruction Book (owner’s manual) does say: For what is it worth, I always have my free wheeling control in the locked out position.
-
I have never seen that part except with an unmolested original coil. I am a little surprised to see a vendor image that actually shows a coil that mounts through the firewall. I'll have to look at their website.
-
There are no vacuum lines to the freewheeling transmission itself. The vacuum lines, if they still exist on the car, go from the intake manifold to a spool valve on the top of the automatic clutch vacuum servo located on the driver side of the engine. I do not know of a supplier of the vacuum lines and they no longer exist on my car. From the photos, the first part of the line from the tab below the carburetor to just above the automatic clutch is metal. I am guessing 3/8 or 1/2 in diameter. From there a short piece of hose connects to the vacuum clutch. I believe that Steele Rubber has a reproduction rubber boot for where the actuating rod comes out of the vacuum clutch.
-
Been a while since I last needed radiator work, but at that time there were still a number of local shops in the area that could do most anything from new core to major repair on the tanks. Have you asked around your local area for a good radiator shop? I personally prefer to give my business to locals if I possibly can even if it costs a little more.
-
5-19-4 are the major adjustment eccentrics/brake shoe pivot bolts which also happen to be the bottom bolts securing the backing plate. I assume you have removed the nuts off the back of those. You can’t put a wrench on the flats to rotate them around to break them free?
-
The 33 and 34 Plymouth blocks are narrower than the 35 and later. I don’t know about before that. There are some references that claim the Plymouth 6 was based on an earlier DeSoto design, so maybe the earlier blocks were narrow too. I think the engine used in the 33and 34 Plymouth and Dodge cars was the first with modern insert bearings and the first with something other than a rope seal and gland nut on the water pump.
-
Yes, 1/4 inch. From memory (might be faulty) all the tubing for fuel, brake, etc. on my '33 is 1/4 inch. The oil line to the filter is smaller than 1/4 and the return to the crankcase is larger than 1/4. The tap off the manifold for the wiper is smaller than 1/4. But by linear feet the vast majority of metal tubing on the car is 1/4 inch.
-
In the 1920s Chrysler used copper for brake tubing. By the time my 1933 was built they had changed to steel. And, at least for the cars I've owned, steel brake lines were standard in American built cars into at least the 1990s. Starting sometime in, I think, the 1980s or 90s a copper-nickel alloy tubing started being used for brake lines. First I heard about it was on European cars. The advantage of the copper-nickel alloy is that it is much more resistant to corrosion. Standard DOT3 brake fluid absorbs moisture so steel brake lines can rust from the inside out as well as the outside in. I think the best to use is the copper-nickel lines specifically manufactured for brake use. If you are going to use DOT5 brake fluid which doesn’t absorb water and you are not driving on salted roads, then steel would be okay. But stay away from the hardware store copper tubing: It will work harden with age and be prone to failure. In addition to not being rated for the working pressure needed, etc.
-
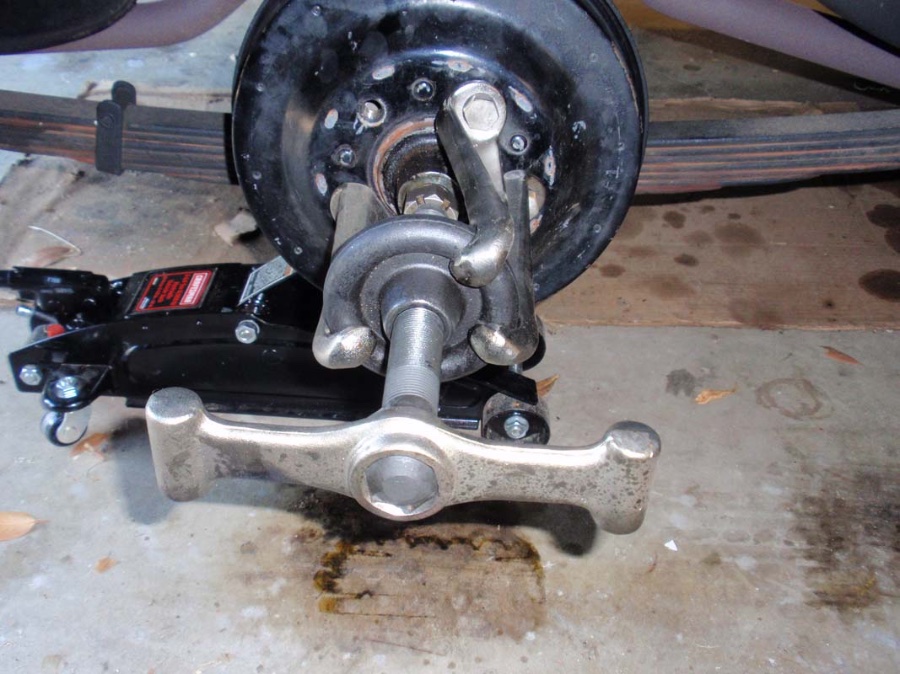
Looks like the puller I use on my '33. But. . . I‘ve heard that some of the new ones are not of the highest quality and can break. If you can find an older American made tool you may want to go for that instead.
-
I don't know what your plans are for the car. If you eventually decide to restore it to show condition then you can get duplicate of original cables from a number of vintage car parts suppliers. If you just want it to be reliable then you can follow the advise of others for getting appropriate cables made up at some place local to you. Unfortunately the one thing you can't really do is get a set at your local auto supply store.
-
The negative terminal on your battery should be connected with a large cable to the switch on the top of the starter. The positive terminal on your battery should be connected with a large diameter cable to one of the bolts holding the cover of your transmission. DO NOT CONNECT THE CABLE ON THE STARTER TO THE ENGINE BLOCK! Especially if the ground cable from the battery to the transmission cover is installed. There should be two wires on the switch on the starter: The big battery cable. A smaller wire going into the wiring harness eventually ending up on one of the studs on the back of the ammeter.
-
@keithb7 Has the description better than your first response: 1. There is no solenoid on the car. Your foot pedal extends the starter pinion gear into the flywheel and then presses on a high current switch mounted on top of the starter to energize the starter. 2. The large cable on the switch mounted on top of the starter is directly from the battery. (This is where I connect a charger if I need to, beats removing the front seat to get at the battery.) 3. The smaller wire connected to the switch feeds power to the rest of the car by going to the hot side of the ammeter. If the starter is not turning over and your battery and battery cable are okay (cable must be a large diameter 6v cable, not a thin cable designed for 12v) then it might be the switch that is mounted on the top of the starter. That is available at your better local auto supply stores. See my parts cross reference listing or follow this link to NAPA.
-
Nylon will cold flow over time if a load is applied. So just sitting there with the weight of the vehicle they will go bad. No way in heck would I ever use nylon king pin bushings. Not a big deal to ream brass bushings and if you can’t do it yourself that should be a very cheap operation at your local machine shop.

