-
Posts
6,895 -
Joined
-
Last visited
-
Days Won
71
Content Type
Links Directory
Profiles
Articles
Forums
Downloads
Store
Gallery
Blogs
Events
Everything posted by JBNeal
-
VINTAGEPIC: spotted this B-series Panel on the FB
-

51 B3B build thread - after all these years
JBNeal replied to bkahler's topic in Mopar Flathead Truck Forum
additional information - inner fender removal From the factory photos that I've seen in Bunn's books and my experience with OEM assembly work, more than likely the assembly line had alignment jigs on the ready at each stage of assembly. We just have to get our single projects done and not truck after truck after truck like they did on the line...so the best approach is to kinda sit the big pieces in place on a best guess, then adjust as needed until we feel it's close enough, then start torquing everything down and hope for the best while checking sheet metal fit. I should clarify that my suggestion is to set the inner fenders in place and maybe start 2 or 3 bolts on the fender ends. If the inner fenders are blocking access to something, they can propped up out of the way without complete removal from the engine compartment. -

51 B3B build thread - after all these years
JBNeal replied to bkahler's topic in Mopar Flathead Truck Forum
I vote for getting them inner fender parts in place before tightening everything since you've got a li'l wiggle room now. When them fenders are bolted down, reinstalling them big panels requires some finagling, some scraping, and some colorful phraseology 💥 -
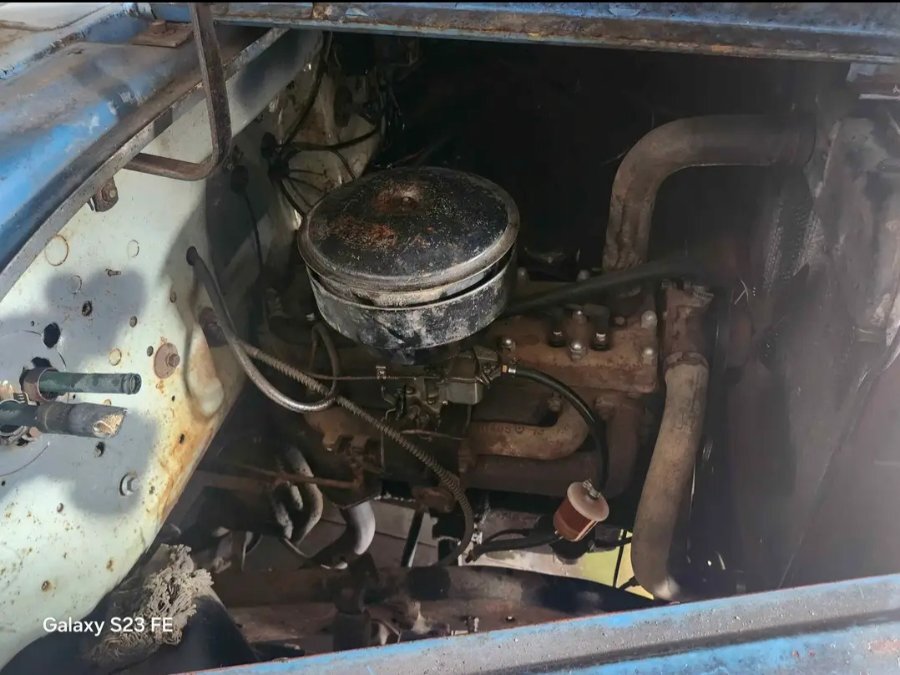
I found the FB listing in question and this picture has some details worth expanding upon. Original color probably is that white hue on the firewall...if the back of the glovebox door is the same color, then more than likely that was the original paint. The heater core appears to be aftermarket and the hacked appearance of installation and disuse is not a good thing...it's not a deal breaker as it's peripheral to the engine and can be addressed. That carburetor looks cleaner than anything in the engine compartment, so maybe that's recent. The head bolts have been changed to studs with chrome cap acorn nuts, maybe the engine has been gone through, maybe not. The missing rad.cap bothers me, that's easy enough to replace but that chore has been neglected. That plastic fuel filter dangling in proximity to the exhaust manifold really bothers me, kinda tells me the engine has been re-fired after years of being dormant and the owner has lost interest and needs to pay bills before January...who knows what jive he's pushing to unload this beast. The engine number is stamped on the block, and casting dates can be found on the block and head, directly above and below the distributor. A build card would need to be procured to determine if the engine was original to the truck...a shortcut might be that if the truck title number and flathead engine number are the same, then maybe that flathead is original. Modern VINs didn't appear until nearly two decades after this truck was manufactured, so the engine number was used on many titling documents...which can be a problem as back in the day there was a legitimate business in engine rebuilding and replacement to maintain vehicles longer rather than buying new vehicles. These flathead engines from 1951 onwards were basically the same, with changes in compression achieved by head machining. Parts availability should not be an issue though more expensive than blue oval or gm of that era as Dodge accounted for something like 10% of the truck market back then, so Dodges are rare compared to them. The side-mounted spare was not a factory option until 1957 or so, definitely not on a C-1, but there were aftermarket kits available as well as many homemade versions found in the wild. That spare was originally underslung of the bed, out of the way. This truck looks to be a good candidate for restoration, but missing pieces, quick (sloppy) mods and its deteriorated condition are not causing me to drool over it. If there's no title available right now, I would be even less interested. If'n ya showed up with a trailer and 3k in unmarked bills in a paper bag, maybe that could close a deal, but more than 5k price tag is a deal that I'd pass on...these guys want top dollar from somebody who is running on emotion and don't like to haggle with someone armed with knowledge. I like to save a relic from the past from an unfortunate fate, but I don't wanna end up in the poor house reviving a basketcase
-
I took apart the steering gearbox in my '49, cleaned and inspected the parts before reassembly, did the correct adjustments, replaced the output shaft seal, then filled the steering gearbox with John Deere corn head grease...that took out the slop and ain't leaked at all since.
-
My '49 was sidelined for awhile due to a non-start issue...I followed the circuits, and figured out that the original wire that ran from the coil to distributor had corroded so badly inside the rotten cotton-braided insulation that not enough current was flowing to the distributor...after I replaced that few inches of wire, it started right up. 🏆
-
I recall the C-1-B rims should have the 5 x 4.5 bolt pattern...fwiw, that side mounted spare rim is not original either, kinda looks like the spare rim I had on the 92 Dakota. The big problem with the C-series was its limited run: C-1 debuted for 1954, with a brief run into 1955; then C-3 debuted in mid-'55 with many running changes, the most notable being the cab + doors going with a more forward look, and ran into 1956. By 1957, the sheet metal forward of the cab completely changed. So the grille + front fenders for the C-1 and C-3 are interchangeable, but the cabs and doors are not. The C-3 cab was used in small trucks until the end of 1960, and in large trucks until the end of 1975. So in some regards, the C-1 was a one-year only production run...that can make parts scarce and repairs expensive. As for steering and braking, the B-series and C-series were very similar. I do not have a factory parts manual to verify all part numbers, but there were quite a few items from the B-4 that carried over to the C-1, as well as C-1 items carrying over to the C-3 and beyond in compatibility, most notably powertrain and suspension parts. The big change for C-1 steering was moving the gearbox outside the frame rails, as the frame was made more narrow at the front axle to decrease turning radius. From a cursory review, this changed the B-4 steering gearbox casting, but the internals were unchanged or slightly modified.
-
additional information - optional heater control locations
-
I do not see the extra switch dangling in that picture, but I see a glass fuse that I know was not factory installed, so who knows what's going on back there...sounds like ya need to trace some wires to confirm functionality.
-
the skeptical crowd observing a helicopter engine being shoved up into a Tucker
-
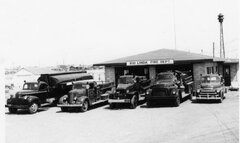
VINTAGEPIC: spotted this W-series tanker and B-1or2 runner at the firehouse on the FB
-

Bad brake master cylinder lead to brake switch not working?
JBNeal replied to dsapern's topic in P15-D24 Forum
Sounds like you have located where to tap in with the pressure gauge...if switch is good and brakes work then MC has a problem; if switch is good and brakes do not work, then brake lights are the least of your problems. -
VINTAGEPIC: spotted this Power Wagon wrecker on the FB
-

New B-3-B owner with some basic questions
JBNeal replied to ktb's topic in Mopar Flathead Truck Forum
JEEBUS at this point I recommend changing your strategy, cuz that engine has an internal problem that has been touched on by others with too much crud binding up the mechanism. I have rebuilt 2 flatheads without removing the engines, including replacing valve guides. One truck I managed to do this without removing the dog house, just the hood and inner fenders. As it was pointed out to me by old timer mechanics who have been long gone, local service stations could rebuild engines without removal as most vehicles built into the early 60s could be worked on without a lift or engine hoist. These buggies had not been parked for decades, so all they typically needed were a ring job, valves ground and new guides, and a seal kit. If ya cannot turn the ring gear, then surgery is required to determine what's binding before doing some damage. Pulling the head and valve covers for sure, even the oil pan needs to come out cuz if that crank is crusty, it ain't gonna matter what's soaking the piston rings loose. One of those flatheads that I rebuilt, drove that thing for 15yrs and then it started having what I think was a partially spun bearing due to a worn crankshaft that needed attention. At the same time, I was flooded with work and chores and helping out the elderly neighbors with increasing mobility issues; 5yrs went by, I went to turn that ring gear on the engine that ran when parked, and it was a no-go...even sitting closed up with oil on every surface needed, it jammed up. So it's on the overhaul list again, hopefully it'll just need crankshaft service and oversized bearings to rectify its problem, as it ran well and never smoked or leaked. -
I've had this discussion with quite a few gearheads about being thrifty...there are some things where the premium price is paid for peace of mind; otherwise, every time that machine is operated is a roll of the dice as to when failure will occur...choose wisely
-
US Radiator has a few Dodge Truck options to consider.
-
@Merle Coggins from what I can tell, there were 2 starters for B-1s divided by engine #, and 2 starters for B-2s divided by engine #...all of those starters have been superceded by the starter listed as those previous starter assemblies were no longer available when that parts manual was printed in 1954. Individual parts, such as the different yokes, were still available, listed on the next page...whether they were on eternal backorder or also superceded is academic I reckon.
-
If your goal is to remove the engine and you have the radiator removed, the transmission input shaft can be partially retracted, then lift the engine off its motor mounts, move it forward and tilt the front of the engine a bit. The transmission input shaft should be able to be finagled out with this gravity assist once the powertrain is angled back.
-
counting neckties on the Tucker assembly line


