

40plyrod
-
Posts
869 -
Joined
-
Last visited
-
Days Won
4
Content Type
Links Directory
Profiles
Articles
Forums
Downloads
Store
Gallery
Blogs
Events
Everything posted by 40plyrod
-
 I like it. It would be good for blowing the cobwebs out from between the ears on certain days.
 -
Father/Son project... Going to pick up the Coupe!
40plyrod replied to coletrain777's topic in P15-D24 Forum
Looks like a great project made even better by being able to spent time with your kid to build it. It should turn out well by the looks of your other projects. I'm looking forward to following along. -
That's pretty cool. thank you
-
Beautiful picture using it as a screen saver too.
-
Just had to share and say thank you to forum member Lakota169
40plyrod replied to 1940plymouth's topic in P15-D24 Forum
Good job. Was it done using a photoshop type program? -
Robert, Thanks for posting the pics. I had one of your pictures from a different thread printed and taped to the frame during my install to use as reference. Everything clears now and I just have to route the lines. Did you use any porportioner valve or residual pressure valves?
-
Chemainus, B.C.
-
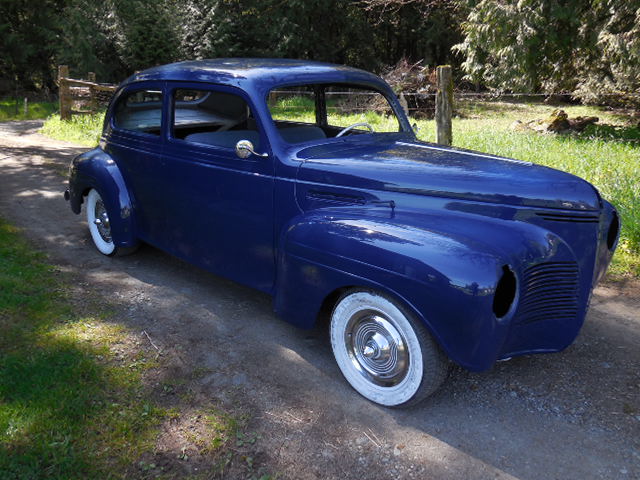
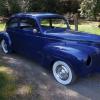
I have finally found my way around the new forum enough to start posting progress of my build again. The little break I took from working on it in December and early January help to renew my enthusiasm. I have now installed a t5 out of an s10 using a kit from Paul Curtis. The kit installed pretty easily and came with a new clutch disc. I also painted the motor and swapped out the pedal start starter for a key start starter. I was told that the starter would bolt right in but I had to relieve an area out of the nose part of the starter as well as redrill the dowel pin hole so I could rotate the starter body 180 to keep the electrical terminal from touching the block. Anyone have any info on starters or have experience with this? I have also split my exhaust manifold for dual exhaust. The manifold was much more difficult to weld than I had imagined, it also had spider web like cracks on the backside for the first port. Maybe from heat cycling? I ended up having to braze those. Next step will be the intake though I'm not sure what I'm going to do there yet.
-
Too bad you can't keep them all. That deuce is really pretty, but after seeing your cars I'd sure love to see what you could do with the 40 sedan.
-
Oops, sorry my mistake. I remember that now.
-
I think that belongs to moose here on the forum.
-
The T5 out of an S10 is probably what your looking for. Search transmission swap on here and google there is lots of info on them. Paul curtis makes an adapter for the swap, that how I did mine. Good luck
-
Beautiful!
-
Having the same problem as well. Also not sure if this has been answered already and I've missed it but I can't seem to find the photo albums I had on the old board.
-
As with anything new it will take a bit of getting used to but I think it looks great. Great forum and great people on it. Life's good.
-
You built a very nice car.
-
Not noticing it much quicker here, but didn't notice it was slow before.
-
I followed your tarp find to road build. It looked like a nice car. nice to see you've got a new mopar.
-
I just phoned our local part supply yesterday to ask about the availability of a complete gasket set and they told me that they had one sitting on the shelf. Kinda funny though I waited 3 days for a altenator belt for my wifes 05 pt cruiser.
-
There's nothing better than a car with nice door gaps and door that open and close well. Great looking job
-
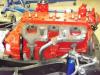
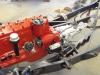
Well the learning curve was pretty steep today. The front suspension is complete so I moved on to dismantling and cleaning the motor. I took lots of pictures for future reference to ease the reassembly, all was going good until it came time to remove the intake and exhaust manifolds. I got all the bolts out without breaking them execpt one exhaust stud. I worked and worked to remove the manifold assembly but couldn't due to the 2 exhaust bolts that go through the manifold being rusted in. So I tried penatrating oil and heat, and still no luck, that's when I found the bolt I missed removing that holds the center intake port. It came off pretty easily after I removed it.
-
I don't think this works for Canadian models. They must have used a different coding system. The number on my 40 plymouth block is H 17 9 and the block ID number is P9C1200. I've checked the other blocks I have in storage and all use a letter plus one or two numbers. I would assume the letter is the year but starting when?
-
Oh no say it isn't so. I was planning a trip with my family this fall but due to circumstances had to postpone it. This is always one of the must stops. Too bad.
-
Looks like you have a pretty nicely balanced car there, cool to be able to check that. I agree not much better than driving them. I may have to move I like your weather much better:D
-
I have finished painting the frame and now moving on to the suspension, but I am having a problem. All the joint bushings on the front suspension seem good and more freely execpt the right side upper bushing where it attaches the upright to the upper control arm. This one is very tight. My question is how does this come apart. There is obviously a eccentric to adjust camber. Which part threads off. I should note that my upper control arm is the cast type. Does anyone have an exploded diagram or can show me the parts disassembled? Thanks


