


andyd
-
Posts
565 -
Joined
-
Last visited
-
Days Won
4
Content Type
Links Directory
Profiles
Articles
Forums
Downloads
Store
Gallery
Blogs
Events
Everything posted by andyd
-
I could be wrong here but generally the old non pressure radiators use a cap that is either deeper or not as deep between the cap and the rubber seal.......can't remember which it is but I'd think that I'd try a cap for an English car from the 30's or 40's....isn't there a radiator shop anywhere close that you could contact..........surely the Pommies can't be that backward that if you say you need a non pressurised cap they should know what you mean..............lol.......andyd
-
I'm no expert but I'd be surprised if the "clunk" on full lock is the kingpins, I'd think more likely its the steering box bearings and/or worm & sector......also as your 1937 plymouth steering box is mounted with a different arangement to the independant front ends from 1939 I'd also check the actual steering box mounting bolts and as it uses a drag link that moves forward & back also check it for any excessive wear or movement...........again I'm no expert so these are purely some ideas I've had sitting here in Oz 12,000 miles away.....lol.........andyd
-
Fatman Fabrications used to make dropped Spindles but AFAIK the business has closed......the stock spindles are to suit both sides however once the lower outer bush is installed then they become "handed" .........the stub axles are also "handed" however the 4 king pin bushes in each new king pin set are installed 2 per stub axle and don't care whether each go top or bottom in the stub axle........as far as lowering the front end is concerned an old trick was to cut 1 coil from the front coil springs........this is not the best way to lower but if going to do this do not use oxy to cut the coil spring....pull the front end apart & at least use a cut off wheel which doesn't heat the spring unduely...........another way to lower the front end is to remove the lower A arms then remove and remount the lower coil spring "pocket" on the low side of the A Arms effectively allowing the A Arm to move higher & therefore "lower" the car height...........and a third way is to install a heavier engine, ie, a V8 of some sort..........lol.............BTW what is the "trunnion" that you refer to?.......welcom aboard from Oztralia...andyd
-
Apart from ensuring that the steering box has some sort of lubricant in it, ideally a proper steering box oil tho' guys on here swear by that "Corn head grease" I'd be checking what air pressure is in the tyres......I'd be running them at around 35psi.......or at least check with a reputable tyre supply place re what pressure the tyres can handle.....andyd
-
Yep that appears to be broke...........unfortunately any Oz ones I have are completely different........a suggestion would be if a drivers door lock is hard to find then try to find a 4dr sedaan rear passenger side door handle assembly.....in "theory" it should be the same tho' the long accuating piece will be different shaped.......andyd
-
Rich, I'm not sure whether the V8 came with a manual trans, however assuming its an auto it will be the Powerflite 2 speed auto, these had the park or emergency brake mounted on the end of the transmission, no "Park" was in the trans......overall suspension should be very similar to what was used in previous mopars tho' I think the front shocks are mounted between the coil springs not separately like up to the early 50's........there were 2 versions of the 270 engine used.......a Red Ram polysphere 270 cube with a 2 barrel Carter and a Super Red Ram Hemi headed 270 cube with a choice of either the 2 barrel Carter or a 4 barrel Carter............sounds like a nice car.......andyd
-
Ed, AFAIK the parking or emergency brake by then should be the internal expanding style which is basically what they had up to the end of that transmission fitted brake.......if it is then you undo the slip joint four bolts onto the brake drum, then using a large pry bar or large screw driver place it between the 4 studs allowing space for a large socket on another pry bar to undo the center nut, then remove the brake drum(having made sure the brake is now "off")..........then you can disassemble the brake parts....there should be a large flat spring steel thing that locks into the centre of the assembly with "arms" that go either side of the assembly to hold the brake shoes.......take this spring thing off and undo the cable adjuster and thats about it.......get the shoes relined and reassemble.............take note of the way the cable adjuster is installed so that the adjusting rachet can be accessed thru the brake backing plate hole........I hope this makes sense........lol...........this is the procedure I've used over the past 50 yrs......lol........andyd
-
Lots of luck with Steele.........andyd
-
I would go to Bernbaums, have delt with them for over 40 years and always a satisfactory result.........Steele Rubber were a PITA, I ordered the correct vent rubber from their catalog and they sent a thing that would not fit and refused to consider that they had made a mistake......so I badmouth them as much as I can........lol............go to Bernbaums............andyd
-
I could be wrong but i've always thought that the Torrington bearing kingpins "bushings" were actually for the larger DeSoto/Chrysler stub axles and that the Dodge/Plymouth size was the bronze(?) bushings........but could be wrong.......andyd
-
The metal casing is in 2 pieces then soldered together....the upper piece, ie has a right angled bend on each side that is pushed into the light reflector.......at least thats what I've found over the years........use a plastic tool or a wide metal spreader to insert between the upholstery remains and the light fitting ends, and you should be able to gently "lever" it up and away from the light reflector.......hopefully........andyd
-
The drain hole I think he refers to is the slot/hole thats in the bottom of the pressed steel clutch inspection cover that is bolted onto the cast iron bellhousing that is used on our 6 cylinder mopars..........thats the only drain hole I know of ........andyd
-
Rear axle vent fitting. Here's a real head scratcher !
andyd replied to Noonan's topic in P15-D24 Forum
Todds reply re the special bolt that holds the brake line junction is correct, I think it was the same bolt used for a number of years. -
Dunno if this might help but an old trick when any sort of radiator stop leak wasn't available was to use black pepper, a couple of tablespoons thrown in the radiator, the pepper acted like a plug to prevent water escaping........dunno how long it lasted but might be worth a try..........andyd
-
Don't think I've a pic of the door/window mechanism.....I built my car before cameras were invented..........well, maybe not that far back but I've had it since 1971, its been a hotrod since 1973............lol.........I may have a spare window with the spring/wedge thing attached will have to check & get back ........this thing as I mentioned is on either end of the window channel and the spring pushes the wedge into a slotted channel that the wedge rides against with a small amount of grease/lubricant to ease its movement............as the Oz assembled/built cars used a lot of "leftover" stuff from previous years, ie, up to 1948 all Oz built mopars had external door hinges, the internal door handles were a completely different type to that used in Nth America and even things like the 1/4 vent windows, while looking the same as US ones, pivoted at a different angle and used different seals..........will see what I can find..........andyd.
-
One piece door glass?......I've not heard of this on a 40's Mopar......so there is no 1/4 vent window?..........do you have a picture showing the door with the window up?.......interested to see this setup, I can't offer much help re the way the window works, although here in Australia the 1940/41 cars which were all based on the Plymouth body shell whilst they all had 1/4 vent windows didn't use any "wheels' as they did in the USA but had channels that a spring/wedge slid against at the front & back of the window edge......I had an ex USA built 1941 RHD Plymouth Coupe, assembled originally in South Africa, imported into Oz in the 1990's with 1/4 windows and will confirm that it did indeed have those diecast wheels at either end of the window channel..........BTW you state your car is a "Club Coupe".........by that do I assume that it has the small folding rear seats?.........my 41 Coupe was also similarly equiped and was what was called an "ASC" or Auxillary Seat Coupe........... being factory RHD with this option it was a fairly rare car..........which I sold like a dope...............lol...............andydo
-
AS mentioned there is NO flange on the axle, although as it "appears" there IS a flange that is rivetted to the brake drum.....this flange is what has the internal taper and keyway that the centre nut holds onto the tapered axle.........so yes there is a flange BUT NO it is NOT like say a late model axle where the flange is part of the axle.......once the falnge & drum is loose it and its brake drum comes off the tapered axle it is separate to the axle.............what the puller is trying to do is pull the flange and its rivetted brake drum away from the tapered axle...............lol.........ain't life fun...........remember wack, tighten, wack, tighten.......discuss its parentage, ie its lack of a mother or father....more wack, more tighten............lol..........andyd
-
This is the puller I have had for 50 yrs....I bought it specifically for the original 1940 Dodge rear brake drums..........it has met other tapered axles over the years but has never met a tapered axle it didn't like....lol.......also its a good idea to closely check the key when the drum comes off.......replacing it if even a slight amount of wear is a good policy ...from memory I think the key is 5/16th , a length of key material is usually sold in 1 foot lengths ...........have fun.......lol....andyd
.jpg.d4234df268ac09885b87038fb2bf3ca4.jpg)
-
Also leaving the centre nut on the axle thgread protects the end of the axle from burring over as the puller is tightened onto the axle......generally you loosen the nut a couple of turns , say maybe 1/8 then tightened the pller, maybe give the centre bolt on the puller a wack, then retighten the bolt, wack again, retighten......etc, maybe leave it to consider its choice...lol..........retighten, wack retighten...........and it should decide that you know best.........lol...........andyd
-
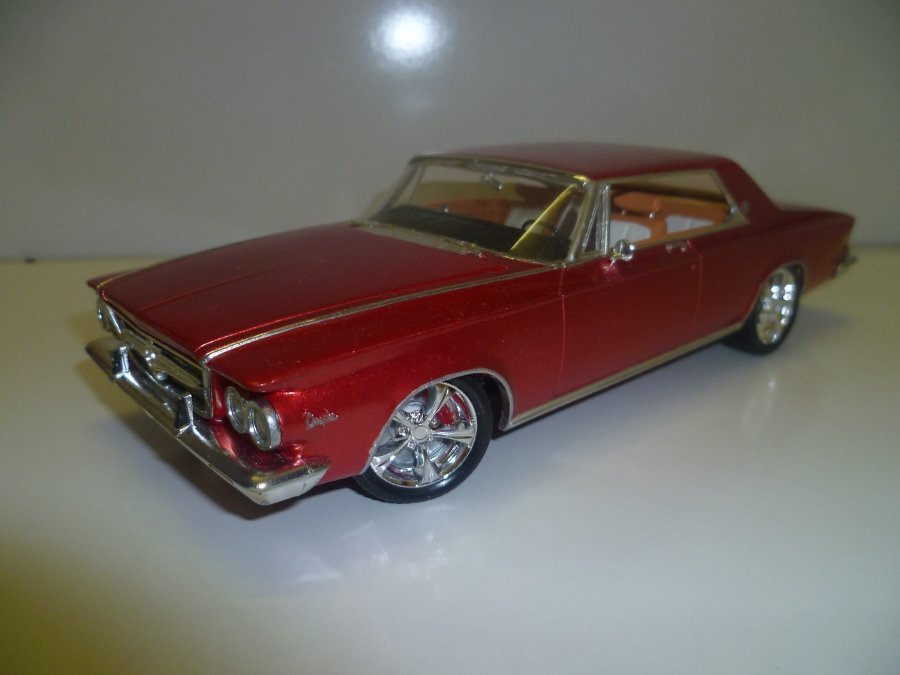
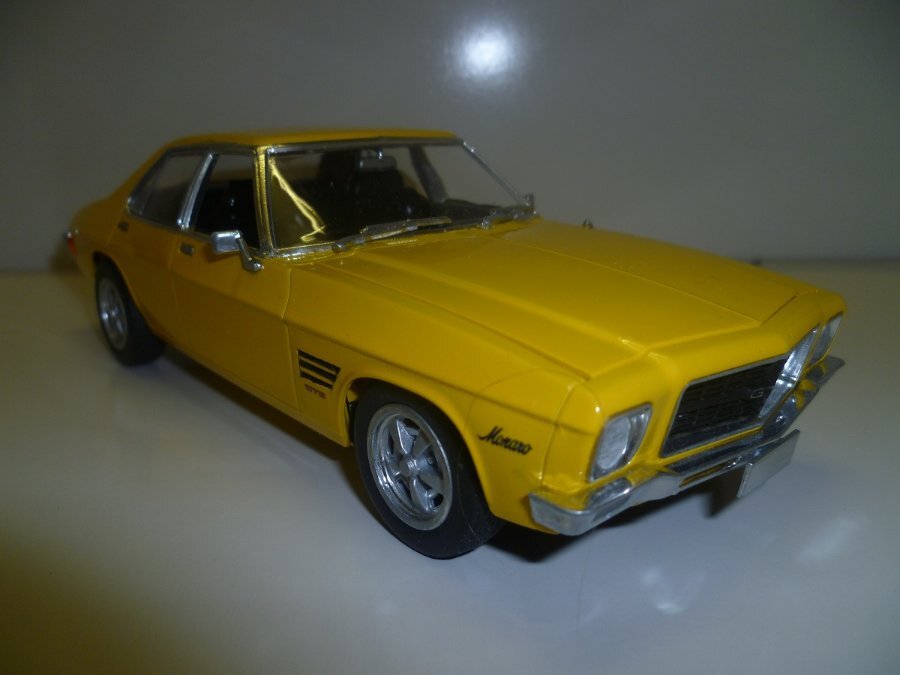
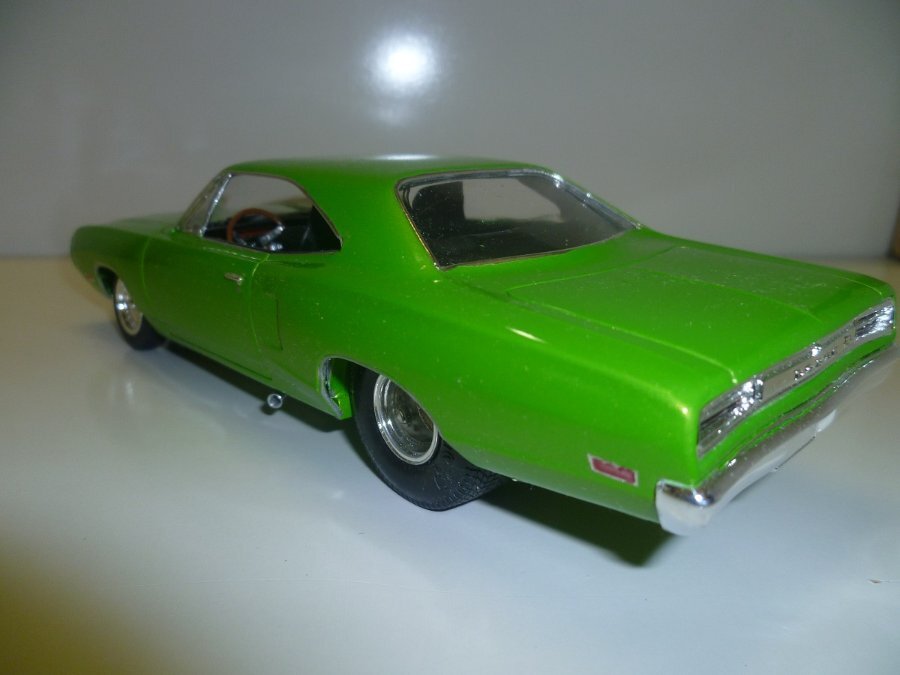
This thread has had some good ideas about the various ways to "chrome" the outside parts like bumpers etc however if you are looking to restore the various small chrome pieces on the dash and various interior items there are a couple of susgestions I can offer as a scale model builder......there are 3 products that while they are not proper chrome plating may help as follows.......for some areas there is a product called Bare Metal Foil which is a very thin aluminium adhesive backed foil that might be suitable for dash strips etc then another product called Alclad11 which is a thin paint which is sprayed over a gloss black enamel.....a gloss black enamel paint is reflective and the "Chrome" version of Alclad11 essentially turns the black into reflective "chrome'......the third product is fairly recent and is called Molotow Chrome Pens...these are availble in 1,2 or 3mm diameter tips and give a brilliant "chrome" like finish........now all these are products that I use in my modelling hobby at various times...........the "chrome" moldings around the windows, and wheel openings on these model cars are either Bare Metal Foil or Molotow Chrome pens......the bumpers and wheels on the red, maroon & green model are the normal model kit chrome parts but all the chrome parts on the yellow car(1972 Holden) are the foil or Molotow pens........ ......anyway this might help for small interior parts.......Andy Douglas

-
david.....that pic shows whats called the "spindle" or "upright".....the king pin should be a close fit in it with the lock pin inseted from one side or the other to lock the kingpin........when installing new kingpins the new kingpin bushes are press fitted into the stub axle from top & bottom then the kingpin bushes are REAMED to suit the diameter of the kingpin.....ensure the bushes are installed with the hole in the side of the bushes aligning with the grease nipple hole in the side of the stub axle..........you state the kingpin won't go thru the spindle hole??.........are you sure you have the correct kingpin set?..........check that the edge of the hole hasn't been worn with a "lip"........if you are referring to the "lockpin" that holds the kingpin it "should" fit from either side but it has a tapered side that locates against the kingpin and holds it in place.............dunno if any of this has been much help...........andyd
-
Hepcat......get a copy of Oz's Street Machine magazine & contact some of the advertisers also places like Rare Spares might be able to suggest somewhere, as FX-EK Holdens use a similar hood closure arrangement.........I can't offer any direct experience as my Oz 40 Dodge has side opening hoods......andyd
-
Ffreeb.......what I meant was that the general proceedure or way in which the cluster attaches to the dash should be similar.......you've certainly got your work cut out for you.....lol.......whats the rest of the car like rust wise?.........andyd
-
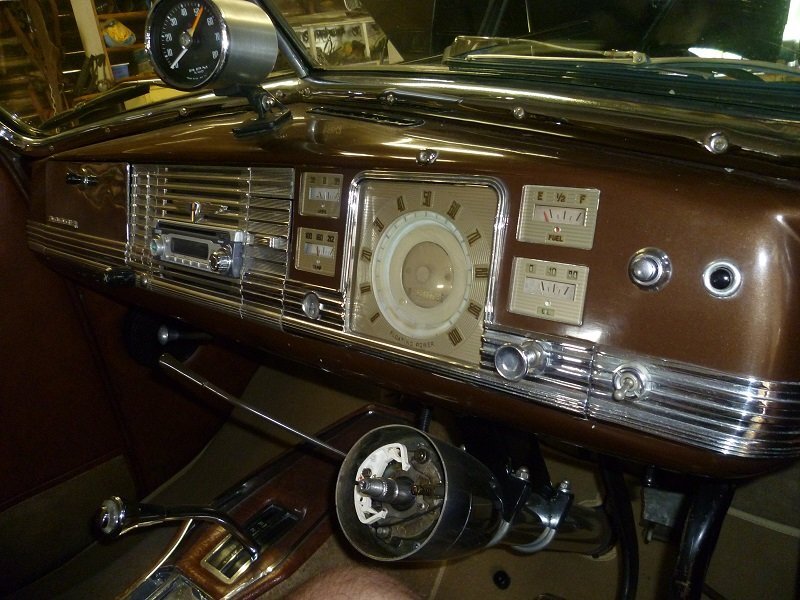
I have not worked on a 1941 Dodge however I've had my 1940 D15 since 1971 and from what I've seen the gauge cluster is basically the same arrangement .......the whole cluster maybe easier to remove than trying to do each gauge individually and as your temp gauge is buggered anyway then thats one less issue to start........lol.........the cluster is its similar in the way it attaches to the dash will have small nuts(3/8 or 7/16th from memory) holding the cluster to the dash......also check the high beam indicator as that "may" have a globe socket that will need to have the globe socket pulled away from the socket and then the socket undone from the piece that the high beam fitting screws into..........if similar to the 1940 then the gauge cluster has a metal piece that fits between the high beam socket........again I can't be certain if the 41 cluster is held in a similar way to the 1940 but it wouldn't surprise me........I've attached a pic of the 1940 dash cluster that may help to explain why I think it maybe similar........regards from Oz......andyd
-
Agreed, clever use of a tool...andyd


