

desoto1939
-
Posts
5,103 -
Joined
-
Last visited
-
Days Won
59
Everything posted by desoto1939
-

Open House at Frank pollack resortation Shop Pottstown PA
desoto1939 replied to desoto1939's topic in P15-D24 Forum
chopt50wgn: I wrote to the 3 dog gargae and then replied back that they do not have any current dates set for any open house date for 2015, but willget back to me when they have the dates set on their calendar. I live near Audubon PA just off of the Oaks exit of 422 and Pa route 363 near Egypt road. Keep in contact with me since we are soo close to each other. Rich HArtung Desoto1939@aol.com -
Car is back together but still won’t start!
desoto1939 replied to perrymedik's topic in P15-D24 Forum
A hand held tach/Dwell tester is what you need to get the readings from the engine. After you get the engine running smoothly then hook up your handheld tach/dwell. Remember that most unit are negative ground and our cars are positive ground. So you might just have to switch the leads to be setup as to how the car is grounded. So If the car is positive ground then the Positive clip goes to the ground onth engine like a heald bolt. The Negative then would go to the power side. The instruction sheet would show you on a typical neg ground set just switch to what you need. Some times you can pick up these units at yard sales or go to an auto shop like NAPA. It does not have to be a real expensive unit. Get one that has the tach/Dwell and alo points check. Rich HArtung Desoto1939@aol.com -
I would think just in the opposite connections. So If you have positive ground thenthe positive clip goes to the ground and the negative goes to the poser source. So when you have a battery charge the positive clip which is the red clip then would go to the ground and the black clip then goes to the power or to the connection that is feeding the battery when charging the battery. Have a negative ground sears timing light. I just switch the clips to be in there respect domain based on the grounding of the car. So red to ground. this red has the positive mark on the clip and this goes to the grounding metal part like the headbolt and the negative which has the minus sign then goes to the power to feed the battery. It works. Rich Hartung desoto1939@aol.com
-
Open House at Frank pollack resortation Shop Pottstown PA
desoto1939 replied to desoto1939's topic in P15-D24 Forum
Bob: Hope you have a great Xmas Holiday season. It is noce to see some of these old restoration shops and how they go about doing ground up rebbuilds. It is also great that you get to talk to the works on a dayoff situation when they have some free time to spend with the visitors instead of having to work on the cars. I know they do not have cheap fees but when you want work done at their caliper then you pay the price. Rich Hartung -
Open House at Frank pollack resortation Shop Pottstown PA
desoto1939 replied to desoto1939's topic in P15-D24 Forum
Pollacks also does upholstery. call and ask for John Shiban 610-323-7108. This guy has alot of experience with the old cars and has been doing upholstery for a long time. Rich Hartung Desoto1939@aol.com -
the D5 is the series for the car. My 1939 Desoto is an S-6 Chrysler used a C Dodge used a D Plymouth used a P Desoto used the S There was a junior 1937 Dodge that used the D6 series Rich Hartung Desoto1939@ao9l.com
-
Does anybody live close to Hellertown, PA 18055
desoto1939 replied to Thomba48's topic in P15-D24 Forum
Thomba48: Did you get anyone to look at the car for you. If not let me know and I could make some time to go look at the car. One thing that the current owner should make arrangements for is to have the car driveable and to be able to put it up on a lift so anyone can look under the car for any rot and other items. This is the only way to really know what is happening on the underside of the car. Rich Hartung Desoto1939@aol.com -
I recently came across a rear gravel guard for a 1939 Desoto. This will fit the Dodge, Chrysler and I also think the 39 Plymouth. This guard goes between the rear bumper and the body. This is in two section that bolt together in the middle. One of the sections was still in the original factory mopar brown paper and the other half was without the paper cover. The 39 guard can only be used on 39 Cars. I wll post a poicture later. Rich HArtung Desoto1939@aol.com
-
Need some advise on my De Soto (Ford guy goes MOPAR Flathead)
desoto1939 replied to ellum's topic in P15-D24 Forum
Elvis: This is what i ment. When you take off the driver side hood sheet metal and with the hood opened then you can lay across the fender. You will see the Master cylinder unit and the line that comes out of the front that goes to the Brake light switch. If you take off the top lid of the master Cylinder and switch the lid so that the filler nut is at the front of the MC. This would be the end inwhich the line goes to the brake light switch. Then you can unscrew the cap and then you can put your finger into the hole to see how much fluid is in the reservioir. If it is low then take a funnel with a log tube and then you can fill the MC. You might over fill the unit but this is much easier to do that taking the floor mat out of the car and then taking the small plate that has access to the mC out of the floor board. I have had mine this way for 27 years.. Also received you email about the rear gravel guard. I perfectly understand. Sent you a reply. rich hartung -
The use of velco permit you to get the panel tight all along the edge of the panel and the door frame. This is just another option that can be used instead of clips that al space several inches apart from each other. Rich Hartung
-
Open House at Frank pollack resortation Shop Pottstown PA
desoto1939 replied to desoto1939's topic in P15-D24 Forum
more photos at the shop -
Open House at Frank pollack resortation Shop Pottstown PA
desoto1939 posted a topic in P15-D24 Forum
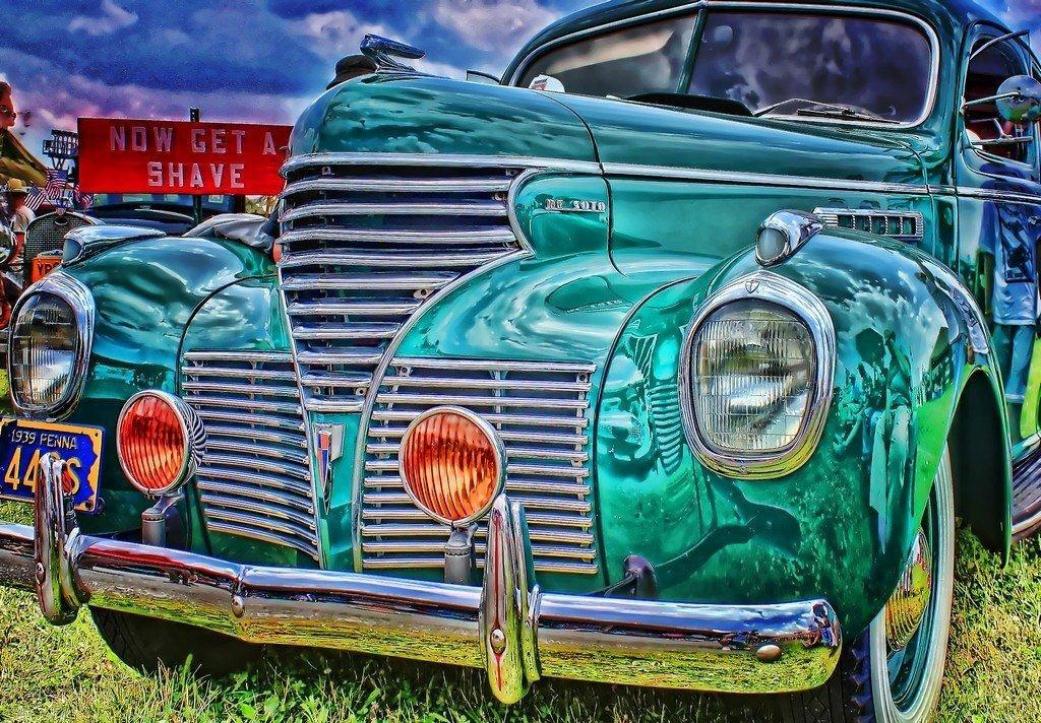
Today the Frank Pollack restoration Shop located in Pottstown held their annual open house. The event ran from 10-3 today 11/23/14. They had some of their workers there to answer questions about what they were working on. I had the opportunity to talk with their Upholstery guy that is 70+ years old about some new material for my 39 Desoto. The weather was a perfect day to drive the old 39 Desoto to the event. I have attached several pictures. They had a 38 Dodge Coupe in the shop that will be getting some work done. Unique car was a limo 29 Ford Model A. Do not know if this was a factory cr but someone did a nice job to make it a limo. If you live in the are plan on attending this event it is a free event and go to the Pollack website to get on their invitee listing. This shop has been in existence since the 1950's and was know for doing work on Bugatti and high end cars. Rich Hartung Desoto1939@aol.com -
Need some advise on my De Soto (Ford guy goes MOPAR Flathead)
desoto1939 replied to ellum's topic in P15-D24 Forum
If you change the top of the MC lid so that the filler plug is at the front of the MC towards the front of the car you can get access to filler the MC and also check on the amt of fluid in the MC. This is what I have done on my MC on my 39 Desoto. To get full access to the MC you need to remove the front floor board assembly. This also provides access to the trans and the emergency brake brand. I have seen on the ebay that there has been a listing for new sheet metal for the floor board. This would also be the same as the 39 Dodge used the same body style and also the 39 Chrysler. You do not have to take off the manifold. Under the manifold there are two metal plates that have two thumb screws. Undo the screw and then the palte will come off the block and then you have access to the valves and the tappets to make the necessary adjustments, and yes the engine needs to warm. To make it even easier put the car up on the lift take the right front wheel off the care. Then you need to remove the right side inner fender sheet metal. This will then provide you full access to the right side of the engine. This is the only way to do the value adjustments . Rich Hartung 1939 Desoto owner Desoto1939@aol.com -
Instead of using the metal clips that rust and also have a tendency to push oput when installing the door panels why dont you use velcro? You can glue the velcro strip rigt to the door frame and then ont the back of the panel and also you can add more strips in specific locations to get the panel to be perfectly flat against the door frame. Also the nice part is that when you and if you ever need to remove the panel it will peel right off the door frame and you will not have to worry about pulling the clips out of the hardboard backing material. This would be cheaper and velcro hold very tightly. USe the modern stuff now when restoring a car or truck also the velcro is hidden so noone will ever know. ALso with the velcro you can re position the panel if you do not like how it fits against the door. If you run a strip along all of the edges then you will get a tight fit along the edge instead of just where the clip attached to the panel and the door frame and you can run a criss cross also on the panel and door frame to make sure it is tight inthe middel and also arounf where the door and windrow crank handles come throught the panel I use velso strips to hold down my rugs in my 39 Desoto and use a good quality glue like gator glue to attach the velso to the two materials metal and the rug backing.. Just a suggestion. Rich HArtung Desoto1939@aol.com
-
Does anybody live close to Hellertown, PA 18055
desoto1939 replied to Thomba48's topic in P15-D24 Forum
I am about a 90 minute drive from Hellertown PA which is near Bethlehem pa. I have two brother inlaws that live near Hellertown pa. I might be able to look at the vehicle. But you might also find someone else that might closer. Anyone near Allentown, Bethlehem and or Easton Pa would be within a 30 minute drive. Hellertown is located off of Interstate 78. Rich Hartung Desoto1939@aol.com -
Joe: Take your time make sure you have the car in the proper alignment and then send them back. If you have to take the car to an alignment shop you can take the tools with you but do not leave them overnight or make sure that they return them to you. Having the correct tools helps. If you do a search on ebay they do sell the single wrench instead of the crowsfoot style that I have. My 39 does not use these wrenches since my eccentric is accessed via a regular box wrench. The 40 and up need the camber specif wrench to reach inside the control arm. Rich HArtung
-
Joe: Glad to hear that the tools that I sent you were able to help get the setup working for you. These were OTC or Ottawa Tool company old style crowsfeet tools. I think this might be the first time that they were used on a car. Rich HArtung
-
The engine is running and the internal temp of our engine get to be around 160-200. A rad will boil over at 220+ degrees. so I am having a hard time trying to figure how the brake fluid is getting to be over 220+ degress to create steam. especially when the brake lines are not in any way creating such heat as compare to the engine and water in the engine block and radiator. If there was a steam build up then I would think that the steam would cause a major expansion and then the pistons would then be pushing out on all four wheels. Steam is a very powerful thing. That I why I was using hte coolant in the radiator position. Rich HArtung
-
I am not following your logic with the steam. Water boils at 200 degrees. So you are stating that the each brake cylinder or a sigle cylinder or some line in the system has water init and when braking the system is heating up the lines to over 220 degree and causing the brake fluid or the water in the line to becom e steam. I have a very hard time thinking that the brake lines and or the fluid and or water is really getting that hot to form steam. I could see the brake drums getting hot and the shoes and lining but that is a great deal of heat. Just think that then this car would boil over oif there is that must heat being made from braking. With antifreese inthe rad that would be an awful amount of heat just by pushing on the brake pedal if could see heat building up if the pedal was sticking and then the shoes would start to smoke and you would get a burning smell . Can you please explan how you came about your statement. I might be wrong but I have a hard time understanding your popint of view. Rich Hartung Desoto1939@aol.com
-
In another post Young ed asked about how to peen down a tubular brake rivet. I have attached several pictures of my brake rivet tool and also the Starr Brake lining tool that is used to hold the lining tight against the shoe when doing a reline job. I f you have any questions on how to use the tools please feel free to contact me. It is a very simple job to reline a shoe and I have done several over the past few years. But remember there are specific sized rivets for your particular car and brake shoe. I also have a listing of the appropriate rivet size and braking lining numbers that will fit your car or truck. The Starr company produced the tools that were used for a lot of the brake relining jobs. Rich Hartung Desoto1939@aol.com
-
Here are some pictures of the newer style brake rivet tool that peens over the back of the rivet when installing new or replacement brake linings on a brake shoe that can take a riveted lining. I like this style better because you can slowly tighten down on the back of the rivet to peen down the back instead using the style that uses a hammer blow to peen over the rivet. On the brake shoe that I have in the vise there is a tool made by the Starr company. This tool is used to hold the brake lining in position and to keep it flat against the metal shoe. You then insert the specific sized rivet for your brake shoe and please note that there are different size rivets for all type of brake shoes. so it is not just generic rivet. they must be the correct size. I have relined several pairs of brake shoes and it it a very easy job to do. The first two pictures are of the rivet tool and the remaining pictures are of the Starr Brake lining tool. If you have any questions please feel free to contact me. Rich Hartung Desoto1939@aol.com
-
ED. To set the rivets for the clutch lining or brake lining there are specila rivet tool to crimp down the brass rivet. ALso rivets come in different sizes anf lengths and also different size heads as per what you are specifically trying to put together. If you are doing a brake relining I can tell you the speific size rivets that you will need and also the quantity that you will need. Contact me with what you are trying to do and I will look up the rivet size for you. I have a rivet setting tool that uses a screw down to set the rivet from the back. I prefer this style instead of the old way of forcing the rivet closed with the hitting it via a punch and hammer. Possibility to crack the lining and with the srew down you can feel when the rivet has bottomed out. Also there is a tool to hold the brake lining on the shoe to keep it positioned on the metal shoe so that you can get the lining to fit perfectly flat onthe curvature of the shoe. I have both of these tools. I will try to post pictures of the tools but send me you home email. Rich HArtung Desoto1939@aol
-
the minor adjustment would just be done with the upper bolt that is on the back of the backing plate or the halfmoon that moves the top of the shoe outward. You have to remember that we do not have self adjusting brakes liek our modern cars. So as the shoes wear and then form to the arc of the drum you will have a greater distance tha thte shoes need to travel to make contact with the drum. When you say soft pedal what happens when you pump the pedal when braking does it get harder and you get a firmer pedal? Check the MC to see if you are low on Brake fluid also check and rebleed the air. ALso put a block of wood on the floorbaord to prevent the brake pedal from going all the way to the floorboard when bleeding the brakes. Look for any brake fluid on the backing plate to see if you have any leaks. If you have a service or repair manaul consult that it sometimes list how often you should do a minot brake shoe Adjustment. Just point to look at. Rich HArtung Desoto1939@aol.com
-
Need some advise on my De Soto (Ford guy goes MOPAR Flathead)
desoto1939 replied to ellum's topic in P15-D24 Forum
Then you have the correct engine in the car if the first two characters on the engine boss are S6. The 39 Desoto is an S6 model the S is used to designate Desoto. If the bottom of the battery tray is not complete you can weld a new bottom to the battery box. The 37-39 Mopar car gas tanks will fit your car but these are very hard to find. You might have to take yours down also drain the gas first via the bolt in the bottom of the tank. Flush it with water and then let it dry and find a guy that will either cut out the bad sections and then weld in new sheet metal. Rich Hartung Desoto1939@aol.com -
When the stabil mixes with the current gas in the tank it then creates a vapor that then rise up to coat all of the exposed metal parts that currently do not have any gas surrounding the ex[poserd metal. It then also mixes with the current fuel and help prevent corrosion inthe current fuel lines and other fuel components. I am getting this inform ation directly from their webpage and also reading the packaging. I am not advocating that this is the be all end all for our problems but might help when storing our cars for long periods of time. It will last upto 12 months when the car is parked. Just trying to pass on information to help others when storing their cars. Here is a link to the Stabuil 360 web site: http://www.sta-bil360.com/how-it-works Rich HArtung Desoto1939@aol.com
