

.jpg.70ad42aba0cfc865ed90fc3c3f5be0d5.jpg)
harmony
-
Posts
891 -
Joined
-
Last visited
-
Days Won
2
Content Type
Links Directory
Profiles
Articles
Forums
Downloads
Store
Gallery
Blogs
Events
Everything posted by harmony
-
How did you get the mirror out?
-
I'm not sure if they made any changes between the '48 and the '49 in the steering wheel. But it could also be loose screws. On the '48 there are 3 brass screws that hold down the brass assembly that the wire is attached to. Then there are the 3 super long machine screws that hold down the horn ring. If any of those screws are loose it can cause the two contacting surfaces that activate the horn to get too close, so that little extra movement when pulling on the top of the steering wheel might be enough to make the surfaces touch. Just a thought if the wire checks out to be in good shape.
-
.thumb.jpg.d599d4c13e08899474e0348bd9baed3b.jpg)
Disassembly of governor M5 hydraulic transmission
harmony replied to harmony's topic in P15-D24 Forum
I was thinking,,,,,,,,,, What would it take to bench test my spare engine/ fluid drive/ M5 trans? I'm certainly not a mechanic or an electrician so I'm not sure how many components I would need to test the drive train. So far everything has checked out to be in good working order. I also have a spare radiator that doesn't leak. The inside of the transmission relay checks out to be in good working order as well. I have a spare EV1 carb that is rebuilt that I can put on it. I checked the oil today and it is crystal clear. Maybe I changed the oil when I got it, but I sure don't remember doing that. The cylinders were filled with ATF when I got it and I've been turning it over regularly once a month for the last 3 years. With a little effort I can compare positioning of the transmission levers to my 48 Chrysler to find neutral. I'm not sure what I'd have to do to operate the clutch lever though. Maybe weld something up to simulate the real thing. If I simply wire it all up, and do some plumbing, would I be good to go? -
That's a very cool Suburban you got there. I'll bet there aren't many of those around these days. I know I've never seen one.
-
Thanks Sam. You'd think at least with a poor memory that I would be able to forget the misinformation instead of the good stuff. ?
-
Disassembly of governor M5 hydraulic transmission
harmony replied to harmony's topic in P15-D24 Forum
-
Disassembly of governor M5 hydraulic transmission
harmony replied to harmony's topic in P15-D24 Forum

-
Disassembly of governor M5 hydraulic transmission
harmony replied to harmony's topic in P15-D24 Forum
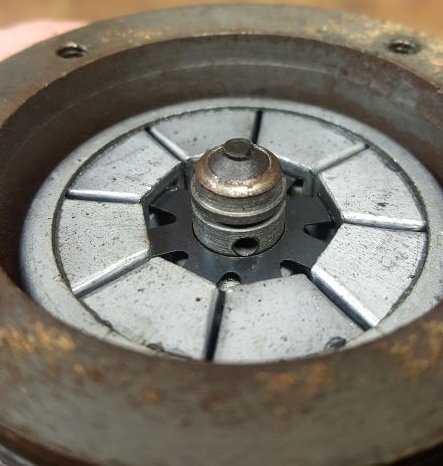
After a little more persistence, the cap finally came off. Everything looks to be in fine shape. I found that vent hole so I added a few drops of 10W oil in plunger. All the counterweights seem to be free and operating nicely. I wasn't quite sure how to pull them out so I just left well enough alone. The points look like that have been touching a little off centre, but then again, I'm almost the same vintage as they are and I'm not perfectly aligned anymore either ? Here's some pictures for anyone who might be curious.
-
Disassembly of governor M5 hydraulic transmission
harmony replied to harmony's topic in P15-D24 Forum
Dodgeb4ya, The ohmmeter checked out the interrupter switch to be in good working order, so thanks for that procedure. Here's a picture of what it looks like in case anyone is curious.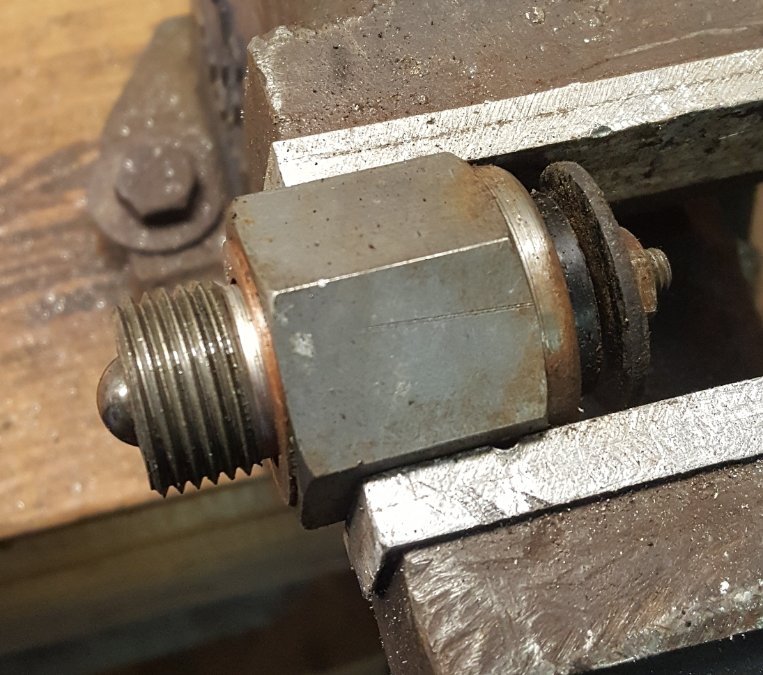
-
Would someone please refresh my aging memory about venting the gas tank for a 6 volt electrical fuel pump? I've read in earlier threads and I think I even asked this question before but for the life of me I can't remember what the advice was. I'm pretty sure that I don't have a vent in my tank, and I thought (if it's necessary) to remove the sender in my fuel tank, and drill/tap a hole in the top and then run a 90 degree fitting with a line from it, to vent the tank. I don't really feel like drilling a hole in the filler tube and welding in a vent line.
-
1950 Plymouth Special Deluxe build thread
harmony replied to bartenderfloyd's topic in P15-D24 Forum
Looking really good. I'm glad my pictures and notes helped in the process of installing the headliner. I'm sorry I missed your post back in November when you were asking advice on the hand brake lining. Did you ever get that project completed? Did you do it yourself or send it out to be done? If it is still on your list of to-do's, I can link you to the page on my '48 Chrysler webpage on how I did my own. Bernbaum's lining doesn't have holes in it, so although the job isn't terribly hard to do, you do have to be methodical with the process and careful to get it lined up before drilling holes, and the countersink holes have to be slot shaped for the rivets they supply. I've also explained the process of adjusting the hand brake on that page. But perhaps by now you already know all this. -
Disassembly of governor M5 hydraulic transmission
harmony replied to harmony's topic in P15-D24 Forum
That's awesome. I was about to ask if there were any illustrations as to what to expect when I get the cover off. Pictures are even better. Thanks. -
Disassembly of governor M5 hydraulic transmission
harmony replied to harmony's topic in P15-D24 Forum
Good to know about that gasket, thanks. -
Disassembly of governor M5 hydraulic transmission
harmony replied to harmony's topic in P15-D24 Forum
Thanks and yes I remember reading about the pencil eraser in the reference book. -
I was very fortunate to come across a parts car a couple years ago. Included was a complete 251-fluid drive-M5 Transmission. I was told it was running and it had been filled with ATF. Since it was raining today I wasn't into going for a cruise so I thought I'd test the electrical components on my spare trans. I found more info in the Service reference book "diagnosing the hydraulically operated transmission" supplied by imperialclub, than in the service manual. I pulled the solenoid and did a bench test and it works great. One down 2 to go. I pulled the interrupter switch and in the service reference book it only suggests how to test it if the car is running and you'd put it up on jack stands and put it in gear,,,, etc etc. Is there a way of simply bench testing it the same way as the solenoid? According to the service reference it sounded like I would just unscrew the 4 machine screws and remove the cap to get at the points and the rest of it. But after removing the screws the cap wouldn't budge. I tried wedging the cap gently with a wide slot screwdriver and still nothing. Then I tried putting the end of the slot screwdriver against the lip of the cap and tapping the screwdriver with a small tack hammer. Still nothing. Any ideas as to how to get the cap off?

-
Mine are working fine now. I was just curious about the process and what they might charge.
-
I went to their website but I didn't see any pricing. Do you know what they would charge per wheel cylinder?
-
I would say that I pretty much always make my own gaskets when possible. I have a couple sheets of gasket material two different thicknesses, plus a sheet for high temps to use for exhaust gaskets. A sharp punch set and a sharp exacto knife is all you need. It's helpful to have a piece of flat stock rubber to cut it out on and that rubber will help keep the punch die nice and sharp too. I even make my own body gasket for my Carter B&B carb. That one is pretty finicky.
-
Did you put the paper bag gasket in dry?
-
From what I've read in other threads, what TodFitch said about the thickness of the gasket being important is quite true. Others have had trouble with oil pressure because the gasket they used wasn't the thickness called for.
-
I can't really offer any specific help because my Windsor is a 6. However I can offer a piece of advice, that being, don't just buy seals from an auto parts store who say they will fit. You should be able to get part numbers off the seals you're pulling out. Hopefully they have been changed before and that they are Timken or SKF. If the seal is stamped National, that's the same as Timken now days. With those numbers you should be able to get them from your local parts store. Don't believe them if they say they have a cross reference number for a different company. Unless they are prepared to supply you with the actual ID, OD, and thickness. I also recommend getting the matching redi-sleeve (timken) or speedi-sleeve (SKF) for the seals as well. When you pull your axles keep the shims that are on the back side of the axle flange separate ( left side, right side) But even at that don't assume that whoever did it last time had it right. So research what your end play should be. Each shim should be stamped as to how thick it is. It might be faint and hard to read so after cleaning them, take some steel wool to them to find the number if you have to, or use a lighted magnifier to help. Here's another issue you might run into and how to prevent it. The seals are a little cheap these days and don't have much of a lip on the back side to hold the spring in place. So when you are driving the inner ones into place, the springs may fall out. Same might happen with the outer ones as well, but at least you will see it happen. I got lucky when I put my first inner seal in and just happened to notice something shinny inside the axle about an inch or two past the seal, after I thought I had seated the seal properly and was about to carry on. So you can either tape the spring in place using electrical tape, in about 4 places, or use some grease around that lip and the spring. I used Lucus Red n Tacky. Either way, once the seal is in place, I'd take something like a coat hanger or something similar, bent in a L shape and reach inside and make sure that the spring is seated up tight inside that tiny lip all the way around. If you have small fingers you can check that way too.
-
Trouble installing new handbrake band on 48 DeSoto
harmony replied to MarcDeSoto's topic in P15-D24 Forum
Assuming your Desoto transmission is exactly the same as mine, here are a couple precautionary points I'll mention when reassembling the hand brake. If you took the mounting bracket off the transmission, be careful to put the two bolts back in the proper holes. One bolt hole goes straight through into the transmission cavity. The other bolt hole bottoms out in the casing. So the bolt that goes in the hole that goes right through the trans case, you'll see a chamfer at the start of the threads in the transmission case. On the bolt that threads in that hole, you'll see a rubber seal with the matching chamfer. Other than that the bolts look the same. Push come to shove if that rubber seal is destroyed you can use an appropriate size O-ring instead. The other point of interest is that the 2 springs ( p/n 4-07-04 in your diagram ) are different lengths. At least they are on mine and when I studied it, they have to be different lengths, so it is a bit of a head scratcher as to why they are the same part number in the parts manual. One is 3/16" longer and naturally I put mine in wrong the first time and nothing lined up. That's when I grabbed my tape measure and realized they were different lengths. -
Trouble installing new handbrake band on 48 DeSoto
harmony replied to MarcDeSoto's topic in P15-D24 Forum
I recently did mine and without anything hooked up, I had oodles of room between the drum and the lining. -
Trouble installing new handbrake band on 48 DeSoto
harmony replied to MarcDeSoto's topic in P15-D24 Forum
Basically it just adjusts inward. Starting with the centre bolt on the far side. You're looking for about 18-20 th. clearance. -
I'm hoping I'll die of old age before I'm saying " damn I should'ov had seat belts" on my premature death bed.
