dodge59 Posted September 22, 2014 Author Report Posted September 22, 2014 (edited) Then something in the alignment or geometry of the parts is different between having the wheel off the ground and having it on the ground. To me that suggests the wheel bearings and/or as mentioned earlier in the thread the castle nut that adjusts the bearings. castle nut looks fine not stripped or anything like that . tightens up fine . Edited September 22, 2014 by dodge59 Quote
Don Coatney Posted September 22, 2014 Report Posted September 22, 2014 castle nut looks fine not stripped or anything like that . tightens up fine . How tight? Quote
Dave72dt Posted September 22, 2014 Report Posted September 22, 2014 What's inside the drum shouldn't know the difference between on the ground or off. The bearings would and the change in suspension parts angles might. Brake shoes used to be designated primary and secondary. Having two of either or backwards might give you that effect. Maybe try loading the suspension by lifting the car as close to the wheel as possible instead of letting eh wheel hang. 1 Quote
dodge59 Posted September 22, 2014 Author Report Posted September 22, 2014 guys ...... here is what I observed today on the brakes. looked at the inner bearing and that looked fine spun good nothing chewed up. full of grease. switched the drums from sided to side and it still locked up.. so it is not the drums or bearings. adjusted the heel toe adjustments top and bottom again on the pass side shoes. still no diff ........still locking up. Then I opened up both bleeders on the cylinders .. it had pressure on both and squirted out fluid until the pressure subsided. then I got in the car started and tried to move the car forward and it moved freely with NO locking up .. so It appears it is the brake hose. I have two new ones coming wednesday.. hope that does it. Quote
dodge59 Posted September 22, 2014 Author Report Posted September 22, 2014 (edited) How tight? snug down .......then back off 1/8th turn or until there is no tension on the nut. drum spins freely no dragging. .......... then adjust the shoes. Edited September 22, 2014 by dodge59 1 Quote
Dave72dt Posted September 22, 2014 Report Posted September 22, 2014 Then I opened up both bleeders on the cylinders .. it had pressure on both and squirted out fluid until the pressure subsided. then I got in the car started and tried to move the car forward and it moved freely with NO locking up .. so It appears it is the brake hose. I have two new ones coming wednesday.. hope that does it. pretty much similar to parking brake cables locking up on self centering brakes. You could back up fine and they would lock going forward. Quote
dodge59 Posted September 23, 2014 Author Report Posted September 23, 2014 How tight? don not tight and not loose is the best way to describe it. right in between . Quote
dodge59 Posted September 25, 2014 Author Report Posted September 25, 2014 still waiting for those brakes hoses thru rockauto.. sloooooooooooooooooooooooow. Quote
dodge59 Posted September 25, 2014 Author Report Posted September 25, 2014 I been working on the lights on the 54 pacecar ........... Got all the lights working except for the headlight. don't seem to have any power from the main lead under the hood to the junction box on the core support to the headlights .. I assume the power has to go thru the high beam dimmer switch before going to the headlights ..... is that correct? or just a myth.. I have no high beam or driving lights . everything else works . could I test that foot dimmer switch ? it is a 6 volt system. any ideas where to look next ? Thanks ! john. Quote
dodge59 Posted September 25, 2014 Author Report Posted September 25, 2014 update on the pacecar . I'm working on sanding down the convertible top frame .. getting it ready for paint. Quote
dodge59 Posted September 25, 2014 Author Report Posted September 25, 2014 I received the convertible black canvas top today.. sweet ! Quote
greg g Posted September 25, 2014 Report Posted September 25, 2014 Yes the head lamps go through the dimmer, there should be a junction bar near the radiator, then to the headlamps. Quote
dodge59 Posted September 25, 2014 Author Report Posted September 25, 2014 Yes the head lamps go through the dimmer, there should be a junction bar near the radiator, then to the headlamps. that makes sense greg since the dimmer switch controls the high beams. power goes thru the foot high beam switch . Quote
Mopar Posted September 25, 2014 Report Posted September 25, 2014 My guess is that you don't have a good ground on your head lights since nothing works. If the ground is good check to see if you have any of the panel lights working. If they work then you have power to the light switch from the ign sw. Power from the ign sw goes to the "IGN" terminal on the head light sw. Power for the head lights comes from the Center tap on the head light switch labeled "H". It then goes to the dimmer switch which has 4 wires on it. 1- goes to the high beam indicator 1- goes to the Junction block on the radiator support and splits to both head lights as the low beam lights 1- does the junction block on the radiator support and splits to both head lights as the high beam lights The 4th wire is power from the head lamp sw Power from the Ign switch goes to the head light sw. Quote
dodge59 Posted September 25, 2014 Author Report Posted September 25, 2014 (edited) Thanks mopar .. you are a big help. with the headlight switch in the on position .. none of the wires have power at the junction block (on the radiator support ) which tells me power is not coming out of the foot dimmer switch. correct? bad foot dimmer switch ? I'll back track from there then. all the lights work except the headlights. so I don't think it's a bad ground. dash lights , blinkers , parklights , taillights , stops all work also. I have compared the wires at the juction terminal on my 54 dodge 4 door vs. the convertible and they are all wired differently.. do I can't use that as a diagram.. john Edited September 25, 2014 by dodge59 Quote
Mopar Posted September 25, 2014 Report Posted September 25, 2014 I have the wiring diagram for the 54 convertible which is what I was getting my info from. It looks to me like you have a bad dimmer sw. I got the body mount on the left and right side of my trunk rebuilt this week and thought In could get by patching a bad spot in the floor of the trunk. No such luck. I have to replace the floor from the spare tire well to the left side body mounts. That's the way things go some days. Quote
dodge59 Posted September 25, 2014 Author Report Posted September 25, 2014 yeah... that's the way some things go .. 10 minute job , turns into a week some times. that floor could be a hard one to fine also. I haven't seen a trunk floor up on the internet anywhere yet. I have to take the floor panel off by the foot pedals to get at that switch and see what it looks like to order one up. thanks for your help mopar. john . Quote
Mopar Posted September 25, 2014 Report Posted September 25, 2014 I have been having to make everything from scratch. I ordered floor pans for the front of my 4 Dr from a place near Detroit but when I got them they were for a Plymouth even though they told me they were for a royal. They didn't fit but I was able to add metal to them and make them work. You will need to unbolt the floor pan under the peddles to get at the dimmer and even then it is a tight fit. 1 Quote
DJ194950 Posted September 25, 2014 Report Posted September 25, 2014 Maybe try unscrewing/bolting it to try and move in to a location easier to do your testing/replacement.?? DJ 1 Quote
William Davey Posted September 25, 2014 Report Posted September 25, 2014 Before you jump into replacing the dimmer switch, try cycling it vigorously (really stomp on it) a bunch of times. Sometimes the contacts get "stuck" in between low and high. 1 Quote
dodge59 Posted September 26, 2014 Author Report Posted September 26, 2014 I have been having to make everything from scratch. I ordered floor pans for the front of my 4 Dr from a place near Detroit but when I got them they were for a Plymouth even though they told me they were for a royal. They didn't fit but I was able to add metal to them and make them work. You will need to unbolt the floor pan under the peddles to get at the dimmer and even then it is a tight fit. Iv'e had to do the same thing with repro parts .. they just don't fit correctly. yeah ........nothing is easy on these old cars.. hahaha Quote
dodge59 Posted September 26, 2014 Author Report Posted September 26, 2014 Before you jump into replacing the dimmer switch, try cycling it vigorously (really stomp on it) a bunch of times. Sometimes the contacts get "stuck" in between low and high. william I clicked it about 10 times before but I will really beat it up now.. see what happens . good Idea. Quote
dodge59 Posted September 26, 2014 Author Report Posted September 26, 2014 (edited) worked on the convert top frame today. sanded all down and painted. looks great ! also earlier this week............ installed the rear bumper extensions. I will never buy from rockauto again.. They screwed me around with the purchase of those brake hoses. over a week to get the parts they said they had in stock .. what gives turns out they had to pick them up at another warehouse on the coast somewhere .......... then they send parts to them and then to me.. why could they have just drop shipped them to me .. no brains there. turns out there main business is only 200 miles away in wi . Edited September 26, 2014 by dodge59 Quote
dodge59 Posted September 26, 2014 Author Report Posted September 26, 2014 Before you jump into replacing the dimmer switch, try cycling it vigorously (really stomp on it) a bunch of times. Sometimes the contacts get "stuck" in between low and high. yeah ......I might get lucky there.. this car sat for 40 years in california. climate control . Quote
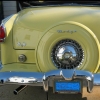
fstfish66 Posted September 26, 2014 Report Posted September 26, 2014 car looks GREAT,,,,, you should have power to one wire at the dimmer switch,,the switch directs the power to low or high so if theres no power at the dimmer,,,start checking backwards... question,,,does your tail lite lift for a gas fill ?? looks like it in one of your pics,,,,koool car,,, Quote

Recommended Posts
Join the conversation
You can post now and register later. If you have an account, sign in now to post with your account.