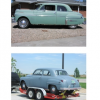
Johnny S Posted March 29, 2007 Report Posted March 29, 2007 So, I haven't yet successfully gotten the 218 on the new engine stand yet although I'm making progress none-the-less as these photos will indicate. I even found a real use for the LUV pickup in my backyard...will wonders ever cease? I picked up a piece of flat bar steel at Lowe's and see how that could work per one of the ideas suggested on a previous thread. Thank you all for the assist. As always...everyone comes through will some great suggestions. I've also designed an adapter plate (currently in cardboard only) that will attach to the back of the engine block using all available locations. Now I just have to cut it out of plate steel and fit it. If my eyeballs have it right then I should be able to easily hook the stand up to the new adapter plate and have ALL of the right angles plus the added advantage of being able to mount the engine a bit lower so the center of gravity and the work height is lower. That's so, my short, but chubby, legs can reach it. And, as far as the near term work is concerned. That LUV pickup bed works great as a portable bench. I just added a hastely constructed engine cradle to keep from messing up the tailgate and bed too badly. I have been soaking the "H" out of everything with PB Blaster and some Liquid Wrench. Managed to get all of the headbolts loose finally without breaking anything. The manifolds came off without breaking anything either....well that is except for the heat riser bolts....they snapped like wooden matches even with very very little tension applied. Don't know yet how much is left to grab onto....that's a "today" project if the snow melts....yes....it was 70 ish here yesterday and we have 2 or 3 inches of snow today.......argghhhh!! Quote
Johnny S Posted March 29, 2007 Author Report Posted March 29, 2007 This engine is a P18 serial numbered engine that came out of a P18 4 door sedan. I'm using it mostly to learn about the inner workings of the flathead up close and personal but if the block is in good shape I will be getting it rebuilt. My "plan" is to construct a static test stand mounted on a small Harbor Freight trailer where I can play with the engine(s) out of the car before they get installed. Plus, if it works out like planned (which it seldom does) I will be able to drag a live engine on the trailer to car shows to demo. The parts are coming together. But my lack of spatial abilities will probably have me building it upside down and backwards the first three or four times. Quote
Young Ed Posted March 29, 2007 Report Posted March 29, 2007 That's an interesting looking fuel pump on that thing. Never seen one quite like that before. Quote
TodFitch Posted March 29, 2007 Report Posted March 29, 2007 . . . But my lack of spatial abilities will probably have me building it upside down and backwards the first three or four times. Then Don C's assembly photos will be of real use for you. At least for the upside down part. Not sure about the backwards part. Quote
Johnny S Posted March 29, 2007 Author Report Posted March 29, 2007 I haven't cleaned the fuel pump off yet but its some type of dual action pump that supplies supplemental vacuum to the wipers up top and pumps fuel too. It's not like any other dual action pumps I've seen before. It will be interesting to take a closer look at it. The vacuum lines and hoses all look to be from the factory however. Quote
Johnny S Posted March 29, 2007 Author Report Posted March 29, 2007 Yes, photos, mostly from the forum....have saved me more than once. Keep them comin'. Don seems to have "all angles" covered. Quote
Johnny S Posted March 29, 2007 Author Report Posted March 29, 2007 See what I mean? I'm not sure if this is right side up side down side up or otherwise! I just wish my gyroscopes worked better. Quote
Young Ed Posted March 29, 2007 Report Posted March 29, 2007 Don you are playing tricks on my mind! One of these days I'll find my cheap 5spd for the swap. Quote
greg g Posted March 29, 2007 Report Posted March 29, 2007 Just think of it as 6 Briggs and Stratton one lungers fastened together.......... Quote
PatS.... Posted March 30, 2007 Report Posted March 30, 2007 Pics of the 251 engine attached to the stand. The engine is tilted a bit while I was chasing the head bolt threads. Hope it helps. Quote
Johnny S Posted March 30, 2007 Author Report Posted March 30, 2007 Thanks for the photos Pat.....I see a new way of trying it! It's in the category of "why didn't I think of that?".....two of the arms bolted into the same slot....that an angle that I haven't tried. However, with the snow and cold that rumbled into Colorado it may be Sunday before I get back after it. Quote
greg g Posted March 30, 2007 Report Posted March 30, 2007 Knew I had some pics of this, found them. Hope they help. Quote
Johnny S Posted April 10, 2007 Author Report Posted April 10, 2007 Well, it may be overkill but it works and it seems to work well. I constructed an adapter plate that fits on the back of the L-head block and attaches essentially at all of the points that were available.....six in total I believe, plus it fits snug over the two guide-pins. The plate is 3/8 mild steel and should be more than sufficient for the job. The engine is now mounted and starting to really come apart now. The Harbor-Freight 2000 lb engine stand is very stable which pleases me no end. I pushed and tugged on it with the engine mounted and there was no sense at all that it wanted to come crashing down like I've had with the 1000 lb versions. I used grade 8 hardware for all connections. Quote

Recommended Posts
Join the conversation
You can post now and register later. If you have an account, sign in now to post with your account.