


Los_Control
-
Posts
4,986 -
Joined
-
Last visited
-
Days Won
43
Everything posted by Los_Control
-

512 cid C series on Dakota chassis- build thread
Los_Control replied to Radarsonwheels's topic in Mopar Flathead Truck Forum
No doubt you need to pre drill, because of the hardness of the wood, you are going to need some strong screws. I know they make some really strong ss screws, I have never found any. Just something else to chew on. -
512 cid C series on Dakota chassis- build thread
Los_Control replied to Radarsonwheels's topic in Mopar Flathead Truck Forum
Damn that is pure porn, really like how it is coming out -
512 cid C series on Dakota chassis- build thread
Los_Control replied to Radarsonwheels's topic in Mopar Flathead Truck Forum
another idea, you could cut a 1/4" notch in the sides of the shovel strips, you still butt into it on top, but small drain holes on the sides for water. I just think when you tighten the bolts down the trim will bend and distort the pretty shovel strips. I also think showing less fasteners is cleaner, but is a personal choice. -
512 cid C series on Dakota chassis- build thread
Los_Control replied to Radarsonwheels's topic in Mopar Flathead Truck Forum
Question, are you still planning to lift the bed floor out as one piece for future maintenance? If so, I would be tempted to use some screws from under the floor boards, up into the trim. The heads would be hidden, 3 screws in each board would keep the floor from racking at a diagonal when lifting it up? Then you would butt your shovel strips to the trim, maybe add a drainage hole somewhere? -
yup yup yup, love that one. I like the idea going to a modern radial tire. I do not think those wheels you have are true widow makers, looks like regular spit ring and think they call them California bud wheels (bolt pattern/center section) May be difficult to find the 22.5 wheels for those but I never tried. Either way, the current wheels you have should be no problem getting tires repaired at a truck stop. Truck looks great as yard art
-
My Uncle got a preview, neighbors complaining and code enforcement showed up. Kids drove 200 miles and started hauling everything straight to the scrappers. Just because you love them, does not mean your kids will.
-
I tend to agree, I looked at the link to see what we were talking about, My first thought is neither will be on my car/truck ... then read pa post. I will add that this will create controversy, many think that loder does not belong in automotive as it is not flexible enough for vibrations. Some say we need crimp on butt connectors for automotive Some will only use solid metal connectors with a shrink tube sleeve <--- I like this one The other connectors have a plastic sleeve on them, basically you smash them flat and hope they work. 1 in 20 may fail in a few years, rewire a whole car and adds up. While the others will work as long as you own the automobile
-
Sheesh what a score, I would build a new driveway for that ol girl .... you are a lucky man to be the caretaker.
-
The goal was to get the family together for outdoor fun time. Of course mother was so busy, she simply had no time for such shenanigans.
-
512 cid C series on Dakota chassis- build thread
Los_Control replied to Radarsonwheels's topic in Mopar Flathead Truck Forum
That really looks nice, You get a atta boy from me -
512 cid C series on Dakota chassis- build thread
Los_Control replied to Radarsonwheels's topic in Mopar Flathead Truck Forum
Almost like cheating, is underneath and nobody going to see it, meat that is left is now very manageable. And the end result is nice. Little putty, little paint, make this ol carpenter what he aint. -
512 cid C series on Dakota chassis- build thread
Los_Control replied to Radarsonwheels's topic in Mopar Flathead Truck Forum
I have never worked with ipe before, sounds like it is tough to cut. Is it possible to back cut at a angle the edge boards, this would remove material on the bottom and leave the top. Then take a #2 pencil and scribe the edges, tracing the sides to the wood. Then use your grinder with 80 grit paper and grind to the line .... this will get you real tight, also can adjust the taper issue so the middle board is cut straight. This is how I would tackle oak or other woods, You can get a fit so tight that cant slide a hair through, then pull the board away from the sides for proper reveal, any adjusting I would want to do it on the edge boards. Making a straight 90 degree cut on the edges is tough to get a tight fit. Especially if the bed rails lean a bit or you have round corners on the wheel wells. Your cuts look really good though. If you could picture using your grinder and grind at a 20 degree angle on the bottom side of the edges. Then the top side that you see is thinner, but on the edges and fine ... and the thin wood with a steady hand, you can easily grind to the line you scribe'd. Same time use a square and math and figure out how much to remove from each edge, to square up the hole in the center. If possible, adjusting the edge boards to eliminate the problem is the correct way. Same time, you could just cut the center board to fit and drop it in. -
Not sure what to do with the armadillo, sure could use the catapult and mole chair, sign me up.
-
512 cid C series on Dakota chassis- build thread
Los_Control replied to Radarsonwheels's topic in Mopar Flathead Truck Forum
how many weeks you think that adds to the build? Not my intention, but when you get a tatoo artist and say "dont do this" I suspect radaronwheels is ready to kick us off the forums -
My First Car -- P15 1947 Plymouth Deluxe
Los_Control replied to NickPickToo's topic in P15-D24 Forum
Nick, I love that you love it. Everybody here respects your opinion. I admit to being old enough to know better, but I also may just paint my truck black as it came from the factory. I get a bit of a pass, I have a truck and if it is loaded with lumber and dirty at the same time, they not going to hit me as hard as a car with dirt on it Paint it pink if you want, one poster here used the chalkboard paint so people could write on his car. I really like this idea. The most important thing here, Take your time and enjoy the process. One thing I worry about, I see it happen to others, you get to be too much of a perfectionist, is going to cost money and project is delayed and eventually abandoned. JUST GET ER DID! and then move on to the next project. ..... girls, they are often sneaky and sometimes a bigger project then first thought .... building a 32 ford coupe could be easier. Keep us posted. -
512 cid C series on Dakota chassis- build thread
Los_Control replied to Radarsonwheels's topic in Mopar Flathead Truck Forum
Probably best if you do not get ideas about tatoo'ing a tree in the wood, like this guy did -
512 cid C series on Dakota chassis- build thread
Los_Control replied to Radarsonwheels's topic in Mopar Flathead Truck Forum
If only there was some sort of T molding made of rubber, you could fasten it to the sides of the wood, top would sit on the wood while sealing up against the bed sides. This would keep it looking clean on the edges. -
512 cid C series on Dakota chassis- build thread
Los_Control replied to Radarsonwheels's topic in Mopar Flathead Truck Forum
just grabbed this off of facebook more food for thought
-
512 cid C series on Dakota chassis- build thread
Los_Control replied to Radarsonwheels's topic in Mopar Flathead Truck Forum
I did not realize we needed access under the floor. The angle strips will not work. But a clean line always looks good. Just like a 1/4" reveal on trim, it is expected. You do not need a 1/4, a 1/8" gap along the edges would look great. I would not over think it and just leave a gap you are comfortable with. The bigger the gap the easier it is to lift it up .... could even go with some sort of strip of rubber over the wood to seal it to the bed sides, just to keep the dirt out. You know the dirt is going to accumulate there, will need to lift the floor to clean it ... no big deal but maybe you could make it easier if you think about cleaning while building? -
512 cid C series on Dakota chassis- build thread
Los_Control replied to Radarsonwheels's topic in Mopar Flathead Truck Forum
I am partial to natural oil. Goes on clear, but the wood ages and gets a natural patina. It is not instant gratification, for example pine, looks white and blah. But in 6 months it starts to get color, 1 year it is "wow thats pretty cool" couple years down the road, it has a color you cant really duplicate with stain. And the wood you have is already beautiful, I personally would not try to add color to change it. And even more important when I was working, I tried to keep everybody using the same natural so it was easier for me doing touch up Sounds like your plan is fine, leave some room so it can expand/contract with weather, the shovel strips will cover the gaps, drill your holes slightly larger then the bolts so they can expand. When you lock it down tight, then it has a better chance to buckle and crack. On the edges from factory is a strip of angle attached to the side of bed and the wood slides under it, acts the same as a shovel strip and allows you to leave a gap. -
512 cid C series on Dakota chassis- build thread
Los_Control replied to Radarsonwheels's topic in Mopar Flathead Truck Forum
my biggest complaint with all the oils is it drying out. In the heat. And sikkens with cetol d, last the longest. Sikkens sells stain without the cetol d, and it dries out quickly also. Good chance if penofin had cetol d in it, I would be shouting from the roof tops to use it. I have no clue what cetol d is I have worked with wood a lot, here is the first floor of a 2 story addition we built, the vigas are in the living room .... these got sikkens on them. Not sure if I have anymore photos of it finished, lost a lot over the past 5 years when I got sick. (dont beat me up over the 2x4 walls, we framed it twice to make the walls 12" thick, this is first layer.)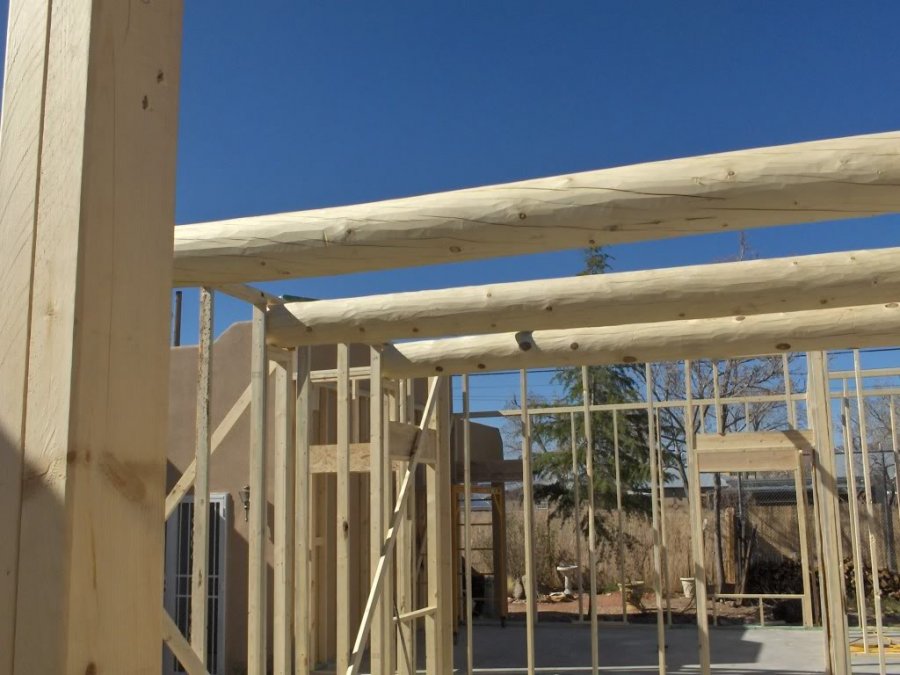
-
512 cid C series on Dakota chassis- build thread
Los_Control replied to Radarsonwheels's topic in Mopar Flathead Truck Forum
Fair enough, I think location also has something to do with it. I spent my last 15 years working in New Mexico, A lot of heat and sun. I now live in west Texas where there is even more heat and sun. So my comparisons are in extreme conditions. I also sold quality work, customers wanted quality products. They do not want to call me back every 2 years to do the same job over and over. I needed something that would hold up and last. What I love about oil, you can tell when it is drying up and no longer protecting the wood. Wash the dirt off and apply more. And honestly, here in town I only have a ace hardware and they sell penofin. I have to order the sikkens or they offered to order it for me. The penofin may work great in areas where I do not live. ggdad the deck looks great -
512 cid C series on Dakota chassis- build thread
Los_Control replied to Radarsonwheels's topic in Mopar Flathead Truck Forum
something for you to remember, penofin is oil just like the sikkens. A gallon of penofin you can apply a new coat every 6 months for years to come, will always look fresh. A gallon of oil goes a long ways and a pickup bed does not need much. I just like the sikkens after using both. They both do the same job. -
512 cid C series on Dakota chassis- build thread
Los_Control replied to Radarsonwheels's topic in Mopar Flathead Truck Forum
I can only add, as a carpenter in Albuquerque New Mexico, I used sikkens for years. It was the only product that held up for me. I am talking exterior vigas, fences, decks, any exterior wood it did the job. For maintenance, I come back 5 years later and it looks a little rough, but the finish is still working, I have seen some pieces go 7 years in New Mexico sun. A few homes I came back every 3 years and brushed on new oil, keep it looking new. The key is the cetol D, sikkens sells a cheaper brand without cetol, and it is equal to penofin. IMHO Now I see it appears that sikkens sold off and the link I posted, claims same recipe as sickens but a new name. You kinda want to question why if you had a quality product, why would you offer a crappy product with your name on it? Sikkens with cetol D I like and stand behind Sikkens without cetol D is garbage I can see where bad reviews will come into play if not separating cetol and non cetol. -
512 cid C series on Dakota chassis- build thread
Los_Control replied to Radarsonwheels's topic in Mopar Flathead Truck Forum
Of course as a carpenter, I say more support is better. You may only want to haul sportsters, then one day you get stuck with a dresser. Same time you are a big boy, I bet if you are not sitting on the dresser, your truck as is will be fine. What would it take to install one more cross brace? Ipe is strong, has limitations. If you like it, I love it


