
Los_Control
-
Posts
4,929 -
Joined
-
Last visited
-
Days Won
42
4 Followers


Recent Profile Visitors
6,687 profile views


-
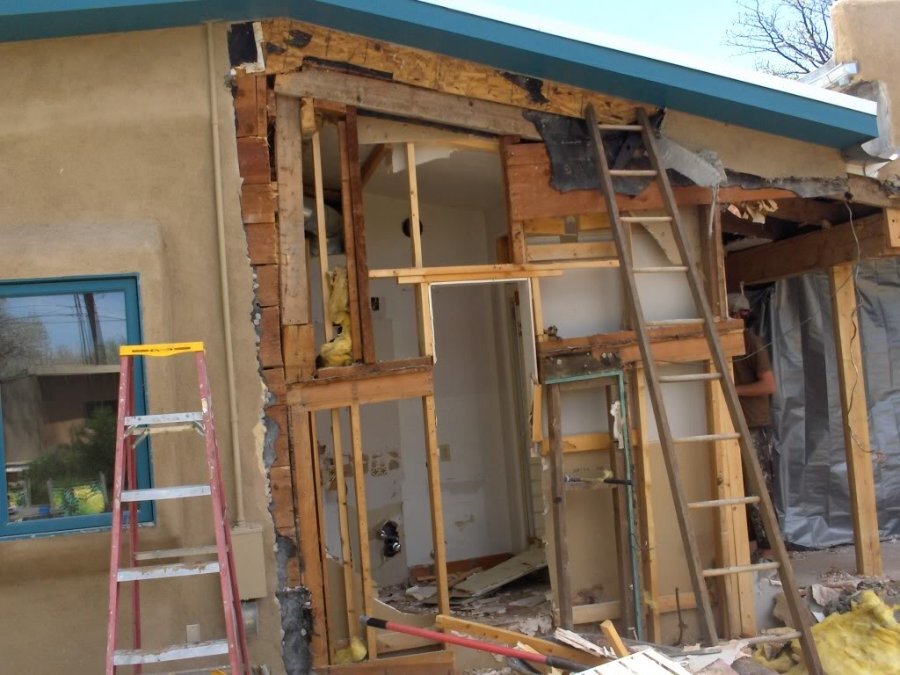
Just a photo for laughs. This house was over 100 years old .... I believe this was a open porch at some time, then someone closed it in .... then later it actually turned into a bearing wall. When opening up a older house, you just have no idea what other people have done in the past. .... IIRC, there was a old live wire buried in this wall that I immediately removed before even thinking about taking the photo. Just one of those jobs that was suppose to be fairly simple .... looked nice on the exterior under the stucco siding .... Looking at the photo it is just WOW! .... This is exactly the reason I always did remodel by the hour and not on a direct bid. The projected cost of the job just went up another $10K when we could see what we had to do to repair past mistakes. Remodel is fun, you just never know what you will run into.
-
@Plymouthy Adamssaid the dirty word It is so true though ... codes change in areas so often. In Albuquerque it was code to use 14GA wire for lighting circuits and 12GA for electrical outlets. Then one day they changed that and required 12GA on all circuits. .... Electricians did not know there was a change, until the inspectors told them. Yeah we changed that last week. I just run 12GA on everything ... possibly overbuilt, I'm ok with that. Is amazing how many circuits are needed in a kitchen. Garbage disposal, refrigerator, oven, built in microwave, lights, outlets ... 7 items need 7 different circuits ... iirc, disposal and microwave need to be GFCI protected ... possibly fridge also. .... Your codes may be different. ... for some reason, I believe they want exhaust fan on a separate circuit also ... just so you can safely isolate these things when they need service and can safely work on them. Every County is going to be different. One thing I was told by a clerk at city hall when we moved in and I asked some questions ... this is a small town. The lady said, If you have plans for any project ... just give us a call. The inspector can stop by when they get a chance and discuss it with you and offer advice ... for free. She claimed, we would rather work with you safely ... then have you do something unsafe .... the inspector can then advise if you want to get a permit or not for the project.
-
I should try my E-brake and see if it even works 🙄 Everything was frozen on it and the old cable was burned through from laying on the exhaust ... probably been like that for years when it was last on the road driving. 30 years ago. Anyway the shoe has plenty of meat left on it .... been working on the linkage with heat, oil and a hammer. Last time I pulled on the handle, it moved a good 6"-8" appeared to be working ... will have to test it. Now that the engine runs good and seems to have plenty of smooth power .... (replacing original distributor with electronic ignition) .... I'm wondering about the gearing on this thing. A old farm truck, I would expect to let the clutch out slow and just crawl along. ... not this one. When I let the clutch out, it wants gas pedal at the same time .... without brakes am hesitant because the driveway is only 2 car lengths before you need to stop. It just shudders and dies. Now if you give it gas it launches smoothly .... but there is only a few feet and need to stop and no brakes Maybe I just need to drive it and get use to it .... I'm thinking it may have a higher rear end installed then a 4.1. I wonder if the factory ever offered that option? ... I dunno For some reason, just not getting motivated. I did get the heater switch wired up yesterday and ordered some things from DCM ... a new heater switch, original does not work. Wondering if I should connect a 12>6 volt reducer on the motor .... fan runs really fast I have a ... DC Converter Regulator, 12V Step Down to 6V 6A 36W Voltage Reducer. I'm not sure what amps the old heater motors draw. ... I'm thinking maybe more then 6 amps? I think I will give it a try anyways since I have it. .... probably just as cheap to buy a 12V motor as it is a bigger converter. Today I should make defroster ducts for the windshield ... with the seats out I have all the room needed to work under the dash .... ducts should have gone in before wiring 🙄 Suppose to be 92 degrees today ... hard to get motivated on working on a truck heater. May is coming soon and wanting to get registration done then .... I need to get these things finished up.
-
It is my opinion, ya kinda stuck with the insulation. Typical home construction, there will be 2"x4" rafters making the roof structure .... will be limited to R13 bat insulation. Blown in insulation, you can achieve a higher R value then R13 ... I think it is better and properly installed it fits into tight spaces and seals better. The roof if it is properly vented, will have dust in the attic .... no way to get away from it. I imagine there is some way to remove/vacuum all the dust and insulation out of the attic ... and clean it .... do your work and then blow in new ....mighty costly for little gain. Attics and crawl spaces are never fun. The electrical, I would go through and inspect it .... anything shady like pulling 110 off of a 220 circuit I would eliminate. I would typically install a new breaker and run 110 all the way from the panel to the item that needs it. I just feel better about not messing with the original wiring .... it worked for 60 years now ... just leave it alone. Unless you want to track down everything and then add up the load and figure out if it is safe to add another item ... too much math in that for me .... just start clean. Then you know what kind of power that new circuit is feeding and if you can tap into it later if it is needed. Same with existing lighting ... either way is acceptable and it works .... just use switches and accessories that work with what you have. If you want something different, then run a new wire from a new breaker in the panel to your project ... leave the old wiring as is. I'm all for eliminating circuits and switches from existing wiring .... lessen the load on whats there, move it to a fresh circuit. I will be honest, I do not care for power to the light and use power to the switch method myself. Many fixtures you will cut power to so you can safely work on it .... your test light will still pickup some power bleeding through the lines .... not enough to shock you, but enough to power the test light ... sometimes it is easier to kill power to the whole house then find the offending circuit. It could be from the light above the bathroom sink, a outlet in bedroom 3 .... just a characteristic of old house wiring. Still it was acceptable and it works. Just leave it alone. In theory it may be fine to start modifying the existing wiring and adding to it ... I personally would not touch it, unless removing a load from it, and then moving to a new circuit.
-
I should also add I have no brakes .... I installed the new brakes and had a leak and had to order proper fittings .... I bled them then it started to leak. I fixed the leak proper, just never did bleed them again. If I had working brakes, I would be driving this thing around the block 6 times without the fenders properly bolted or lights working .... No registration or insurance .... I'm saving the bleeding of the brakes for last 😜
-
Been slow this time of year .... I have all 4 new tires and hubcaps on. I wired up the turn signals today and have all lights working. Still have a few things to put back together in the cab.... heater switch, cigar lighter. ... I have a CB radio and a am/fm radio to install .... seats need to go back in .... just all stupid little stuff. I never did finish bolting all the fenders down and aligning the doors to fenders .... if that is even possible. I'm getting really really close to finish this thing up and drive it .... then pull the engine apart and do rings and valves. I have ran this engine for long periods of time and it quit smoking ... then let it sit for a year and it starts to smoke again next time started. I feel I need to give it a long drive in the country and see if it stops burning oil .... I feel this time it will not and will need to tear it down. I still have to give it a chance. .... Been a long haul to get this far, soon will be reporting first drive.
-

Coolant flush without a running engine?
Los_Control replied to ktb's topic in Mopar Flathead Truck Forum
I wish all ya all luck .... this Texas is as hard as the cowboys that live here. .... I imagine the water makes us tough. I was too lazy to change my distribution tube and ran a rod through it to clean out all the hard water deposits. .... Lets be fair, I expect to have to pull the engine at some point and will fix it right then. Texas we have hard water and it will plug up any plumbing fixture you have, including the distribution tube. -
Whats the dimensions, and will it fit into my truck are the first things that pop into my mind. Who needs a high rise manifold to stick dual carbs out of the hood ..... lets stick a complete flathead engine out of the hood
-
1951 Cambridge. Might need an engine rebuild
Los_Control replied to matt167's topic in P15-D24 Forum
OK I wish you luck with everything .... I too am a fan of electronic ignition and have it installed myself. I used a slant 6 distributor and converted my original distributor using parts from the 49 Dodge and from the newer slant 6 .... then I used a GM HEI to complete it. Just saying that I have OEM Dodge contacts in the distributor .... OEM GM reading the signal and sending it to where it needs to be. Either part can be bought at a local auto parts store. Your petronix may work as well, just need to get working parts and make it work .... probably cheaper/easier then replacing the distributor. -
1951 Cambridge. Might need an engine rebuild
Los_Control replied to matt167's topic in P15-D24 Forum
I may be the biggest guesser on this forum .... I guess it might be this, or I guess it might be that ... until you actually test a few things, you will never know. For example, A weak squirt from the accelerator pump will not stop the engine from running ... it will give it a hesitation when you step on the gas ... but it will still run. You need to know if you have spark or not at the plugs .... if not, you need to backtrack the system to see where you lose it. $$ well spent having a extra distributor around and setup to run points .... So far we still do not know if you have spark to the plugs or not .... makes no difference to buy another distributor if you do have spark. I would change the thread to asking for help for basic troubleshooting procedures, rather then buying random parts. -
Is always nice to know if it is a spark or fuel issue. These are cheap and will show if you are getting spark to the plugs while turning the engine over .... also tell you if a strong steady spark or a weak inconsistent spark. I have never used petronix myself. Seems they built a really good quality product .... then years ago they sold out and the product quality has consitently gotten worse over the years. .... Some people have never had a issue, others have had problems right out of the box. Some it worked for 6 months then failed .... some has worked for years and no issues ... others just never worked. Good chance you might need to freshen up your carb .... just be sure you are getting good spark first .... just because it is new, does not mean it is working.
-
Check out https://thewheelsmith.net/ .... Too pricy for my budget, if they do not have it in stock they will build it.
-
1951 Cambridge. Might need an engine rebuild
Los_Control replied to matt167's topic in P15-D24 Forum
These flathead engines imho have weak valve springs. If you get a little bit of sludgy oil built up around the valve stems, the lifters will push the valves open, the springs are not strong enough to pull the valves closed again. So the head of the valve will be swinging in the breeze and not coming back down to seat. Soaking the cylinders with a light oil like marvel mystery oil can loosen the sludgy oil enough the valves will start operating again .... If you can get enough compression to get the engine to start on 4 cylinders .... A good chance the heat and running oil will have all the valve stems clean and operating. That would be my goal, soak the cylinders ... keep spinning the engine over ... try to start it when it has 60 psi on a few cylinders and just let it idle and warm up. If you are lucky, you will hear the other cylinders start to kick in as the valves start moving again. The more it runs, the better it will run. Or you may end up pulling the head in the end ... no compression on a few cylinders is not uncommon ... when the engine was parked, those valves were open, the oil turns to glue and they no longer slide ... springs are too weak to pull them back down ... heat and clean oil can fix this. -
I think that looks pretty cool .... I might do something similar myself .... I wonder if using a larger hole so the wood panel did not interfere with the spring .... but the escutcheon does still cover the hole? That may not work and may need to make the hole large enough for the escutcheon to be countersunk into the wood .... just ideas. Dark stains would cover the exposed paneling. I picture that door panel with a arm rest and a leather pouch/pocket on the bottom to store crap .... it will look really nice. All sorts of ideas for edging around the paneling .... or again just dark stain. Keep us posted on your progress
-
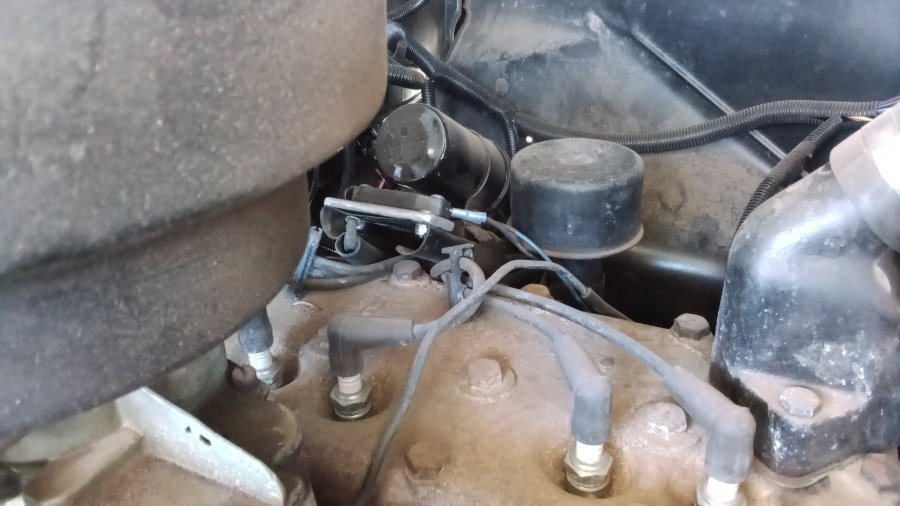
Had to go out and look at mine to remember what I did .... If I did it, we know it is not right First of all my generic plug wires are too short. I just ordered 6 universal plug wires the same length from RA. Just something to get the engine started .... never did change them. I cut slots in my mount for the wires .... it is easy to take off and on as needed ... not very often. I have had my coil bracket off several times before finally decided on electronic ignition, and it is in its final form now. If the wires were long enough, I think they would stay where they belong with no problem .... only 3 wires on each side. Or you can install the wires, cut to length and do final assembly in place ... hope you do not need to remove later.