


40desoto
-
Posts
547 -
Joined
-
Last visited
Content Type
Links Directory
Profiles
Articles
Forums
Downloads
Store
Gallery
Blogs
Events
Everything posted by 40desoto
-
Completely wrong kit! Studs about 1 1/2 inch too long.
-
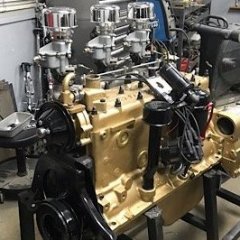
Regard the benefits of studs.... When the shop rebuilt my engine the installed ARP studs without me requesting them. They mentioned that they are best to produce less torquing pressure against the bolt thread on the block itself. What they mentioned was that when torquing down the pressure woul be mostly on the finer pitched top part of the stud. In my opinion without understanding too much on the mechanical advantage I would think the benefits are: - Finer thread groove on top for finer torque alignment - better gasket, head, and block alignment when istaling the head. (use stud as a guide) - and...... third but not last , they look a hell of a lot cooler..
-
This was provided in a previous post by one our members. I cant seem to locate the post to link but I had the info saved to my notepad. ARP, Ventura, CA 10/12/16 AP3.750-ILB Head stud- 7/16/x 3.75 Long broached (21 @ $5.38) $112.98 APN58 7/16 x 20 Hex nut (head) (21 @ $ .80) $16.80 APW1316N 7/16 ID 13/160D non-chamfered washer (21 @ $ .98 $20.58 Shipping $18.20 I plan on ordering these in the near future
-
Was just informed when i contacted ARP tech support.??♂️ Purchased from Summit and I will be returning. What threw me off was the reference to cast iron head for L6 Chrysler engine. found this elsewhere on a post here. om the secret file that the missus will never see (or, at least, I hope not): ARP, Ventura, CA 10/12/16 AP3.750-ILB Head stud- 7/16/x 3.75 Long broached (21 @ $5.38) $112.98 APN58 7/16 x 20 Hex nut (head) (21 @ $ .80) $16.80 APW1316N 7/16 ID 13/160D non-chamfered washer (21 @ $ .98 $20.58 Shipping $18.20
-
JT, which ARP studs did you use? I ordered a kit and it appears that its for a slant 6 and not enough studs in the kit.
-
So.... I ordered the ARP stud kit listed for a Chrysler L6 engine (ARP 142-4001). Didn't notice until the the package arrived and I opened the box that it only included 15 studs but the head on my 265 requires 21. Not sure if anyone sells individual studs.
-
Hello Mike, I just saw your post. I will message you in a bit. Thanks for the advice
-
I recently purchased an ARP stud kit listed for a Chrysler L6 engine (ARP 142-4001). Didnt notice until the the package arrived and I opened the box that it only included 15 studs but the head on my 265 requires 21. Watch out for this
-
Sad news today from Lisa Coatney
40desoto replied to greg g's topic in Recognitions and Remembrances
Wow.. Sad to hear this. My condolences to his family and loved ones. I was just browsing through some of Don's posts in search of some of those great detailed pictures of projects that he posted. He will be missed. -
Im surprised that ford air cleaner fir the carter BnB carbs that you are using. Any modifications to make them fit?
-
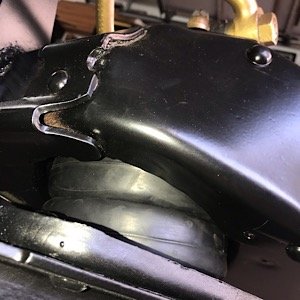
Thought I'd share in case anyone on this post is interested. I ended up using Slam Specialties 6 inch airbag (SS6 model) luckily it fit right in the frame's spring pocket without having to cut any of the frame out for clearance. I also cut out the raised spring anchor on the lower control arm and welded a plate to mount the airbag too. I'll post some pictures from my phone.
-
I was sorting throw a box of old air cleaners thinking I had a similar spare one to donate but only found some without the ridges on top and the breather holes on the side are different as well. do you still need one? If so, Ill keep looking
-
My differential is facing down towards the front 2.5 degrees down. Since the trans will angle 3-4degrees down (need to confirm this). I will need to angle my differential 3-4 degrees up. found this short video that explains.
-
Is there a spec on what degrees the motor and transmission is tilted when installed on the car? I have the motor on a stand and working on installing the the differential on a 4 link setup. I was researching and most literature states to adjust to a 3 degree tilt downwards. Is it save to assume that the engine and trans is tilted 3 degrees towards the back as well?
-
Andy, I should of clarified before, these are not fully nor properly installed. I put them them on temporarily in order to install and test clearance on the airbag installation. my apologies
-
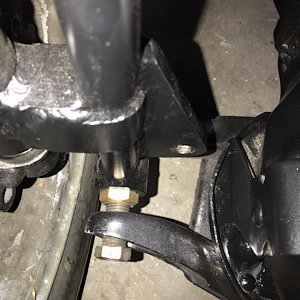
Thanks for the info Andy, didnt think about installing the pin and bushing with the lower arm off and on a bench. I think Im going to go this route during the final installation. When i took off the old pin and busings I noticed that bushings where tack welded to the upright. Maybe that how they kept it centered on the upright while they installed the pin? Heres a few pics of the temporary installation of mine.


-
James, that makes sense and thanks for the info. I'm in that same situation as well where Im trying to center the lower upright between the lower control arm fork. What holds the bushing and upright centered while installing the shaft? What I noticed when installing the shaft that once it hits and threads into the further side of the control arm fork, it appears to bind and makes it very hard to twist any further. Is this normal? Ill post some images as soon as I can get them reduced enough to get them loaded
-
Not sure if I understand your question, but the last month I have removed and installed my lower and upper control arms over a dozen times to fit an airbag system. I believe you can simply bolt the inner part of the lower control arm to the frame and lift the arm with a jack to the desired position.
-
My desperate plea to cancel the outage!!!
-
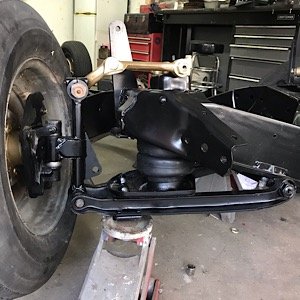
Some work over the weekend. It appears I got lucky and They’re not rubbing on the frame. The Bottom control arms have not been modified to accept the airbag. Its just mocked up to see fitment.


-
Thank you Ken! Great advise. I will be renting a pressure tester and doing the pressure test along with checking that the water pump is circulating water. I have a feeling its not because the water temperature varies drastically around the block and radiator.
-
Thank you Los Control. Here's my update. I flushed out the water from the radiator and block. filled with water and coolant. Filled radiator all the way to the top. ran the car and about 13 minutes in the car guage spiked to 210. At about 180 I noticed a bit of coolant trickling out of the overflow tube on radiator. when it got to 210 it was flowing out pretty fast. When it hot to 190 I turned on the electric fan and the temp kept rising and did not stop at 210, when it got to 215 I just the motor off. When I shut the motor off the coolant continued to gush out pretty consistently for another minute or so. Keep in mind that I used a non-pressurized cap. Until I get the kit to measure any exhaust leaks in the car, Im going to concentrate an another part of the car to get mind off of it for a bit and stay sane. Thanks to everyone for all the advise and insight.
-
I used two different infrared thermometers (to check accuracy) and both read 175-180 at the rear of the head when guage read 178ish at that point, the thermostat housing read 165 and the top of the radiator read 148. Something just doesn’t seam right. I will continue to troubleshoot. not sure if its relevant but I did notice even at the first time filling with water after the. Rebuilt when i drained the wAter looked very dirty. Brownish/red rust color like. how detailed does a machine shop go in flushing out the water passages when cleaning an engine block before machining?
-
Thank you LosControl. My engine is a fresh rebuilt and a new water distribution tube installed. Ive had had a similar issue on an older motor I had overheating issues as well.
-
So heres my latest. Installed a non pressurized cap on my aluminum radiator and filled radiator with water leaving about 1 inch space on top for water expansion. once the temperature at guage reached 175 water started flowing out if the radiator relief tube. It reached 210 and water started pouring out of the tube consistently. When the temp reached 180 I turned on a household fan that I had mounted to the front of the radiator and it didnt change the temperature at all. on the positive side, there are no more water leaks on the head studs. I plan on flushing the system and refilling with distilled water and testing again. hoping the distilled water and coolant will make a difference.
