40desoto
-
Posts
547 -
Joined
-
Last visited
Content Type
Links Directory
Profiles
Articles
Forums
Downloads
Store
Gallery
Blogs
Events
Everything posted by 40desoto
-
Just found the answers to my questions on the following post!
-
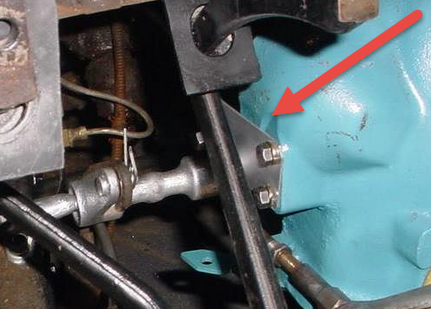
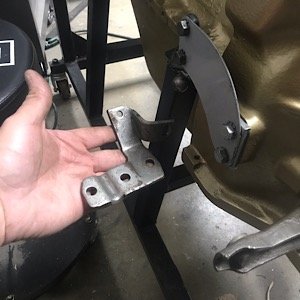
Thank you Don! This is very, very helpful. I knew that the silver plate bolted on the side of the bellhousing but I noticed on mine, and on your as well, the matting area is not flush. How did you get that silver plate to mount flushed?
-
Thank you Don. After posting my inquiry I didnt find thing diagram through one of your many posts of it. Thank you it has been very helpful. Where Im stumped is where this plate (spring 6-52-5) goes mounted on the bellhousing. Im assuming the bracket 6-53-5 goes attached to it?

-
I took apart my clutch pedal assembly from my 1940 Desoto about 5 years ago and lost track of where everything goes. I was assuming I would easily refer to the shop manual or any other diagram available online, but I havent been able to find one. More specifically Im looking for a diagram that shows the plate that I believe mounts on the bellhousing and acts as a two bolt mount for the clutch torque shaft pivot bracket. I vagely remember that plate was thin and caught my attention that a mounting plate would be so thin. Does anyone know what manual would provide an exploded view or is willing to share an diagram?
-
Thank you Don.
-
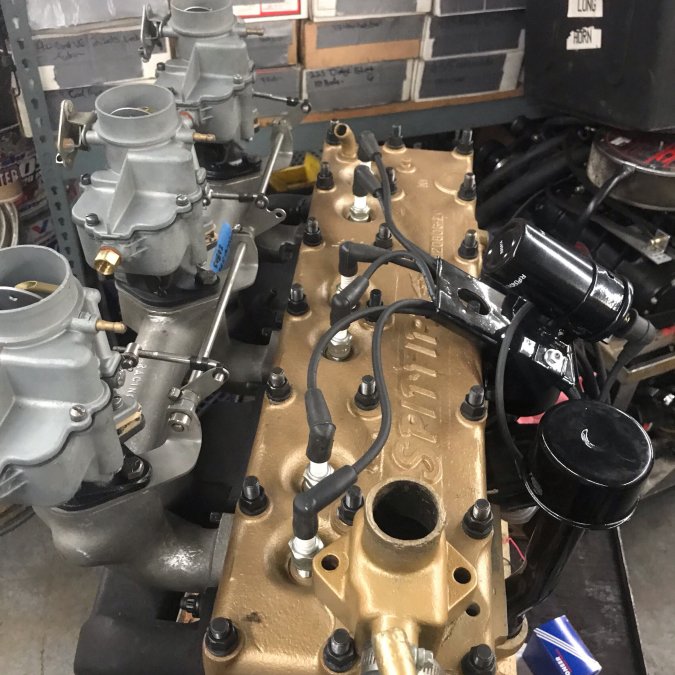
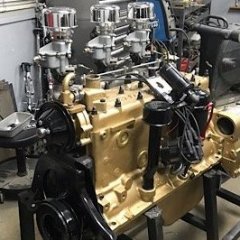
When using a triple carter ball n ball setup. Is it beneficial to run the vaccum advace from all three carbs?
-
Not sure if your question regarding how much off the head was directed at me, but I did notice that they didnt specify on the paperwork. I will ask the shop. I dont know how much had been removed before so i'll most likely never know how much has been taken off from the original head.
-
Wow! After all that great work you’ve done you’d think the blocksanding part would be easy. Im weird that I actually like block sanding. I find it therapeudic.
-
Hello Jon, defnitely. I'll send you an email.
-
I was under the impression that all 40-41 desotos had the master cylinder that sits in front of the of the pedals not to the rear as the pictures attached shows. In my opinion the mounting bracket that they provided you doenst seem to apply to either styles


-
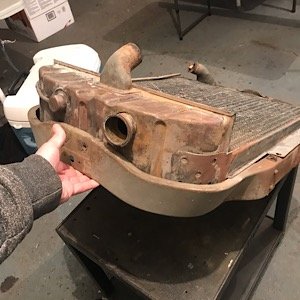
Pictures of my existing radiator with the bracket im referring to. I guess the top part of the bracket will not block the top filler neck as much as I first thought.


-
Thats the plan now that I know its that close. Theyre not open on weekends and difficult to take time off work during the week this season but I'll figure it out. I was just wondering if anyone on this forum has experienced modifying one that has the top mounting assembly covering the top. I'll post some pictures of that mounting assembly.
-
Thanks for the pictures Don! Unfortunately on my 40 desoto the radiator has a "wrap around" style radiator mount that might hit the top filler neck. I was thinking that all 1940's had this type of radiator mount but after doing some research, it appears that 1940 Dodge, and Plymouth's do not have this mount style. The good thing is that Champion Radiator is about 25 miles from me so I'll be taking my existing radiator and mount and see what model best fits my need.
-
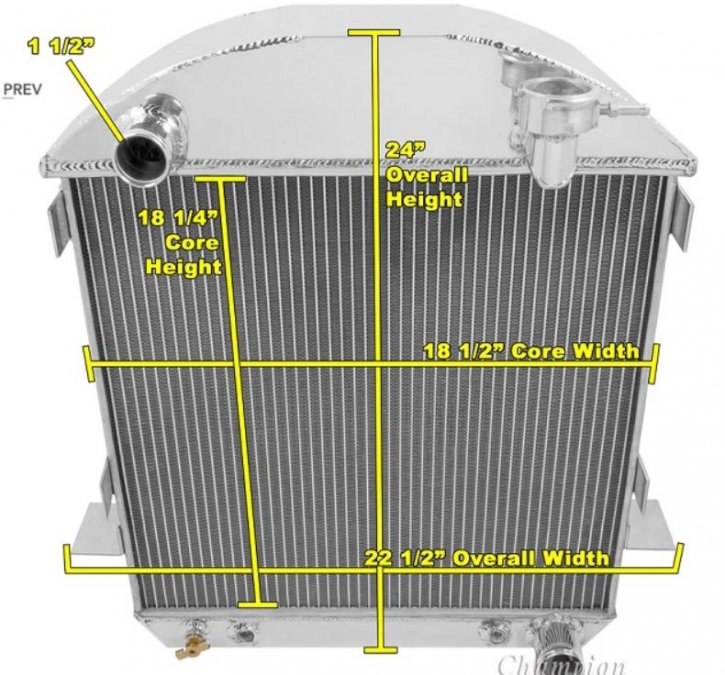
Thank you DJ. Does your Champion radiator have the upper hose in the middle or towards the side?
-
The Fatman dropped uprights kit I believe come with front shock relocation mounts. They mount to the frame. I have some pictures I can post if needed.
-
I just got off the phone with a rep at Champion Radiator. They have a universal one that might fit my application the only thing is that it has the upper hose inlet towards the drivers side vs the center. Its a little shorter in that the original. I asked about the pressurized vs non- pressurized system and he recommended that I get a really low pressure cap so its doesn't blow out any caps or cause any leakage elsewhere.
-
Thank you. By PITA I meant Pain in the ass . LOL
-
Thank you PT81! This is what I was thinking of doind since Im assuming they are only small pinhole holes. But them again I would hate for it fail and have to take it out at a later time. Looks like a PITA to take out
-
Ive had a similar experience with US radiators a few years back but couldnt complain because they are affordable and carry many classic popular model car radiators. This was for 60’s chevelles and Nova’s .
-
The shop owner recommended that he modifies it to make it a pressurized radiator. Does this make sense?
-
Just wondering if anyone has successfully adapted an aftermarket more modern radiator to a 1940 car. This is assuming all 1940 mopar cars use the same radiator design. I took my original one to a shop and the price they quoted was pretty steep. Ive never researched this topic before as I simply assumed I can get it fixed for no more than $200 if needed. As I began researching this week Ive realized that most aftermarket radiators, even thought most dimensions are correct, do not have the overlapping top tank in order for the filler neck to clear the radiator mouting bracket at the top. What other years have this same overlapping tank design? About 4 years ago I ran my old engine with this radiator and didnt notice any water leaking but did notice a small coolant stain towards the bottom area of the honeycombs. Heres what the shop offered and stated; the radiator has a honeycomb 3 row style that they will replace with a vertical, 4 row core, add a bottom return tube made out of brass (the existing one is about 1/2 corroded) make a pressurized system.
-
Thank you Don. Thats what I plan on doing. By thw way, did you fabricate those carb air cleaner adaptors?
-
Thank you Matt. I will take a close look at the plugs and keep an eye out for any leakage. Do you think itll be something that if bad, will notice if I run it at idle for a while on the stand?
-
Yes planning on making a radiator stand extension on the front that bolts on to the front of the stand
-
16 months later the engine is done. I think the shop needed some xmas money so the contacted me a month ago to let me know id be done before Xmas.