


MarcDeSoto
-
Posts
1,860 -
Joined
-
Last visited
-
Days Won
10
Content Type
Links Directory
Profiles
Articles
Forums
Downloads
Store
Gallery
Blogs
Events
Everything posted by MarcDeSoto
-
Yes, i have a 48 DeSoto radiator that the radiator shop said the core is shot. He said he could re-core it with a modern core design that looks good. He showed me a core that was not the old honeycomb design, but would work and not look very far off from original. But the cost would be around $1200. The only reason I didn't go through with this plan was I was tipped off to an NOS radiator still in the box!
-
The transmission, not the fluid drive, uses 10 w non detergent oil. You won't find it at the auto parts store. you will have to order it.
-

Looking for a P15 Woodie I sold in 1996. To a dentist in California.
MarcDeSoto replied to Plymwdy's topic in P15-D24 Forum
I would want that car back too! Gorgeous! -
The Spitfire name in the head of Chrysler engines goes back at least to 1941 and it was used up to the early 50s I think. It was a left over nickname from the WWII era. My first car was a 50 Chrysler Windsor with the Spitfire engine. Spitfire was painted red, but I'm told it didn't come from the factory that way.
-
Yes they did. Every American Mopar car I've seen from the 40s or 50s had a data plate on the firewall with the color code.
-
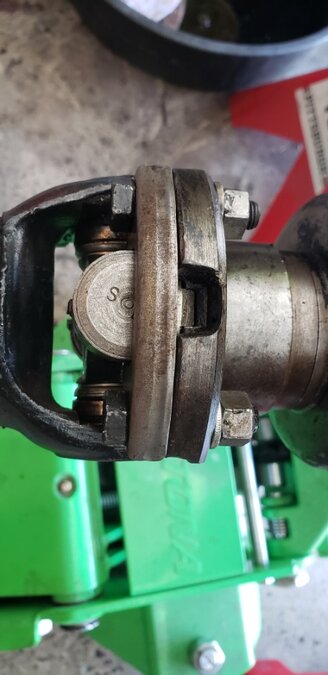
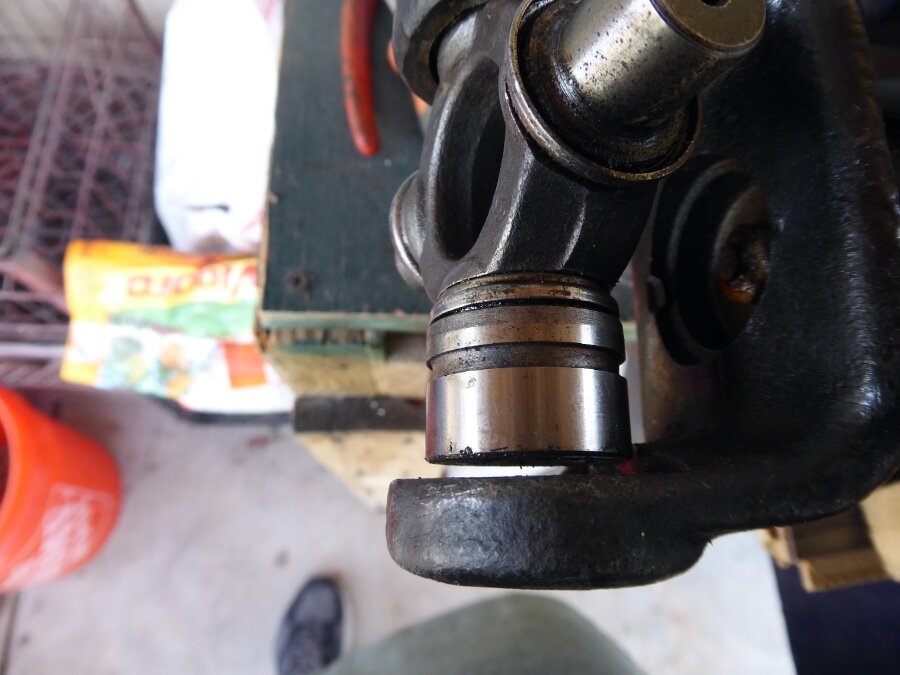
Yes, but my DeSoto never had a ball and trunnion joint. Here's how we fixed the problem. We took the old ujoint and put it up to the flange to see if it would fit. We noticed that it would fit one way, but not the other. So my helper said is there anyway you could have put the the bushings on the wrong cross. So I said I don't think so because I was careful to put bushing on the same cross as they were in the box. That turned out to be the problem. Some factory worker maybe 70 years ago put the bushings on the wrong cross where the blocks should go and put the blocks where the bushings should go. So we knocked the bushings out of the yoke and put the bushings on the other cross, and now it fit. Check out the new pics!

-
My handy man found the problem. It's flush now. Bet no one can guess what it was!
-
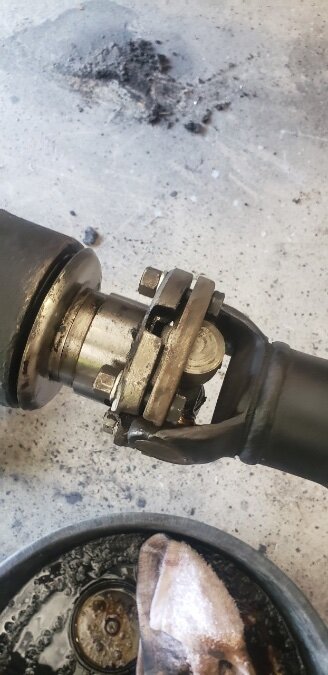
I do have a slip joint type drive shaft. It is original to the car. I don't know what you mean about adjusting it? Are you supposed to put the rear u-joint in first and then the front? We can get one C-clamp on flush, but not the other side. We have jacked up the diff to make the drive shaft more level, but still can't get the rear c-clamps flush.
-
I think I'm going to disassemble the rear ujoint and try to find what is making have that gap there.
-
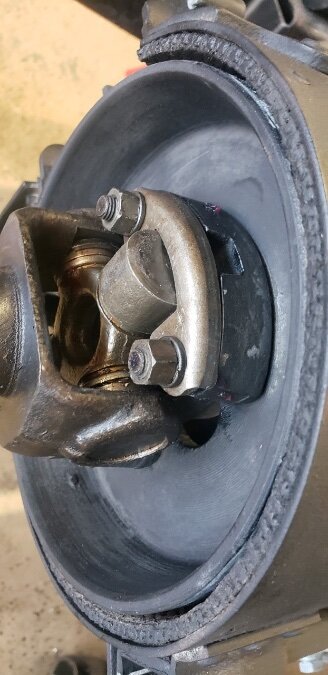
I took the handbrake off. Now it turns. I put the driveshaft on, but have a question about the rear ujoint. Are the c-clamps supposed be flush with the other side like the front ones? Front ujoint is on the top. Rear ujoint is on the bottom, and you can see a gap at the edge of the C-clamp. What should I torque the nuts to? Can't find the torque specs anywhere except I found a general spec of 20 to 30 ft. lbs.
-
Installed my driveshaft with new u-joints today. The problem is the driveshaft wont turn by hand or when cranking engine. It used to turn. The only thing different is I installed the handbrake. Maybe it's too tight?
-
There are also 1947 booklets, and some of the booklets from later years also pertain to your car. Good luck. I'm restoring my 48 DeSoto business coupe right now.
-
Got out my driveshaft and u-joints for 48 DeSoto
MarcDeSoto replied to MarcDeSoto's topic in P15-D24 Forum
I just put in NOS U-joints on my driveshaft. Putting the new ones in was a cinch using the socket and hammer method. I gave up on the U-joint press. It was too hard getting it centered, and then it would put uneven force on the bushing and it would get cocked in the yoke. I would say avoid it, unless you have a very stuck bushing. Now I just have to install the bearing blocks, which do not go in the yoke, and fasten it up with the C clamps to the trans and diff. I feel good about not having to take it to a drive line shop. -
I like the booklets too and know what you mean. Like when you are in the garage working on your radio you just want the facts. Not some customer saying, "If you guys think I'm going to drive all over town trying to get my radio fixed, you have another thing coming!" But also like the filmstrips too. So I guess you gained access OK now?
-
Got out my driveshaft and u-joints for 48 DeSoto
MarcDeSoto replied to MarcDeSoto's topic in P15-D24 Forum
Who needs a special u-joint tool? this guy just uses the hammer method to remove u-joints! -
if you like written instructions over filmstrips, that website MyMopar.com has all the booklets too. https://www.mymopar.com/downloads/mtsc/043.pdf The 1985 version of the Petersen Guide is just a reprint of the 76 version. https://www.ebay.com/itm/232122835770?_trkparms=amclksrc%3DITM%26aid%3D1110018%26algo%3DHOMESPLICE.COMPLISTINGS%26ao%3D1%26asc%3D20210609144404%26meid%3D2f063e14fead4273b90aa36a25188c24%26pid%3D101196%26rk%3D1%26rkt%3D12%26sd%3D185071253530%26itm%3D232122835770%26pmt%3D1%26noa%3D0%26pg%3D2047675%26algv%3DItemStripV101HighAdFeeWithCompV3RankerWithKnnRecallV1&_trksid=p2047675.c101196.m2219&amdata=cksum%3A2321228357702f063e14fead4273b90aa36a25188c24|enc%3AAQAHAAABEA%2FJiT7ssNXrEsx1zZncFUUkLU8ikMh%2FiWOsxkTqeqIbE5K4lpcDSKjAfQ%2F1if83xW%2FyUKAFHQLZUhK1urCIf4Z703BSvoqaVz652suN6CFHGVCCHXJHeMBvjv9UqPagqNG208ENiBZIJHTTFflLCka5Xy%2BFOTbML8%2BHTQP49dj%2FKevhzP3dMBD5fJOvMKAGSfQcRQ2XaDnrJpfhFIL%2BjWCx%2B37m0CUZ8g7gWw28dHzfKsv%2F%2FMrhpZoBzQdTWPP8AIBxHcvtcjet%2Fmz1FTBOt0GYGYtnkio0lVJsXNwDLCp2HSgiYuoOeZtwNlefOTzzGvlBMNuLmrGhQHbGR%2Fk1k49tpoLskUIvFHrp082bPXuv|ampid%3APL_CLK|clp%3A2047675
-
Got out my driveshaft and u-joints for 48 DeSoto
MarcDeSoto replied to MarcDeSoto's topic in P15-D24 Forum
I got one side of the drive shaft done. Boy it's hard to get the snap rings back in. I had to pound the bushing in a bit far just so I could get the snap ring in the groove. After you get the snap rings in, is the u-joint supposed to be a little stiff when you move it back and forth? Or is it supposed to really loose and floppy? -
Got out my driveshaft and u-joints for 48 DeSoto
MarcDeSoto replied to MarcDeSoto's topic in P15-D24 Forum
I think the way I should do it is to forget about the bushing that is punched out, since you can't remove it anyway. but to get channel lock pliers on the other bushing that is sticking out the other side, and twist it back and forth until it comes out. See the video by Eric the Car Guy above. -
Got out my driveshaft and u-joints for 48 DeSoto
MarcDeSoto replied to MarcDeSoto's topic in P15-D24 Forum
I finally got the u-joints out, but it wasn't easy. As I said you can't just press them out because the round shoulder gets in the way. And you can't take a bushing off after you press it in. I had to use a screwdriver and hammer to hammer the bushing out from the inside. I destroyed the bushing as I did that. Now I'm hoping putting new ones in is a little easier! -
Got out my driveshaft and u-joints for 48 DeSoto
MarcDeSoto replied to MarcDeSoto's topic in P15-D24 Forum
The snap rings were easy to pop out with a screwdriver and a hammer. I rented the U-joint bushing press from O'Reillys and it worked well, BUT! It popped the bushing out of the yoke OK, but what about the other side. It didn't push the other bushing all the way out, and you can't push the other bushing out because the U-joint circle prevents that. So I can't get the bushing out, even though it's out, and I can't get the other bushing out. I tried to use pliers to pull out the other bushing, but it won't budge. What should I do?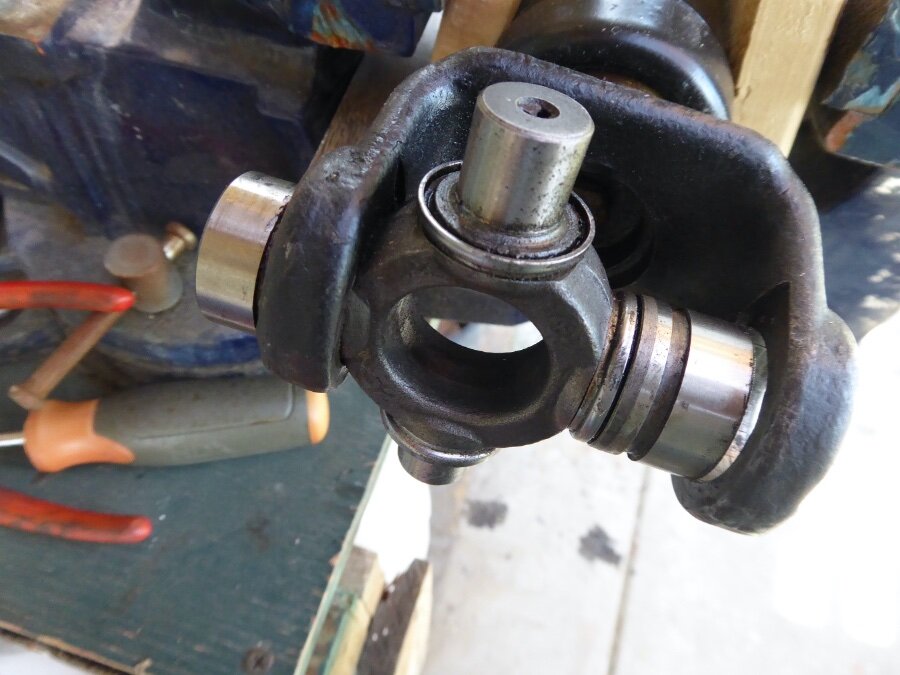
-
Got out my driveshaft and u-joints for 48 DeSoto
MarcDeSoto replied to MarcDeSoto's topic in P15-D24 Forum
It would be great if it's really this easy to remove the snap rings. -
Got out my driveshaft and u-joints for 48 DeSoto
MarcDeSoto replied to MarcDeSoto's topic in P15-D24 Forum
I was lucky enough to find NOS u-joints. Just have to replace the rotten dust seals. How do I remove the snap rings on the inside of the yoke on the bushings? I guess they make snap ring pliers. -
Picking a paint store. Auto Color Library?
MarcDeSoto replied to MarcDeSoto's topic in P15-D24 Forum
What do you mean by this? What is acid? -
Got out my driveshaft and u-joints for 48 DeSoto
MarcDeSoto replied to MarcDeSoto's topic in P15-D24 Forum
At the top of my thread I show what kind of U-joints I have. Most MoPar guys know that only Dodge and Plymouth used ball and trunnion type u-joints. -
Got out my driveshaft and u-joints for 48 DeSoto
MarcDeSoto replied to MarcDeSoto's topic in P15-D24 Forum
After watching a few videos on changing u-joints, I think I'm going to do it myself. I have a vise and I can also rent a u-joint removal tool at O'Reillys. Eric the Car Guy always has good videos on different jobs, even though he doesn't specialize in old cars.

