


MarcDeSoto
-
Posts
1,860 -
Joined
-
Last visited
-
Days Won
10
Content Type
Links Directory
Profiles
Articles
Forums
Downloads
Store
Gallery
Blogs
Events
Everything posted by MarcDeSoto
-
I'm doing the same thing with my 48 DeSoto soon. I'm thinking of just putting the DeSoto gas tank up on a milk crate and screwing the gas line into the tank. The body is off of the chassis that is why I need a milk crate. Then I would prime the carburetor with gas and start the engine. The fuel pump would them pump more gas up to the carburetor.
-
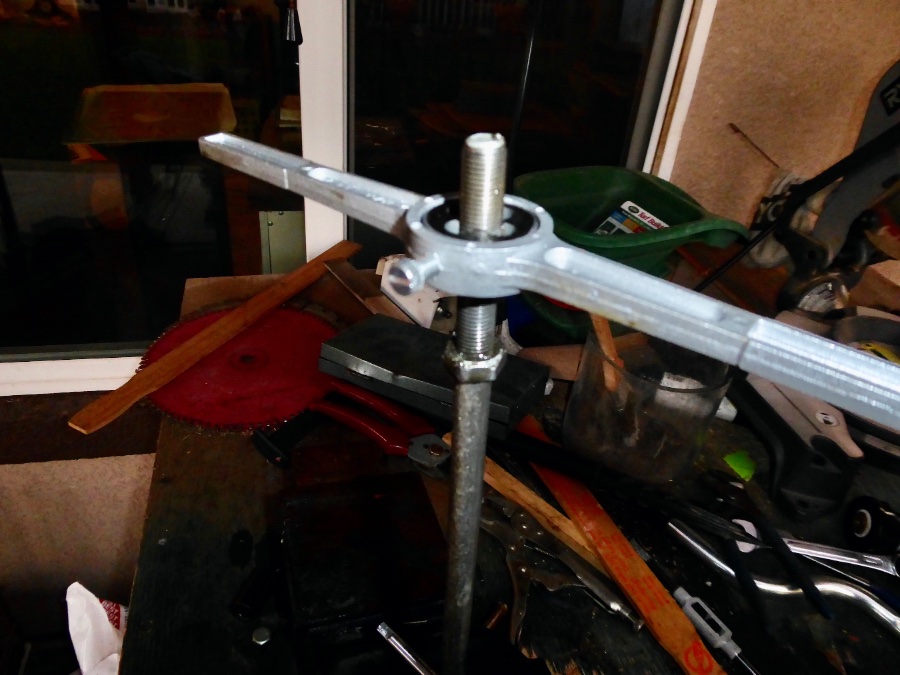
I found out that lining up the C-705 gauge is easy. Just put the gauge on and turn the turnbuckle until it lines up! It's easy once you know how this linkage works. I only had to assemble and disassemble it about 15 times!
-
I guess I'm wrong. They do still sell SAE 50 oil. It's made for racing. https://www.amazon.com/Brad-Penn-Oil-009-7115S-Racing/dp/B002RFE4MG/ref=sr_1_6_mod_primary_new?crid=121Y6MOUKMV2&keywords=50w+oil&qid=1660695206&sbo=RZvfv%2F%2FHxDF%2BO5021pAnSA%3D%3D&sprefix=50+w+oil%2Caps%2C142&sr=8-6
-
I don't think they sell 50w oil anymore. If I'm right, you could make your own 50w by mixing some 90w gear oil with some 30w oil.
-
I think I finally have the clutch linkage hooked up right. The Miller gauge C-705 lines up right. The clutch pedal comes back and doesn't stay down like before. Question: If I push the clutch pedal down and release it suddenly, it snaps back hard. I think that's normal as you are supposed to release the pedal slowly. Am I correct?
-
Speaking of trial and error, I had to learn the hard way that there is just one way to mount the heavy overcenter spring on the clutch torque shaft. After hooking everything up except the spring and the clutch fork rod, you must hook up the overcenter spring, then unscrew the clutch fork rod nut so that it is at its shortest length. Then, with force, pull back the clutch pedal and hold it with all your might. Then have a strong friend pull back the clutch fork enough to slide the clutch fork rod into the fork. I've tried all the other ways, but this seems to be the only way that works.
-
Keith, yes, looks like 1948 was the last of the turnbuckle design. The 49 S-13 DeSotos eliminated the turnbuckle, but still had an overcenter spring. It was adjusted by turning the eyebolt at the front of the spring to align with gauge C-853 on the overcenter spring. Looks to be a simpler design. What do guys do who don't have these special Miller tools?
-
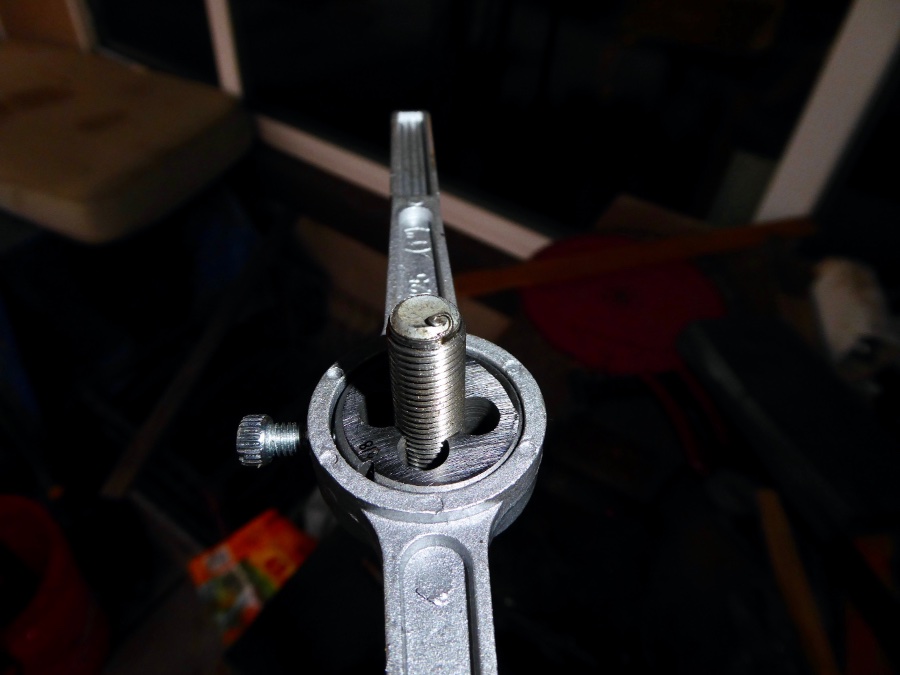
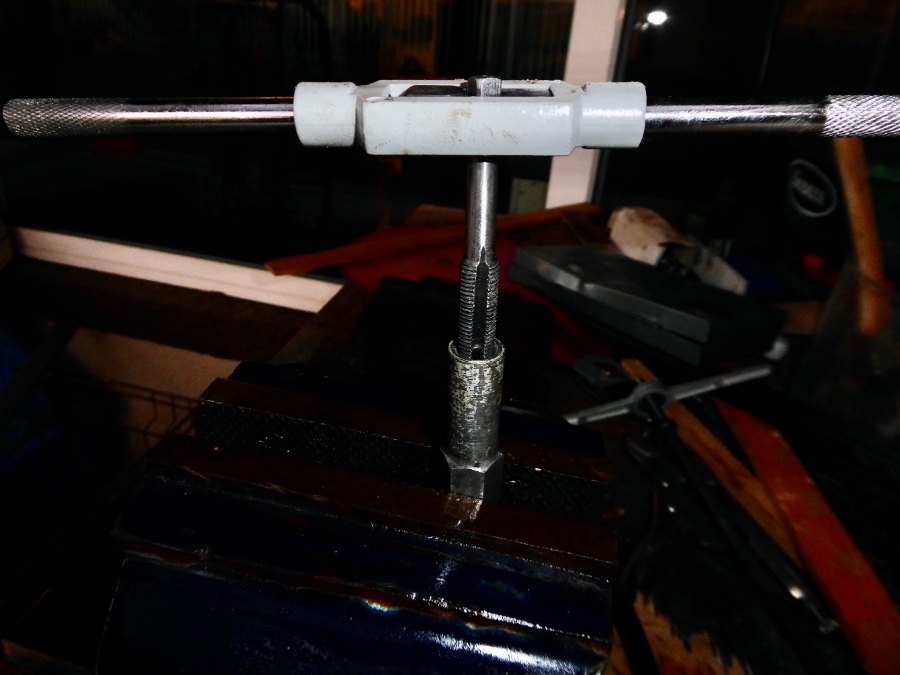
Well, I finally got the clutch rod unscrewed from the clutch long nut that goes into the fork. Luckily, my Tap and Die set had the needed 3/8" 24 thread tap and die. I could see that the clutch rod threads had been stressed and were dry. I lubed them and tapped and died the threads. Now they screw together easily! I guess I'm becoming a junior master mechanic bit by bit. I have had this clutch linkage assembly apart so many times now, I think I'm beginning to understand it!
-
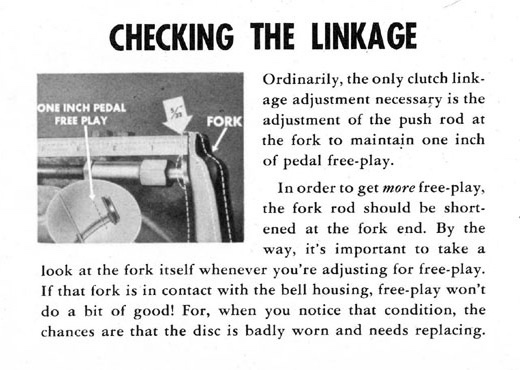
Keith, the clutch pedal rod is correctly put on the inside of the torque shaft. The pedal rods are slightly bent to fit better. But I noticed another problem I'm having. The Master Tech filmstrip says you must have 5/32" free play at the clutch fork. You check it by removing the pull back spring and jiggling the fork so that it has 5/32" free play at the fork rod, which produces 1" free play at the pedal. But when I disconnect the spring there is no free play at the fork. When I try to screw the fork rod nut back to make the fork rod shorter, it WON'T turn anymore, even though there is more thread there. I can't think of why the fork rod nut stops unless the rod has a messed up thread. BY THE WAY, 5/32" FREE-PLAY AT THE FORK IS JUST A HAIR MORE THAT 1/8". REMEMBER YOU HAVE TO DISCONNECT THE PULL BACK SPRING TO CHECK THE PEDAL FREE-PLAY!
-
James replied to my questions, but I thought I should share it here. Hi Marc, Just got back into SF. Have you run through all the procedures as outlined on Page 25-26-27 here: https://www.web.imperialclub.info/Repair/Lit/Master/016/Page26.htm One thing to note. If you have one inch of travel on the pedal but do NOT have the 5/32 inch clearance between the end of the rod and the clutch arm then something is bent. One thing is to never use the over center spring to try and adjust the clutch. Never. I have had BAD luck in the last 10 years with clutch's. The re-builder's are not watching the detail on the arm height, the correct springs nor the marcel (the wave spring) on the units. On my 1949, I know something is wrong as I had to build a linkage arm an inch longer as the stock one was too short and I did not want to pull the entire thing apart again. I will at some point... If you have one inch of play, 5/32 clearance and the spring is adjusted using the tool; then I would say that either something is bent, the throw out bearing arm is wrong, the throw out bearing housing is wrong or the arms on the clutch arms not adjusted to the correct height. James
-
I straightened the fork rod and disassembled the clutch linkage and re-assembled it. I got it so the clutch pedal now does return, but the overcenter spring gauge does not line up. I'm thinking I put the turnbuckle on in an incorrect manner. When I turn it, it gets close to coming off of the right side, so still more work to do.
-
I took the clutch torque shaft off with the clutch fork rod. The fork rod has a slight bend in it, so I will try to straighten it. Also the clevis pins have lots of play in them, which I will try to fix with more washers. You have to be careful with that overcenter spring. It has a lot of pent up power!
-
No I didn't. The excessive side play came back. I guess I need to put an extra washer in there to take up the slack.
-
After stepping on the clutch pedal with the clutch fork rod connected, it pushes the clutch fork in a normal manner, so I don't think that is the problem. I'm still stumped at what is causing the clutch pedal to stay down after being pushed down. I noticed that this condition improves if I tighten up the clutch fork rod so that there is no pedal free play, but you are supposed to an inch of free play. What should I do now? Thanks.
-
Has anyone tried to use tool C705 to set the overcenter spring to its correct alignment? It is for putting the adjustment on the overcenter spring. I can't seem to get all three points to align.
-
I'm wondering if I have the right clutch fork pull back spring. It is 7 3/4" long. Sound and look right? see vid.
-
I don't understand your statement. I checked and I do have a washer between the clutch pedal and the MC. I took the fork rod and clutch release pull-back spring off. I did this because it seems the clutch release bearing is extremely tight. Is it supposed to be this tight? If not, I guess I have to pull the drive shaft and transmission to investigate.
-
I solved the excessive play on the pedal shaft just by hammering the shaft in a little bit. But the kink that stops the return of the clutch pedal has me stumped.
-
I'm having some trouble with my clutch linkage. I adjusted my overcenter spring using tool C705. And I adjusted the clutch fork to have one inch free play, but the clutch doesn't return after being applied. see video below
-
 I don't have the wiring harness installed yet and the body is off of the chassis. I'm just trying to start the engine to see if everything is OK before I put the body back on. I already made my own blown up, color coded wiring harness which I displayed here a couple of years ago.
 -
I can't find a wiring diagram that tells how to wire up the engine before the wiring harness is installed. since the body isn't on the car, I suppose the accelerator is just the rod activated by your hand. Does the neg. side of the coil go to the neg. battery terminal? Does the pos. side of the coil go to the distributor ground connection? I know how the starter crank is wired. Am I on the right track?
-
What is that little "weep hole" on the bottom of my water pump?
MarcDeSoto replied to MarcDeSoto's topic in P15-D24 Forum
Does yours have the heater hose bypass on top? I'm buying a new water pump on ebay. It doesn't have the zerk fitting because it says it has a sealed bearing with no maintenance. -
What is that little "weep hole" on the bottom of my water pump?
MarcDeSoto replied to MarcDeSoto's topic in P15-D24 Forum
That's where my plug is. I'm going to try to find a zerk fitting for it. Does your pump still work OK, or are you going to buy a new one? I guess it's a good idea to buy one as an extra to carry in trunk in case the pump has a break down. I don't think the local garage would have these pumps available in stock! -
What is that little "weep hole" on the bottom of my water pump?
MarcDeSoto replied to MarcDeSoto's topic in P15-D24 Forum
I can't remember if my water pump was rebuilt or I got an exchange since it was about 40 years ago, but I think it was the latter! My water pump turns perfectly with no play. So I'll put a zerk fitting in and grease it with water pump grease, if they still sell such a thing. -
What is that little "weep hole" on the bottom of my water pump?
MarcDeSoto replied to MarcDeSoto's topic in P15-D24 Forum
Why would it need to be rebuilt? Wouldn't the rebuilder put some grease in there? It turns over fine. The water coming out of the weep hole looks brown. Maybe it's the grease?
