


bkahler
-
Posts
1,951 -
Joined
-
Last visited
-
Days Won
39
Content Type
Links Directory
Profiles
Articles
Forums
Downloads
Store
Gallery
Blogs
Events
Everything posted by bkahler
-
Interesting pictures. I had always thought the oil line fitting went to the port behind the starter. I knew the trucks didn't have the rubber hoses in the oil line between the gauge and the block but I just like the idea of having the isolation feature the rubber hoses provides. Now I've got to decide if I should re-route the line from the hose to the block on my truck!
-
51 B3B build thread - after all these years
bkahler replied to bkahler's topic in Mopar Flathead Truck Forum
One more item off the engine start list. I'm assuming I have it installed correctly.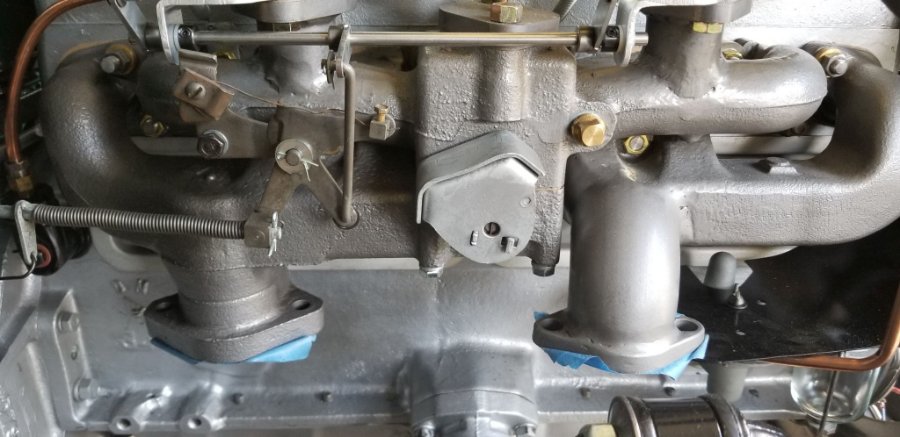
-
51 B3B build thread - after all these years
bkahler replied to bkahler's topic in Mopar Flathead Truck Forum
Ok, the oil gauge piping is done. I installed my spare block fitting without modification. Other than fluids all that's left before trying to start the engine is generator, starter and heat riser. I'll try and tackle those tasks over the next couple of weeks. Thanks for all the replies and suggestions. Brad
-
51 B3B build thread - after all these years
bkahler replied to bkahler's topic in Mopar Flathead Truck Forum
So if I understand correctly you're saying your fittings do not have the 1/32" restrictor built in and you don't really have any issues with your gauge bouncing all over the place due to variations in fluid pressure. This approach would be rather challenging to perform, at least for me. Mainly because of the inverted flare portion of the fitting. Getting any silver solder in the wrong spot would negate the flare seal. I think I'll take the approach of not doing anything until I start the engine and see how the gauge reacts. I prefer to procrastinate whenever possible! Thanks, Brad -
51 B3B build thread - after all these years
bkahler replied to bkahler's topic in Mopar Flathead Truck Forum
Unfortunately this approach won't work. The fitting is an an inverted flare style and there is minimal room between the starter and the block for the fitting to fit in let alone any sort of adapter along with the fitting. I've got plenty of 1/32" drill bits. I was rather surprised at just how much the bit deflected in the hole. It was no where near straight! Brad -
51 B3B build thread - after all these years
bkahler replied to bkahler's topic in Mopar Flathead Truck Forum
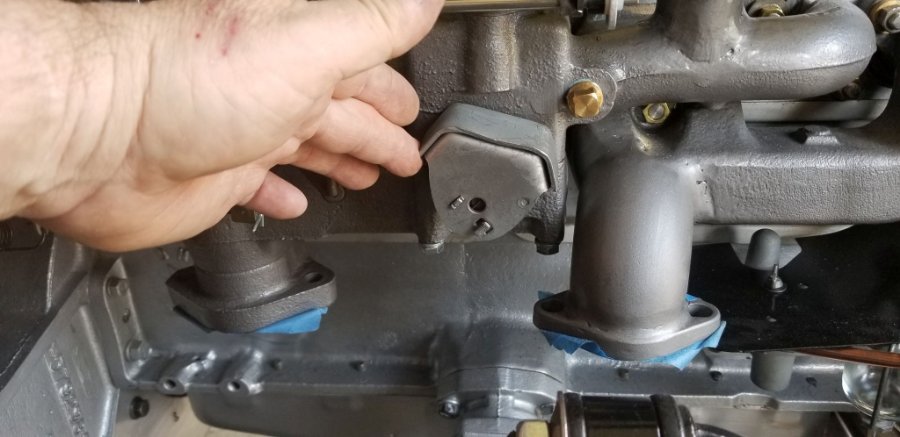
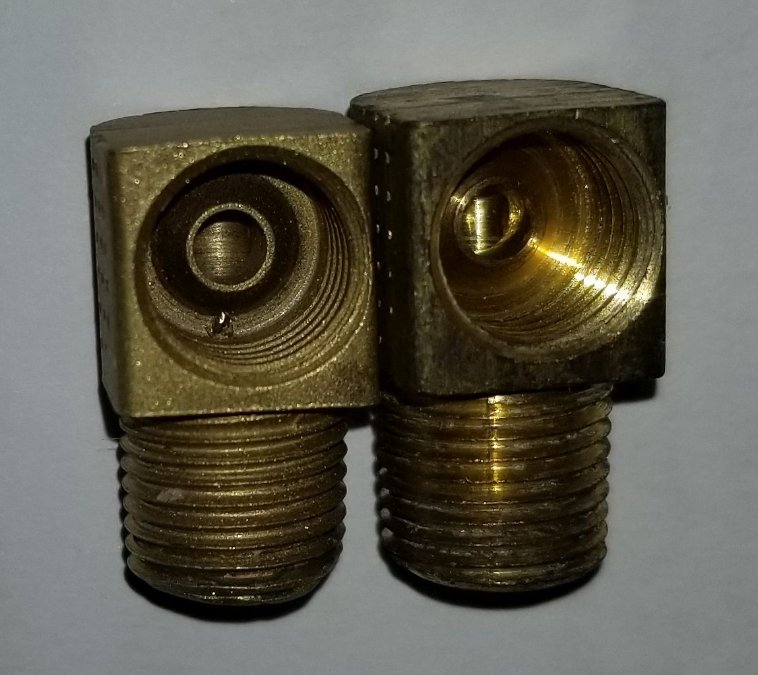
While viewing the Dodge oiling system video I realized that I probably don't have the correct fitting in the block that feeds my oil gauge. The video talks about the fitting having a 1/32" diameter feed hole. So I checked my fitting and sure enough, it doesn't have the small feed hole. The fitting that I installed I bought for a different project and was a left over. It was the right size and style so I figured on using it. I decided the easiest way to get the proper size feed hole would be to silver solder the fitting closed and then drill a 1/32" hole. The silver solder part went just fine but the drilling part not so much The tiny drill bit wandered a huge amount and ended up in the wrong part of the fitting before snapping off. In the picture below you can see where I started off drilling in the left fitting. I could see a faint impression of the original hole so that's where I started. By the time the drill bit snapped it had wandered up and into the area where the nut screws into. You can see the broken drill bit tip in the left fitting. The right fitting is my last spare so I want to get it right the second time! I'm beginning to think maybe I should use an epoxy like JB Weld to plug the original hole. I think it might be easier to drill through and I believe JB Weld is oil resistant. Any thoughts or tips on drilling with such tiny drill bits? Thanks, Brad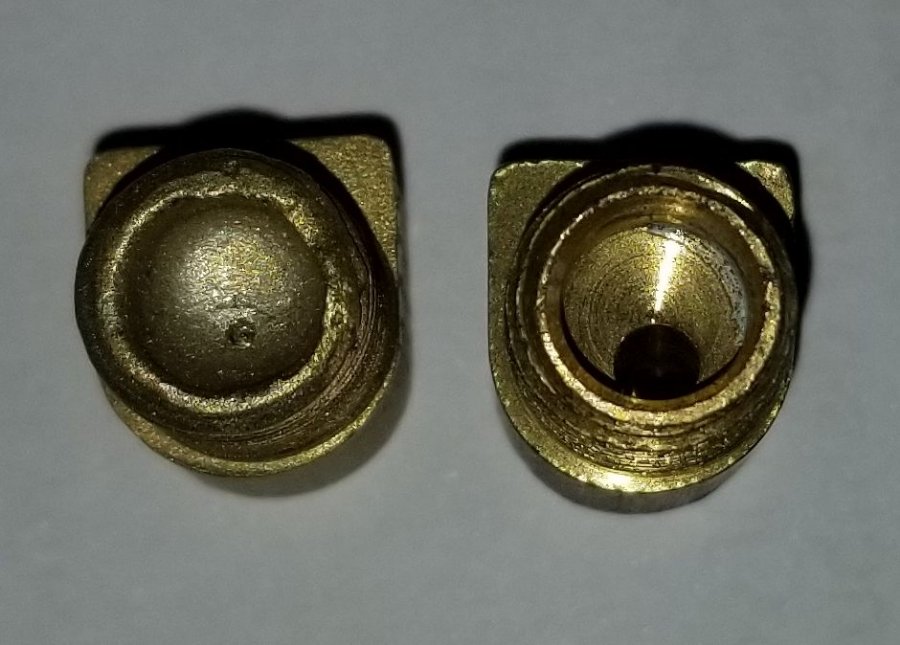
-
51 B3B build thread - after all these years
bkahler replied to bkahler's topic in Mopar Flathead Truck Forum
I hadn't really thought about it. I've never really been tempted by the new coolants that are on the market for my other restorations. I'll do some research and make a decision when I'm ready to fill the system. Thanks, Brad -
51 B3B build thread - after all these years
bkahler replied to bkahler's topic in Mopar Flathead Truck Forum
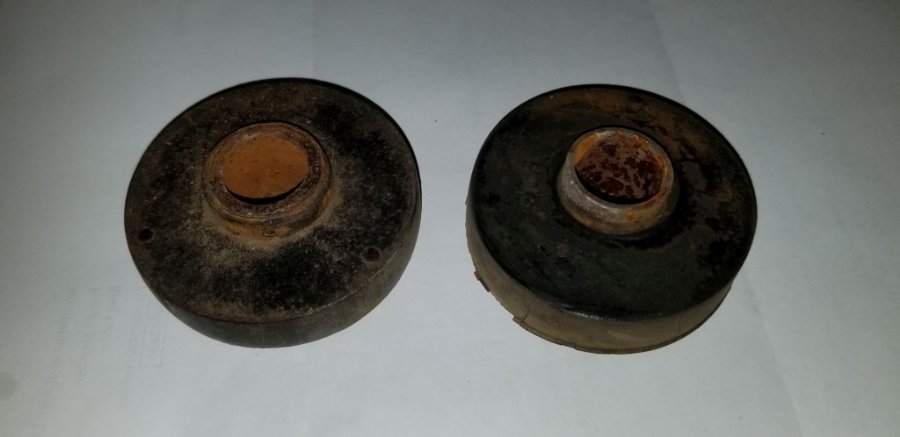
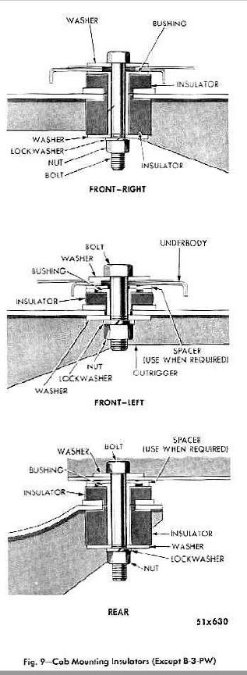
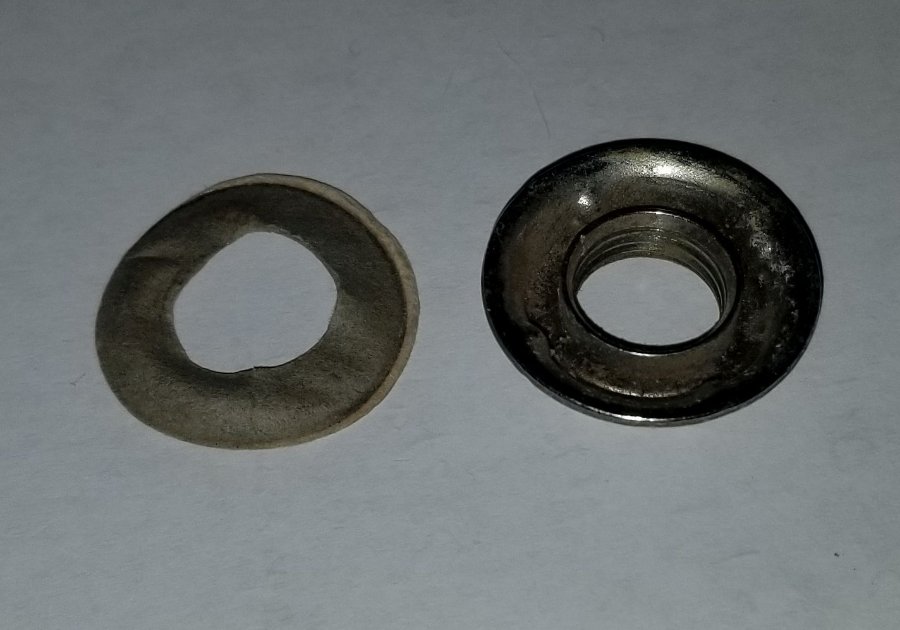
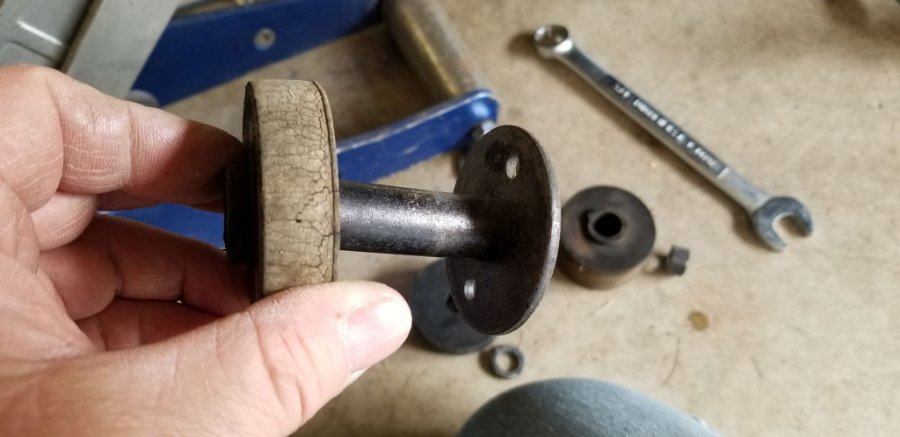
My original on had a metal disc and tube like the other three corners only it didn't use the large lower rubber. I scrounged a spare one years ago just like my original. Attached is a picture out of my service manual showing the bushing inside the rubber disc for the left front. I think I'm going to look at what it might take to modify the new rubber bushing to work with the steel tube and disc. When I have time of course!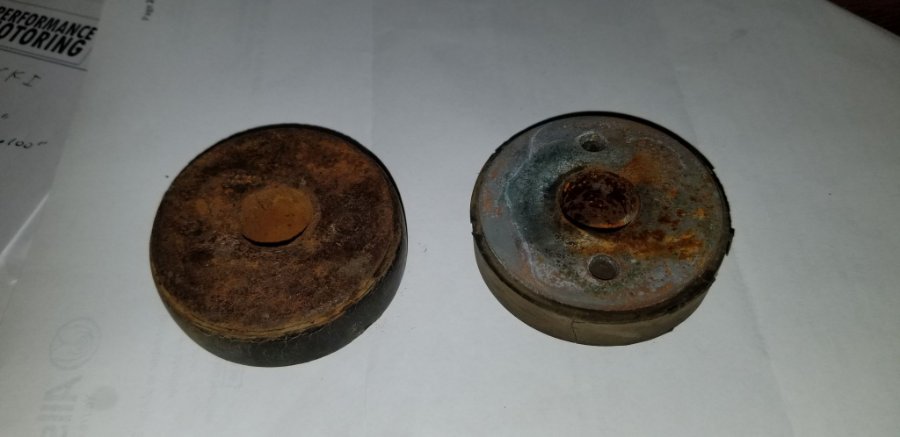
-
51 B3B build thread - after all these years
bkahler replied to bkahler's topic in Mopar Flathead Truck Forum
Workin on it...... :) I could do that although on other motors that I've rebuild I've not done so. But since it's already late spring here it wouldn't hurt to use water on the first start. Once started I need to run it for about 30 minutes to break in the cam and lifters. After that it will be a while before I attempt to drive it. -
51 B3B build thread - after all these years
bkahler replied to bkahler's topic in Mopar Flathead Truck Forum
Ok, I lied the other day ? I said the coolant system was done and I could fill the system. Unfortunately I forgot that the temperature gauge bulb was not installed. Last night I managed to finish that task so the coolant system is NOW ready to fill I ordered a brass adapter from Amazon and it turned out the inner bore was too small so I had to drill it out to match the size of the original bulb. The only tasks left before I can start the engine for the first time are rebuilding the starter and generator, hooking up a battery and a couple of temporary wires and fill the truck with fluids of various types. I'm thinking sometime in June I just might be able to start the engine after waiting 21+ years since the rebuild. Getting close.......!
-
Were 1955/56 Dodge trucks 6 volt or 12 volt?
bkahler replied to bkahler's topic in Mopar Flathead Truck Forum
Duh, I have most of Bunn's books and didn't even think about looking through them! Oh well, thanks! -
Were 1955/56 Dodge trucks 6 volt or 12 volt?
bkahler replied to bkahler's topic in Mopar Flathead Truck Forum
Sorry, all I have is the year 55/56 and the part number 1568-393. -
Were 1955/56 Dodge trucks 6 volt or 12 volt?
bkahler replied to bkahler's topic in Mopar Flathead Truck Forum
What I'm trying to find out is if a Mopar heater switch for 1955/56 trucks part # 1568-393 is for a 12 volt heater motor or a 6 volt. My 51 is now 12 volt and I installed a 12 volt motor in the heater so I'm concerned that the original switch won't work properly. Last thing I want to do is burn up my new wiring harness! Brad -
Inquiring minds need to know! Thanks, Brad
-
51 B3B build thread - after all these years
bkahler replied to bkahler's topic in Mopar Flathead Truck Forum
I just ordered a nylon sheet that is .010" thick. I'll try making a punch on my lathe that will punch out .900" round washers. I figured it was worth a try. If it doesn't work I'll try an milk jug! -
51 B3B build thread - after all these years
bkahler replied to bkahler's topic in Mopar Flathead Truck Forum
I'm at the point where I need to install the cables that pass through the dash and the various switches. I've been searching for the plastic/nylon washers that the switch and cable nuts ride on to prevent marring of the paint. The nuts for the cable housings measure about 0.9" outside diameter, 0.465" inside diameter and the washer has a thickness of about 0.010". I googled to my hearts content and still haven't found anything that is suitable. What have the rest of you used to overcome this problem? Brad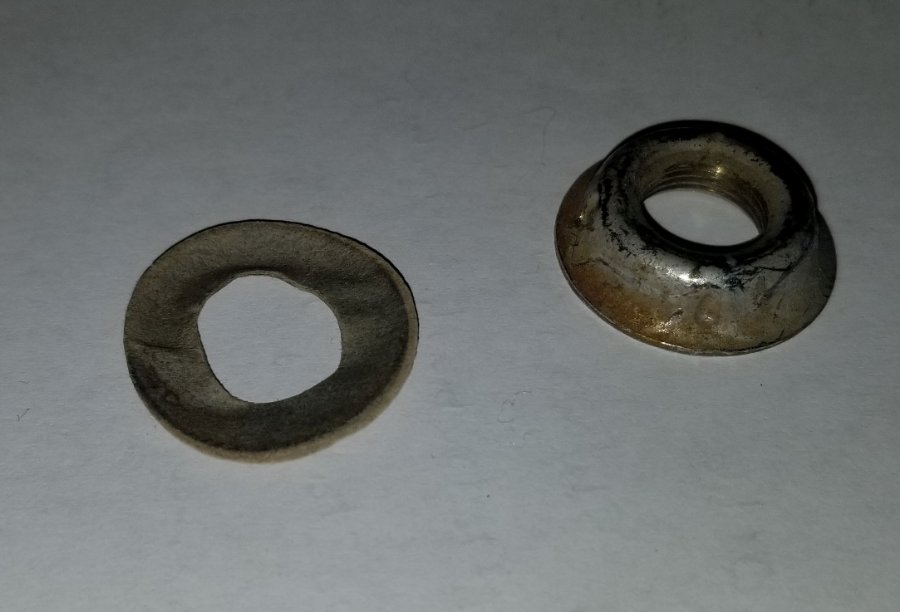
-
6v electric fuel pump: help needed
bkahler replied to Worden18's topic in Mopar Flathead Truck Forum
I had a similar problem years ago on a race car. The problem ended up being a very slight leak on the suction side of the pump. All it was doing was sucking air. Tightened the fitting and problem solved. -
51 B3B build thread - after all these years
bkahler replied to bkahler's topic in Mopar Flathead Truck Forum
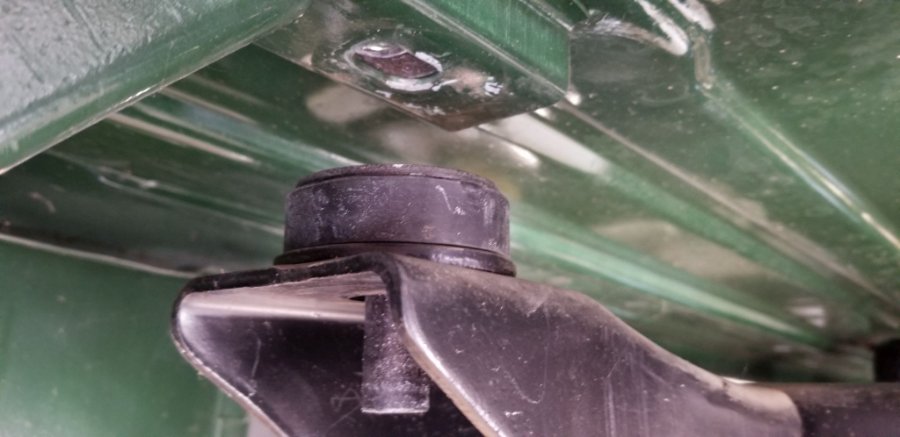
The radiator drain petcock was the last item in the cooling system to install and that task is now complete so the system can be filled anytime I feel like it. I also installed the temperature gauge tube retainer that mounts on the firewall. Finally I replaced the rubber cab mounts. Even though the originals weren't totally deteriorated I figured there would be no better time to replace it than now before the fenders are installed. I bought the rubber parts from Vic's Dodge Garage. They seemed to be pretty decent quality. Only issue was the left front didn't allow for the steel tube so I need to look at that a little closer before I tighten everything for good. Brad

-
10th Annual International Work On Your Truck Day!!!
bkahler replied to 48Dodger's topic in Mopar Flathead Truck Forum
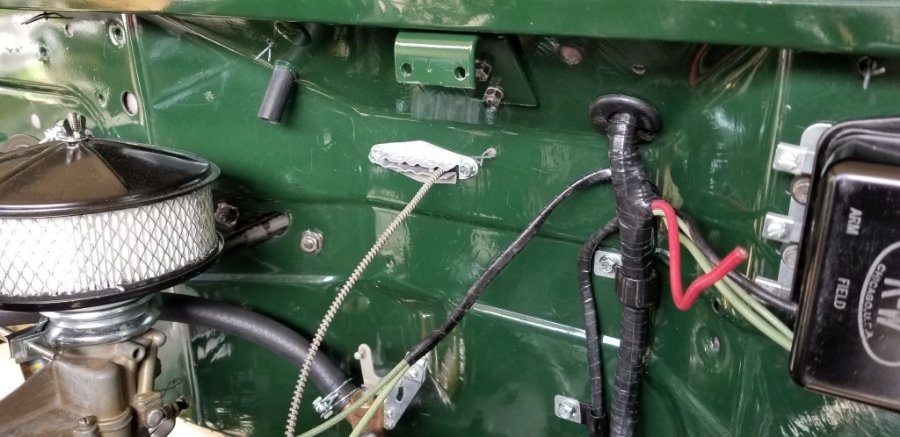
I had to work OT yesterday and today which definitely limited what I had time (and energy) to work on, but I did manage to get a few things done. Anyway, I got the radiator drain petcock installed, new replacement cab mounts installed and the little retainer bracket that supports the temp gauge tube, throttle and choke cables. Brad -
51 B3B build thread - after all these years
bkahler replied to bkahler's topic in Mopar Flathead Truck Forum
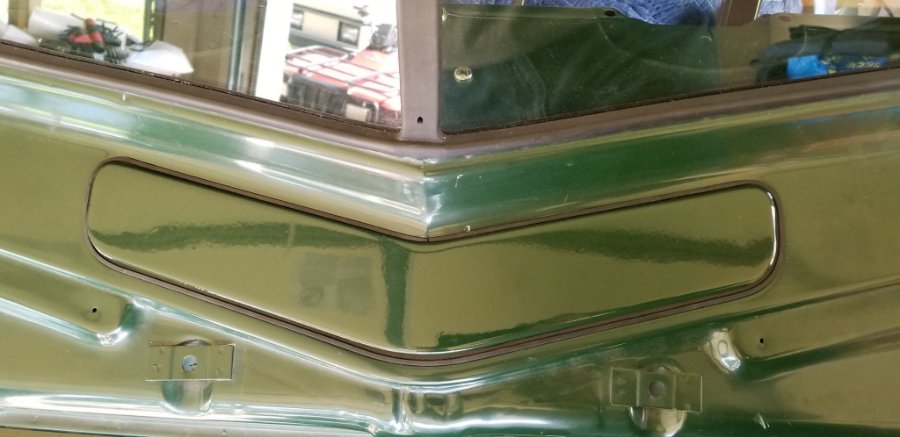
JB, thanks for the picture and info. I would not be a bit surprised if my door wasn't bent at least a little bit in the corners. Seventy years is a long time where it could take a set. It looks mostly flat and like everyone has been saying it probably should have some angle to it from the center out. I'll talk to a friend of mine who does body work to see if "tweaking" the cover would be doable without to much damage to the paint. Part of the problem is how the door is made. The flange that is welded to the cover acts like a stiffener. I spent a couple minutes last night installing the instrument cluster. I have replacement NOS gauges available but I figured I would start out using the originals and only replace them if they didn't work correctly. I know the temp gauge works as I tested it years ago. I ran into a problem when I tried to screw the temperature sensor bulb into the block. The adapter fitting on the block has been damaged and the gland nut won't screw in. So now I'm on the hunt for an adapter fitting Brad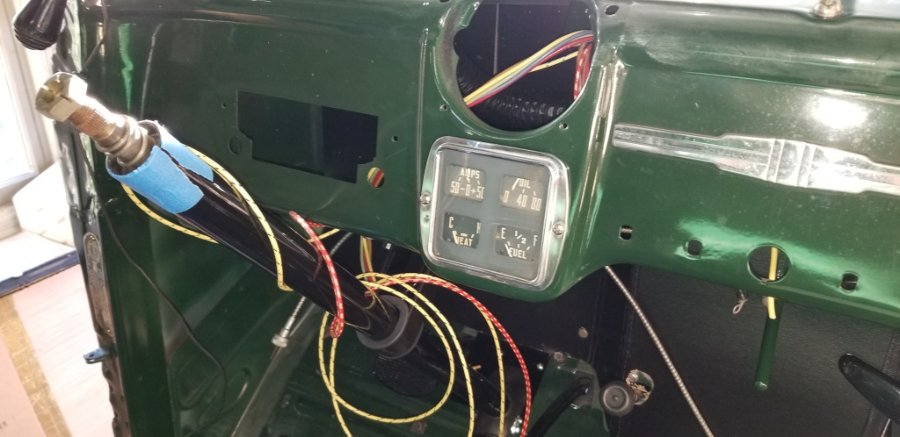
-
51 B3B build thread - after all these years
bkahler replied to bkahler's topic in Mopar Flathead Truck Forum
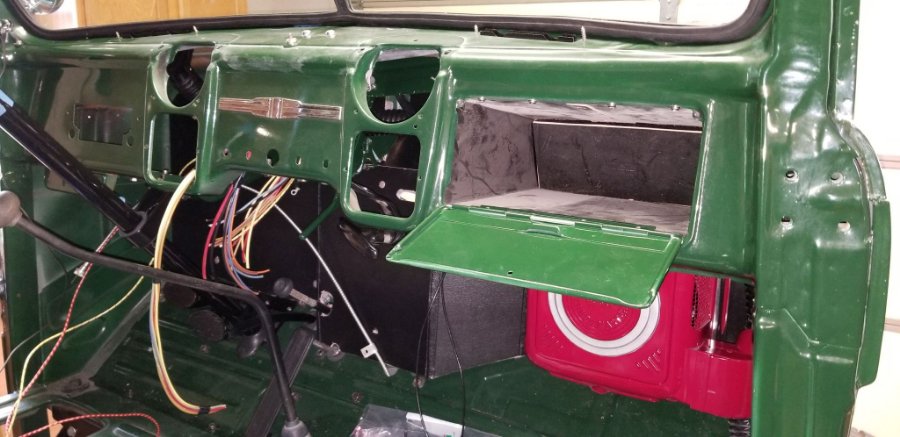
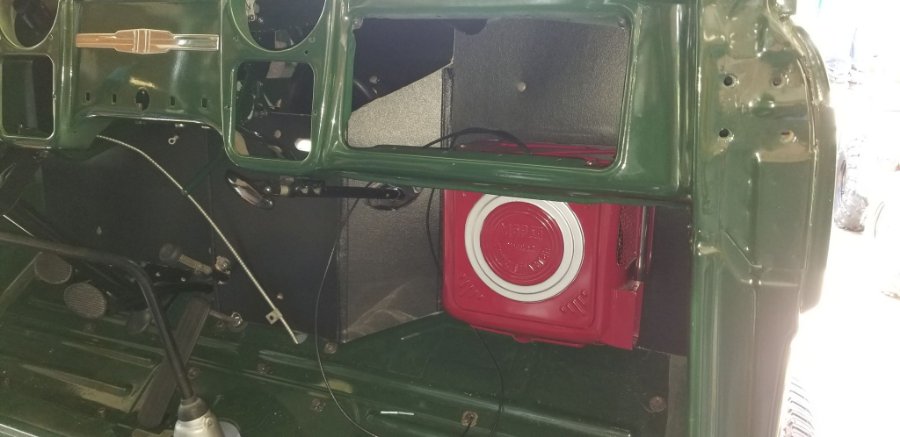
No good deed goes unpunished. I thought the glove box would fit through the opening, nope, it has to be fitted from the backside. So, I had to pull the heater so I could get the glove box set in place. Before I did that however, I installed the defroster hoses. I also installed the glove box door. Still need the handle but the door is in place. After all that I put the heater back in place Next I pulled the main wiring harness through the firewall and into the dash area. The engine compartment is really starting to come together! I'm sort of dreading making all of the electrical connections under the dash. I'm not near as flexible as I used to be. I think I'll find a whole lot of packing blankets to make a bed inside the cab so I can lay there in comfort. Brad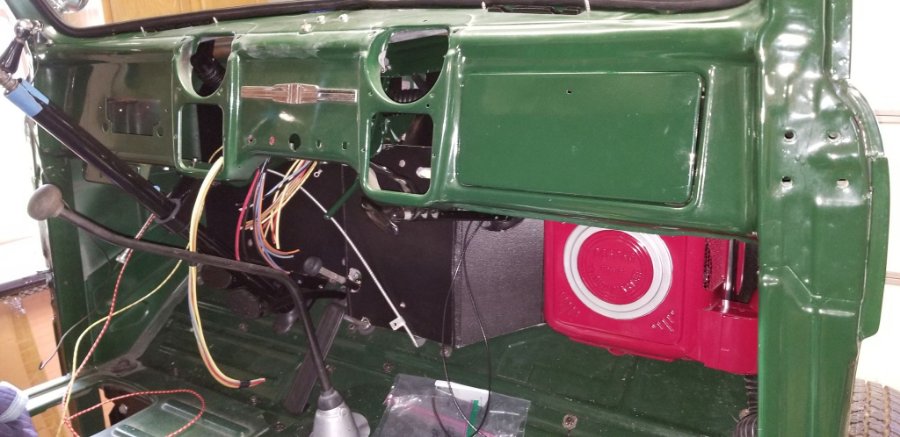

-
51 B3B build thread - after all these years
bkahler replied to bkahler's topic in Mopar Flathead Truck Forum
Thank you for the kind words I wish my truck was flawless but in reality it is no where near that quality. I'd call it a ten footer at best! I would have liked to get a honey comb re-core unfortunately I just couldn't justify the price. It is nice that there are places that are reproducing them, just not doable for me. Thanks! Brad -
51 B3B build thread - after all these years
bkahler replied to bkahler's topic in Mopar Flathead Truck Forum
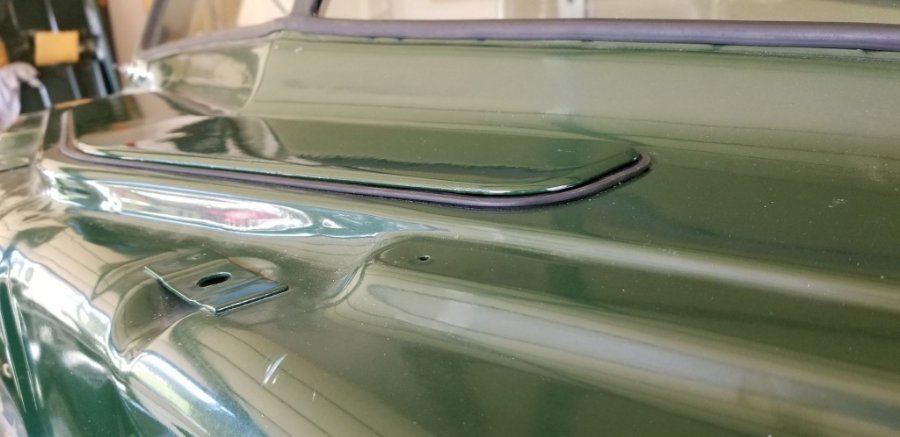
Merle's post got me thinking about the linkage arm where it bolts to the cover assembly. I had thought I had it pushed up all the way against the two bolts when I tightened it down but I after checking I realized there was a little bit more movement available. Made the adjustment and it was a lot closer to closing all the way but not quite there. So I took the support bracket with the linkage out and lengthened the slots on the arm. I also lengthened the slots on the cover assembly itself. Once I did that the cover pretty much closed all the way with a nice solid snap. It now snaps open and snaps closed. When it's closed I can see a slight sliver of light in each corner when looking under the dash. So, I'm going to say it's good enough and considering what Los_Control mentioned about the water channel and drain tube I'm going to call it good enough. At some point I might attempt what Jeff did where he built up the gasket with silicone sealant however I'm going to leave that for another day. Right now I want to start making progress with the rest of the truck To celebrate the vent being complete I went ahead and installed the heater for the final time! Now I think it's time that I try and fit the wiring harness. I think it will be easier to install without the gauges in the way so I might start that project tomorrow. Thanks all for comments and suggestions on dealing with the cowl vent. Brad
-
51 B3B build thread - after all these years
bkahler replied to bkahler's topic in Mopar Flathead Truck Forum
I used one of those in my motorhome shower pan....I think I'll pass on putting one in my truck! ? I think the overall solution is going to involve modification of the slots in the cover or shortening of the pivot arm or a combination of the two. I'm going to stew on it for a while. I'm of the opinion there has to be a solution somewhere, I'm just not seeing it at the moment. -
51 B3B build thread - after all these years
bkahler replied to bkahler's topic in Mopar Flathead Truck Forum
I checked the mounting of that bracket last night. There is no adjustment where it bolts to the firewall other than a little slop in the mounting holes that don't amount to anything. The bracket is pretty much fixed in one specific spot. My cover is in good shape, no warps, bends or tweaks. The only problem had been in the lever arm, it was bent out of whack which I straightened prior to installing. My parts look just like the picture in the manual. One idea I've been toying with is where the arm pulls down on the cover assembly would be to shorten the arm slightly so the cover would have be pushed downward slightly to be able to bolt the arm to the cover. Still thinking that one over.... Brad

