Ivan_B
Members-
Posts
1,195 -
Joined
-
Last visited
-
Days Won
13
Content Type
Links Directory
Profiles
Articles
Forums
Downloads
Store
Gallery
Blogs
Events
Everything posted by Ivan_B
-
I was planning to do a more comprehensive write-up, if people are interested. Just let me finish it completely first ?
-
That is not technically the case, but it works and the majority probably cannot tell the difference anyway
-
Do you have a picture of the actual carb, showing where it is leaking from? It sounds like your bowl is simply over the top, again... Happened to me, recently
-
-
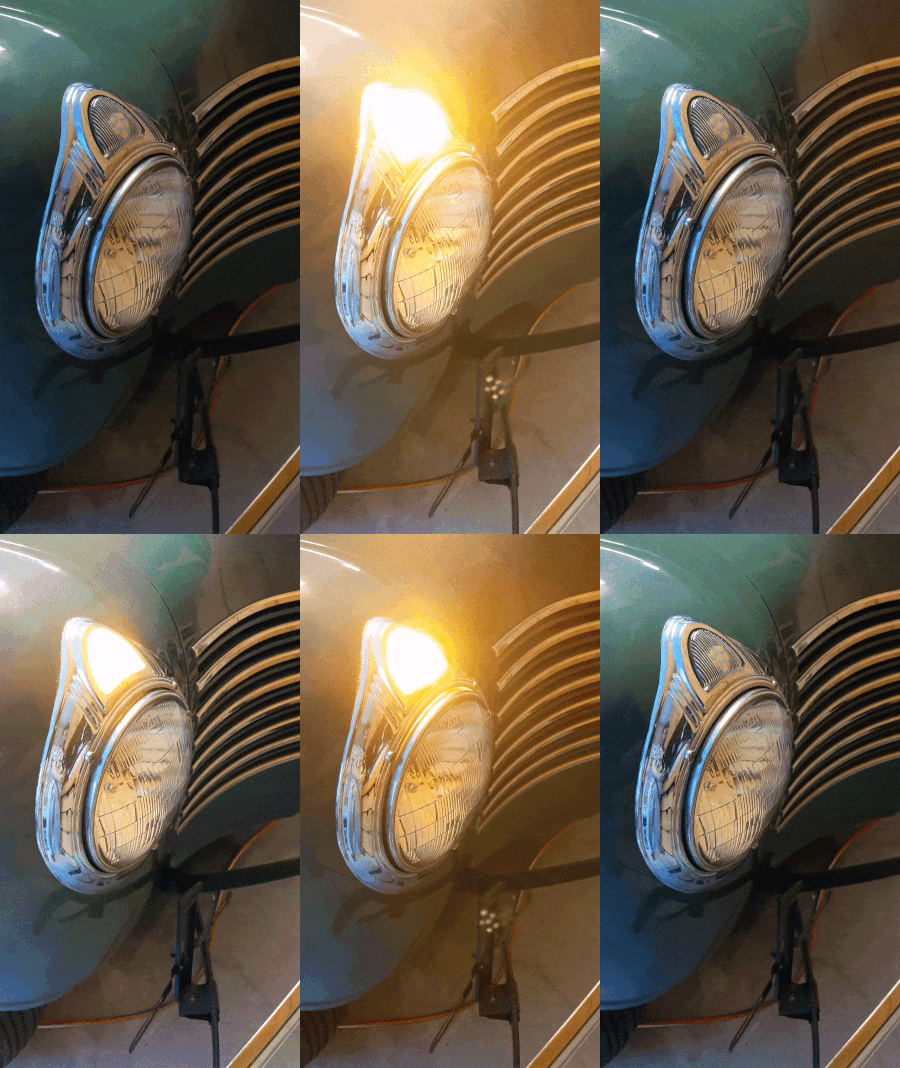
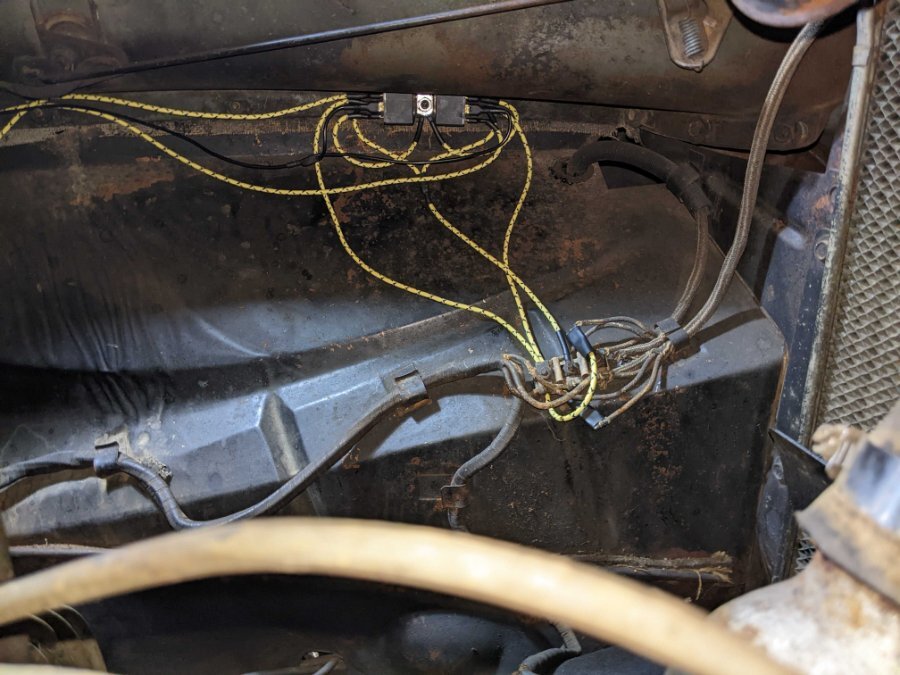
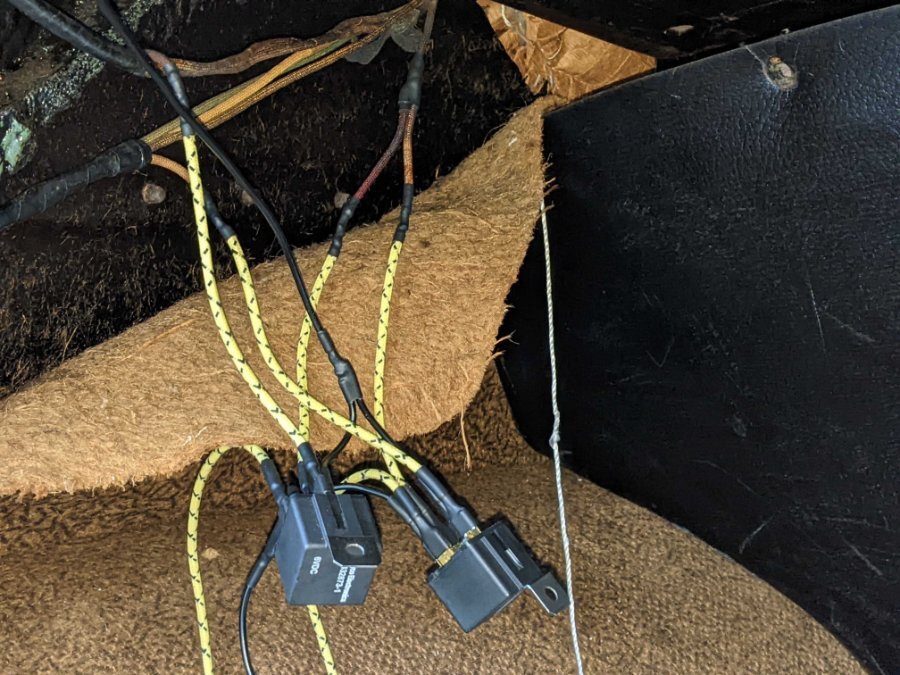
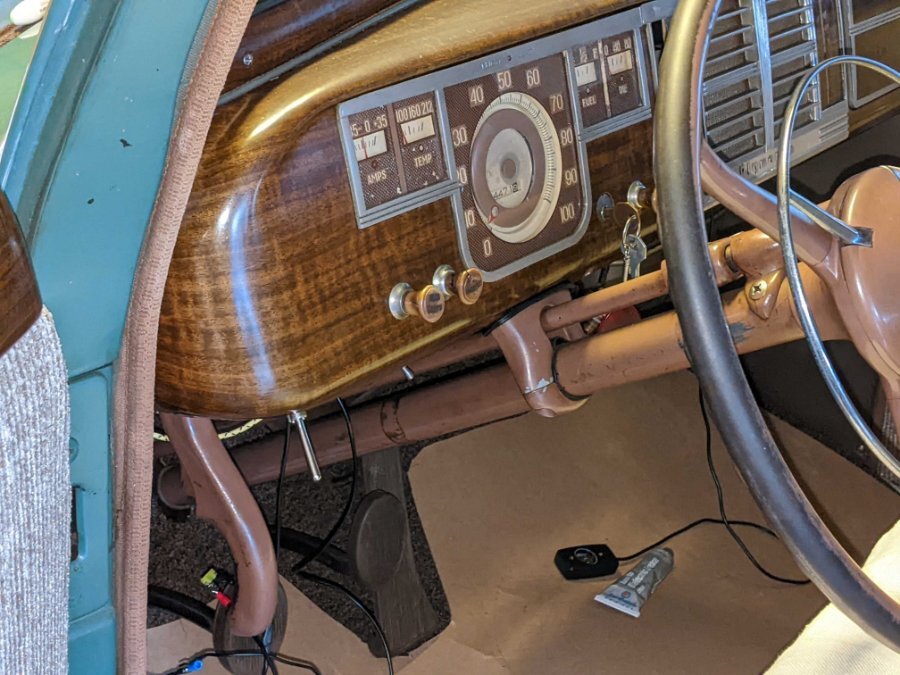
I can finally share a good thing: I just finished my turn signals! Well, almost, I still have to properly route the wiring and do some cosmetic adjustments. Sorry for the messy pictures, could not wait, since I am very excited that this is finally done and I no longer have to "wave" to people at intersections ? I am using 4 LED bulbs, 4 5-pin relays, LED flasher, 3-position toggle switch, and about 55 ft. of 16 gauge wire. My goal was to keep the car original, so I am simply flashing the existing lights (parking lights at the front, and the brake lights at the rear). I also attempted to keep all of the original wiring, so I connected my relays to the front connection plate at the driver's inner fender (for the front) and into the brake circuit splice in the trunk (for the back). Once I looked at the brake circuit wiring, I discovered that it was already broken and repaired (by tying the wires together) some time in the past, so I did not even have to cut anything It took me a whole day to do the wiring, and then another two days to figure-out why it did not work (the LED flasher, I got, turner-out to be defective so I had to order another one) ? You can do the same thing using just 2 relays and much less wire, if you are willing to alter the existing wiring harness. But I did not go that route. Here are the relays for the front bulbs under the hood: I am still waiting for the cloth electrical tape to arrive, so that I can properly wrap everything in the OEM style. It will be less noticeable and look more professional that way. The rear lights wiring looks a bit more messy: I will wrap the cables together, hang the relays onto the top shelf above the trunk, and cover it up with carpet, so no one will ever see this. Also, I ran out of the fancy cloth wire and had to use a plane black one. Here is the switch: I could not find a good-looking column-mounted one, so decided to use a simple toggle instead. I think it fits in very nicely and keeps the car looking stock. And no, I did not drill the dash. I mounted it in place of the heater fan blower switch, which I relocated into an extra available hole below the radio speaker in the middle of the dash (this way, both the driver and passenger can control the heater, which I think makes more sense than the original installation).
-
What makes you wonder? Is the line damaged, rusty, or just has dirty old fluid in it? How about all the other lines? That is actually every 2 years. That's scary, the line must've been heavily corroded carbon steel ? That's probably the best choice (not used by manufacturers because it is expensive). Flaring is really easy and, hey, who says metric is not right? ??
-
These are probably still around, not as popular as the medium frequency, but likely not completely extinct like the low frequency either.
-
That's true, if you are just interested in the original look, you can just buy a broken radio and install a modern player inside.
-
Did the guy gutted the entire radio and placed a BT player with 2 speakers inside the box? This is barbaric... For me, the point of having an old radio is to actually listen to the old radio. This is why I am specifically suggesting to use an AM transmitter, to transmit what ever you want into your old radio. If you do not actually intend to use the old radio, you can just install whatever into the box, or under the dash/seat at you wish. Do not even need to mess around with the existing radio at all Also, I couldn't help but noticing that the author did not heat-shrink any of his crimp connectors, somehow ?
-
Could be the case but not necessarily. I've seen some questionable work on my car, after the PO had it serviced by some "classic" mechanic, too. In this case, the mechanic should've done all of the things already suggested in this thread... Taking off the manifold makes no sense, unless there is a dead rat inside and the tail is sticking out of the carb, or something like that... I am afraid that if you want to own an older car, these days, you need to learn to do all the basic maintenance yourself.
-
In this case, I seriously doubt it's the clutch or anything drive-train-related, because it takes very little force for the engine to rotate just one rear wheel... Does it rew the same with and without load? Are you able to hook-up a tachometer to it, to see what RPMs you are actually getting?
-
Thanks, I've looked for these but they are wrong color. Mine were supposed to be ivory (I don't get it, by the way, all of the knobs/buttons in the car were ivory but the steering wheel and shifter knob are brown, for some reason ?). There is also a 3D model available for sale, which you can print and polish, but these are a very simple square profile with a metal casing. So I think it will be much easier (and cheaper) to fabricate these myself. I'll show the results once I get around to it. AM is fine, you can just get a small transmitter and have what ever broadcasting right into your radio (even another radio signal, if you wish). These transmitters were selling since the 60s, I believe, once the stations started switching to FM and some older radios were becoming incompatible.
-
I would go to a different mechanic ? Does it work if you gravity-feed it from a water bottle? That, alone, eliminates any of the fuel-system issues (unless the carb is messed-up, of course). So, the car would rew, but just would not get up to speed under load, right? How about this for a test: if you set it on a dyno (or just lift off the rear) are you able to push the speedometer where you need it?
-
Yes, that's exactly my plan as well. My radio is working, although the buttons have completely deteriorated. I'll need to get those replaced (just need to find some suitable color plastic, or maybe even use light-colored oiled wood to make it fancy) and give it a general cleaning and check-up. The radio is already sitting on the garage table, waiting for its turn, after I get a couple more important issues off the to-do list
-
My mounting holes are currently in the middle position, if I recall correctly. I might want to start with moving those. Thanks.
-
eBay is also a good place to check. By the way, are you sure you need one? Th OEM one is not going to tune into any stations either, unless to install an AM transmitter with it
-
1934 Plymouth PE Deluxe brake drum return spring(s)
Ivan_B replied to Mac McFarland's topic in P15-D24 Forum
Are you talking about the shoe return spring (usually one or 2 at each drum)? Have you tried e-bay for a used one? -
I am not tall, probably the new average 5'9". The problem, I believe, is that there is not enough room between the seat bottom and the door frame for my 11-size shoe, with a moderately pointy nose to fit through with a reasonable extra space, in the parallel to the car position. So it is all about the shoe size. I watched my feet carefully getting in - they are naturally at an angle, and fit through just fine. When I am exiting, however, i cannot place my feet at the same angle because it does not bent that way into the opposite direction ? So, if I literally back out of the car (turning the body the same way as when I was getting in) it works just fine. But this is weird.
-
Hi everyone. I am having a constant problem kicking the "kick" panel with my foot, each time I get out of the car. The panel also show sings of wear, to I am definitely not the first driver to do so ? The seat is all the way to the back, right now. And I believe that I've assembled the slides properly, after I took them apart for cleaning. At this time, the distance between the seat bottom and the door frame is about the same (front and back). This is a 2-door P10 sedan; looking at other 2-doors on the internet - the seat appears to be positioned the same. Which makes sense, so that people can get in both ways - front and back. Is anyone experiencing similar issues? I've noticed that this is only happening while I am getting out of the car, but not on the way in. So, I figured that if I get out of the car the same way I get in (back out of it, so to speak) then it works fine. No way that this was expected by the manufacturer, though, was it? ?
-
50s Dodge Panel Truck
Ivan_B replied to vintage6t's topic in Ebay, Craigslist and External Site Referrals
Car is located in NH, but is listed in (and is probably priced for) CA ? Don't even get me started on antique car prices and other listing contents. I'll just say that there are plenty of ridiculous things going on. I am very glad I found my Plymouth so that I don't have to deal with all of this anymore. Just a few days ago, I incidentally opened the Marketplace, and it still showed me some of the previously viewed car ads, still for sale, still overpriced, still rusting in someone's yard full of trash... -
You know, this is probably not your case but I've recently encountered some issues on acceleration, after fixing my leaking carb (and replacing the air filter). The car would stumble up the hill in 2nd. I spent hours thinking what have I done different since the last time it was running fine, but could not identify the issue. Luckily, I noticed that a crimped cable between the coil and the distributor had a somewhat loose contact at the connector. Soldered the crimp together (the way it should be done - problem solved. So, you might want to check all your ignition-related wiring ?
-
That is true, however, for "stock" I actually meant not restored. Sorry, should've been more clear
-
If the car is truly all stock, I would seriously advise to keep it that way. Isn't it funny how mostly everyone is looking for a stock un-customized car, and then wants to customize it? Nothing brings the value of a classic car down like a poor custom mode ?
-
Can you see exactly where it is leaking from? Did you use some pipe tape in the adapter threads? ?


.gif.9d98a9356d17450e664fb7fd9a2fe23d.gif)


