DutchEdwin
-
Posts
393 -
Joined
-
Last visited
-
Days Won
1
Content Type
Links Directory
Profiles
Articles
Forums
Downloads
Store
Gallery
Blogs
Events
Everything posted by DutchEdwin
-
I promised to deliver some math. You can calculate the losses in the wire you installed. Be aware, this does not include the losses at all connectors you have in between but will give you a good start. Sorry if this is in metric, but the methode is the same in inches. Copper has a specific resistance, Rho=17xExp-9 Ohm-meter. resistance R=Rho* (length/ cross section of the wire) The wire I used for the head light is 2.5mm2 (is about AWG 12). Make the equation for a wire length of 4.5 meters (= 13.6 foot) R=17xExp-9*(4.5/0.0000025)=0.031 Ohm resistance in the wire. To calculate the loss in Voltage: V=ampsxR In my case I measured 17 amps for the headlights high beam. V=17*0.031=0.53V loss. I measured 1.3Vols of loss. This means 0.8Volts on all connection points. There are 4 = 0.2V per connection point. Do the math with AWG10 (= 5.2mm2), the result is 0.015 ohm resistance, result in 0.3V loss in the wire. AWG10 can give you problems in the connection to the lamp socket. So if you will have to make more connection points, this will lead to more loss in voltage then running a little bit smaller wire that can connect directly to the lamp socket. Hope this helps on the decision
-
Greg, I run 1.5 square on indicators and 2.5 square on head lights (= AWG12 and AWG10 on all the lighting wires, but have to check for sure tomorrow to make the conversion from EU standards to AWG). This includes the ground wires I have running from the front to the rear of the car to every electric consumer. This illuminates the rusty joints. For safety I have an old fuse box from an early 1980's car that has the plastic cigar like fuses. Up to 25 amps. In the lighting circuit (high beam, tail and brake lights, interior light and dash light combined) I measured 28 amps, without the engine running. Measuring the voltage, I measured 6.4V at the battery and 5.1V at the fuse box. I placed the fuse box about 6 feet from the battery with 4 connection point between the battery post and the fuse box. So there are some losses For the headlights I use halogen bulbs. Brake light is standard 21/3 Watt bulb. For the formulas: Volts=Amps*Ohms. Watt=Volts*Amps For the headlights I measured 17 amps. It is advised to use a fuse 20% to 50% higher then the max amps going through the fuse. I made that mistake by letting 26 amps through a 25 amps fuse, didn't know that until I measured it. The fuse stayed alive for 10 minutes, almost starting a fire, as a result the hole in the cap of the fuse box. I'm going to measure the amps with running engine this weekend but I do not expect other readings. The amps I measured for the battery post with everything on light radio etc. reads 55 amps.
-
Jo, I used the 6V battery from my car. No problem, even out of the garage I could see the mark clearly. In case you cannot, someone suggested in an earlier post to use the wire that runs between the coil and distributor cap. You get more light as the strobe flashes on all 6 sparks but read the timing only on the #1. I tried that and it works but I had enough light on the #1.
-
Jo, Thanks for the suggestion but I do have a shop manual that describes the carburetor, although the pictures in the book I have are sometimes not very clear in detail but they will do. Just have to learn by doing. Those carburetors have a life of there own. All individuals and female. I wonder why the car manufacturers changed to injection. Takes the fun out of it.
-
Joe, When I first started up my engine I didn't check my carb settings. The engine ran very bad. My case was float needles not shutting off making a hard idling engine. After I cleaned the carb with thinner (all the chambers and passages). cleaned it about 3 times with letting the thinner do it's work for 10 minutes to dissolve the gunk and blow all the passages with an airgun at 6 bars. Installed the overhaul kit, adjusted all the settings that had to be done according to the manual. Man they were way off. Also took the time to get the play out of the rod connections by adding little washers to the joints. Now the engine is idling smooth, and can be adjusted easy. When you do a thing like this, get a timing light, tachometer to read the engine rpm and a vacuum meter to read the engines vacuum. This will make things a lot easier to diagnose and less frustrating, although I'm still not fully satisfied about my settings but the engine sounds good and runs good and I do not want to steal your thread so I do not talk about that here. good luck.
-
I did some work on it. I saw some white smoke from the tail pipe (wasn't there the day before).Torqued the head bolts again, now there is only very little smoke coming from 1 tailpipe for 5 minutes at idle or 2 km when I drive it. Then it goes away and stays away. Did check the for head gasket leaks by putting a hose from the radiator vent pipe into a water bucket (with radiator cap removed and sealed it with tape). No air bubbles at idle or high rpm's. Checked if fuel leaks into the carb when hot....no it isn't. That rules out flooding the engine. Also measured the temp at the carb on each side at the point where the floats are placed; Temp starts at 38C (100 F) and goes up to 43C (109F). That isn't hot to me. Checked the nozzles by blowing a little air in with an airgun. All 4 nozzles gave fuel. The car (being hot and not starting just before I tried this) started up right away after that. Took the car for an 8 km drive. After stop and sitting for 5 minutes it didn't start. Pushing the gas pedal 10 times, it almost started. pushing 5 more...it started. After that waited for 5 minutes, it started right away with the pedal pushed in for 1/3. Looks to me the engine is not drawing enough fuel from the carb when hot. After getting fuel from the carb it is giving enough fuel. . I'm going to test new things this weekend, see it the previous owner did mix up the primairy and secundairy main and idle jets. Can someone tell me how I can tell which one is primairy and which is secundairy? They look the same. Must have something to do with the jet diameter.
-
Fred, Get a thermocouple temp meter. Then you only have a wire to measure with. Instant temperature reading on surfaces and in fluids. Edwin
-
Don, to make the woody more beautiful I would like to suggest to use wood from a pear tree, the color will give a better match........LOL. Nice video, nice looking engine. First time I heard a 6 run.
-
You only tipped it over. When I had it out I tried to be smart on refill. Had it on its side, filler plug up, and tried to fill it. Had to wipe half a can of oil from the floor , and give CPR to my son as he was almost on the floor for laughter. The hole in the tranny is there because a shaft will come out there when you shift into a gear. So do not plug it off.
-
Yes, I considered vapor lock. My fuel line runs from the front of the engine high above the block to the carburetor. I have a glass bowl at the highest point. As I get fuel (checked with the nozzles) no valor lock. This would mostly stall your engine when running at low speed. Had this one on a mountain with my first car an Opel Kadett type E, trying to reach the top (Edelweissspitze on the Grossglockner in Austria). Luckily I just reached the top as the road is busy and 15% steep, if I recall that number right, with sharp curves. Cool mountain weather helped cooling down the engine temp, Good for laughs when your down and safe.
-
I looked it up in my country. The rule in the Netherlands in simple words: If the car has the original frame it can hold it's original number plate. That is if the original plate is a dutch plate. No matter the date. If the car is an imported one, it can get vintage plates (dark blue with white letters and numbers) if the year of first production of the car series is earlier then 1-1-1978. Cpt. In my country car inspection, called APK (your Tuv) is simple for me. If the car's first road date is earlier then 1-1-1960, NO INSPECTIONS NEEDED . Get your car licenced with dutch plates, (if that doesn't bite in Germany:D). Makes life easy.
-
I did some research on the hotrodders.com site. They came up with some idea's for problem. The problem could be electrical or fuel. Probably both. Electrical. A week coil will produce less spark when hot. Thus easy to start when cold. Hard to diagnose. Easy to solve, $30 for a new coil. Also corroded connections, bad wiring, wrong plug could be the problem. There are some fuel related problems., 1) leaking float needles. Will lead to overflow of the float chambers as the pump pressure will bleed into the chamber. 2) overheating carburetor. Will lead to expanding or boiling of the fuel in the float chamber. Both lead to flooding the intake with fuel. (Greg g’s post from 2007). The diagnose is simple. When the hot engine is shut down. Look into the carb. with all butterflies open and see if fuel drips into the intake. There are some measures you can take to correct this. 1) Ignore the problem. Start with the pedal to the floor and keep it there until it starts. This can cause two problems. Short term, leaving you on the spot with an empty battery. Long term, when the fuel leaks into the cylinders it will wash away the oil lubricating the pistons. 2) Readjust the floats. (assuming they are set to factory specifications). It is suggested they should be lowered by 1.5mm (0.06”). This could differ from the type of carb. When lowered to much the car will hesitate when accelerating at higher speeds. 3) Check the heater valve in the exhaust. When this is open all the time the intake will be heated to much. On engines with aluminium intakes the passage is blocked off with a piece of sheet metal. 4) Place an insulator between the intake and the carburetor. It is suggested that wood will insulate best. I prefer nylon as it is heat resistant (120C) and self extinguishing when at fire and fuel resistant. I’ll make one my self from a plate 4.5mm thick add 1.5mm for the gasket, makes it 6 mm is almost ¼” insulating material. 5) Place a nylon washer on the carb. studs between the carb. base and the nut. 6) Let a fan blow to the carburetor cooling it for 15 minutes. Actually this was done by Volvo on one of there cars to solve this problem. I’ll let you know the result. B.t.w. Feel free to correct me on things I’ve written. These are Ideas I read from car enthusiasts on the hotrodders forum dealing with the same problems on old, modern and modified cars.
-
pictures will be taken next Thursday, christian holyday as you know. I did put a new picture of the engine on photobucket. Hope to work on the hard to start when hot problem too.
-
Took my first trip today :cool: After doing all this work for so many years she's out on the road. THANK YOU FOR ALL YOUR GREAT HELP TO GET THIS DONE! It was fun to drive, have the feeling of this big car. Although in the beginning it's hard to handle her, the big nose, sifter at the steering column but fun to do. Just one thing to figure out to be a reliable drive, no starting after she's hot and sits for more then 10 minutes. Gives you the shivers when you go the the gas station. Will she start after I filled her up.......
-
To solve the hard starting problem when hot I took the carburetor off and adjusted the float level. I set it 0.7mm (0.027 inch) deeper at the primary float and 0.5mm (0,02 inch) at the secondary. I checked the floats, for leaks, they were ok. Started the engine and set timing (6 degrees advance looks best) and mixture. After the engine had run for 1 hour stationary I shut it off. The temp showed the engine was very warm (2/3 of temp Needle range). Tried to start after 10 minutes with pushing the pedal very slowly to the floor before starting so vapour could get out. Started for about 1.5 minutes....no starting. Went to the carburetor and opened the butterflies. Inside the butterflies were dry. Carburetor base dry on the outside. Inside the intake the metal was wet, but when I operate the gas handle there is some fuel injected, no matter how slow you do it. Should I lower the floats more? Float setting specification: prim: 1/8", secondary 3/16". Drop primary 5/8", sec.: 11/16" . I did not readjust the drop after adjusting the level. Edwin.
-
I tried starting with and without touching the gas. No result in starting. But when I touched the pedal, it did give fuel as I didn't do it slowly. Going for an other try today, keep you posted for the result.
-
Rollie, I don't know if what I'm going to say will be the problem but when I did service my starter I had to align the rear cap of the starter where the bearing is in. not aligning it would make it impossible to spin by hand. Just a guess.
-
Like said in the other tread I tried to adjust the carburetor today. I encountered two problems. The one in this tread....not enough vacuum. I have a vacuum meter attached the the intake manifold. When I set the engine at 4 degrees to 2 degrees advance, the needle is steady. But not enough vacuum, only 15 inch. I do have a complete overhaul set installed in the carburetor. If there is a vacuum leak (I think there is) where will it be? My guess it there are only two places: 1) The gasket between the intake and the carburetor. 2) the tread from the plug where the vacuum gauge is attached to the intake. Are there more places? and How can I check this? I tried to adjust the two idle mixture screws, when I look at the vacuum gauge I hardly see any difference. Is this because there is an vacuum leak? Thanks. Edwin.
-
I tried to adjust the carburetor today. I encountered two problems. The one in this tread....hard starting when hot. The carburetor is a 4 barrol, with automatic choke. The choke operates fine, Carb has been cleaned a week ago and has new valve needles etc. complete overhaul set installed. I have a good cranking engine, have enough fuel, have a good spark (at least I can see one when I took the spark plug out) when I cranked the hot engine. I tested to start the hot engine after 1 minute, no problem. After 15 minutes or so, won't start. I didn't touch the gas pedal. After that I pumped in some gas.....no start etc. Stopped for dinner. After 1.5 hours started up right away. Let the engine get hot again. Stopped for 15 minutes and tried to start with the gas pedal 1/3 pushed in. Was hard to start but did after a few cranks. Stopped again for 5 minutes, again the gas pedal 1/3 in. No result. couldn't start it again. Did some search and came up when a tread where Greg g and grey beard mention float adjustment needed http://www430.pair.com/p15d24/mopar_forum/showthread.php?t=4931&highlight=hard+starting+warm+engine Has anyone ever tried or solved this problem by adjusting the float, or do I just have to follow the advise.....learn to start a hot engine by slowly pushing down the gas pedal and letting evaporate the gas that has flooded the engine. (what is the down side when I adjust the float?). Thanks. Edwin.
-
Sealed beams light the road on the left and right side of the car. The beam on European cars aim from straight ahead to the right side of the road. And at the other side of the English channel, straight and to the left side ot the road. So you do not blind the oncomming traffic.
-
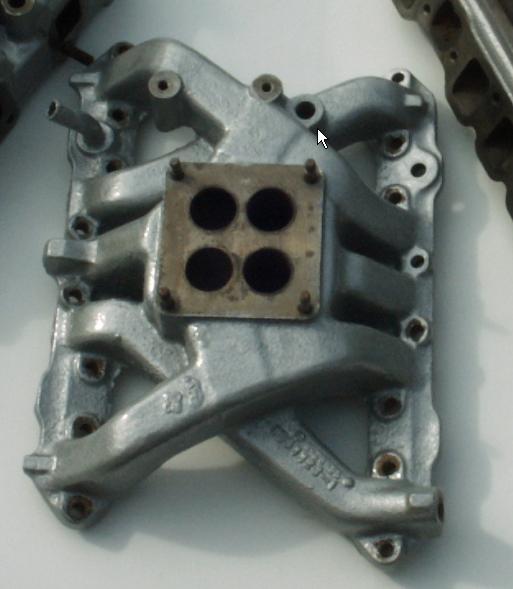
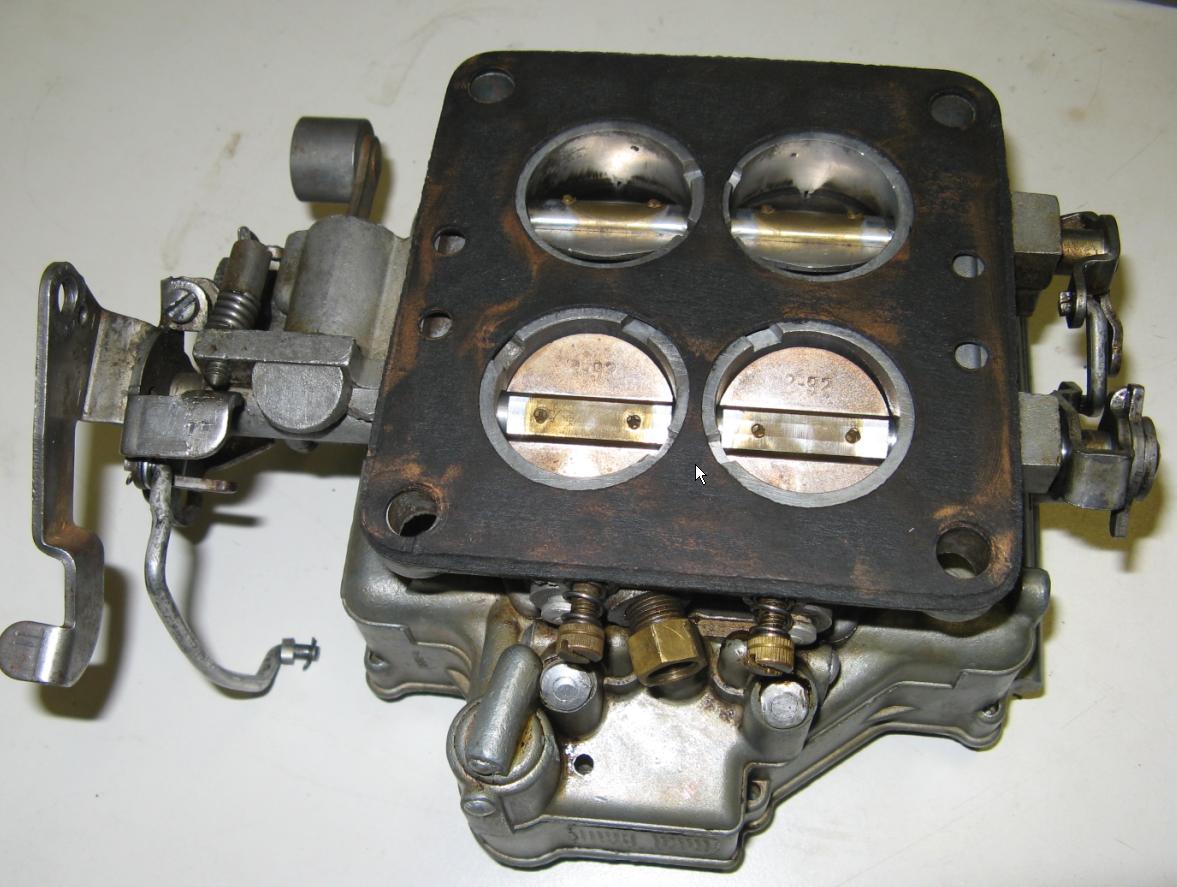
I have a Carter WCFB 4 barrel carburetor, type 2253S. I read the manual on how to set the idle mixture, but unfortunately.....it only mentions the 6 cylinder engine. Here is my problem. The carb has 4 chambers. 2 primary and 2 for secondary, fast driving, extra power. For this is a dual carburetor, I need to set two mixture screws. I planned to set the mixture screws by measuring max vacuum (18-21 inch). I did connect a vacuum meter in the intake manifold. There is only one hole in the intake manifold, going to cylinder #1, #2, #4, #7. (see first picture at the arrow). So I can meter 1 mixture screw. The other one goes to the manifold channels where there is no hole to attach. However, I did see at the bottom of the carb, there are two cross way's that connect the carburetor channels with each other, just underneath the butterflies to the manifold (see arrow in picture 2). Setting idle speed at 450 to 500 rpm, TDC at 4 degrees advance. Question: How do you set this carburetor or the right mixture. Is the cross way between the left and right side of the two channels enough I can reed the vacuum at only one point. Thanks, Edwin.


-
Here is the picture of the front of my car.

-
Frederic, perhaps you should look into the beam glasses from Alfa Romeo. They have glasses in H4, without the letters ingraved the glass. Also the glass is convex and patterned. Looks very much the same as sealed beam. I did the same on my car, got them on the trade in Essen in spring time, from the Alfa club. Safes you the trouble of changing every time for "tüv". Good luck
-
That's what I like about old grease, after sitting for over 50 years on my chassis, I just had to take hammer and (wood) chisel the get it off leaving a clean chassis.
-
Thanx. Would be cool