DutchEdwin
-
Posts
393 -
Joined
-
Last visited
-
Days Won
1
Content Type
Links Directory
Profiles
Articles
Forums
Downloads
Store
Gallery
Blogs
Events
Everything posted by DutchEdwin
-
Ulu, is it also normal the car start's hard after a few miles drive and 10 minutes engine off at temperatures like of 40F to 50F and high humidity? To me it sounds like a warm engine start. Normal in summer it would start right away in that condition. Could it be my timing is set wrong? although it is at 9 deg. BTDC. The vacuum is still only 18 inch, not 21. I do not want to introduce an engine knock.
-
I overhauled the choke. Took a lot of metal stuff out of it. I changed the exhaust tube to the choke to one out of copper. It works fine now. The car is running at high rpm after startup until after a few minutes when it turns to normal idle 450 rpm. The other day I took off the air cleaner the choke was closed. When I start the car only 1 day after it ran, it will start right up. When it sat for 3 weeks, and I press the pedal just once, it will not start. I then will have a hard time to get it running. But when I press the pedal in that case 3 times before the first attempt most times it will fire up (warm weather). I checked there is still fuel in the carburetor after a few weeks, so the fuel does not evaporate. I just do not know where to look for this problem. Ulu, I've owned two cars in the past, one with manual choke and one with automatic choke. I too favoured the manual, never gave me trouble, other then the automatic.
-
Took my 1955 Plymouth (V8 engine 4bbl carb. automatic choke) out for a drive last week in the evening. It is a "cold" 10C (50F) overhere. This is the first time I drive this late in the year. I could get the car started, but it took me a while. After driving 6 km (4 miles) and a stop of 10 minutes when I tried to start again it was hard to get it running. Normaly in summer times the car starts after 1 or 2 times trying. Does anyone know what I can do to improve this? When starting cold I first pump 3 times with the gass pedal. Sometimes is startes withing two starts. Sometimes I doesn't. Then I put the pedal half way down when starting. If it is still not starting, pedal all the way down. Then lifted all the way up. And repeat this until I smell gass. Ten just starting the the pedal all the way down. Normaly takes I think 3 minutes to get it started, and almost drain the battery. I checked that there is enough fuel in the carburator. The improvements I've done so far. - new coil, - overhauled the distributor with new contact points and cond. - New spark plug cables and plugs, - VERY thick batery cables to the starter motor - Overhauled fuelpump (original one) - had my fuel tank cleaned - overhauled the carburator and set all the adjustments to specification mentioned in the service manual. - placed an modern inline fuel filter before the fuel pump - Complete engine overhaul - I read on the forum that modern fuel is burning at a slower rate due to higher compression in modern engines I think. I did advance the timing from 4deg BTDC to 9deg BTDC. I measured the engine vacuum. it improved from 15 inch to 18 inch but not 21 inch like it should be. When I did tune the engine to 21 inch I couldn't see the timing marks anymore, althouth I did place marks up to 10 deg on the new balancer on the crankshaft. I did'nt want to create engine knock. And because it is so hard to hear with a loud engine I didn't like the idea to advance more.
-

Car is back together but still won’t start!
DutchEdwin replied to perrymedik's topic in P15-D24 Forum
Perry While waiting for that tester, I still haven't heard anything on getting the carb fixed. I had a working carb. Took it off the engine and had it off for 5 years. After that time all fuel had turned to gunk blocking channels and sticking needles in there place, thus flooding of the carb seen as fuel comming out of it like you had. The way to get rid of this gunk it to clean it with thinner. It will dissolve the gunk and free the needles. I had to open up the carb and fix it. We can guid you but I think the manual is very good on this. Just work clean and have everyting spread out as taken out in that order. Take pictures and assemble after cleaning in reversed order. It's not that hard to do. On the sludge section......and I do not want to scare you..... When I overhauled my engine it was looking the same from the inside as yours. Look at my photobucket pictures on what had happened with my crankshaft because of the sludge (4th picture on the top row), its worn down the crankshaft over 1mm and a camshaft with hardly any lift on two cams. The sludge is not only in the places where you can see it, but also in the places where it can hurt the engine. It's the same as a human body blood supply. The sludge blocks the oil channel some where. Then in that part there is no oil going. Thus no lubrication, it runs dry and wears. Modern oil is designed to prevent sludge and to dissolve slugde. This means that when it does the job in your angine it can break lose a larger piece. In my engine that is what happened at more than one place, is the way I bought the car. For me it ment I had to change $$$$$ every moving part inside the engine except for the rocker arms and shaft. I understand you want to drive. But keep in mind it still can hurt your engine as a time bomb in every oil channel in the engine. -
Clunking sound under braking at some speed
DutchEdwin replied to skchandler's topic in P15-D24 Forum
A few mouth's ago in my 2003 van I heard clunking sound like it came from underneath the car, every time I went over a speed bump. After looking all over the car I then remembered I had the back of the cabin removed to transport stuff. It turned out I'd forgotten to fasten one bolt in the roof frame. Came lose and rattled every speedbump. Sound travels inside the interiour. Did you check the exhaust if it is hanging loose or able to touch the body when wiggling it around? -
Got my door lock out.. The door lock is working again after a little cleanup. But I think I'm missing some parts. I've only 1 spring and I think I'm missing the cover. Can anyone post a picture what the cover should look like? Also I do not know what the pins in the lock should look like when theey are not worn. Does anyone have a picture of that too? Thanks, Edwin.
-
I had problems with my fuel tank years ago. Got it cleaned profesionally. When I inspected the cleaned and dry tank I saw there was a little rust inside due to the acid they used I think. For killing rust I use a product that is called FERTAN. It transforms the rust into a closed "film" of irontannin. In the proces, the rust will also create a powder like residue that can be cleaned with water and is not toxic (oak tree bark has tannin inside. Fishermen used it to protect there nets from rotting). I use it everytime I have a litted rust on a plate I want to paint or prevent rusting ferther. I did put some Fertan in the tank, made sure it covered every corner. The product is water thin. After letting the rest out let it sit for 2 day's. Then I cleaned the tank for the powder residue by using some small stones inside and let then roll.Then I installed a plastic filter before the fuel tank and 2 spare ones in the car. The first 3 tank fill up's I had to change the filter. Now the filter stays clean. When I inspected the tank after 2 years I did see only a black wall. No rust anymore. My 2 cents. edit: http://www.fertan.com/products/derusting-products/ I used the black bottle at "derusting products". Not the epoxy coating they have.
-
Hi Bill, I did send you a PM to discuss the timing. Do not want to highjack this tread
-
Very impressive on what you are doing. Rebuilt my own 259 poly. Kept it as a poly but with some adjustments I got from hotheads oilpump for larger oil flow swap to modern oil filter, got rid of the check valve. added a balancer on the crankshaft. but the pulley that hotheads provided was a lot smaller in diameter. So the fan is running on lower speed. When driving in summer there is no problem but I avoid traffic jams to prevent overheating. I saw the amount of timing marks on the balancer. Do you have any idea on how much advance the engine needs on modern fuel? I now have on 10 deg BTDC. But still not enough to get the max engine vacuum of 21 inch. some more pictures of my project are on my photobucket page.
-
Sounds like an easy job. Didn't know you can reconfiger the lock too. So if I have to order a new lock I can set it to my own key's? By the way, to prevent wear to my key I had 3 copies made and the original in the vault. One more question, The service manual mentions to remove the lock I have to slide a latch plate aft (push way). For this I do not have to remove the door panel. But to install they use a wire to gide the lock. For this you need to remove the panel. Can to install be done without removal of the panel? Thanks to you all.
-
OT: Operation Market Garden 70 years anniversary
DutchEdwin replied to DutchEdwin's topic in Off Topic (OT)
Well...eh...this wasn't the only parade happening at that day / weekend. There were (what I've heard of) about 3 of them with sort of simular amount of vehicles. -
A few weeks ago when I tried to lock my left door, the key just wouldn't go into the lock. Had it in just 2 minutes before to unlock that same door. Doesn't matter what I do I cannot get the key in again. Tried WD40 a few times but no luck. There seems to be a small metal piece that does not move up. Does anyone know how to fix this? Without new locks if possible? My car: 1955 plymouth plaza suburban. The key now fits the ignition, left door, rear door. The passenger side does not open with the key, although the key does go in the lock.
-
I Went to see the 70 anniversary of WWll operation market garden last month. I visited the para jump at the Ginkelse Heide where it happened 70 years ago. Very impressive to see. Watch and enjoy. para jump from the dakota's https://www.youtube.com/watch?feature=player_detailpage&v=3x_R-OoAEMQ and a tour of military vehicles on the same route Hells Highway that was done 70 years ago. https://www.youtube.com/watch?feature=player_detailpage&v=rL9GiRwvRCE https://www.youtube.com/watch?feature=player_detailpage&v=uJNYwM4thJU PS, I've heard that the world largest stock of spare parts of these cars and trucks is in the Netherlands. There is also a film made of this operation : a bridge to far.
-
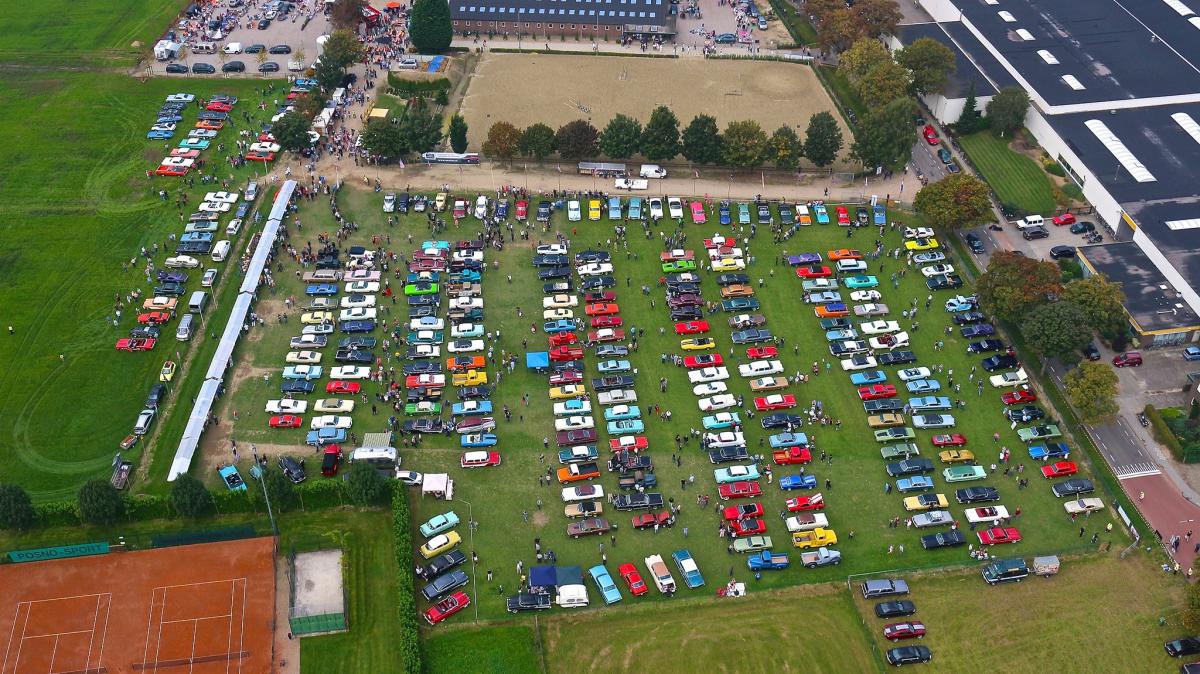
Sunday was a perfect day. First impression from a drone... Total count was 640 cars for that day!

-
Well, we EU'S look younger then we appear.
-
If anyone has the time, next Sunday Sept. 7 there is international USA classic car meting Reuver in the Netherlands, near the German border. Probably the biggest of its kind in Europe. Last year there were about 600 cars from the 20th up to 1978 http://www.cadillac1962.nl/?p=752 Here is an impression of the last years. Check on foto's (photo's) google translate will do the trick to translate the site into English. The most odd one was this classic. To bad for her age.....
-
Greg, I thought of that, but I'm not shure about the looks. I do not want it to look like a bad try of a hot rod.
-
I did my engine with POR15 silver with a brush some years ago Some hot parts are turning a bit yellow/brown. (the heat duct in the intake manifold). However the paint sticks to the engine perfectly. For the result, check my photobucket.
-
Sorry, I mixed up the speed. My bad. The speedo give to high miles for the speed. At 50km it should be 31 miles, reads 35+ miles. Sorry, my bad. Must have been the late hour. I called a tires shop for classic tires. They told me two things: 225/75R15 would give me very hard steering. My Plaza does not have power steering. Also there is a new tire on the market from Coker: bias ply sized radial tires, http://www.cokertire.com/brands/american-classic-tires/american-classic-bias-profile-radials.html Expensive although, €310 each. In the US "only" $247 = €200. What they told me is that Coker bought the old tire moulds from Firestone etc. and is now producing radial tires with bias ply looks. It solves the speed issue. Chris, thanks for sharing. How is the steering at low speed and parking?
-
My 1955 plymouth plaza suburban has 205/75R15 tires on it. My problem is, the speedo meter is giving to low speed. So I want to change to a larger size. Doing my home work: the shop manual says the tire on the car is 6.70 x 15 bias ply (or 7.10x15 (spec. Equip.). When I bought the car 205/75R15 radials were on it. So I do not know which of the two is the correct one. Can anyone tell whatr car had the 7.1x15? I want to have wide white walls about 2.5 in. Comming from the 6.7x15 tire: When I calculate the diameter of the bias ply tire, (in metric) it is : 15x25.4 + (2x6.7x25.4) = 721.3mm When I calculate the radial tire: 205/75R15 : 15*25.4 + (2x 205 x 75%) = 688.5mm. So yes, is giving me the to low speed because of the smaller diameter. The closest to mach the diameter is 225/75R15. : 715mm diameter. My question is: does this tire fit my 4,5 rim and does it fit in the rear and front fender. What else to considder? . That gives the Coker (€262), American Classic (€302) or BF Goodrich (€350) each tire. (the bias ply from Coker costs €212) Please advise. Thanks, Edwin.
-
The grease looks a bit red and a bit semi-transparent. I do not know this type of grease, To my knowlegde normal and heat resitant grease is brown or brown with a mint green like color for the heat resistant. I think the chamber is full, when I push the grease forward with a little stick, it comes out of the hole. Looked up the torque for the axle nut, 142 ft. lbs. minimum for the 1955 Plymouth.
-
Oh, one more thing, While I was at it I wanted to lubrcate the rear shaft bearings. I thought I would find a grease nipple, however I did find a stop that blocks the hole to get the grease in. Should there be a grease nipple or how do I get new grease in?
-
Thanks for all your advice....but guess what, After spending one evening behind the PC to find out the right bearings and seals the bearings do not need to be replaced after all. What happened to me is that the drum came off the shaft just a little. Kind a funny though, for most of us are trying hard and cannot get it done. I think I did not tighten the castle nut enough 10 years ago. The cotter pin is able to slide in the hole when the nut is thightened just a little. It could be I drove the care for 10 miles with it on a curvy road, but shaft and drum do not show a scratch. Problem solved, no harm done. One thing is for sure, I have proven the way on getting the drum off buy losening the nut a little and drive around the block will not hurt the shaft or drum. One more thing, I did put some anti seize on the shaft to get it off easy the next time. My 2 cents. Thanks, Edwin.
-
From my 1955 suburban the righe rear bearing is broken, play on the wheel when you twist it horizantal and vertical. So needs replacement. I read the tech-forum about drum removal. Should be easy I had my drums off 10 years ago. Did put a little grease on the cone when I put them on again. Is there an easy way to remove the axle and then the bearing without the special tools mentioned in the manual? thanks, Edwin.
-
Thanks for all your reply's. I rewired the complet car about 10 years ago. Even put in thicker wires. That did make this car more relayable. Also I made sure all current goes through wires, not the body, but the lights have been dimm always. Because I want to stay to 6V I thought go to LED head lights. I'll check if it the light will be bright enough if when I run a wire direct from the battery to the lights. If so, perhaps install a relay to switch on the lights and not the switch on the dashboard. When I find a solution I'll let you know.