


JBNeal
-
Posts
6,974 -
Joined
-
Last visited
-
Days Won
74
Content Type
Links Directory
Profiles
Articles
Forums
Downloads
Store
Gallery
Blogs
Events
Everything posted by JBNeal
-

Dip Stick Support has a Minor Leak at the Bottom
JBNeal replied to Jocko_51_B3B's topic in Mopar Flathead Truck Forum
I've never drilled out those spotwelds to take a gander, but considering the technology of that era, that might just be a cork gasket in there that probably dried out and has some cracks in it. I had one that leaked a little on the '48 but I drove it on so many dusty roads that after awhile, it didn't seem to leak any more. I plan on injecting a sealant into that seam on the next rebuild. -
51 B3B build thread - after all these years
JBNeal replied to bkahler's topic in Mopar Flathead Truck Forum
ya might be able to flatten that opening area with a bolt-flat washers-nut clamp: washers on both sides of opening, tighten nut down, smack it with a hammer and call it good. -
The spring used on canister filter elements was to keep the canister from bouncing around in the housing. The perforated dome used on sock filter elements was used to hold the element in place as well as to keep the element from blowing apart.
-
How Many Pilot House Trucks Have Survived?
JBNeal replied to Bradley S.'s topic in Mopar Flathead Truck Forum
SURVIVOR: Spotted this ol' buggy at the corner service station in downtown Belton but couldn't exactly pull in to ask about it with traffic...went back later and just like that, it was gone ... -
From the album: Dodge Truck Survivor Sightings
-
that filter housing and lid looks very much like a DeLuxe Products Filter Assembly additional information - JC SERIES – DELUXE PRODUCTS CORPORATION – LA PORTE, INDIANA
-
VINTAGEPIC: Route and Panel Vans spotted on the FB
-
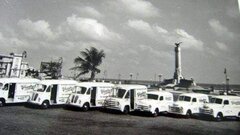
From the album: Vintage Pictures
-
I think welding 50k steel to the sheet metal should be adequate and a lot easier than trying to get a decent bead with stainless. Maybe it would be easier to put the running boards on after the bed and front fenders for alignment purposes so ya don't paint yourself into a corner. additional information - 1955 C1B Build Thread
-
IMO that truck crank jaw bolt may have been damaged or stripped, and it was welded to a hex head bolt that fit into the crankshaft...kinda looks like a flat washer to keep the crank pulley hub seated. The original crank jaw bolt would have a cavity that could accept the crank handle by a couple of inches for the crank handle pin to engage the crank jaws properly. If ya look at the crank pulley on this truck engine, the crank jaw bolt seats flush to the hub and is not proud of the hub like the modified bolt. additional information - flathead hand cranking
-
51 B3B build thread - after all these years
JBNeal replied to bkahler's topic in Mopar Flathead Truck Forum
would a 3M trim adhesive be less prone to cracking than JB Weld? -
11th Annual // International Work On Your Truck Day!!!
JBNeal replied to 48Dodger's topic in Mopar Flathead Truck Forum
a few days ago, I removed the oil pressure gauge and part of its pressure line from a parts truck to compare fittings. I verified that the compression fitting used for the oil gauge is not the one from McMaster-Carr, tho it's really close: did some research and may have found possible sources for this hard-to-find fitting, but am awaiting confirmation...spent the actual 11th annual IWOYTD "putting out fires"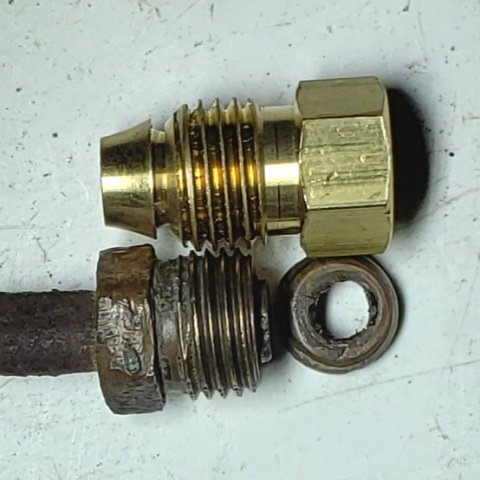
-
51 B3B build thread - after all these years
JBNeal replied to bkahler's topic in Mopar Flathead Truck Forum
I recommend using the square washer supplied with the new retainer on the original check arm...drilling out the old rivet and installing a new rivet...maybe I should post those pictures somewhere... -
VINTAGEPIC: Route Van spotted on the FB
-
From the album: Vintage Pictures
-
https://www.ebay.com/itm/294835923093
-
51 B3B build thread - after all these years
JBNeal replied to bkahler's topic in Mopar Flathead Truck Forum
that repair channel might need to be whittled down on but that replacement door check retainer should fit in there ? -
Dwell Meter Connections for a 6V Positive Ground System
JBNeal replied to Jocko_51_B3B's topic in Mopar Flathead Truck Forum
This is very similar to the diagram that accompanied the 70s vintage Hawk Dwell-Tach that Dad had in his old toolbox...whatever paper those instructions were printed on, the silverfish just chewed to pieces, but this is a generic version of that diagram. Having used it several times over the years on 12V neg.grd and 6V pos.grd, these test lead directions are accurate. This diagram assumes the user understands the complete function of each component, so it just shows basic test lead connections for modern negative ground electrical systems. The note to reverse the connections for positive ground electrical systems would mean that the tester black lead would be on the coil negative post, and the tester red lead would be on chassis ground. My understanding of what is going on here is that the dwell meter is measuring a signal each time the ignition coil discharges. The coil + post is battery voltage from the keyswitch, and this voltage feeds the primary and secondary windings for what is a step-up transformer that takes battery voltage and multiplies it greatly to be distributed to each spark plug. The primary winding exits the coil at the - post and heads to the distributor condensor and breaker points. When those points open, the magnetic field of the primary winding collapses, discharging the secondary windings through the high tension lead to the distributor cap and rotor then to the indexed spark plug wire. The - post is used to monitor the current change when the breaker points open because typically this is easier to physically access than on the distributor terminal as shown in the diagram as the alternate connection. However, if the distributor is installed on a testing stand such as shown in the linked video, then the dwell lead connection is made at the alternate connection. So why do they say reverse the connections for positive ground systems? When ground polarity is changed, so is the direction of current and ultimately electron flow. The dwell meter is made so that it only registers electron flow in one direction, so negative ground systems have current flowing from the battery positive post into the red test lead and out the black test lead to ground to register needle movement on the graduated scale. With positive ground systems, the current flows from ground to the battery negative post, so the dwell meter leads are reversed since current flow is reverse of negative ground systems. additional information - testing the distributor additional information - ignition system servicing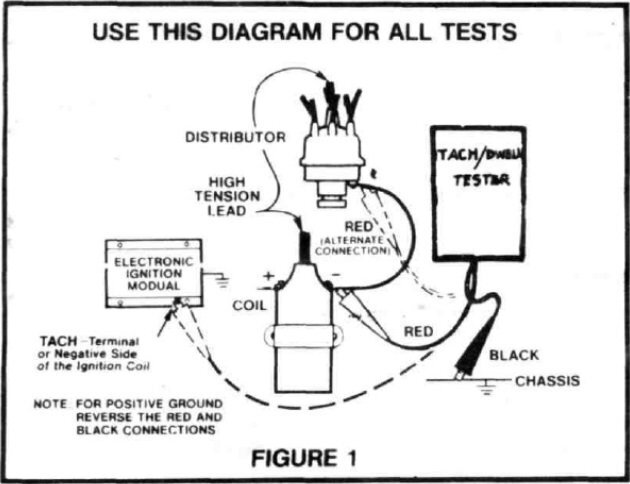
-
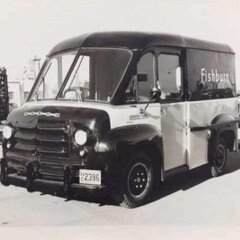
VINTAGEPIC: COE bookmobile spotted on the FB
-

From the album: Vintage Pictures
-
I had noticed years ago that the '49 seat seemed like it sat lower than the '48. The '49 definitely rode smoother from its 126" wheelbase vs the 108" wb of the '48, but even stationary, the '48 had a firmer seat cushion. Eventually, I looked at variations on the Pilot-House cab seats, and I did notice a variety of small changes in seat cushion springs, seat backs, etc but finally remembered to measure the seat frames a little bit... '48: '49: '51: '53: additional information - factory seat options
-
VINTAGEPIC: Route Van and big B-1or2 Pilot-House spotted on the FB
-
yep, rodents are definitely on the move this time of the year before the snakes come out of the ground...I've got at least one mouse getting into the QuadCab HVAC box when I park by the house at night...that cab, designed in the early 90s, has a rodent entry route that is barely visible in the A-pillar area, but leads straight into the HVAC system. They don't mess up the carpet, but WOW that is still a mess to clean up, every stinkin' year... Not sure why I haven't found any floor plugs in the B-3s, but the B-4s redesigned the cab a bit so there is no need for the floor plugs. additional information - Pilot-House Cab Differences
-
Rear cab mounts on the '48 and '49 had plugs in the cab floor. The seat mounting frame looks to brace the cab floor with a filler plate to the B-pillar. Rear cab mounts on the '51 and '52 were similar, but I could not find plugs in the floor. The seat mounting frame was extended and looks to brace the cab floor as well as tie the B-pillars together. Rear cab mount on the '53 were a bit different, with no floor plugs as the longer bolts go through the cab floor. The seat mounting frame is integrated into a straight brace with gussets that ties the B-pillars together, which might be the transverse member that Bunn described in his book.
-
I looked at VPW and no dice...looked at ford and gm repro suppliers, and nothing close there either. I reckon that corner seal is a whittle-it-yerself special, to be applied by the restorer, as a unique signature of the craftsman ?

