JBNeal
-
Posts
6,972 -
Joined
-
Last visited
-
Days Won
74
Content Type
Links Directory
Profiles
Articles
Forums
Downloads
Store
Gallery
Blogs
Events
Everything posted by JBNeal
-
I have to agree with the Fram analysis. I started noticing in the early 90s that Fram filters in my Dakota were allowing the oil to get dirtier faster, even after changing from Quaker State to Pennzoil to Valvoline to Castrol to Mobil. The oil was black and felt gritty, and didn't instill confidence as to filtration. When I switched to Wix, it didn't matter what brand oil I used in that Dakota, the oil stayed relatively clean for 4000 miles out in West Texas, a notoriously dusty environment. Last year, during a hectic 5 month stretch, my Buick went 10k on a Wix filter with Mobil 5000. The oil was black but didn't feel gritty when drained. The three subsequent oil changes at 5k have yielded oil that is brown and still very slick. The fact that the bypass filter elements can collect smaller particle sizes than the full-flow filter elements has me leaning towards not modifying my flatheads. Also, I am not willing to risk butchering my flathead blocks by drilling the required ports to convert the blocks to full-flow filtration. I figger it's cheaper (and safer) to do more frequent oil changes. The flathead blocks that have provisions for the full-flow filter seem to be the best candidates for this mod since they are practically done, what with the filter base mounting boss and all.
-
Looks kinda like an Arvin heater...if you're going to 12V, why not just put a new 12V heater fan motor in place of the used 6V motor such as NAPA BK 6551083
-
Note how 8 & 9 are not along the centerline laid out by the other holes...this makes me think they are custom holes by a PO, possibly from an aftermarket rear bumper bracket. As for tail lights, I've seen a fair share on eBay every once in awhile, them folks are awful proud of'm.
-

How Many Pilot House Trucks Have Survived?
JBNeal replied to Bradley S.'s topic in Mopar Flathead Truck Forum
SURVIVOR: the B-3 grain truck sitting next to the barn on the east side of the county is completely obscured by sunflowers, but I was able to take a pic of the flatbed sitting over at the nursery a few miles away: -
That is a fine lookin' Hemi ya got there, but I reckon you've got a li'l work ahead of ya gettin' it wedged into that engine compartment. I reckon you're gonna have to modify the firewall & floorboard for engine & transmission installation because you need more clearance between the front crossmember & the balancer. Locating the center of gravity of the engine behind the front axle will help in unladen stability, especially during a hard braking maneuver. Anyhow, keep up the good work!
-
1950 b2b motor/fire wall tag question
JBNeal replied to ge tadlock's topic in Mopar Flathead Truck Forum
that thing on the side of the motor is the oil pump, Crank'n Hope also sells shop manuals on eBay, I'm not too savvy about deciphering the body tag but there is an ID tag in between the hinges on the driver door jamb, there should also be a ID# on the frame in the front axle area. -
another dumb question - please be patient
JBNeal replied to BulldogTom's topic in Mopar Flathead Truck Forum
This is another area of performance improvement I'm going to attempt on the '48. When I first removed the manifold, there was no valve or shaft for that matter to divert exhaust into the intake manifold chamber...besides, that chamber was chock full of carbon. Since I had no shop manual when I first got the engine running, I put a couple of small bolts in the holes where the diverter valve shaft would be to block them off. As I recall, the motor ran decent for the first year that I drove it. As it's summer time 9 months out of the year here in TX, I never noticed a problem in cooler weather. Below freezing weather is usually accompanied with nasty winds, rain and/or ice in these parts, so I never drove this classic in any foul weather. I have since installed the diverter valve to see if the engine would run any better. When it's in the 40s, it seems to run a little better, but the rest of the year it seems to want to stall out. So I uncorked the spring and let the counterweight hold the diverter so the exhaust would flow straight out, and that helped out. I reckon I'm gonna try to remove this diverter valve and block off that chamber from exhaust gases with a metal plate of some kind. I kinda wished I had left that old carbon in place as it filled all of those voids rather nicely. It probably allowed for some insulation from the heat and kept the charged air density higher in warmer weather. I reckon I could fill those voids with melted lead from some old wheel weights or takes some scrap steel and a blow torch to fill the volume with slag. -
That is good news...with practice, you can partially dismantle & clean that carb every year with only a screwdriver, needle nose pliers, a couple of clean shop towels and a can of carb cleaner, and it'll take less than an hour. Ya know you've gotten good at it when you can perform this task on the side of the road while wearing your Sunday best and only need to wash your hands afterwards.
-
I never understood why there was a need for a glass bowl on the fuel pump and a separate glass bowl in front of the carb. Why not put the filter in the fuel pump glass, run a line straight to the carb, and be done with it? Not to mention the jostling the carb filter bowl took on rough roads, makes me wonder how many of those brass fittings from the filter head to the carb split in two from the vibration. Evidently, fuel storage & transfer was not a clean process back in the day because of this redundant filtration setup. However, I've seen many an old Farmall that had a sediment bowl below the gas tank that fed the carb with no fuel filter in sight. I've been tempted to eliminate the carb filter housing and put a filter in the fuel pump, but I don't have enough smarts to know how this will affect the carburetor. During engine idle operation, I've seen bubbles percolate in intervals inside the carb filter bowl, as the carb float chamber empties and the fuel pump shifts from bypass to pumping more fuel into the filter bowl. I'm a-thinkin' the carb filter housing is doubling as a reservoir for the carb float chamber, so that during an instantaneous wide open throttle operation, ample fuel can dump into the carb float chamber with minimal lag time in re-filling, kinda like having the reservoir on a residential water heater. If I install an electric fuel pump, I wonder if this carb filter bowl will be obsolete. I recall later Chrysler carb setups that had engine mounted mechanical or electric fuel pumps with no sediment bowl and an in-line fuel filter before the carb, with a return line back to the fuel tank. So I reckon it depends on how much the individual wants to modernize their fuel system to wring out as much performance as that flathead can muster.
-
Blocking off the port on the thrmo housing
JBNeal replied to NiftyFifty's topic in Mopar Flathead Truck Forum
the factory cooling system ain't pressurized, so the cap shouldn't have a spring in it. a water pump without the port for the external bypass elbow on top is for internal bypass engines. The internal bypass head will have a bump on the thermostat end of the casting, whereas the the external bypass head will be squared off on both ends. The internal bypass head will have an opening in that bump that should mate with an opening in the head. The head gasket for the internal bypass head will have a corresponding ear for this passage, whearas the external bypass head gasket has squared off edges. btw, when I rebuilt the 218 in the '48 back in '96, I didn't realize that I had a 218 from a '53. So I have an internal bypass engine with an external bypass gasket set & housing. Now that I've realized this, I know why I have a seep behind the water pump at the head.
-
how do you remove a stuck engine?
JBNeal replied to 41/53dodges's topic in Mopar Flathead Truck Forum
I reckon that's the nature of the beast, finding how to get all of the bolts out with the least amount of work. Since this beast has been sitting in the woods for all these years, it might have to bite the bullet & pull the engine+trans as a unit for cleaning & replacing the gearbox seals. At the very least, the transmission will have to be removed to get at those remaining flywheel bolts. Jacking up the front of the truck a foot or two should give enough room to get a floor jack (and adapter) under the transmission to guide it off the pilot bushing, but the driveshaft will need to be removed. fwiw, I've resurrected two Pilot-House trucks from being parked outside for 20+ yrs...getting the '48 road-ready was an extended chore and taught me patience with each busted bolt & knuckle, so when I tackled the '49, I was ready for each hurdle that I had to cross. This also gave me the confidence & patience to split my International 584 to replace leaking engine seals & a fried parking brake. They are all machines that can be worked on if'n ya take yer time and accept the workload that is required to get the job done. -
Yep, thinned oil won't provide enough protection...as I was taught by a few older mechanics, developing a feel for oils & greases is a skill that can be used in diagnosing problems. My Firestone co-workers wondered why I wiped the dipstick with my fingers instead of a rag when doing oil changes, and this is why. Oil may look okie dokie, but if it doesn't feel right, then there's a problem afoot that needs attention. When I first got the '48 running back in '96, I had not rebuilt the fuel pump or distributor. This was my first engine rebuild, and being in college, I didn't have much $$$ for the peripheral stuff, so I focused on the engine internals, starter/generator, and carburetor. The truck had sat in the TX sun, heat & humidity for 20+ yrs, and I was about to learn alot about that. The engine ran fine for about a day, then the fuel pump diaphragm came apart. When I rebuilt that, I reckon that AC pump dated from the 60s. When I got it on the road after fixing the brakes, it ran like carp going up hills and couldn't go over 30mph. That's when I realized the distributor vacuum advance had come apart. So I parked it for another 2 yrs while I replaced every rubber component on that machine when I could scrape up the $$$ as I was now assuming they were all very close to being rotten. With the advent of the E10 gasoline blends that are prevalent, this only magnifies the need for replacing all rubber fuel components on these old buggies. I've spied a few vintage NOS fuel pumps on eBay and I know they will need a rebuild kit to update the rubber parts, so I stay away from them. I found several Power Punch ring sets on eBay, and one set had little pock marks in the auction photos so I stayed away from those as I was certain that the seller had cleaned off some oxidation but didn't get all of it. IMO I think your bearings were going to fail from the oxidation that had occurred before installation, but the oil dilution accelerated this failure.
-
One of my concerns on my '48 is the inner bearing race that could be removed from the axle housing with my pinky finger, that seemed just a tad too loose to me as the left side was a bit more snug. At the 5000 mile mark, I had gear oil in the axle bearings, first spotted when gear oil was on the backing plates accumulating gravel road dust. I cleaned all that up and put another 5000 miles on the beast, same result: a very slow seep of gear oil into the axle bearings. I don't recall any shims being present, so I reckon that's gonna need to be addressed; anyone know the thicknesses I should make or a supplier? I'm kinda thinkin' that there's a slight neck on my axle shafts that is allowing the gear oil to get past the inner seals, dunno if that can be sleeved or not. Anyhow, just wonderin' if anyone had run into the loose race issue. I'm not sure if I can make a 'sleeve' for the race/axle housing since I don't know the exact ID of the housing. When I tear the '48 apart in a few weeks, this is one of my priorities to address as I don't want to be motoring into town someday and lose a wheel to a busted axle shaft.
-
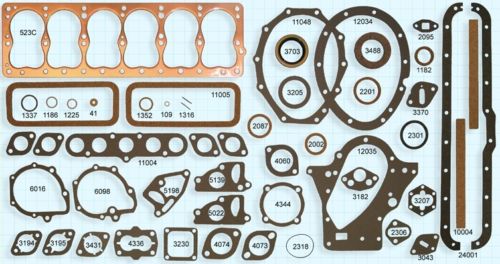
I've used this approach many times...my shortcut is to put a thin thin layer of grease on my flat machined surface, then mash that surface onto the gasket material. It will leave a silhouette for cutting the new gasket. For assembly, I use gasket sealant to stick the gasket on the surface for assembly. So far, those homemade gasket haven't seeped any.
-
Remove as much of the crud with a screwdriver, gasket scraper, steel brush, etc. as ya can so ya can use the least amount of chemicals possible. Heating up old caked-on gummy grease will get it more fluid to scrape. I've soaked parts in vinegar with success, then poured the waste on the gravel driveway weeds to knock them down too. Diesel, an old stiff nylon paintbrush & a bucket were good also...place the bucket under your work area so you can brush the diesel on the parts and it'll drip back into the bucket...if you're really good at it, none of the diesel will miss the bucket. Once all those heavy deposits are off, any of those degreasing chemicals will work great at attacking the crud that's in the 'pores' of the metal.
-
how'bout some of that roll-on bedliner stuff, for the sound insulation?
-
the 5-digit odometer should be a giveaway...from what I've been told, if ya could make a car or truck last 80k, then that was due to good maintenance and minimum wear & tear. Counting all the grease zerks and adjustments that could be made on brake & suspension parts, as well as carb & clutch rebuilds, vehicles of that era usually pooped out before the motors did.
-
I've seen a Chevrolet version of one of these (in a photograph), complete with the roof rack & visor...I'm thinking it's a limousine or school bus up-fitted as a limo.
-
an alternative is to put the float in the summer sun and let the accumulated gas boil out, then re-solder the joint. Test by attaching a weight like a big hex nut on a string to the float and submerge the float in a pot of water. Any air in the float will find the leak point as bubbles would escape, much like finding a pinhole in a flat tire. Submerge for I dunno a day or so to test the solder joint.
-
I reckon the oil pressure switch can also be routed to a relay that feeds the ignition coil...a manual override switch with a trigger guard could be put under the dash.
-
Q: if an electric fuel pump is installed, does a return line from the carb to the fuel tank also need to be installed? My concern is the psi from the electric pump will crack open the float needle valve and flood the carb...
-
The electric fuel pump as a back-up to the mechanical fuel pump as well as a mfp primer...I reckon that is going on the upgrade list, along with bigger rectangular mirrors, radial tires & turn signals. My '48 stalled a couple of summers back at the controlled intersection of two farm highways in between two small towns. As I sat in the truck at the green light, waving the sporadic drivers to pass, I spied a rapidly approaching F250 with a contractor just a yappin' on his cell...I was getting ready to bail out of the truck when he finally saw me stopped in the middle of the road and swerved to avoid smashing into me. This prompted me to get out & push the beast into the ditch, where we sat for another 1/2 hour (it was well over 100 that day) as the truck cooled off, both hoods open. I reckon the electric fuel pump would've negated this story and the near-loss of my wits that day, so that's good enough reason to bite the bullet.
-
Sounds like the float needle valve is sticking open, allowing the fuel pump to flood the carb. Ya might have some crud in the carb, as sediment & varnish have a tendency to collect in the float chamber. I recommend removing the air horn, being careful not to damage the gasket, remove the float & needle valve, and flush the innerds with a can of aerosol carb cleaner. Dry with compressed air, reassemble to specifications, and see if that works. Or go the full nine yards and get a carb.kit, disassemble the carb from air horn to mounting flange, clean thoroughly & reassemble.
-
Leave pedals on to pull motor? Really?
JBNeal replied to Dan Babb's topic in Mopar Flathead Truck Forum
I recall the shop manual mentioning removing the front fenders & grille shell as a unit. If you've got an engine hoist, you could probably do this by using some 2x4s & lifting straps. If you've got the floor shifter, remove the top plate from the transmission to clear the cab firewall after removing the floorboards. Then the engine/transmission can be unbolted from the frame, tilted up, pulled forward, raised and removed for further entertainment. -
Does the hood rest on top of the radiator
JBNeal replied to Dan Babb's topic in Mopar Flathead Truck Forum
I have '51, '52 & '53 parts trucks that I'm planning on cobbling together to make a driver with the T-5. The '52 is the most intact, but it has the B-1 grille, hood & baffle. Does anyone have a picture of the B-3 baffle? I might have to fabricate one, but this project is on standby until after I get the '48 & '49 back in shape.