


JohnTeee
-
Posts
236 -
Joined
-
Last visited
-
Days Won
1
Content Type
Links Directory
Profiles
Articles
Forums
Downloads
Store
Gallery
Blogs
Events
Everything posted by JohnTeee
-
Two thoughts from my reading . . . How's your heat riser assembly? Could it be diverting heat all the time to your intake manifold. @keithb7 has a good video about this (just finished watching it, again) and you can search the forums. Oh. Also a good link in the reference section. Also, there is a heat shield for the fuel pump . . . I think wrapping the fuel line (picture foreground, left side) in foil tape. Cheers! John
-
What feeler stock do I need to set the tappets hot?
JohnTeee replied to MarcDeSoto's topic in P15-D24 Forum
When I worked on the valves several years ago, I used a regular feeler gauge set with straight blades. They are not destroyed when using them with the engine hot. Gotta watch that hot exhaust! I just picked up an inexpensive set from O'Reilly, with bent ends, that should make it much easier the next time I do it hot. Even helped a bit when setting them cold. John -
@soth122003 Morning Joe, Thanks for the thoughts. Pulled the head, again (grin) last night and plan to start messing with valves this afternoon. Your suggestion on valves is similar to Snipers and I'm going to listen to you guys while I have everything open. Getting new parts together in the meantime. While I'm in here and the radiator is out, new water pump, heater/radiator hoses, some gaskets and a little rear-end work (pumpkin is leaking). Winter project! John
-
Regarding fuel line filter, I'll have one in-line, just before my fuel pump. Yes, the new tank comes with a drain plug. John
-
I think you have a winning idea and what the mechanic had in mind for me to go look for. I went a slightly different route and, apparently, I don't know how to measure fittings! The fuel filter that screwed into the tank inlet and the flared end fitting have matching threads. When I checked with a vernier caliper, they measure 3/8" from side to side, across the threads (I may not know the correct way to measure a bolt?). The flare fitting matches the fuel line filter. So I made up a connector from the fuel line fitting and a piece of 5/15" I.D. Fuel Line. Cut the flare fitting off the end of the fuel line, screwed my connector into the tank with little pipe dope on the threads, trimmed the rubber to length and slipped it over the end of the fuel line. I think it will serve. In other news, my Leak Down Tester arrived late yesterday afternoon. Busted it out this morning, calibrated it and checked each cylinder. #1 - 30% #2 - 25% #3 - 25% #4 - 45% #5 - 45% #6 - 40% The leakage from all 6 cylinders could be traced to the crankcase, with it heard audibly through the crankcase rebreather. I think this thing is going to get the new head gasket installed, some gas added and cranked in the near future. John
-
Thanks Sam, You and Los_Control were posting similar answers together. <grin> Below is a carb line fitting. With that taper, to a 5/16" flare fitting, that looks like what I need. Just measured my fuel line and it is also 5/16". Hmmmm, wonder if I have some 5/16" fuel line sitting in my stash? John
-
Los_Control, Thank you very much for that forum link and the info! I have to run out in a bit, so will look for a 1/4"-18 NPT/Flare fitting. Funny, as I was typing the message above, NPT fittings kept trying to flit through my brain. Had even Googled "NPT" to find that it's "National Pipe Thread". I guess my only concern about running it as is has a two-fold answer. One, the original concern was possibly a leaking head gasket and I would be putting the same one back in. Which leads to the second part - reusing a head gasket. It DOES only have 500 miles on it, but can you get an effective, 'permanent' seal by reusing a head gasket? I had done some reading and was lead to believe that this is a 'No No', due to the crushable nature of the gasket. Thanks again for all the help! John
-
Well, you guys have given me some positives when I was fully expecting, 'Rebuild Time!' My 'Leak Down' tester will be here today. I'll check with that and recheck compression now that it's been sitting a few days. Then will remove the head, again ?, closely inspect seats, maybe pop out a couple of valves, put it back together and install the new head gasket. See what happens from there. In the meantime, I need to figure out an adapter from new fuel tank to fuel line. The new tank comes with something like a 3/8" fine thread female fuel connection and my existing fuel line connector is a 1/2" coarser male thread. I have a little fuel filter with the same 3/8" thread on one end and a rubber fuel line connector on the other. I can screw that into the tank, cut the male fuel fitting off and bridge it with a short piece of flexible fuel line . . .
-
I thought I'd post an update on what I've found . . . As you will recall, my mechanic reported a leak down failure from 5 into 6 and the intake. Suspected head gasket or valves. Sniper recommended setting the valve lash. Following the manual . . . and added 0.002” to the valve lash intake and exhaust clearances to account for a cold engine. Since the head was off, I was able to visually run each piston to TDC on the compression cycle, giving me lash on both the intake and exhaust valves. Set all six cylinders this way. Spun the engine around around several times and rechecked the valves . . . and got some funky results. Mostly on #5, having lost it's lash. Tried another round, using the recommended: Stage A, #1 and #6 at TDC, #1 in firing position Stage B, #1 and #6 at TDC, #6 in firing position To move from Stage A to B, manually turn the engine 1 revolution. Stage A – Adjust #1 Both valves, #2 Inlet valve, #3 Exhaust Valve, #4 Inlet valve, #5 Both valves. Stage B – Adjust #2 Both valves, #3 Inlet valve, #4 Exhaust valve, #5 Inlet valve, #6 Both valves. It all looked good. Spun the engine several times and had some off settings, I think mostly lost lash on #5 again. I was curious about any possible improvement in compression test, to put the head back on, with the old gasket and some grease on one side. Did not want to put a new gasket on, just to check and then throw it away and have to buy another. Did not torque - no particular reason, guess I just wanted to do a quick test. Old values December 2017 #1 -100; #2 – 110; #3 – 107; #4 – 110; #5 - 100; #6 – 112 Since this has set for 5 years, I had added a dollop of Marvel Mystery Oil to the open cylinders when I first pulled the head and spun it around. This was a couple of days before retesting. Today, after setting valve lash cold, with the extra 0.002” on each: #1 -118; #2 – 110; #3 – 105; #4 – 105; #5 - 80; #6 – 85 Added oil to #5 and #6 and rechecked compression. #5 – 100; #6 80 Torqued the head and rechecked, just to see what would happen. #1 -115; #2 – 110; #3 – 105; #4 – 80; #5 - 135; #6 – 140 OK. Even after setting the valves, recheck #5 ad #6 were low. So, does that argue for head gasket? But after I added oil, #5 and #6 shot way up. Expeted? Do I really need to do a compression test with a warmed up running engine? I have a leak down tester coming my way, should have been here today, hoped to be able to recheck with that and post those results. Should be here tomorrow. I wanted to run what I had up the flagpole and see what happens. <grin> Thanks for reading and any help. John
-
If I remember correctly, Tennessee Clutch & Supply Inc does relines brake shoes, in addition to doing clutches. 1995 Nolensville Pike #113, Nashville TN 37211 (615) 242-4163 Cheers! John
-
Bob, even I can understand them! ? John
-
Thanks Sniper. I had to educate myself when I worked on the valves and head ten years ago and that knowledge just did not hang around when it wasn't getting used. <grin> Gives me an idea of how to check #5. I'm also watching a fella with a bunch of Flat Head 6 stuff, "Keith's Garage" and found a video Flathead Live Tappet Action & Valve Set Performance Gains, which has given me some idea of how to start out with a cold, non-running engine. I have the 'aft' valve cover off and getting ready to play. Thanks again! John
-
Thanks Sniper! When I replaced valves 10 years ago, I no longer recall how I figured out they were bad (bent shaft, warped valve). It occurred to me AFTER I pulled the head, that I could have check valve clearances vs. compression and maybe avoided some of this. How do I check for proper seating with the head off. John
-
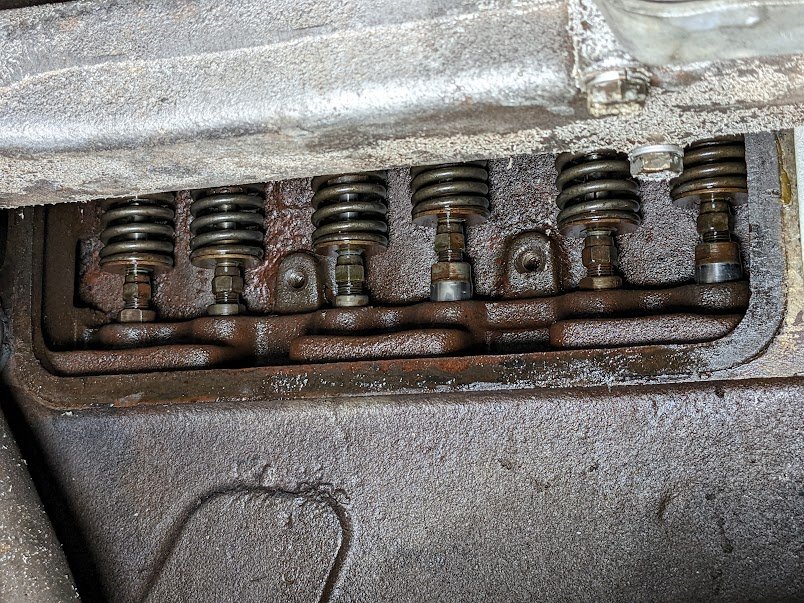
After a long hiatus from the P15-D24 Forum and my 1947 Plymouth P-15 Special Deluxe Convertible, enough is enough and I want to get it running again. History: Winter 2011-12 - rebuilt carb, spark plugs, replaced four intake valves with #V1086 and "valves ground" (to my additional shame, I did not record WHICH intake valves they were), Points, Condenser, Fuel Pump, Fuel Filter, fuel tank cleand/lined, under dash/aftermarket water temp gauge installed (original gland broke off sensor cable), head resurfaced and new gasket, 140F Thermostat (don't ask why, I don't recall. Must have seemed like a good idea at the time), intake/exhaust resurfaced Winter 2014-15-It Had a 'clutch blowup' and it was out of service for a while. Got clutch back in and wanted to drive it. No exact recall of what I did. I know I mucked about with the distributor and carb float. Had a massive backfire that blew out the side of the muffler. Could not get it to run. I'm not great at troubleshooting engine and so, it has sat. In an effort to get it going again, I was going to take it to my local mechanic who came up 'Old School' and was going to take it on in his 'project bay' when he got done with a truck engine replacement. This excellent gentleman was diagnosed with, and shortly later, died from Pancreatic Cancer. I got in touch with a mechanic who said he could work on the old girl agreed to take it in. Got it in too him and he certainly identified problems; did not return it running. Work he did: Replaced battery Replaced spark plugs Found fuel tank was rusty and fouling the fuel. Lining was flaking off and tank was rusting. New fuel tank from Vans Auto installed. (Ironically, they had a better price with shipping on eBay, than their online site) Radiator leaking - sent off, along with spare, to local radiator shop to pick the best and fix any leaks They had removed the radiator to check timing against the balancer marks Ran compression test and found #5 with low compression. Ran 'leak down' and found air leakage into cylinder 6 and carb He knew I had been into the head and valves in the past. In an effort to save me some money, recommended I have it towed back home, pull the head and inspect the head gasket for leaks, or check valves for proper operation, which we agreed it sounded like it could be. Pictures below of what I'm working with. I'll post links, as each is larger than the total size allowed for upload. May have to come back and edit to find a link format that works. I've pulled the head and do not see anything readily apparent with the gasket Nothing readily apparent on my inspection of the block Close up of Cylinders 5 & 6 Here is a YouTube video link for a short, head off, crank, showing all valves working. Soooooooo, any thoughts about where I need to concentrate my attention? New head gasket obviously. Several years before all of this I had put a different head on, I think because it gave me a few more C.I. - it's the type with the bypass hole, which my block does not have. Guess it doesn't make any difference which head gasket goes on, as that hole isn't going anywhere? Check valve clearances? I really appreciate any ideas. I'm not sure how much I'll tackle the rear differntial pinion housing leaking and passenger door latching on down the road . . . <grin>
-
1947 P15 Starter,Generator rebuild places???
JohnTeee replied to 47P15Cruiser's topic in P15-D24 Forum
Nation Starter and Alternator 2210 Broadway St, Cape Girardeau, MO 63701 http://www.nationsstarteralternator.com/ 888.334.2632 They've been in Cape since 1930, were Nation Brothers, back in the day. John -
Do you have a reverse light? Maybe in the left, rear fender? Dad's '48 has that rotating switch connected to a reverse light. jT
-
Don't know if this will help you or not, but it looks pretty similar to my stock '47 P15 installation. Bit of a challenge to get in there to take a picture. Boy, is it dirty under there!

-
I've still got my original Oil Bath Filter, in pretty good shape. Cleaned up and modified a spare filter that was in kind of sad shape. Here's my results and the air filter cartridge that I used. Be sure your filter is tall enough. Otherwise the bottom edge of the top will suck down to the base and block airflow. Of course, you could always go up higher removing the sides of the top. John
-
Back, Clutch & Pressure Plates, A Whole Lotta Shakin'
JohnTeee replied to JohnTeee's topic in P15-D24 Forum
It wasn't that bad, at first, when the sun was shining a little higher. By the time I got home, my ears were quite chilled. Wish I'd thought of using the dice. John -
Back, Clutch & Pressure Plates, A Whole Lotta Shakin'
JohnTeee replied to JohnTeee's topic in P15-D24 Forum
Well, just like a bad penny, I'm turning up again and popping this thread back up to the top. Sent the original clutch and pressure plate to TN Clutch and have finally got in installed and the car buttoned back up. As the pilot bearing and throw out bearing had something around 2000 miles on them, I left them in use. It drives sweet! Still have some minor adjustments and need to recheck the timing, but I had it out driving today after getting it buttoned up. Afternoon Drive . . . It was 29F and the top has been sitting 'down' for a year. Could not get it up and latched. Drove it to Wal-Mart anyway. John- 16 replies
-
- 1
-

-
- clutch
- pressure plate
- (and 3 more)
-
Back, Clutch & Pressure Plates, A Whole Lotta Shakin'
JohnTeee replied to JohnTeee's topic in P15-D24 Forum
Hey Don! Lots to think about there and sounds like another good place to look. I will qualify this with, "at one point" the springs were in place and clipped into the fork, with the fork seated on the ball. That's not to say that we didn't knock something out of place during reassembly. I'll see if I can do some 'peeking' and otherwise, pull the trani back out. Throw Out Bearing was new in '05, came with new springs and may have 1-2,000 miles on it. Er, hum, how do I tell if it's correctly seated? I've got good, smooth clutch pedal action and can put it fully into neutral/disengaged. I probably need to adjust clutch free travel; saw that procedure, but got interrupted in the process by the bucking. Test fit of the second/installed clutch was good on my spare trani input shaft . . . and yes, on the installed trani as well; had to think on that for a moment. We pulled the installed trani, set it on the bench and checked the fit. That was when we found the fit of the 10" clutch splines on the input shaft splines was a problem. The clutch was installed with the legend, "Flywheel Side" to the flywheel and the raised portion to the back. Thanks for all the ideas. Now, I'm not sure when I'll get to check them all out. I work the next several days, then leave on vacation. May end up being the end of the month before I can tear into it! Cheers! John -
Back, Clutch & Pressure Plates, A Whole Lotta Shakin'
JohnTeee replied to JohnTeee's topic in P15-D24 Forum
Hi Rich! I changed the bushing in 2005, a couple thousand miles at most on that. Er, uh, not having the Miller tool, I used the shade tree method of filling the pocket with grease, inserting an appropriate size bolt and whacking with an soft hammer. Can't recall how I inserted the new bushing, but I had advise from here, or the old site, rather. Sounds like good advice. I'll see if there's gunk or rust built up and let TN Clutch have a look at it. Thanks! John -
Here's a very nice reference site that may answer the question: Flat Head Six Engine Numbers That Start With "P" P25 218ci Plymouth Car Plymouth 6 1954 Except that site does not address the 'Diamond' stamp . . . Cheers! John
-
For those of you who are eBook readers, just ran across this listing on Amazon for a free Kindle ebook that looks to be good (and received good ratings/reviews): The Old Car Nut Book I'm downloading it for my Kindle, may get a chance to read it on vacation, along with the other 500 books I have on the thing! John
-
Back, Clutch & Pressure Plates, A Whole Lotta Shakin'
JohnTeee replied to JohnTeee's topic in P15-D24 Forum
Morning Doug, Both my installed flywheel and my 'original' are drilled for both sizes. By serial number, my engine/flywheel probably came out of a 1948-49 B-1-B Dodge Truck (probably rebuilt later, as the "T142" is over-stamped with "E17670"), other spare parts came out of a '53 MOPAR (guy told me he had '49 parts!) and a donor '48 P15, so it's hard telling the origin of my parts. I have a matching Borg & Beck 10" Pressure Plate and 10" Clutch. I suppose I should have it rebuilt before using, so I don't run into the same kind of problem I'm having now. Attempted installation of the 10" was, while the splines of the clutch matched both the input shaft and the alignment tool, it was a very tight fit on the input shaft. I was trying to decide whether I should possibly 'dress up' the splines of the clutch with a fine file, or . . . Maybe if it's rebuilt, TN Clutch could look at that. Thanks! John
