Roadkingcoupe
-
Posts
562 -
Joined
-
Last visited
-
Days Won
1
Content Type
Links Directory
Profiles
Articles
Forums
Downloads
Store
Gallery
Blogs
Events
Everything posted by Roadkingcoupe
-
I was interested in finding out the measurements of the trunk lids for 1940's PDCD Plymouth Dodge Desoto and Chryslers That way I could confirm some applications and interchangeability. Any chance you could measure the trunk lids/openings? Would be interesting to see if it matches a 1940 / 1941 & a 1942 Plymouth trunk lid The problem with part numbers is that the trunk lids have different part numbers not because they wont work but because the holes for medallions, light, license plate holders and trunk handles are sometimes in a different location and therefor Chrysler provided a different part number for the same basic trunk lid. I would like to use the measurements to confirm the fit and application. In addition the 1940 Dodge for example had a "ridge" that was used as a divider for the common two tone paint schemes. Although the trunk lid would work on another car the "ridge" makes undiserable as a replacement for a Plymouth. Looking forward to measurements. Possibly three horizontal measurements (top, middle,lower) measured with a flexible tape and a vertical measurement straight down the middle (using a flexible tape following the contour of the trunk). Thanks in advance for any info.
-

Plastic-topped Plymouth... must have been a one-off
Roadkingcoupe replied to Robin (UK)'s topic in P15-D24 Forum
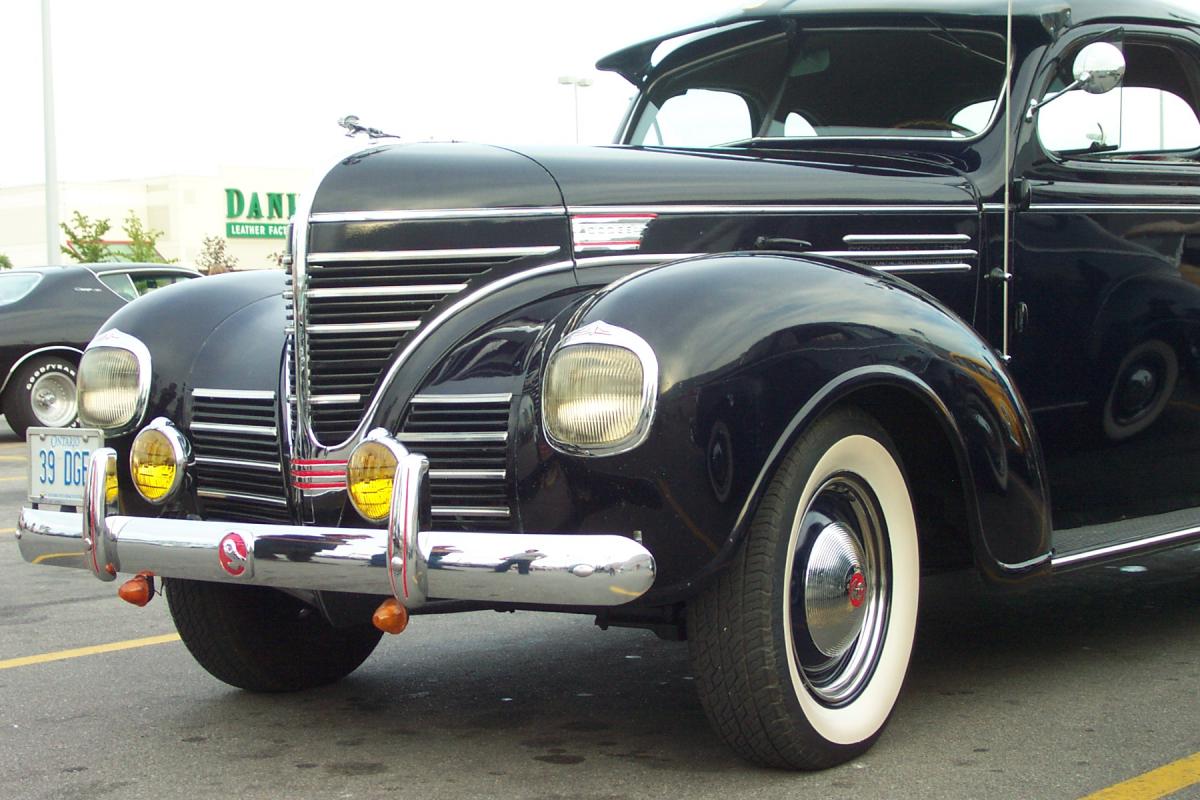
commonly known as a "PLODGE" Plymouth bodied Dodge badged Canadian car "Maple Leaf Mutant" Here is a 1939 Canadian built Plymouth bodied Dodge (Plodge) Same 1939 Plymouth sheet metal and square headlights, specially manufactured Dodge grill
-
Plastic-topped Plymouth... must have been a one-off
Roadkingcoupe replied to Robin (UK)'s topic in P15-D24 Forum
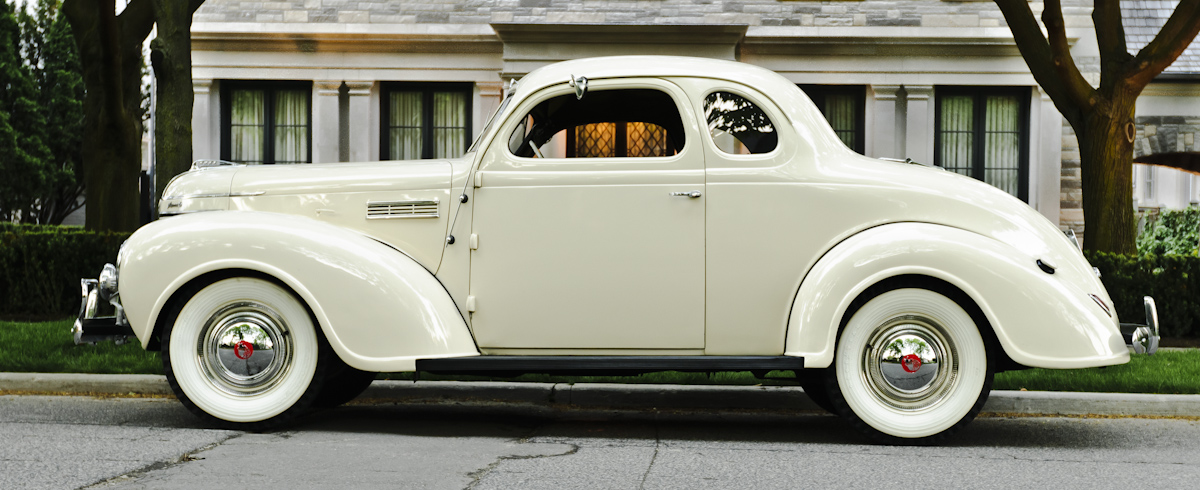
A variation on a theme..........
-
1940's Glove box and Dashboard mounted Clocks were manufactured and provided to Chrysler from G.E.O Borg Company There has to be some overlap on the internal workings of the clock mechanism. Actually considering the cost of a P11 / P12 or P15 clock and the relatively low price of a 1940's Chrysler or DeSoto clock that's a great idea. To rebuild a non-functional "pricey" clock with the guts from another "lower" priced unit.
-
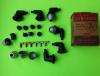
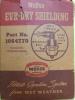
The original MoPaR Ever-Dry Kits were part # 1064770 / # 1321118 The ebay ones pictured are offshore reproductions and can be sourced at Birenbaums as well. The main difference is the repros have a rough textured surface and they do not come with the spark plug rubber wire ends, coil rubber ends & spark plug wire terminals as found in the NOS parts box.
-
Mounting brake master cylinder 39 Plymouth
Roadkingcoupe replied to likaleica's topic in P15-D24 Forum
If you have an used (no longer needed) extra brake drum you can cut out a "window" at the shoulder and use that as a way to adjust the brake shoe alignment. -
Mounting brake master cylinder 39 Plymouth
Roadkingcoupe replied to likaleica's topic in P15-D24 Forum
Interesting that the only wheel cylinder working is closest to the MC Have you tried bleeding the wheel cylinders starting at the furthest from the MC and then one at a time move closer to the MC. Of course if the wheel cylinders are "frozen" the they need to be disassembled, honed out, rebuilt or replaced. -
Empty trailer - Rockport, Tx to central Mo
Roadkingcoupe replied to austinsailor's topic in P15-D24 Forum
Hopefully neither house has a 1/4 million dollars of vehicles....or they would be lying upside down on their roofs. Can you tell which house has a quarter million dollars worth of collector cars inside? image.jpg -
Mounting brake master cylinder 39 Plymouth
Roadkingcoupe replied to likaleica's topic in P15-D24 Forum
after bleeding the brake system the next challenge will be the alignment of the brake shoes to achieve full contact. Bleeding the brake system will activate the wheel cylinders and the shoes will/should press against the drum. There are two adjustments a major/minor (micro/macro) at the top and bottom of the back of the brake shield. The goal is to get the maximum amount of brake shoe to press against the brake drum. This has been discussed many times on the forum and includes the use of a specialized tool including the Ammco 1750? Others have manufactured homemade versions. If you have an used (no longer needed) extra brake drum you can cut out a "window" at the shoulder and use that as a way to adjust the brake shoe alignment. There is a wealth of information on the forum....just do a search. When properly adjusted the brake should be quite effective at stopping the car. If they are poorly adjusted the braking distance will be less then ideal. -
Vaseline on one car- worked well, stays on the rubber, leaves residue on paint and glass Armor all on the other- applied with a sponge the same width as the rubber, multiple coats over time, no mess, more time needed. I knew the jokes would follow as soon as I mentioned vaseline.....keep them coming:)
-
Vaseline (ya I can hear the jokes coming) but it leaves a mess on the windows/body Armor All (not really for rubber but it worked) The rubber seals were dried, shrunk and cracked. After a number of soakings and time to let it sink in the window seals "plumped" right up. Really surprise me....tried it on dried out running boards and it worked well.
-
Previous discussions indicated that Steele Rubber was high quality with the least problems for installation. This pertained mostly to the front and rear windshields. The Steele rubber ones are molded for the exact application. Some of the Andy B ones were harder to fit and they were from a roll of stock material. Not sure if this info applies to the 1/4 windows as well. Have you tried restoring them. I had a set on a 1941 Plymouth that looked cracked and checked. After continual soaking them they came back to life and look great.
-
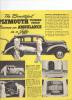
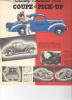
Poor mans ambulance & Business Coupe P/U conversion (not ute). patient loaded through the trunk....attendant conveniently sits beside the patient.
-
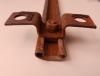
I believe that the second drawing in my earlier post is actually for early 1930's Dodge "32-33-34-dodge-hood-center-hinge" is the caption on the drawing Looks like Chrysler went with a stronger hinge as the hood s became longer and heavier. Please note there is a difference between the early 1930's and later 1930's and 1940's Hood hinge mounts as well. The later years used a "sliding cap" with threaded mounting bolt to afix it to a "perch" that mounted to the vehicle.
-
Tried calling the ebay vendor = no answer looking carefully at the miniature picture in the auction, it doesnt look like the inner flanges roll up enough to fit the Dodge. Will keep looking for a supplier. How long is the required hinge for your vehicle? I took some measurements off of 1939-1941 DCPD and they measure anywhere between 34 9/16" (1939 Plymouth) and 35 3/8" (1940? Plymouth).
-
Here is a link to the topic discussed on a MACK Truck forum http://www.bigmacktrucks.com/index.php?/topic/13163-stainless-hood-hinge/
-
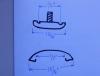
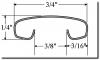
Hood Hinge Pictures and specs apologies for the drawing....crude but effective. The picture is of a 1939 1940 1941 style hood hinge from Plymouth Dodge Chrysler The first drawing is for the actual dimensions (measured with a tape measure, not a micrometer). The third photo is of a vendors part that is available today but not the right size. Hope the info helps.
-
under the P15-D24 Banner there are a number of links One of them is "classified" right between blogs and store That is where you will find it.
-
I would point out that the "molding" mentioned in the statement below is a molding not a hinge. It is a decorative cosmetic trim part (only). The 1941-1948 Plymouth's had an alligator style opening hood BUT the Dodge continued to have a "butterfly" style hood right through the first series 1949's So you might find out that the molding will NOT work as a hinge. If I remember correctly the MACK truck B2? models had a similar butterfly hinge and they are still available today. Can not confirm for certain that they are identical but worth a look. "I have seen similar hood hinges for the early Plymouth's that are made of stainless steel. The seller is on Ebay so you might seqarch there and be able to find the seller and see if he has a long enough section that might work on your car. The hood center strip on my 39 Desoto is Chromed plated all the beltmolding on my car is stainless. thry this link on ebay 1949-50 MOPAR PLYMOUTH HOOD CENTER MOULDING (NOS) PT# 1298932 selling for arounf 30 dollars"
-
words of wisdom? Very topical...... I recently spoke to a gentleman who took his hood hinge in to be re-plated. They ground so much of the metal (to smooth out the surface) that the hinge was no longer strong enough to work as intended needless to say....he is now looking for a new(er) hinge. If you take the hinge in to be re-plated you might want to make sure that the chrome shop knows what they are doing. That they do not compromise the integrity of the hinge in order to make it "look good".
-
The original ID post states P12 only.
-
The same vent window was used on ALL Plymouth's 1940 - 1949 (first series). The garnish molding medallion with 2 groups of three red stripes was used on the P12 trimmed cars got any more pictures?

-
1941 Plymouth P12 looks like a 1941 Plymouth P12 Since there is so little to go by from the picture The ivory colored rectangular trim (with the red vertical stripes) on the door (inside garnish molding deducing that this is the only car I know with that exact trim 1941 Plymouth P12
-
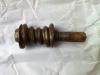
If anyone knows what this NOS steering worm gear is for....................any info would be greatly appreciated. there is a short splined shaft and the original paper protective covering is still attached. It is a mystery as to what style of steering box used this short stubby worm gear?? Limo? Airflow? Airstream? 7 passenger?
-
How to remove igntion switch from cylinder
Roadkingcoupe replied to Thomba48's topic in P15-D24 Forum
Besides"hot wiring" a car, you could "borrow" a vehicle by simply swapping out the ignition to coil cable. There are three flat tabs and once pried away from the coil there is only one thin wire to swap and "voila"!