FarmerJon
-
Posts
470 -
Joined
-
Last visited
-
Days Won
1
Content Type
Links Directory
Profiles
Articles
Forums
Downloads
Store
Gallery
Blogs
Events
Everything posted by FarmerJon
-

Found my camshaft! - Pulling motor on 1948 Dodge.
FarmerJon replied to Bryan's topic in P15-D24 Forum
Oregon quoted me $89 or $99 ( I can't remember) for a mild performance grinds about a month ago. Lifter refacing was $3-4 each. Plus shipping, maybe a flat rate Gameboard box would fit it, around $24, each way. I had a Nash V8 cam done there several years ago. Delta did a import cam modification, with radical grinding, think it was $90+ all the shipping. -
Found my camshaft! - Pulling motor on 1948 Dodge.
FarmerJon replied to Bryan's topic in P15-D24 Forum
You could send one or both of the cams to Oregon or Delta camshaft to be reground. They both offer stock profiles as well as mild performance grinds. Oregon can resurface your lifters as well I would think they could measure and tell you more about the two cam profiles as well. -
I though it was helpful. Not all of us have a library full of reference books, and thus far the internet only has so much love for the ol' flatties. Maybe someone could bless us with a few scanned pages or a link. I was looking at the horsepower ratings for the Dodge lineup and found it interesting that the rated power output and compression didn't change from 1947-1953. Plymouth was bumping it up every couple years, with '53 going up to 7.1/100hp, only 3 HP less than its big brother. I wouldn't think a cam change, even a small one would yield some sort of gain, unless Dodge just didn't bother to re-rate the engine. '54 did jump up, both in output and compression. So, this all leaves me wondering if the 230s ran a larger cam to help fill those extra 12"?
-
If it has E-10/e15 fuel in it that is several months or more old, I would drain a bulk of it and refill with fresh gas, as well as a quick carb rebuild. It is amazing how quickly fuel can go stale. Sometimes it smells rotting, sometimes not. You can 'blend' the stale fuel with fresh gas and use it up in a late model or more tolerant classic so you are not wasting 10-18 gallons. Any sort of fuel stabilizer would be better than none: Stabil, Startron, even Seafoam I think would help. As others have said, no need for a lead additive.
-
Doug, too late now, I am sure, but talk to your bank or Credit card provider. Most provide a service of settling claims like this. If company won't do right your bank can and will reverse the charge.
-
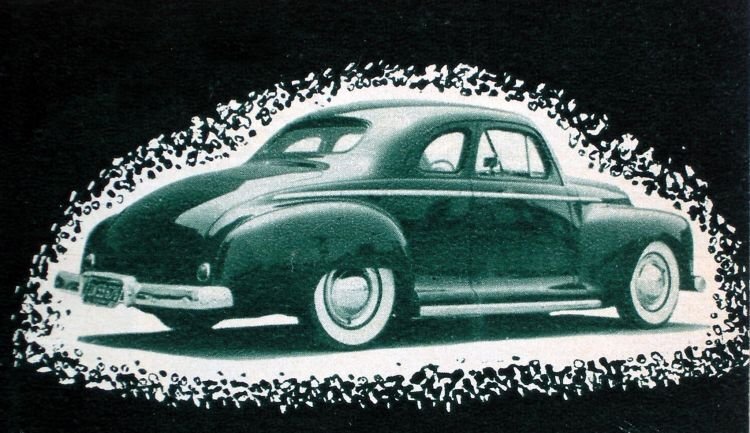
What a beautiful Coupe! Got my first drive of '22 in on Saturday, but it didn't scratch the itch!
-
Friday got fuel pump on, thermostat installed, (oh yeah, '90s Napa 155 fit fine) and plug wires run. Wouldn't catch, even with fuel pump primed, gas poured in float bowl, and starter fluid. It was about dark, so called it a night. Once inside I had the thought to check my factory manual. Sure enough the diagram I had pulled up online for the firing order showed the distributor turning counter-clockwise, but I had watched it turn clockwise. DOH! Saturday morning swapped wires around and it fired right up. Until the carb ran dry. Damn. Ran a milk jug of gas just below the fuel pump and it ran fine. Oh no, the fuel tank must be full of trash and plugged up! About to give up and go buy a car cover, I figured I would say least LOOK in the tank. Pulled the fuel level sending unit. New. About 1" of gas in the tank. Well gauge read 3/4 and PO said it was right, but I could see the pickup. Above the fuel. DOH. Got gas in it, warmed it up ( MUCH faster now it has a thermostat!) and dumped the crude oil it was using as lubricant, and gave it some fresh 10w30. Tried to set the timing but found it has no timing pointer. It drives so much better already. Next weekend I am hoping to get it up on a lift and replace all the other fluids, and plan on pulling the oil pan and adjusting the valves. I will knock the dents out of the pan and wipe it out as well. Then onto getting wipers and heater 100%.
-
I was thinking the same thing. Looking at the part numbers, they are all 7 digits, no -#. Eneto has the same part # head as me, just a different -#. I wonder if it is a mold # or drawing revision #. At my work the -# is revision. Sometimes it changes based on actual changes, sometimes due to changes in drawing notes or procedures. If it was mold # it could just be there for QC purposes.
-
In order to get an accurate reading, you need something like a piece of plexiglass to keep the surface tension of the liquid from throwing off the reading. I used a grease to seal the Plexi to the head. Alternatively you could use a non water based modeling clay or 'silly putty' to press into the chamber. Once you have it to shape and leveled across the top, pull it out and drop it into a graduated cylinder that has a known amount of liquid already in it and note the change. Ie if your measuring cup has 50cc in it. You drop your chamber mold in and the level rises to 150cc, you have a 100cc chamber. My work may have some scratched up Plexi they are throwing out, I will see if I can nab any. Bryan, did either of your heads have a date code cast in?
-
A few have mentioned zinc phosphate content, and if our cars with mild valve springs ' need' it. I would argue that it IS need, IF you are starting a newly built engine where there cam and lifters (flat tappet) are new or reground. Is it possible that it is overkill? Sure, but it is so cheap compared to a new engine that I will risk the minor waste of $$. I like oils with their own zinc, vs additives. Amsoil offers a dedicated "break in oil" 30 weight, with high zinc and no friction modifiers. They also offer "Z-Rod" oil in various weights for general classic car use. It is not hard for me to believe that modern oil is tailored for modern engines. What engine has been built in the last 10+ years that hasn't had EFI, roller lifters, low friction design, pcv systems, etc? I know that my car is fairly sludged up, so I am pulling the valve covers and oil pan to manually remove deposits before running modern oil. I will change the oil and filter at 500 miles, and again at the next 1000 miles. The I will start running something like the Z-Rod oil.
-
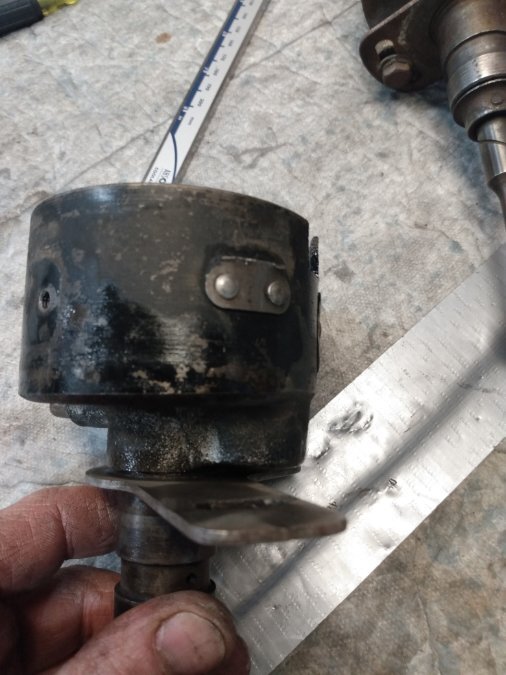
A 1/2 socket fit one. A few solid taps with a hammer and it got much tighter. A few more and it expanded enough for a good seal. For the other side, the socket wouldn't fit over the frame of the valve, so after a thorough search of my work, I found a junk collet that fit over it but had a thin enough wall to only press the edge. Due to collets being fragile I opted to use a shop press on this one. Again I went a little ways, stopped, and checked. Then applied pressure again. I don't know if you could crush these things, but didn't want to find out. You can see collet ended up breaking while I was using it, but was able to hold it together enough to finish the job. A dedicated tool would be easy enough to make, may even be able to find the right size tubing.

-
I got it. Had to fashion a sort of seal driver and swage them. Now they fit snug. At the expense of my pride, I will leave this up, in the case someone else has the same issue.
-
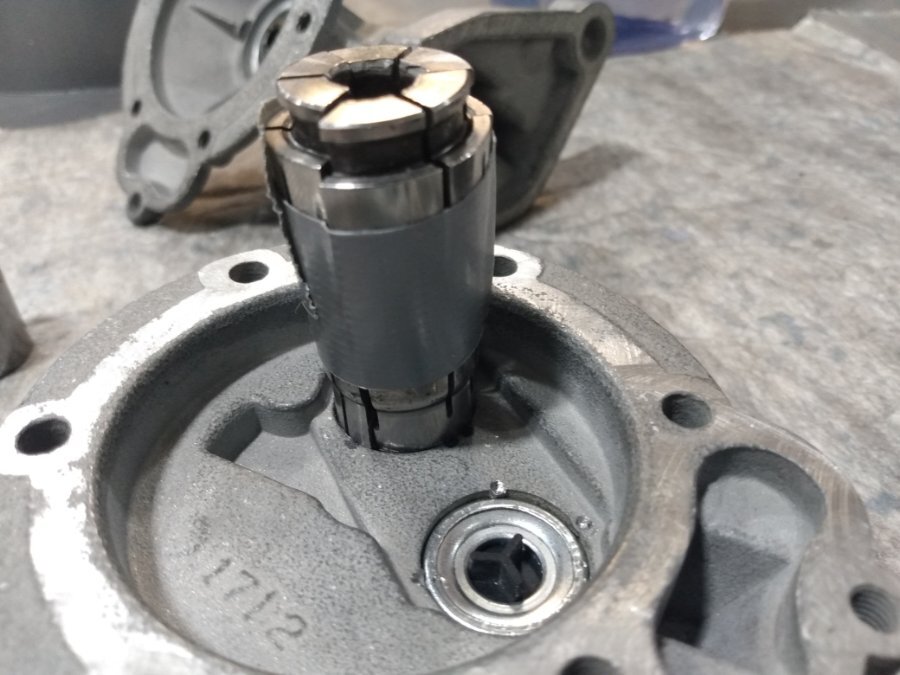
I had the fuel pump in my coupe peter out at the end of December, so I ordered a rebuild kit. Due to holidays and shipping delays, it showed up yesterday. Eager to get my car running again I had already stripped, cleaned and prepped my fuel pump, so this morning I started dropping parts in. Immediately I saw that the one way valves were a very poor fit. The old ones were press fit in, making them a bit of a trick to remove. The new ones are around .003-.004 smaller than the holes, so they have nothing to retain them. I tried to stake one in, but it is impossible to displace enough material to press the valve down into it's gasket to seal. Am I doing it wrong? Should I apply some sort of sealant or adhesive to the valve, then stake it? Open my second pump and see if they fit better? Pretty frustrated, I was hoping to have the car running enough to get it under cover before the next snow coming, as it died in my open driveway.
-
Got my dual point conversion kit, found it is missing some small pieces. Got the old grease cleaned out of it and the distributor it will go in pretty well cleaned up, but have a bad vacuum advance, so off it goes to Terril machine to be rebuilt. Since that will take at least a couple months, and I am still hunting a couple small components to install the kit I figured I would pull the distributor out of my car, clean it, and fix whatever was causing the rotor to hit the cap. Turns out it is a different model than either of my other distributors, and was in total shambles. Vac canister totally blown out, advance plate locked up. Weights sticky and covered with rust. Points covered in carbon. Connecting wires inside wrapped in tattered electrical tape. I managed to save the points and condenser, and one cap clamp. Everything else went in the parts bin. What I had been calling my parts distributor I cleaned up, fit the salvaged cap clamp it it, and reassembled. It takes a different cap than what I have, so I will pick up a cap tomorrow and get it back in the car. Hopefully that and a new ignition coil will get my spark back. Should drive a little nicer with a functional advance and one less vacuum leak. Fuel pump rebuild kit is here, going to put that together tomorrow, and hope to have the car back running Friday.

-
A few weeks ago I got a chance to talk to Mr. Asche. When the conversation got around to milling heads, he said that generally stock, uncut heads measure around .500" from the gasket surface to the valve pocket of the combustion chamber and that total thickness was around 2.00". Obviously CCing them will tell you more, but is there a known Stock number to compare to? I looked back at some pictures from my car and was able to make out the head part numbers. 1120803-5 installed in 1948 Plymouth, on p15 engine 1405849-10 installed on p24 engine, has late 1952 date. I have been meaning to pull the '53 head, I will try to take matching comparison photos and measurements, Plymouth 217 vs Dodge 230.
-
Found my camshaft! - Pulling motor on 1948 Dodge.
FarmerJon replied to Bryan's topic in P15-D24 Forum
Sorry if you have already said, but what is your end goal of the engine build? Fairly stock or moderate modifications? The '53 cam should be a little beefier that the earlier cam, I think at the snout where it attaches to the timing gear. Oregon Cam can regrind these cams to factory or performance specs for a very reasonable price. They also resurface lifters. George Asche can also handle performance regrinds. -
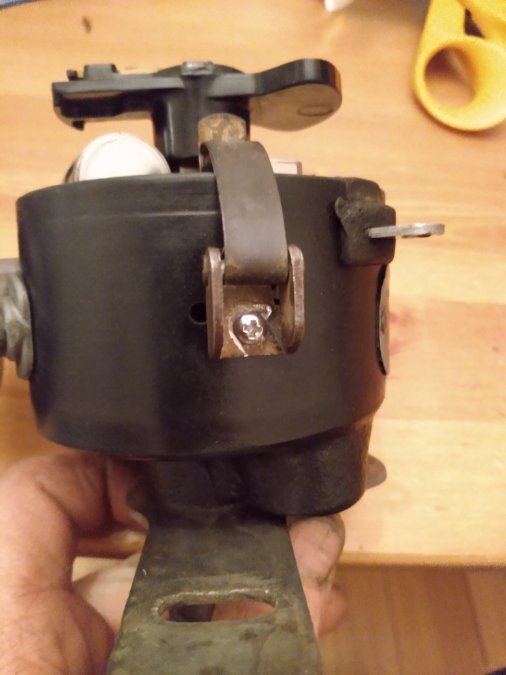
DYNA-FLYTE DUAL POINT CONVERSION ASSEMBLY HELP
FarmerJon replied to FarmerJon's topic in P15-D24 Forum
Photo credit Don Coatney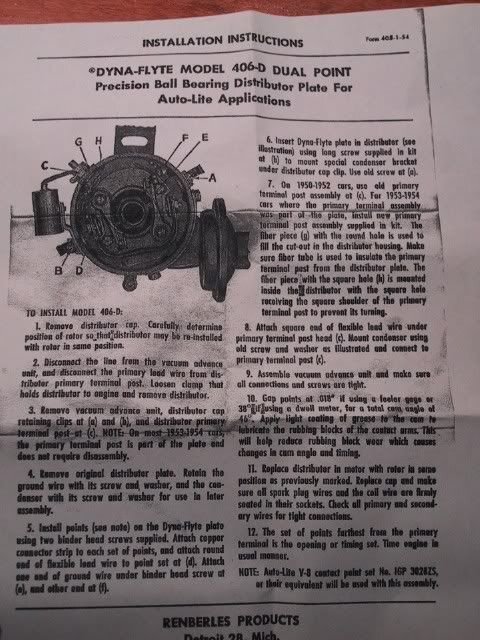
-
DYNA-FLYTE DUAL POINT CONVERSION ASSEMBLY HELP
FarmerJon replied to FarmerJon's topic in P15-D24 Forum
I have the OEM single point plate, good idea for me to refurbish it to keep in the car. It would be a cheap, easy fix if broken down on a trip. The unit I am working on, however, I don't think it can press apart. It is an aftermarket ballbearing plate, and seems like it would be damaged by forcing it apart. Don saves the day! Picture of his instructions! Seems I may be missing a few small pieces. -
Picked up a NOS Dyna-Flyte 406-D conversion plate for my Plymouth, as well as the correct autolite point set, and a autolite condenser for the original distributor, a Autolite AIT-4101 from 1953, that I am almost done rebuilding. Conversion plate did not include instructions. Anyone have something similar that shows what the little plate and hardware is for? Points sit the same as in a Mopar V8 dual point distributor, I don't think the condenser will fit inside the cap. Grease in the ball bearing was rock hard, and I have a little more work to do to get it clean out the rest of the way, but what should I use to relube it? Not much room to repack any sort of grease back in. May get some in from the back side, but I doubt it. Will a few drops of motor oil do it? Something thicker? Lighter? Any random history or info about the Dyna-Flyte brand is welcome too.
-
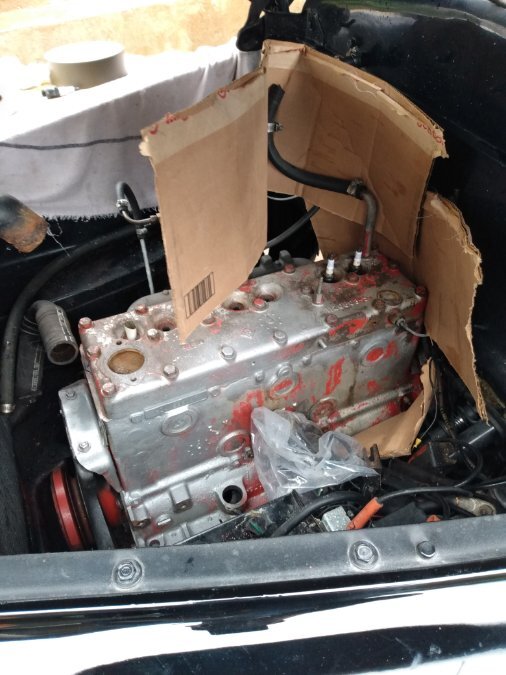
As long as you bought it right, I don't think you will regret having it. Looks like a IAT distributor, 7.1cr head, block, cam, full set of 230 rods, assorted pulleys, some covers, and a clutch assembly that is at least good for a core. Even if your current block is not cracked, your machine shop may find one block is preferred over the other. I always like to have spares, so I guess I am biased.
-
Imagine how bad they would handle if they hadn't had that consideration!
-
I don't know about late model Econoline vans, but I do know for a fact stock 68-72 Ford f-100 trucks have a wider track in front than rear. I don't recall if future generations of trucks fixed it or not. Definitely looks broken going down the road.
-
Have you heard of Alpha Gal? It is a condition, often brought on by tick bites, that makes a person become allergic to red meat and generally all mammal products (dairy, gelatin, things like suger that are processed with charcoal made from bone) It is very hard to diagnose because the reaction is offset by 4-12 hours. Only allergy to do that, and many Dr.s have never heard of it, so won't test for it. Blood test is only moderately accurate. Each type of mammal has its own variant of protein, so not everyone is sensitive to every type of meat Easiest way to test: document all the food you eat for a few days. Try to avoid all mammal products. Look for products labeled Vegan, then add chicken or fish to them. Do you feel better? If you accidentally, or on purpose, eat some red meat, see if the next day you have an episode. I struggled with this starting in 2013. It took me a year in a half to figure out what was wrong with me. Got so bad my wife wouldn't let me drive- I would nod off so randomly. Dr. said I needed to get more sleep, everything was fine. I was 28, sleeping 10+ hours and drinking 2 pots of coffee a day, and still taking 1 or 2 naps. I had lost 50#, and most of my friends though I was dying. We are a strict diet until mid 2020, when I found and tried a treatment for it that worked. To well, you may say, as I put back on that 50#. SAAT or Solomon's treatment. https://alternativemedicinecenter.info/soliman-auricular-allergy-treatment-saat/ Perhaps you can find someone in your region that is certified to do it. Good luck, message me if you have any questions
-
I am not familiar with the Gyromatic in particular, but most cars with a torque converter will have the wheels turn at idle when off the ground. If it is pulling when on the ground and clutch let out, perhaps the idle is too high and the converter is starting to engage. Iirc idle is around 400rpm on most of the flathead 6 s.
-
Made some progress this weekend. Still no thermostat that fits. I have tried 11, including a new Napa 155, none fit or are missing the rubber seal. Bought a NOS Napa one. Hopefully it works or I will modify the housing to accommodate it. Also have a 4 core aluminum radiator on the way. I put everything together so I could get antifreeze in the block so it wouldn't bust during this cold spell. I will just run it as is till I can get some other stuff caught up. While I had everything apart, I took the time to clean and scrape off a lot of the scruffy red paint and repaint it with the stock silver. Looks a lot better. When I have to oil pan off I will do the same to the underside. Waiting on my fuel pump rebuild kit, and now that I moved the coil, I have no spark. Coil is dented and ancient, plug wires are ratty old lacquered cloth, and distributor cap looked like the rotor has been grinding the hell out of it. Grabbed the distributor from my spare engine, a '53 unit, IAT-4101. I found a NOS Dyna-Flite dual point conversion kit and a pair of NOS autolite points for it, and have them on the way. I still need to figure out what coil will perform best. I know most of y'all wouldn't mess with points, but if I wanted electronics, I would drive a new car. I also made 'conceptual' progress- I came across a early '50s custom that gave me a lot of ideas for how I want the car to turn out: the Bob Alexander coupe. I am not planning on the front end mods, just the shaved handles, deck lid and modified trim. May fill and peak the hood down the road.