maddmaxx1949
Members-
Posts
250 -
Joined
-
Last visited
-
Days Won
2
Content Type
Links Directory
Profiles
Articles
Forums
Downloads
Store
Gallery
Blogs
Events
Everything posted by maddmaxx1949
-
Spark at the points meaning, if you take the distributor cap off and crank the engine with the ignition on, you should see a decent spark where the points are opening and closing.
-
I usually start with -Battery -> spark at distributor -yes, check rotor, cap, plug wires/plugs, if no -> wiring -> Wiring/grounds looks good -> switch or relays.
-
Set it up laid out labeled on a piece of plywood and stand it up, then you can walk us peons through the system lol. Breakdowns on how things work are always appreciated even if they are basic.
-
Honestly with the amount of no spark questions on here its amazing there isn't one already.
-
A combination of both. The coil and distributor are still connected via wire off the ground side of the coil regardless if the cap is attached. Should be + if your system is stock.
-
Are you getting spark at your points? You can pop the distributor cap of and crank it with the ignition on and see.
-
Excessive Clutch Travel Mystery almost solved...
maddmaxx1949 replied to maddmaxx1949's topic in P15-D24 Forum
Okay thank you, Then that looks normal to me as far as depth for the new disk. My release bearing has a good 1" at least of travel before it contacts the fingers. This is with the adjustment rod taken to where its just about to fall off and I checked the overcenter spring adjustment and worked its way from all the way in to most of the way out with very little change. The sleeve length matches to my other fluid drive car so I don't think it's that either. It has me stumped and frustrated... I should add that my adjustment rod matches the length on my 51 and 50 and so does the rod the connects the pivot arm to the pedal. I have at least 4-6 inches of free play. -
Excessive Clutch Travel Mystery almost solved...
maddmaxx1949 replied to maddmaxx1949's topic in P15-D24 Forum
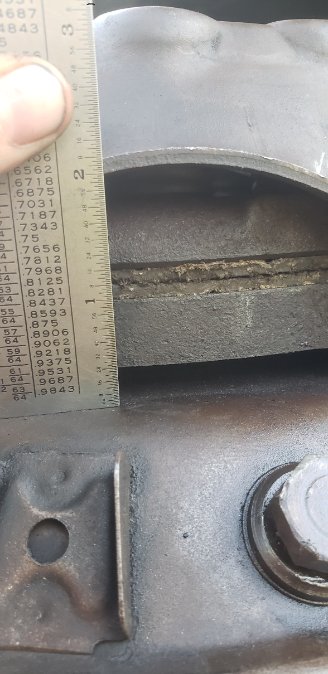
Okay so I had a spare fluid unit and pulled the clutch disk and pressure plate to compare to one I pulled from the 51, assuming it was in driving condition at one point. Here is the difference. and what the fingers look like. The disks look almost identical in terms of thickness but maybe not so much because When I bolt down the pressure plate I get a noticeable amount of lever travel on the new disc. Measurements in picture for comparison. Any sage advice on what I should see would be appreciated. Picture on the left is old disk, picture on right is new disk. -
Excessive Clutch Travel Mystery almost solved...
maddmaxx1949 replied to maddmaxx1949's topic in P15-D24 Forum
I'm not sure what its supposed to look like to be honest. I lack the experience. Sometimes these things make it seem like I'm an idiot the other half the time its like I almost know what I'm doing. -
Excessive Clutch Travel Mystery almost solved...
maddmaxx1949 replied to maddmaxx1949's topic in P15-D24 Forum
You might be onto something there. The manual states it should be .125 inches thick and im at about double that. Plus if I back it off an approx. 1/8" the levers are just about where they ought to be. -
Excessive Clutch Travel Mystery almost solved...
maddmaxx1949 replied to maddmaxx1949's topic in P15-D24 Forum
It is the same thickness as the old one I pulled out, the only difference is the center build is modern. There is a comparison photo here. https://p15-d24.com/topic/55913-clutch-disk-center-distance/?tab=comments#comment-600867 Protruding side goes towards the trans correct? -
Should be a little flip up small cup thing to put a drop of oil in like on your distributor. Real small like. Added photo where it is on mine.
-
Not sure what the squealing is but you can try put a drop or two of oil in your generator cup. Starter sounds like its disengaging okay. May need to have someone give it a little gas when you are cranking it. I would run a hose into a small gas can off the fuel pump if you can to ensure a good steady flow of fuel.
-
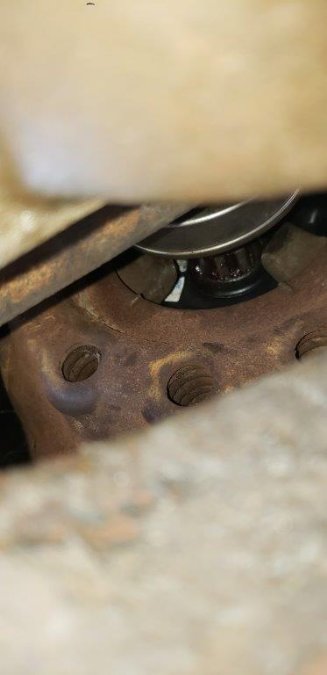
Hey all, In my '49 basket case thread I had asked about and had been having some trouble with my clutch pedal travel really far before getting any engagement. I was checking everything, linkage, springs, forks, bellhousing measurements, anything I could think of. Since I had the lower bellhousing off I could see my clutch disk and I wasnt getting very much separation, basically none. All this at the last inch of travel basically on the floor. I snuck my head underneath and noticed that my pressure plate levers were being constantly depressed creating a large amount of travel for the throwout bearing before it engaged. Not quite sure on the exact cause of this yet, but this is for sure why my engagement was so late. You can see the depressed levers in the photos below. If you have seen this before, comment below, in the meantime I'm going to be checking the clutch disk construction, possible interference from another part etc. This is not pressure plate exclusive, I've had two different ones on and two fluid drive units as well.
-
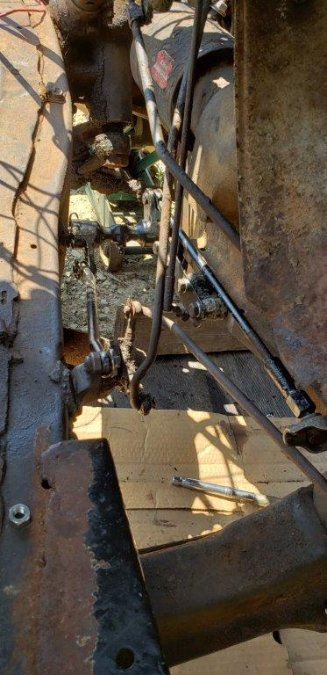
Update: The 1505 bearings that alot of the auto parts stores call for do not fit the fluid drive option. I ended getting a National 1847 bearing which worked. Thanks Sniper for the cross reference help. I Reinstalled the release bearing and transmission/driveshaft. Now onto the next/recurring issue. Clutch disengagement. I am also not sure on the pedal feel. I tried my 1950 chrysler pedal and it is smooth from top to the bottom of travel. The clutch on this one, not so much. It makes me wonder if I am missing a return spring or something. So, Question: What is the method for returning the clutch to the upright position? Here is a link to show my current clutch pedal behavior. https://www.youtube.com/watch?v=_yBUNS3SC-o and attached are some photos of my setup. Linkage lengths all match what I have in my 51 and 50 so I don't think I have a major error in the linkage however If ya'll could check these photos and the video and offer input it would be much appreciated. This is the last step before it's driveable.
-
Last donor engine I had i used a crowbar. Snapped the heads off three valves the engine was already fubar'd with a huge crack from freezing. But brake fluid would made my life a heckuva lot easier. You should've seen that valve take off across the shop.
-
Can't seem to get enough advance on the distributor
maddmaxx1949 replied to Wes Flippen's topic in P15-D24 Forum
Thanks Sniper I did indeed forget to mention that. I feel like I had already posted it but it was on another thread. They all start running together.... -
Can't seem to get enough advance on the distributor
maddmaxx1949 replied to Wes Flippen's topic in P15-D24 Forum
Here's how I just did my M37 after the timing got all buggered up. Same thing, I couldn't seem to get it to fire. 1.) Locate TDC using static timing procedure. 2.) Gap points at 0.020 or whatever it calls for for your vehicle. 3.) I started with the distributor major adjustment all the way to one side, tightened then reinstalled distributor. 4.) With ignition on and cap removed. Loosen minor adjustment. rotate distributor by hand until you see/hear a spark at the points. If you do not get a spark, try your major adjustment again, maybe somewhere in the middle then repeat step 4. Also turn your ignition off before you remove the dist or you might get zapped. If you don't get spark at all, it may be worn distributor parts. make sure your points are contacting each other and getting separation. The moment they break/separate is when you should be at TDC or whatever you want your timing set to be. -
Starters and Fuel Pumps Between Cars / Trucks
maddmaxx1949 replied to ChrisMinelli's topic in P15-D24 Forum
Never heard that one before. -
Starters and Fuel Pumps Between Cars / Trucks
maddmaxx1949 replied to ChrisMinelli's topic in P15-D24 Forum
You can add an inline filter prior to and after the fuel pump if you want instead. -
Starters and Fuel Pumps Between Cars / Trucks
maddmaxx1949 replied to ChrisMinelli's topic in P15-D24 Forum
The truck starter has a footpedal start that goes through the floor and pushes the lever on top which engages the bendix and completes the circuit via the switch on top of the starter connected to the lever. I believe at that point the cars had a standard electric start with a solenoid and ignition switch thus eliminating the need for the lever on the starter. I tried to use a truck starter in my 49 but the lever contacted the steering column. -
Also, does it not crank at all or are you just not getting spark?
-
normally around 7 o clock rotor position for #1 at TDC on its compression stroke. you can check TDC with the small plug directly over the #6 cyclinder at the back of the head as #1 and #6 are at TDC at the same time.. I use a 5/16" welding rod with the flux stripped off in the hole to see the piston height. You can verify #1 is on the compression stroke by pulling #1 spark plug and trying to blow in some compressed air while at TDC. Resistance means its on the compression stroke. If air flows freely its on the exhaust stroke, you need to rotate it until its back at TDC on the compression stroke. Edit: That is if it is stock and nobody messed with your oil pump indexing.
-
What is the difference between a P12 car and a P15 car?
maddmaxx1949 replied to moparmusclecars's topic in P15-D24 Forum
For instance, my 1949 Dodge Coronet is labeled as a D30 and is designated in the parts book as such. -
Thank you that's kind of what I figured. So now I have 4 that I don't need lying around.


