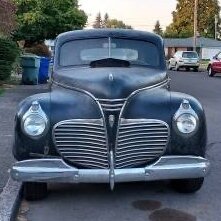
41 Plymouth Coupe Posted January 31 Report Posted January 31 Hey guys, I want to remove the belt line stainless trim to straighten and polish it. As shown in the photo, it has the round clips holding it on. I’m not sure how they fasten or how to remove them. I thought I would ask before I damage something. What is the best method to remove them? Thanks Quote
clarkede Posted February 1 Report Posted February 1 Those look like the back side of aluminum pop rivets. I would probably just cut all of them off with a small angle grinder, dremel, or an oscillating multi-tool with a cut off blade. Then the moulding will gently pull off of the car from the outside (depending on how flush you cut off the rivets). After the moulding is off, you can then easily remove the clips that will still be attached. Quote
Dan Hiebert Posted February 1 Report Posted February 1 Unknown if it works the same on the '41, but for '48 cars, if those are original clips, you remove the beltline trim by pushing down on the top of the trim while you (gently) pry the bottom off. I'd think they would at least be similar. Then you can deal with the mounting clips if you still need to. Once again referring to '48, but the clips are removed after the trim is removed. I'd at least try this unless you know those are not the original mounting clips. Quote
desoto1939 Posted February 1 Report Posted February 1 Suggestion: Go to a good quality automotive paint supply store. Ask to see if they have a supply of plastic molding clips. Also take along one of your stainless steel moldings and then try to find one of the clips that will fit into the back of the molding. I did this with my 1939 Desoto. Reasons: 1. The old steel clips will rust and then the water when it runs down behind the trim will eventually leave rust markings on the paint. 2. Since the new clips are plastic they will not rust. 3. When pushing the clips and the molding back into the hole it will not chip the paint and or even send crack marks in the paint. 4. If you have to remove the molding at a later time the plastic clips will just comeout very nice and clean and its easier to remove the moldings. 5. No one even sees the clips so go with the modern clips. 6. Go to the web site for Restoration Supply in Windber PA. they have a great selection of plastic clips and they are a great company to work with for supplies. It might take an hour or two of your time to find the correct size plastic clips but it will make you reinstall much simpler. Rich Hartung Desoto1939@aol.com 2 Quote
41 Plymouth Coupe Posted February 2 Author Report Posted February 2 Hey Guys, thanks for the advice. I think they are a pop rivet of some sort. I tried to remove one and it won’t come off. I also tried as recommended above to push the molding down but it won’t budge either way. I think cutting them off with a dremel is the way, but impossible up inside the doors. Im currently preparing the car for black primer, and as I haven’t even driven the car yet, I’m just going to leave the moldings in place for now, get a couple coats of primer on it, reassemble it and drive for a while. I’ll post a couple of photos after I shrink the file size. Thanks, Steve Quote
9 foot box Posted February 2 Report Posted February 2 You have to pinch the two tabs flush to pull the clips through the body hole. I would clean the sealer off of them. I haven’t seen the last rearward clip available on your side trim, so be careful removing the nut. If you are going to leave the trim on for now, pressure wash any dust that has accumulated behind the trim till it’s clean. It might save what you can’t see. 10-4 Quote
41 Plymouth Coupe Posted February 2 Author Report Posted February 2 15 hours ago, 9 foot box said: You have to pinch the two tabs flush to pull the clips through the body hole. I would clean the sealer off of them. I haven’t seen the last rearward clip available on your side trim, so be careful removing the nut. If you are going to leave the trim on for now, pressure wash any dust that has accumulated behind the trim till it’s clean. It might save what you can’t see. 10-4 I cleaned one off with a wire brush, put on my glasses and shined a bright light on it. I don’t see any tabs like that to squeeze for removal. The end clips have nuts on them that are surprisingly easy to remove. I’ve been using compressed air to blast behind the trim as the body is currently sanded down to bare metal. Quote
41 Plymouth Coupe Posted February 2 Author Report Posted February 2 Here’s a couple of photos. The hood has wet primer on it. The fender is kirker “perfect prime” and the artillery wheels have kirker hot rod black, matte finish. That is the paint I plan to use for the car. Quote
Ivan_B Posted February 5 Report Posted February 5 Here is what the 1940 clips look like, for reference. So I agree with the previous suggestion about potentially having something highly custom going on with your clips... Quote
Dartgame Posted February 5 Report Posted February 5 40-50 years ago we had a 41 coupe with similar clips for the side stainless. These are pretty odd shaped/designed clips. I recall the portion that fits into the sheet metal are round kind of bulbous shaped spring steel things, and are held in by friction. To remove ours we twisted and pulled them out from the front (trim) side. I don't know if that was the right way to do it. I'd clean the back side of them first, and apply some penetrating oil. Next try tapping a pipe or a small socket just slightly smaller than the bulb over it to collapse the bulb from the back side with a light weight hammer, and see if that moves them. Once you get one out in tact you may have a better understanding of how to remove them. hope this helps... 1 Quote
Solution Bruce W Posted February 13 Solution Report Posted February 13 I have seen these clips on my 40 Plymouth they are original clips. I suggest a little wd40 sprayed on the round part that is exposed, then tap on the rounded head with a mallet. They will drive through. Take your time. For the one's you cannot access using a mallet, spray the wd if you can then use a plastic wedge under the stainless at the location of the clip. Good luck! Quote
41 Plymouth Coupe Posted February 14 Author Report Posted February 14 On 2/5/2025 at 1:46 PM, Dartgame said: 40-50 years ago we had a 41 coupe with similar clips for the side stainless. These are pretty odd shaped/designed clips. I recall the portion that fits into the sheet metal are round kind of bulbous shaped spring steel things, and are held in by friction. To remove ours we twisted and pulled them out from the front (trim) side. I don't know if that was the right way to do it. I'd clean the back side of them first, and apply some penetrating oil. Next try tapping a pipe or a small socket just slightly smaller than the bulb over it to collapse the bulb from the back side with a light weight hammer, and see if that moves them. Once you get one out in tact you may have a better understanding of how to remove them. hope this helps... Thanks for the reply. I think this is the correct answer as they appear to be a press fit, rather than expanding after being pushed in. Maybe ones in the door, with limited access, can be done from the outside. It’s helpful and I’ll try it this weekend. Quote
41 Plymouth Coupe Posted February 14 Author Report Posted February 14 22 hours ago, Bruce W said: I have seen these clips on my 40 Plymouth they are original clips. I suggest a little wd40 sprayed on the round part that is exposed, then tap on the rounded head with a mallet. They will drive through. Take your time. For the one's you cannot access using a mallet, spray the wd if you can then use a plastic wedge under the stainless at the location of the clip. Good luck! Thanks for the reply, this helps confirm the previous reply that they are a press fit, and should slide out with some persuasion. I’ll give it a try. Quote
41 Plymouth Coupe Posted February 15 Author Report Posted February 15 (edited) Solved. I notice now that after the clips were installed at the factory, a one inch wide strip of undercoating was sprayed on to seal them from leaking, and it kind of cemented them in place. I sanded around them, lightly squeezed them with vice grips to break the bond, added penetrating oil then used a mallet. It takes a pretty decent hit to free them. Some with less access I used a 1/2 drift punch. I tried to pry a few from the outside with a plastic pry bar, to see if it would work for the doors, it looks like the clips are rusty enough now it can be pryed off without damaging the trim, then remove them from the door. Thanks for all your help. Edited February 15 by 41 Plymouth Coupe Add penetrating oil to the sequence of repair. 1 Quote

Recommended Posts
Join the conversation
You can post now and register later. If you have an account, sign in now to post with your account.