40plyrod Posted March 15, 2016 Author Report Posted March 15, 2016 Well I think I'm calling the wiring done, I haven't been able to track down why the turn signal indicator light stays lit but it doesn't seem to be causing any other problems so I'm going to leave it as is. I wired in some interior lights that work off door switches over the weekend. The lights I used are universal trailer license plate lights from Canadian Tire, and while I'm sure being made in Taiwan that the chrome on them would last all of 2 months before showing rust, in the interior they should last well. As well $6 a piece sure beats the $45 per light the local Hot rod shop wanted for interior lights. 2 Quote
fstfish66 Posted March 15, 2016 Report Posted March 15, 2016 those lites look good,switch out the bulbs for LED,s they will be brighter and will never burn or discolor the lens, Quote
40plyrod Posted March 30, 2016 Author Report Posted March 30, 2016 Lady Luck is smiling on me! Didn't think I would be able to afford whitewalls for the Plymouth but my brother-in-law spotted these for me in a local classified. The guy who sold them to me unfortunately (for him) ordered the wrong profile for his corvette. I guess my next project will be stripping and painting the rims. Quote
dpollo Posted March 30, 2016 Report Posted March 30, 2016 try reversing the in and out leads on your signal flasher and don't forget I have a tire machine you can use. off to Portland Swap Meet dp Quote
40plyrod Posted April 1, 2016 Author Report Posted April 1, 2016 Thanks dpollo, I'll try that. Happy hunting. Quote
40plyrod Posted April 10, 2016 Author Report Posted April 10, 2016 Another step closer! Spent the last 2 days sand blasting (is there a worse car building job?) and painting my rims in preparation for the whitewalls. I'm hoping to post those picture next weekend, so for now, here's just the painted wheels. 2 Quote
casper50 Posted April 10, 2016 Report Posted April 10, 2016 I think block sanding is worse than sandblasting. Your wheels look super. Quote
rb1949 Posted April 10, 2016 Report Posted April 10, 2016 (edited) Spotted your nifty interior lights. Found them local for $4. Now trying to find the 6v bulb that fits. (not going to pay $9 to ship a bulb!) edit: just found the bulb, same place as the lamp. Edited April 10, 2016 by rb1949 Quote
Dave72dt Posted April 10, 2016 Report Posted April 10, 2016 Another step closer! Spent the last 2 days sand blasting (is there a worse car building job?) and painting my rims in preparation for the whitewalls. I'm hoping to post those picture next weekend, so for now, here's just the painted wheels. I think block sanding is worse than sandblasting. Your wheels look super. neither is as bad as removing undercoating Quote
40plyrod Posted April 11, 2016 Author Report Posted April 11, 2016 Ya, blocksanding was pretty bad but I didn't end up with sand down my back and everywhere else. I can imagine removing undercoating would be nasty, I never had any on my car to remove, if I had maybe I wouldn't have had to replace the entire floor. :-) Quote
casper50 Posted April 11, 2016 Report Posted April 11, 2016 (edited) The undercoating on my car chipped right off. Took about 90 min for the whole bottom. Sand washes off. Muscle pain from sanding takes awhile to go away. lol Edited April 11, 2016 by casper50 1 Quote
pflaming Posted April 11, 2016 Report Posted April 11, 2016 "Muscle pain from sanding takes awhile to go away.". Does it finally go away? Quote
Dave72dt Posted April 11, 2016 Report Posted April 11, 2016 I spent a couple afternoons and evenings wirebrushing the accumulation off the bottom of FEF and more time with wax and grease remover to get it ready for paint. With the cab laying in it's back , access was good but crud ended up everywhere. Chipping didn't work.. The Mach I wasn't any better, working from under it. Sanding is therapy for me. Blast cabinet or goggles, face shield and hoodie keep most of the sand out as well as knowing what angle to work at, same as with a pressure washer. It'll tell you instantly if you should change your approach angle. Quote
dpollo Posted April 11, 2016 Report Posted April 11, 2016 (edited) If you like sanding, then Google or Youtube search Leroy Anderson's Sandpaper Ballet. Very soothing. Edited April 11, 2016 by dpollo Quote
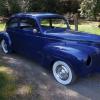
40plyrod Posted April 15, 2016 Author Report Posted April 15, 2016 You'll have to excuse it being so dirty but got the new "shoes" mounted and installed today and wanted to get it outside for a look before the sun went down. 3 Quote
40plyrod Posted April 15, 2016 Author Report Posted April 15, 2016 Thanks! Starting to run better too. Goes for a windshield next week which will make future road testing a little more enjoyable. 1 Quote
40plyrod Posted April 25, 2016 Author Report Posted April 25, 2016 Started making up the door panels, I'm lucky that the old ones came with the car even though when I got the car there wasn't much door left for them to cling to. I used as them as trace templates for the new panels. Kind funny, 19 clips plus the door handle, window crank and armrest to hold the door panel on and just the window crank to hold on the rear compartment panel. Before I add anymore holes or complexity I'm wondering about the screw that goes into the shaft of the outer door handle. Is it needed and is it supposed to go through the door panel and show on the fabric or is it hidden behind the panel? It seems to have a shoulder on it which gives the impression of going through the panel. Sorry if I've explained this clumsily. The last 2 pics may help. Quote
mrwrstory Posted April 25, 2016 Report Posted April 25, 2016 I have some of those shoulder screws from when I removed my door panels but don't know their purpose either. Quote
40plyrod Posted April 25, 2016 Author Report Posted April 25, 2016 (edited) So you didn't reinstall them? It would look smoother without them but my brother-in-law is a big man and I don't want to see the handle ripped off the door because they're important to the integrity of the assembly and I didn't use them. Mostly just wondering how they're supposed to look normally then I'll decide how I'm going to use them. Edited April 25, 2016 by 40plyrod Quote
Niel Hoback Posted April 25, 2016 Report Posted April 25, 2016 The screw is there to give you access to the end of the shaft to guide it into the square hole in the latch mechanism. With the door handle off you can feed a piece of soft iron wire through the screw hole and into the threaded hole in the end of the square shaft. that will guide the shaft into the square hole so you can get the handle back on without removing the interior door panel. 1 Quote
mrwrstory Posted April 25, 2016 Report Posted April 25, 2016 The screw is there to give you access to the end of the shaft to guide it into the square hole in the latch mechanism. With the door handle off you can feed a piece of soft iron wire through the screw hole and into the threaded hole in the end of the square shaft. that will guide the shaft into the square hole so you can get the handle back on without removing the interior door panel. How cool is that! Tx Hope I can remember that when/if I need to pull the door handle. Quote
40plyrod Posted April 26, 2016 Author Report Posted April 26, 2016 That's cool, so you would see the screw head if it was done right. I've never noticed any in a door panel before anybody got pics? Since they don't seem to be structural and I didn't use them to install the door handles the 1st time I may leave them out. Thanks Quote
dpollo Posted April 28, 2016 Report Posted April 28, 2016 The only reason I can think of for these screws is to prevent the removal of the handle from outside the car..... but that does not allow entry if the door is locked. Some trunk locks, like the 37 Plymouth were the same but there the lock was in the handle so removal would allow access. Both my 40s were/are equipped with these screws, nickel plated. Quote
40plyrod Posted April 29, 2016 Author Report Posted April 29, 2016 Well, that's a good pitch to keep them. I guess I'll continue to waffle for a while. Lol Quote

Recommended Posts
Join the conversation
You can post now and register later. If you have an account, sign in now to post with your account.