Search the Community
Showing results for tags 'Rebuild'.
-
I ran across this video in a multi-part series that describes how this guy rebuilt his P15 engine. I found it pretty damn good, considering I know very little about doing that sort of thing. Some of you have probably seen it.
-
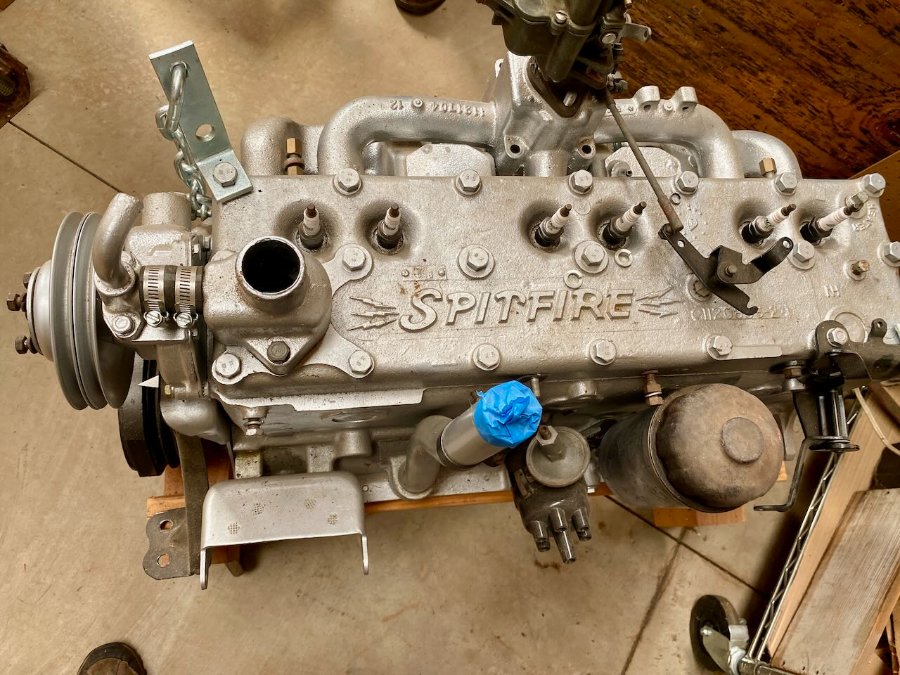
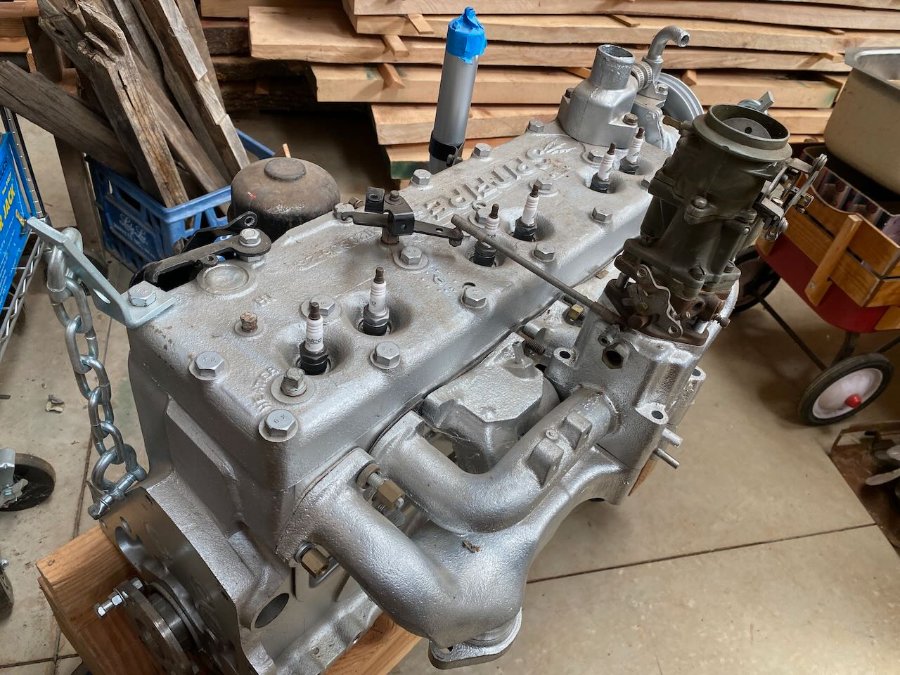
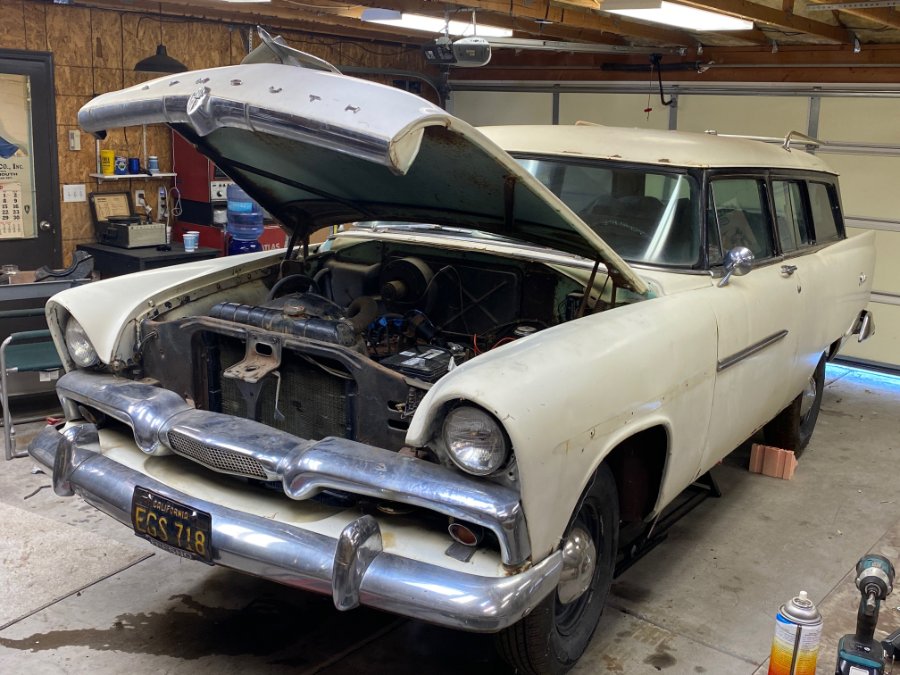
I have the opportunity to purchase a rebuilt C54 Chrysler Spitfire 265 motor from a friend at a very good price. I was looking for a powerplant for my stalled '52 Suburban project and after some research and help from Forum members, I think I can fit it into the wagon with only minor modifications. I have the bill of sale from the machine shop and it looks like they did a thorough job: They magna-fluxed and hot-tanked the block, resurfaced the head, installed new valve guides & lifters, rebored and honed .030 over cylinders. Installed new 030 over pistons and rings, reconditioned the rods with new pins and bushings, ground and polished the crankshaft, installed new rod and main bearings. Fitted new cam bearings, and installed a new oil pump. They then reassembled the long block. Costs were: parts $203, labor $890, total $1109. The year was 2003! In one of his excellent videos, @keithb7 states that rebuilding a Mopar flathead, parts alone will run you about $500/cylinder. I can testify to that price range, as I have a 230 motor in a local machine shop for hot tanking and magna-fluxing. They quoted me $5,000 to rebuild it and 6-9 months to get it done! I will be able to purchase the Spitfire for less than the cost of the original rebuild so obviously, I MUST BUY IT! I'm excited about resurrecting the motor, but not sure how to proceed. It was never run, and has been in dry storage for almost 20 years. I know - Marvel Mystery oil in the cylinders and using a drill in the the oil pump shaft to lube the bottom end - should I use standard 10-40w with an additive like Lucas TB Zinc-Plus for break in oil? Any other cautions/suggestions?
-
Coming up on the first year of ownership of a 1947 Chrysler New Yorker. Very satisfied with this daily driver car. in April I switched to 40 oil from 30 (engine has always only used non-detergent I am told). Engine is running nice and cool - never over 160 degrees (unless excessive idling waiting at a level RR crossing on a hot day then 180). Never any burned oil smoke coming from exhaust but I have started to notice puffs of white smoke coming from the crank exhaust (not the breather the exhaust under the car) - this occurs after I have been driving for some time and I stop at a red light, a moderate but embarrassing billow of white smoke wafts from under the car. I have changed the oil three times since April and it always turns black right after I change it. I was told that the car had a valve job in the not too distant past and oil pressure appears good - always above 40 PSI - 60 when first started- and drops to slightly below 20 when hot weather and idling very slowly. Before I take it in for a compression test which I believe will confirm that the piston rings are worn and require replacement, I want to know what I am getting into. The car is great and very original - big black four door sedan straight 8 - excellent original interior - but I have been down the re-build path before with a '49 Dodge Special Deluxe Club Coup (Canadian) that I had for about twenty years. The machine shops that I dealt with back then were lousy here and outrageously expensive - maybe there are some better ones now- but I want the best at a fair price and I think that means that there is going to be some travel south of the border in my future where there is greater experience and selection. If any of my fellow Canadians or Winnipegers on this site know of a really good shop here then please let me know and accept my apology - it was well over 20 years ago that I am talking about. Otherwise I kindly ask my American cousins if they can recommend a really good shop in Minnesota, the Dakotas, or Wisconsin - or even farther afield. Some idea of the current cost of this operation or any other options would be greatly appreciated too!
-
I'm just starting the removal of my 230 donor engine to replace the 218 in the wagon. After watching all of @keithb7 videos, I think I can handle the job! Thanks, Keith! It is a running engine and actually sounds pretty good, except for a slight tapping sound that increases with rpm. I disconnected the driveline yesterday and plan to remove the 3spd from the block today so I can get it out. View it here: '56 Plymouth flathead running I did some compression tests and here are the results. The engine was up to operating temp on test 1, but on re-testing the next day, it was only slightly warm on test 2. Test 3 was done immediately following 2, but with a teaspoon of engine oil added to each cylinder. Cylinder 1 2 3 4 5 6 Test 1 110 112 115 121 120 130 Test 2 115 120 118 128 128 138 Test 3 w oil 125 135 130 130 138 145 A couple of observations/questions: Would the differences between test 2 and 3 be traceable to rings, valves or possibly both? I am definitely planning to lap the valves. The service manual says the compression pressure should be 120-150 psi. How much does that change once the motor is broken in? The engine is listed as having a compression ratio of 7.6 to 1. How does that 7.6 to 1 ratio change if the cylinder pressures are lower? Does a 10% pressure drop in the cylinders equate with a 10% loss of power? The PO had some work done on the engine and the head was off - there is a new head gasket, water pump, fuel pump, gas tank, etc. How can I tell if he had the head shaved- i.e. what is the factory thickness of a 1956 Plymouth head? I couldn't find it in the service manual. My brother-in-law, who has rebuilt all kinds of engines, wonders if the tapping noise may be a rod bearing or a wrist pin, and thinks that I should do a complete teardown. Enough questions! Thanks for the help
-
Hey everyone. New to the forum. First 1941 rebuild here. Just finished a 1967 Big Block Corvette with my buddies. The Back Story: In the middle of a power-train rebuild on our families 1941 Dodge Luxury Liner. Car has a 3 speed with the fluid drive. We pulled the fluid drive out of the car. We've had the engine rebuilt. Also rebuilt the transmission our self. Everything was running smooth until the fluid drive unit. When we pulled out the fluid drive, it was still full of fluid. No leaks. We drained the old fluid, and used some de-greaser to clean her up. We filled up the fluid drive unit and let it sit ready for install and to test for leaks. So far so good. The Problem: About a week later, we stood up the fluid drive unit as if you would mount it in the car, spun it around by hand to check, and now it leaks like a dripping facet out the bottom. Not sure if we some how manged the seal by lifting it improperly. Hate to think these could be that fragile. I have never pulled one of these apart, but would love if anyone has a guide, advice or a recommended shop who can assist. I am located in southern California. Cant wait to get this baby sealed up and back in the car. If anyone knows a trans shop or some steps. We tried using a combination of bear pullers, you name it. Maybe we're going at it the wrong way and in over our heads. I have on hand a fluid drive seal kit. Brand new that just came in. I can not remember the vendor I ordered it from.
- 12 replies
-
- Fluid drive
- leak
- (and 5 more)
-
Tonight there was a small old 1938 Sedan in Canada that once again, propelled itself. I am tickled to share this brief clip tonight. One more has been checked off my bucket list. Many of ya’ll have experienced this. It sure feels good. A fresh new 237 engine. Now I just need to go find where I put the brakes. I seem to have forgotten to install them. No workee! ?
-
Hi all, I'm new here and will get some pics of my new project up soon, as well as some progress reports. Currently, though, I'm in search of a gasket set and seal for the 3 speed manual, standard duty, transmission for my pickup. Google hasn't provided any results, except for a similar products, but not the ones I need. Anyone know of a source or recommend how I can move forward? Any help is appreciated, first project vehicle here. Done a handful of motorcycles in the past.
-
So, I have been lurking around since I bought a 49 Chrysler royal back in August. I bought this car for it's beautiful lines, it's condition being upstate New York is nothing but rust, and lastly it's steel of a price. We have been on the fence of a classy chassis or a muscle car. So instead of deciding we got two prodjects, the 49 royal and a 69 Camaro. So now the Chrysler story starts.
-
Hey everyone, Recently I have gotten the time (and funds) to continue, and hopefully complete, my engine rebuild on my 230 Flathead. About 6 years ago I purchased a '55 Flathead from a buddy, while taking an engine rebuilding course at my nearby community college. This was after learning my lesson when buying a cracked engine from an unmentionable forum. After finding the one my buddy sold, I began the teardown. I photographed as much of the teardown as I could. I'm also pretty anal (can I say that here?) about labeling everything. I zip-locked each bolt set and labeled their size, count, and where they belonged. Now, here is my issue: After receiving my 230 crank from a local shop I am ready to plastigage it with the bearing caps, but I don't remember how my caps go. Attached is a photograph of my setup. I could have sworn I stamped them, but also notice there's oil caps, as well. I have looked through my Service Manual from 1955 and don't see any diagram or illustration as to the order in which these caps go. I've checked images online of similar engines and nothing close to what I'm looking for. Long story short, if anyone has any photographs of their rebuild on a 230 I would really appreciate a shot of the bottom end install. Also, Could I get away with replacing my Bearing cap bolts with some grade 8 bolts? I have called various suppliers (i.e. Burnaby and Vintage Power Wagons) and they don't carry any. Any info would be appreciated! =Adrian=
-
I thought I'd write up how I rebuild the temp gauges for our MoPars. Start by carefully cutting the outside protective wrap at about 40 inches from the bulb. Then coil the tube around your hand (starting at the bulb) and put it in an ice bath.
- 17 replies
-
- 3
-

-
- not working
- rebuild
-
(and 3 more)
Tagged with:
-
Anyone have problems with steering play? My 51 Plymouth has new, correct bearings & race. If you are brave enough to get your steering box out of the car, you need the correct bearings. I found Rxxx Auto to have the parts, but the bearings were not fitting , the seals were ok. So i looked up in my Chilton parts manual, got the correct bearing numbers, searched eBay, found the correct bearings & race. The box takes two bearings (upper - lower) - both are the same number -> 669077. (you will need 2) The bottom race # TIMKIN 6CE, will be worn as it takes the full load weight of the shaft & steering wheel. The top race is integral with the shaft. Rock Auto has the correct seals, not correct bearing. This cross references with Ford tractor 1939 to 1964. Ford # 683571-A2 for the bearing, not for the race.
-
I am trying to get rid of a terrible shake, shimmy, vibration whatever. I have purchased a new set of tires from that TN tire dealer and that has not helped my shimmy-shimmy shake at 35 MPH. The old tires were 35 years old and sat for a long time, so I figured that was the problem. We have balanced the tires off the car, on the car, with new road force equipment, still cannot get over 35 MPH. While we were doing the road force balancing we checked the link pins and tie rods. They seemed to be within tolerance. the drag link seems like it may be a little loose. I get about 1/4 to 3/8 inch movement at the front of the tire. So is the drag link adjustable or do I need to put a rebuild kit on it? I never rebuilt the drag link the first time I restored the car and it would go well beyond 35 MPH. Greg
-
I've completely torn down the engine on my 1950 Chrysler Windsor Sedan, as the engine was seized when I bought it. I have yet to collect any precision measurements (I don't own any machinist's tools), but I did notice a few things as I disassembled the engine, and I'd like to know if any of you have any advice. Primarily concerning me right now is the valve train. While some of the valves slid right out of their guides after I had removed their springs and retainers, there were a few that were so stubborn, they required vice grips, penetrating oil, and nearly an hour of twisting and tugging to remove. What's odd, is that aside from the damage inflicted by my vice grips, I couldn't find any apparent deformities on the stubborn valves. I'm wondering at this point if there's any good way to determine if the problem was my valves, valve guides, or both. Additionally, after finding what's available on Vintage Power Wagons, I've been considering the possibility of installing modern valve seats and valves to allow for the use of unleaded fuel. I hope to one day drive this car daily, and don't want to deal with tracking down and adding a lead substitute at every fill-up. Does anyone here have experience in running these fatheads on unleaded? Do the original valves ruin themselves if you do? This is my first engine rebuild, and any advice on the subject is greatly appreciated.
-
I've got a 48 plymouth and my steering has quite a bit of play. I want to get steering nice and tight again and I'm wondering if there is a rebuild kit available or where to send it to be rebuilt. I remember seeing an article in a magazine, maybe rod & custom last year about a shop in southern IL that rebuilds them. I even got a quote from them and have since lost the contact info and can't find the magazine. Can anyone help? I don't really want to do the cavalier rack swap. Thanks!!
- 20 replies
-
- Steering
- Steering box
-
(and 1 more)
Tagged with:
-
So I thought I would go ahead and start a build thread on my 1949 Dodge B-1-B truck. He's named Tater after my dad and is in pretty rough shape but is slowly coming back to life. The truck is getting most of the original items rebuilt but also has a lot of my own taste to it. Here's a few pictures to get started with. I will try to keep y'all updated as the build goes on. For all you northerners (y'all) can also mean you guys and you all! http:// http:// http://
- 10 replies
-
- 1
-

-
- truck rebuild thread
- rebuild
-
(and 1 more)
Tagged with:
-
Last year I bought a 1936 P2 Deluxe 4 door, I keep regular license plates on it and drive it all around. I rebuilt the brakes this spring and would like to do some engine work. I've read about a whole bunch of things other people have done to their flathead motors, but don't know which things would give me what I'm looking for. I would appreciate very much if I could get some advice on a few points. Right now the motor has quite a rattle in it at a certain RPM and I am getting enough blowby to make it unpleasant to ride in unless the windows are down. I have 40 LB oil pressure when it first starts up, but that goes down to 5 lb or so after it warms up. What I want is to have the engine run strong and smooth and last a long time, 55 MPH on the top end is good enough for me. So I was thinking I would just get an engine rebuild kit from Kanter for my 201 CID. Then I started reading different forums and saw how many other things were being done to these old motors. A lot of things I read were dealing with making flatheads go fast, but I just want it to be smooth and durable. For anyone who’s gone through an engine rebuild before, should I be putting some modifications on my to do list? Things like: Cross drilling the crankshaft for better oiling Adding a pcv valve Shave the head or mill the block Grind the camshaft 3 way valve job One final thing, I've been told by some that Chrysler products used babbit bearings and others said that they used insert bearings in 1936. Has anyone had a 1936 engine apart and know what's inside?
-
Well, after 7 months, I finally finished the the 230 rebuild project. I did a complete mockup on the crate before putting her back in the truck. More pics to come as the job progresses...
-
Well, after 4 months, I finally got my block and other engine parts back from the machine shop. They ground the mains .040" under and supplied me with matching bearing shells. I used the plastigage method to check the clearance, and they all measure .001", right in the middle of the specs (.0005" - .0015"). When the caps are bolted on snug, not even torqued down, turning the crank in the block is very difficult. I have to put a pipe wrench on the front snout bolt and use a 4' long cheater bar to get it to turn (with one foot on the engine stand). Even with this effort, its only a few degrees at a time. With the caps torqued it's pretty much impossible. The addition of rods and pistons won't help, either. I'm worried if I continue with assembly and get the engine back in the truck, then try to start it, it won't turn over. Should I take the crank back to the shop or count on my 6 volt starter to wind up this baby?
- 14 replies
-
- crankshaft
- engine
-
(and 1 more)
Tagged with:


