


Radarsonwheels
-
Posts
1,232 -
Joined
-
Last visited
-
Days Won
17
Content Type
Links Directory
Profiles
Articles
Forums
Downloads
Store
Gallery
Blogs
Events
Everything posted by Radarsonwheels
-
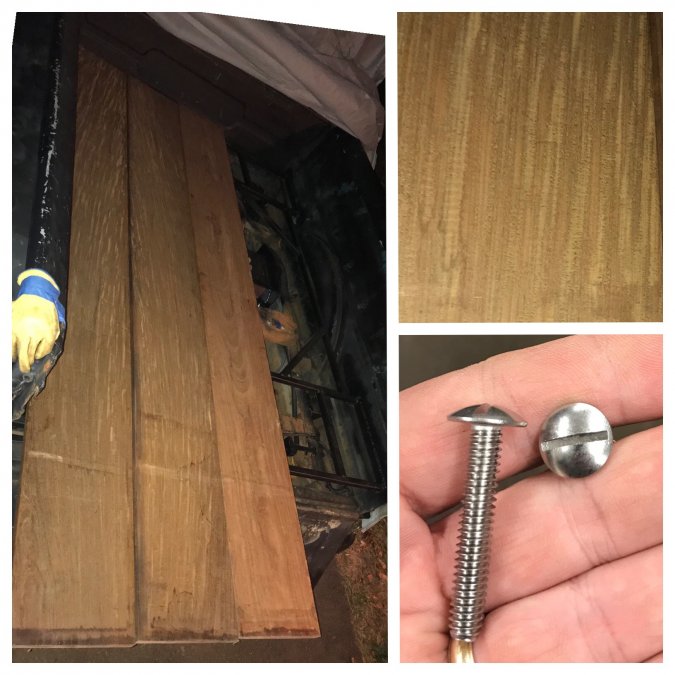
 Sounds like I’d be happy with either product. I’ll have to see if the good cetol is available in PA or what I can get locally. Another factor might be what colors (or ‘clear’ no color) are available. With the red gut I wouldn’t mind going a little toward a warm reddish brown but not ronald mcdonald red. The local exotic hardwood sawmill spot only had really wide boards so it cost $50 more than I wanted and of course it was only in 10’ pieces so I have some drops to make shelves for my wife or something for xmas. Looking at all the wood in the bed I have two pieces that are kinda bookmatched and out of the remaining 3 one that’s a little darker than the others. The math works out to 54” wide with 1/4” bolts, 2 skinny boards at 10” and three wide ones at 11”. I have to get the shovel strips in the mail friday or next week before I can mill out the board corners but I can get the widths lengths and do the reliefs for the wheelwells in the meantime. I am hoping the ipe will be pretty stable and won’t buckle if I butt it right up to the 1/4” bolts I’m using? I plan to rip the center board last to get a comfortably snug but not overly tight side to side fit. I’m thinking about capping the front with a sheetmetal angle and the rear with a more durable chunk of angle iron. The sides I want to just butt to the bedsides and tubs.
-
Hmm now I’m just more confused- the sikkens has mixed reviews on amazon and elsewhere because they also sell some reduced emissions amd water based versions that suck and dry slowly or not well. I also read that the cetol lasts much much longer but doesn’t age gracefully.
-
Thanks Los! I’ll check it out. Here’s a pic of what I’m working with. I just put it in and walked on it- it has a very little flex but not much. It should be good for hauling a harley sportster but maybe not a full dress electraglide.
-
Oh and the other thing I’m researching is the wood finish. I know I need to do the waxy endgrain sealer as soon as I cross cut the boards but I’m a little conflicted about the actual finish. Penofin was suggested earlier and it looks super nice but by all internet accounts it loses its beauty in 6 months and will start to gray out after a year. It won’t be much work to powerwash the gray off and re-oil every 9 months or so but I don’t know if I want to commit to that. It also is pretty stable in it’s gray state so I can just let that happen if I like it? Or since the sun is what kills the color and UV protection I can get away with refinishing without disassembly as the bottoms sides and parts hidden under the strips will both still be protected and not show anyway? I guess I’ll get the penofin and see how it does
-
I got three ipe boards my buddy was saving for me today- 1’x1”x8’. Boy they’re heavy! I’m hoping my torquey big block can use the help with traction- no need for a bag of sand in the bed with this heavy bed wood. My bed is 6’ 7” long by 4’ 6” wide so I need to cut the three boards down and get two more boards. Unfortunately I can only get 10’ lengths and they’re like $80 each! Still not bad on total price for exotic hardwood since 3/5ths was free. I have a couple friends with tablesaws and I have a router and sanders so the tools are covered. I got my stainless hardware in the mail but not the stainless strips yet. I’m still getting my plan of attack ready. I think I’ll fit the side boards around the wheel wells first then sneak up on a good fit side to side with all 5 boards using the bolts hanging down from washers for shims, then mill out the pockets for strips last. I got stainless 1/4”x20 wide low profile head flat head screws instead of carriage bolts & nylock nuts. The last board will need a helper to install but I won’t have to file a hundred square holes in my strips and no stock punched strips would work in my custom application. The frame I made for my bed floor is not well supported in the middle because I made it so that the floor would float less than 1/2” over the truck framerails. The whole bed is mounted with 4 poly body mounts- my goal was no squeaks or rattles which is the exact opposite of how it was as a survivor farm truck. I’m hoping to use a thick strap under a central row of strip bolts, then use the bed floor frame I made instead of additional crossmembers. It is .120” wall 1” square which is way overkill (I want to occasionally haul a couch but won’t be loading up bessie the moo cow in my hotrod) so I think it will be fine to just drill and tap it for the strip bolts. Mainly I am counting on the 1” thick ipe to be pretty stable and strong so I can span that unsupported central area and also so I can use less than the factory amount of strip bolts. Four strips will be pretty managable compared to stock too. I plan to do the front and back hold downs through the bed frame, the central strap to stabilize and share strength through the span, and two rows of floating pincher bolts with fender washers underneath. At least that’s the plan for now...
-
Here ya go. It’s a corvette style dual diaphram booster off ebay that came with a bracket and swinging pedal for the inside of the firewall. My firewall is not stock but I originally put this same setup in this truck back when it was on it’s 54 chassis with the flatty- search my threads from like a year/year and a half ago-ish? The key is the dual diaphram booster it’s much smaller diameter and worked fine with whatever vacuum my hotrod 230 flathead made. There is a lot of room to put it where you want under the hood but I did extend my toe board up and make more room before the pedal is floored- a smaller bore master will have better feel but need more travel. Fingers crossed the big stroker idles tame enough to suck on the booster but I can always go manual brakes if I have to later. I welded the stock 54 brake pedal pad onto the bottom of the aftermarket pedal arm so if would look right in the old truck. I might be welding a wide pad on it like an L now so that it reaches under the column more- the new hacked firewall didn’t have much room so I put the pedal swinging to the outside of the column instead of to the right and it fits because there is no clutch pedal but it feels a little far left to hit with my right foot. Likewise when the floor/tunnel is done I wanna tweak the gas over to the right some more.

-
Will I fit in a '42 Plymouth PT-125 pickup?
Radarsonwheels replied to hotrodv840's topic in Mopar Flathead Truck Forum

-
I just came to your thread here from your profile page- I was trying to remember what kinda dakota thing you were doing after you posted on my build thread. I hope the Moog springs work out for you. They gave about a 2” lift on my rig from the beat stockers which was about how far it sank when I set a 400 motor with aluminum heads & intake and a 727 auto transmission. I don’t know what kind of weight difference there is from my driveline to yours but the cummins is a heavy girl if I remember right? Definitely get that weight sat on there before finalizing your cab mount (& resulting front sheetmetal location) if possible. I just made mine the high side of ok and got lucky that it worked out later. I will say the moog springs are nice and stiff and my 300 lbs on the bumper doesn’t spoil the stance like it did with the stockers. There’s a bunch of wiggle room to make everything fit using wheel and tire choice if you end up with tire rub but those big dakota tires sure look cool in your mockup!
-
Will I fit in a '42 Plymouth PT-125 pickup?
Radarsonwheels replied to hotrodv840's topic in Mopar Flathead Truck Forum
Brent can I borrow those boots? I wanna be 6’ 7”! Size 14 right? -
Will I fit in a '42 Plymouth PT-125 pickup?
Radarsonwheels replied to hotrodv840's topic in Mopar Flathead Truck Forum
Wow I’m 6’ 3” 290lbs Us dodge truckers seem to be on the way down the leading edge of the height weight bell curve haha -
Moog cc772 Lots of people talk about swapping the 4 or 6 cylinder dakota springs for the v8 spec springs. If mopar or their supplier ever made dedicated springs for the v8 they are now discontinued. If you search various years on rockauto under the v8 they don’t even offer springs. I knew my front end was too low and even new v6 springs would be an improvement over rusty 30 year old ones so I crossed my fingers and ordered the moog ones hoping for a little more stiffness and lift. It wasn’t a ton of $ but it was a lot of work- I hate using spring compressors because it can be dangerous and I want to be buried with the teeth and fingers I have now. Plus my spring compressor has a little gauge with it that barely fit the stock v6 coil spring wire diameter and the moog was too thick... used it anyway (carefully!) I was using the compressor style with the threaded block that goes inside the spring and no matter how I tried it the hook fingers would either be in the way and not allow the spring to go into the frame or lca pocket or not grab enough coils to compress the spring enough. The winning technique (first side took two days second side took an hour) was this- take off the bottom block and hooks from the compressor tool and just use the threaded block. Drop the screw down through the shock absorber hole with a big heavy washer. This will allow you to compress the spring at the same time as locating it properly with the rubber damper in the upper pocket. Then loop a good ratchet strap through a coil near the bottom of the spring and across to the opposite frame rail on the other side of the car. This will keep the spring from launching down, bouncing off the ground, and taking off your jaw on it’s way to your neighbor’s mercedes windshield, while also sucking it into the LCA pocket. Make sure the end of the spring on the bottom is properly clocked to sit in the recess in the lca. Alternate compressing the spring, tightening the ratchet, and jacking up on the control arm. This will get it 90% there but to pop it home I used a 6’ prybar (ok it was a bedrail haha) to pry the bottom up and in. Of course when it pops home it will scare the crap out of you and make the compressor slip free but the tight ratchet strap is good insurance. Good luck and I hope I helped!
-
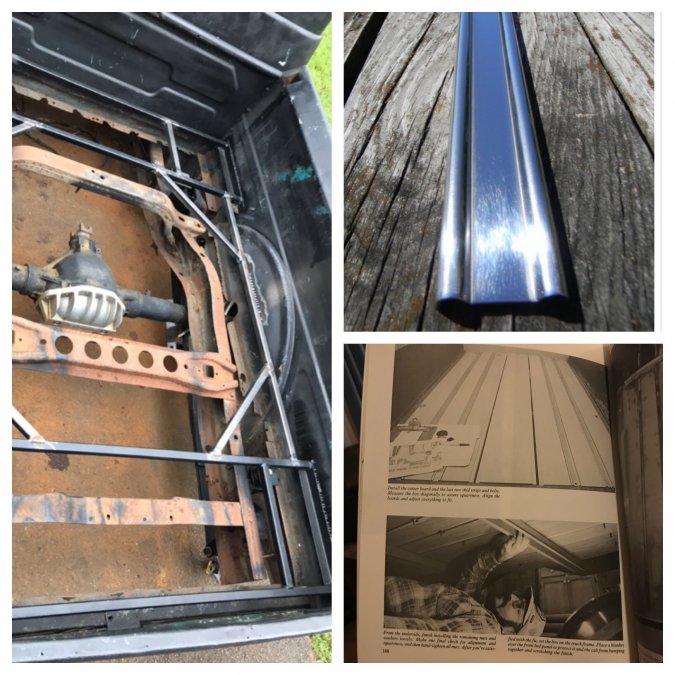
And I got the 3/8” hard fuel line installed through and above the passenger framerail today so all that’s left to do under the bed is finishing up the fuel system and fuel level sender wire and running brake lines to the back. Then I can start work on the hardwood bed. I can’t wait to hide all this work under the bed and make it look simple and useful again. The plan right now is five strips of ipe and four stainless center strips. I ordered some undrilled 80” strips- my bed is 79”. I figure I will see how strong the wood and strips are just laid on there before I decide how many bolts I need and which ones will either interact with the bed floor frame (drill & tap 1/4”/20?) or just have washers to tie them to their neighbors, or if I need a thick strap under them in the middle of the bed to share their strength and not flex. 1” thick ipe should be pretty strong and not want to warp I hope. I want to get some kind of plan together where the wood can unbolt from the floor frame with 4 bolts and be removed as a unit and I’m also looking at some lifting and tie down type hardware. It won’t be correct like in the book but I want it to look right and last forever.
-
This is the offending uphill run. Shoot all this “aah it’ll be alright” is taking more energy than just fixing it. I just need to raise the hole in the bedside about 1/2” or a little more to get it better than level. It’s on the list.
-
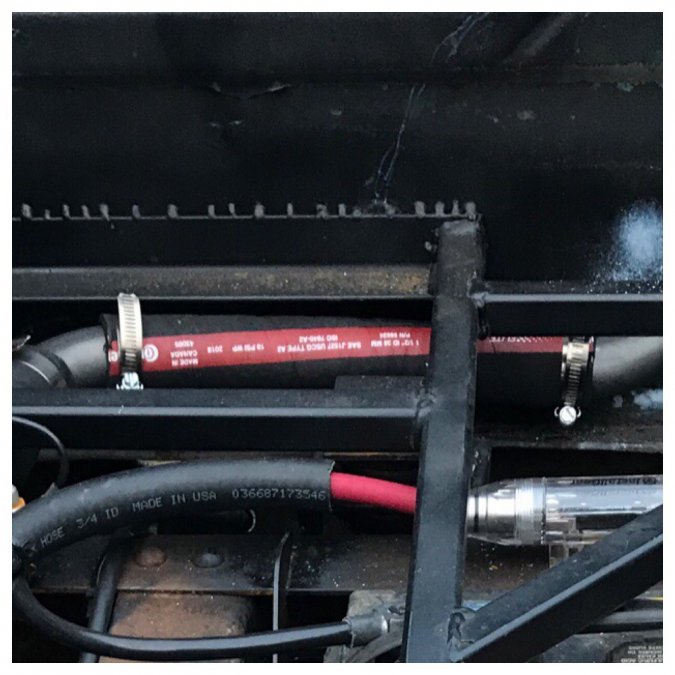
Hmm... DJ- did you see the earlier pics of where the filler is installed in the wheel tub? If you only saw that last set of pics it’d be easy to imagine the filler is quite low. It’s well above the stamped body line in the bedside and the vent terminates well above that so it should fill all the way up till I see it climbing the filler- probably will even click a modern pump off. I can still raise the hole in the bedside to get a proper grade on the whole run but I figured if a P trap in a sink can pass water fast this is a very subtle restriction in comparison. Here’s a pic of the filler and it’s connection to the under deck connections in the other picture the pic on the right is laying on my back looking up into the wheel tub/inner bedside

-
Tie Down Hooks - Thoughts?
Radarsonwheels replied to FlashBuddy's topic in Mopar Flathead Truck Forum
I’m really enjoying this thread! I am about to redo my wood and I’m also thinking about tie down stuff. The tonneau style hooks I never saw before and I’m surprised that all of them actually look totally right on there- the hand forged looking one especially. I was considering brass cleats or flush d-rings in the corners and possibly even a central ring. I want to be able to use mine to secure a load in the bed but also as lift points if I want to lift off just the wood or the whole bed with an engine hoist. -
I thought about that but it would have only saved a couple feet of 1 1/2” filler hose. Everything else would have been the same labor wise and I would have had to patch the hole in the top of the driver side fender. The deck filler was already there- I had installed it a year or two ago in an attempt to get a plastic fuel cell to work that my buddy had put in there. His filler neck was almost level and at a gas station the fuel would slosh back out almost as fast as you pumped it in unless the pump was on a hill! My marine deck filler solution worked back then but the tank was too old and crusty and I wasn’t able to convert the rollover vent into a hosebarb- the vent needed to be higher than the fill or else it would get full then pour out of the vent on top of the cell before filling the neck and shutting off the pump. Besides, the ‘suspect’ run is the one that goes front to back not the side to side one. My buddy said to just take it off the tank and run a hose down it and I’ll find out quick if it will fill ok! Now I just need a day well over freezing...
-
And here’s a shot where you can see how the run of filler hose from right to left (edit: from R to L in this picture but front to rear in the truck running along the bedside) not exactly downhill like it probably should be. I’m thinking if the trap on a sink drain flows good this will too it’s a much bigger diameter than a gas pump nozzle and the uphill is subtle

-
Wednesday! It threatened to snow this afternoon but never started in earnest. I got the previous owner installed triangular rear bed reinforcements trimmed off. Thankfully my bed floor frame seems to be keeping things square and the gate still fits the same so I’ll call that a win. I also fabricated painted and welded in some brackets to hold my new fuel cell, split some hose to act as rubber insulators, and bolted in the tank. The marine deck filler I installed in the driver’s rear wheel tub two gas tanks ago on the old chassis got re-used and I connected it up with steel 90°s and good 1 1/2” and 1 3/4” fuel hose. I’m a little concerned that I pierced the bed side too low and the run has to go slightly uphill along the bedside to go over the frame rail before turning toward the tank filler neck but I think it will work fine. The tank has three 1/2” ID bungs- a return which is plugged, a sender which has a 90° push lock hose barb fitting but I still need to reduce from 1/2” to 3/8” and plumb hardline up to near the mechanical fuel pump, and a vent with a ball bearing in it for rollover protection. I ran the 1/2” vent line over to the driver’s bedside, reduced it to 3/8”, pierced the stake pocket and ran it up to the top where it is folded back down to keep rain out. It didn’t seem crimped when I blew through it but this will all get tested quickly when I try to put 17 gallons in it at the station and see if it fills smoothly or if you have to go slowly... The yellow thing in the last shot is a worn out leather glove. I taped them over the backs of the rolled bed tops so the edge doesn’t rub through my car cover. You can see the folded over 3/8” vent hose in the stake pocket. I’d like a better solution- maybe a little black cone filter?


-
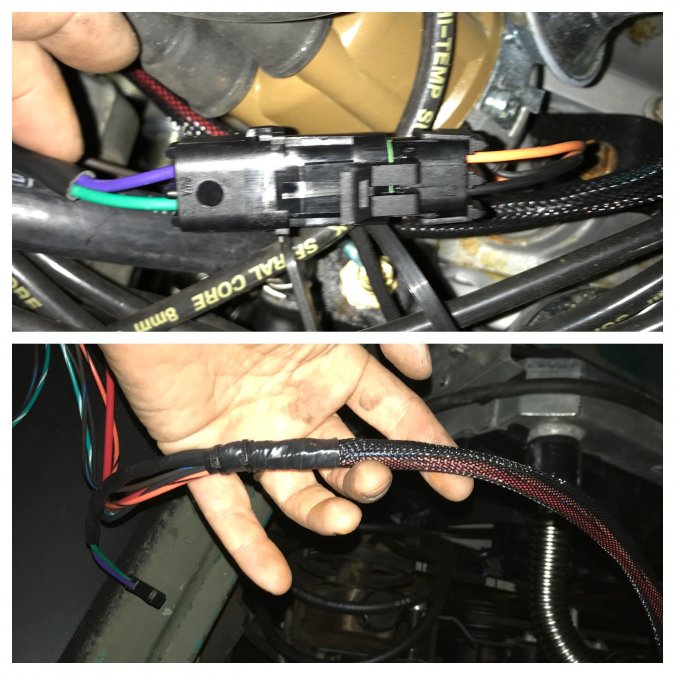
Thanks fellas. I got worried for a second I know ignitions can be sensitive to RF and not to run the purple and green back trigger wires right alongside any high tension plug/coil wires! Thanks also for the vote of confidence on the motor. I forget the name of the gameshow from the 80s but whenever I start a fresh motor to break it in I still say “no whammies no whammies no whammies” When I built my ‘72 demon pretty much through my whole 30s I started out making an old pile into a daily driver, then a ratty big motor hotrod, then a kind of low buck resto-mod with a gorgeous stock interior, paint and fancy decals, 500hp. It turns out it was the most useful in its first incarnation, the most fun in its second and the most impressive but least fun in its last. I am not into the ‘ratrod’ thing but I do like honest patina, beaters, and sleepers. Some important visual stuff definitely already happened- stance, wheelbase, upholstery, rims & tires, and some is in the works- gauges, controls, tidy but not hidden wiring & plumbing, ipe wood bed. So there will be some mix of fanciness and crustyness. I plan to get rid of the green on the door interiors and put in red upholstered panels over black paint on the floor and doors asap and finish weld the join from sectioning the bed sides but it’ll be a while before I address the body work or start thinking about spraying an actual color. I want to enjoy it for a while! Here’s pics of my demon in all 3 stages just for fun

-
Do you mean I should route the electronic distributor trigger wire seperate from the other wires that go to the front of the motor especially the alternator? Because of rf interference or something? It’s my 1st big block mopar my distributors were always on the back of the motor on smallblocks or on the side for slants and flatties so I never had an alternator and distributor in the same area that needed to wire up to the firewall.
-
Done working outside, just messin with my phone searching- looks like black and green is negative while orange and purple are positive. Whatever that means- distributors produce an alternating current trigger pulse. But it’s a good educated guess I’m goin with it.
-
I had already made a loomed harness for the distributor, alternator, and water temp sender but I got the front of it installed- new autometer H2O sender, alternator field, reference, ground, and charge wires have shrinkwrap, ring terminals and are all bolted on. The only wiring loose end up at the front of the motor is the distributor- I have a new stock style vac advance unit with that stepped two wire push on connector that’s orange and black and the one from the msd is spade connectors. I want to put on a nice 2 terminal weatherpack and be done with it but if it won’t fire right up for break in I will be swapping the trigger wires- been there. Anybody know the answer for sure? I can always make an educated guess then swap the pins in the connectors later I guess. Man it gets dark early!

-
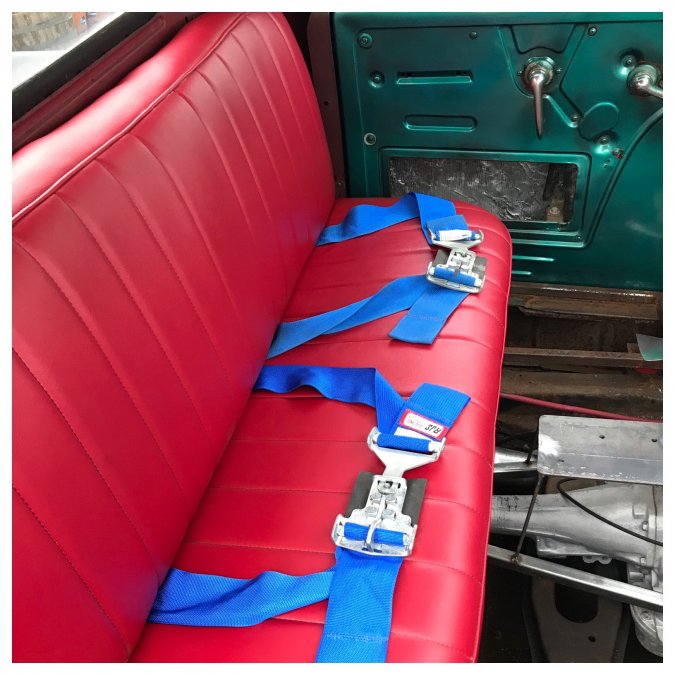
I’ll take that as a compliment! The seatbelt mock up looks good with the seat riser and sealbelt attachment points welded in and the belt feels solid and comfy.
-
1951 Fargo 400cid on Dakota chassis
Radarsonwheels replied to f_armer's topic in Mopar Flathead Truck Forum
Filler panels look great. It looks like it’ll be back to work soon -
More slow progress. Some tiny details are coming together and some bigger stuff is moving forward like a glacier. I got some 1.5” fuel filler hose to go to my marine deck filler thats already installed in the rear driver’s fender/tub. I already have a reducer and some 1.75” fuel hose with a 90° to attach to the fuel cell and I ordered three more steel 1.5” 90° elbows. The filler line has to go between the framerail and deck frame, forward to the rear of the tub, out through the bedside into the tub, then up to the deck filler cap. I’m not sure if I’m going to run the vent just sistered up to that whole plumbing nightmare or maybe just up the passenger side stake pocket? I am also thinking maybe a loop of hard line ending facing down or a little baby cone filter at the top would keep water out? I’m not going to do a charcoal can but the truck lives outside. The running boards are now bolted to the rear fenders and zipped down to the forward brackets with self tappers. Now they’ll stay put and not rattle. A 50 pack of fine thread 5/16” bolts and nylock nuts from McMaster Carr is turning out to be the gift that keeps on giving in the form of way less trips to the hardware store. I just got a box yesterday with 1/2” fine bolts for my seatbelt ends (that you could probably lift the whole truck with one of em but why not overkill on safety) and 1/4-20 allens & nylocks to bolt my throttle bracket to the firewall. The bracket has recesses that wouldn’t fit hex heads. The trans hump is coming along. The piece in the picture is the only facet that has a complicated potato chip shape. The rest are pretty flat. I don’t know if I’m doing dynamat and carpet or not. It is nicer that way but my windshield and cowl leak a little so a painted steel floor won’t hide or fester problems. I got my fuel cell brackets in the mail. I was overthinking how to mount it so these will be easier I can just make four mounting points welded and dropped down from the frame crossmembers.


