Radarsonwheels
-
Posts
1,232 -
Joined
-
Last visited
-
Days Won
17
Content Type
Links Directory
Profiles
Articles
Forums
Downloads
Store
Gallery
Blogs
Events
Everything posted by Radarsonwheels
-
 Agreed. I welded another stainless 3/8” bolt to the framerail just behind the power steering pump and ran a 2g cable over to a boss on the passenger side aluminum head. I also ran a six or four gauge cable off of the starter battery lug with a 50 amp inline fuse. That should be good for the hot going to the fuse box but I think I’ll run another unfused thickish charging wire from the alternator to the battery lug on the starter. I’m not sure if I still need another strap from the bellhousing to the frame rail for the starter? I will definitely put one from the motor or frame to the firewall to ground the cab and dashboard.
-
Today the battery cables got finished. I put a big fuse inline on the +12v side and welded a stainless bolt to the frame and made a short ground cable. I think I’ll make another 1g black ground cable to go from the starter lug on the bellhousing to the frame. If I weld another stainless bolt to the frame up there I can use that to run grounds for the charging system and in the cab. Maybe a third ground lug up by the rad support would keep it clean to run grounds for the front turn signals headlights and electric fan.

-
The power went out at work today from high winds so I got home before dark and got a couple things done. I installed an early style speedo adapter and the proper gear for my axle ratio and tire size and confirmed that the threads fit my speedo cable. I crimped and soldered a ring terminal on a 15’ 1/0 gauge cable and ran it up to my starter from the battery. The battery side has to wait for the big fuse to arrive before I finish that end. I also added some mid pipe hangers to my exhaust system which is now completely done and ready to rumble.

-
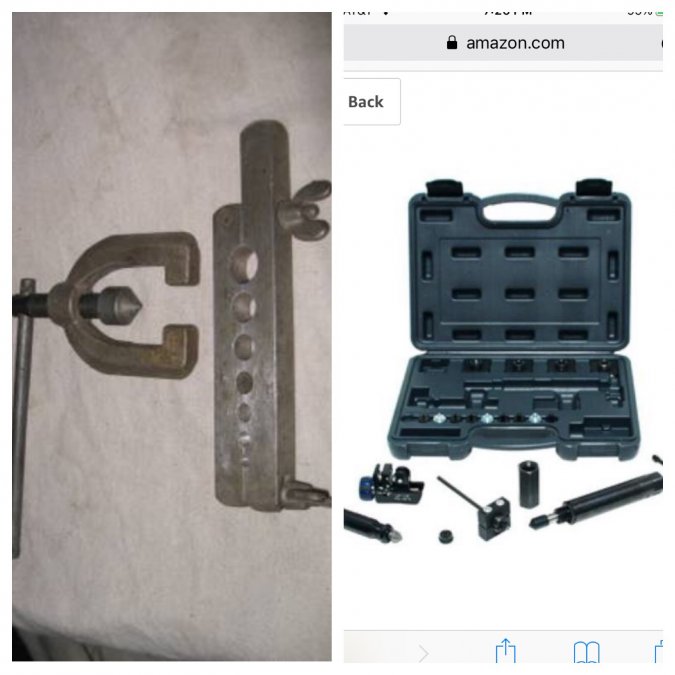
This turret flare tool is awesome! My bench vice is a little awkwardly near the wall of my shop so I will have to plan my runs carefully or make them then remove flare and reinstall but it made two perfect flares in 5/16” steel tube like butter.

-
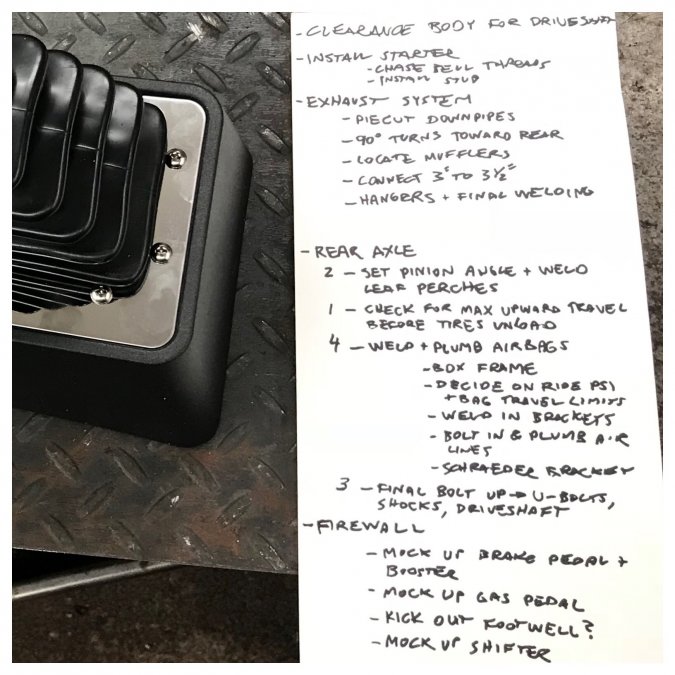
No razors in our apples or pledges to serve the dark one last nite! Halloween is fun when you have a kid that still wants you to come trick or treating with her. I got all my bends piecuts and welds finished up and after a hundred mockups and cutting/welding sessions I finally installed the whole system with gaskets and hangers. I think I should put another hanger somewhere in the midpipe just behind the trans crossmember but it looks like using U bolt style exhaust clamps would be the easiest way to make it removable. I ordered a couple- I’m thinking manny moe & jack probably don’t stock 3.5” it’s too big for gasoline and too small for diesel. My instinct is to not use the cab floor to mount the mid hangers? I don’t know how much extra noise would come through using rubber isolated hangers like the ones that hold the mufflers but I’m thinking the whole rest of the system is totally isolated from the body so why mix mounting points. Any opinions? I could just weld a couple pieces of square tube to the top of the frame that hang over the exhaust like little gallows. Anyway I’m pleased to check this big job off the list!

-
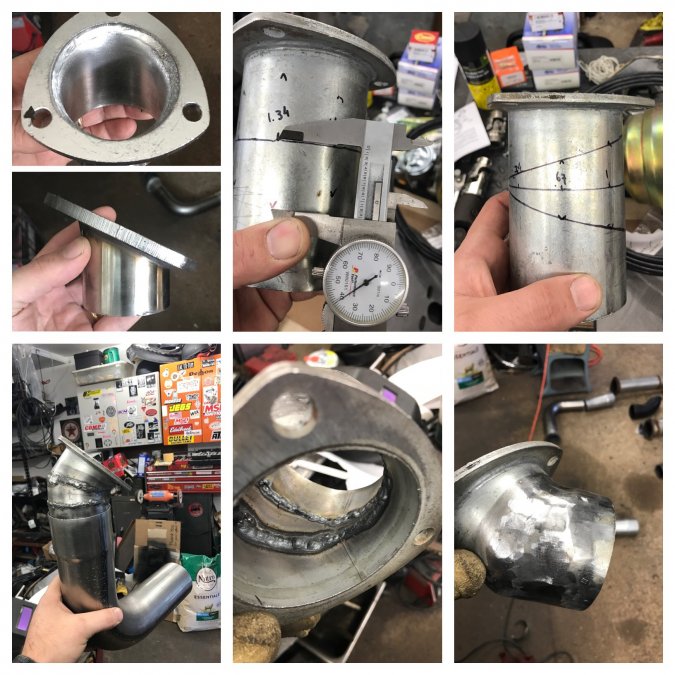
I got the 3” downpipes done. The two sides had totally different stuff to get past plus the headers both aim in at the oil pan so they needed to turn immediately. The driver side had to slope back right away to miss the motor crossmember and the passenger side needed to go straight down to avoid the aftermarket oil dipstick. All done for today- I got the exhaust routed to under the trans crossmember, ready to meet up with the expanding cones into the 3.5” pipe and mufflers. It looks like I will lose the H pipe that’s already on there which might not be a bad thing since the welding on it looks shady and leaky (& rusty!) I should have time to finish it up with gaskets installed and weld in hangers tomorrow. Now it’s time to take my 6 year old trick or treating! Be safe and enjoy halloween y’all!

-
Forgot to say- I made sure the battery will be able to be removed without pulling the wood bed apart! Also that cal van flare set is GARBAGE I am glad I got it on amazon it’s going right back and I’m getting the eastwood style one that mounts in a vice.
-
I hung a battery box under the bed in the back of the truck. I know the passenger side would have been a little better for weight transfer but at least it’s behind the axle and it’ll be easier to run wires up to the starter since I’m already on the driver side frame rail. I also got the exhaust system hung and mocked up. The 3.5” will definitely not fit between the floor and trans crossmember but if I tuck it under there it still only hangs down about even with the running board brackets. I welded my angled tips on the ends after the mufflers. They have plenty of room at full chassis lift and drop and won’t heat up my airbags. I tried to angle them down and out for maximum smoky burnout billowing, not that I’m the burnout king I don’t spend money on tires like that but why not right?

-
B3B Diff and front end swap info please
Radarsonwheels replied to Marc 1952 B3B's topic in Mopar Flathead Truck Forum
I wrestled with my stock rear’s brakes for years trying to keep the four wheel cylinders and eccentric adjusters happy. I never had a single problem with the gears though. Jeep ZJ worked for me and had discs. Why not use the jag independant rear suspension while you’re at it? Super fancy setup with the inboard brakes -
Oof it was time to replace those for sure! I’m glad you will be able to use my old gauges they don’t do anybody any good sitting on my shelf.
-
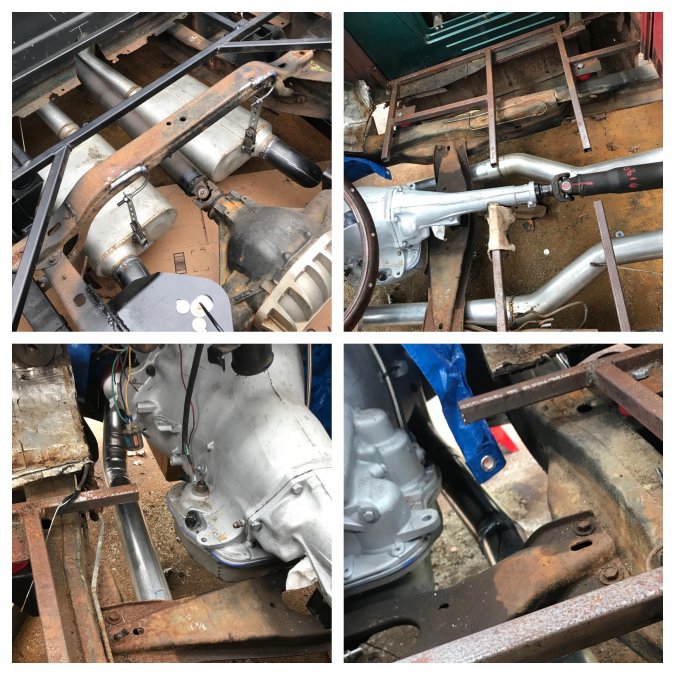
I love my new miller welder. I used to use a little 110 for sheetmetal and thinner brackets etc. then I would drag out the stick welder to do leaf perches and heavy stuff. I never got enough practice to be a really good stick welder but I’m pretty happy with these welds. Now that the pinion angle is set and the perches are on for good I can torque the U-bolts and plug in the driveshaft- all the driveline engineering is pretty much done. The trans and rear need oil, the speedo drive in my transmission was a junk late style plastic thing so I ordered a new aluminum housing (fsm calls it an adapter) that should fit my 32 tooth gear and female square drive cable to run my autometer speedo. And it’s really time to get this exhaust done so I can start plumbing and wiring around it.

-
I don’t know what to tell ya- I personally unbolted it off a ZJ jeep. It has 5x4.5 bolt pattern axles and I pulled them to get the disc backing plates before I gave my 1954 chassis to my buddy- they were definitely a c-clip style chrysler 8.25 top dana 35 bottom

-
I thought rack and pinion was hard to use with a straight axle- you need to mount it on the axle and use a telescoping steering shaft right? Or else deal with terrible bump steer? Maybe this is a common modification around here and I am just not in on it? How are you going to set this up on your truck?
-
The bags took about five hours to install today. I boxed the frame, re cut the bottom brackets with 3” and 3 1/2” circles so they would sit down and flat, got it all welded in, painted, plumbed, and messed with the air. It seems to be holding just fine. The truck sits very low and flat with no pressure in them and at a tall ride height with 30 psi which is still nice and squishy. They get a couple inches taller but over 40lbs seems pretty stiff. The bags will take 550lbs in case I ever need to haul a safe with an elephant in it. I was originally going to go with a T and a single schrader but I was reading that it accentuates roll in a turn as the stressed bag squeezes air over to firm up the other bag. Now I can set my pinion angle without fear that my ride height will change again with the ipe bed and a tank of gas. It is tempting to put dumps and an air tank and compressor on it but that’s not what I’m trying to do here plus that is expensive!


-
It was a toss up between the cal van and the eastwood which looks like yours- more of a turret setup. A bunch of folks sell them- I don’t know if the quality is all the same or if some are knockoffs? In any case we’ll see soon if I chose well or not. Several companies use this design with the deeper single hole clamp blocks that have the male threaded boss on top to receive the ram- hopefully the cal-van version is closer to tool steel than pot metal.
-
Cabbage Hauler - WD-21 Build Thread
Radarsonwheels replied to Jomani's topic in Mopar Flathead Truck Forum
Looks killer- so smooth and clean! All the work you put in is really paying off -
New 1950 dodge Truck to me
Radarsonwheels replied to 5027 steve's topic in Mopar Flathead Truck Forum
That glass looks great! Got any pics of your exhaust? I’m starting on mine now. -
I also ordered a new tube flaring tool. It was kind of hard because all the $15-$50 tools are pretty much the same quality as the made in usa bar clamp one I already have. I got pretty good at using it- it’s all in the prep work chamfering the tube and making sure the bar sides are exactly even when you clamp them down. I still hate it though and don’t get a perfect flare every time. Plus if you clamp the tube hard enough to not slip it leaves puckers near the flare that either make the nut harder to turn when you’re trying to start threading it in, or get filed down smooth which removes the rust protection. The next obvious step in quality to professional tools seems to be $300 for the master cool kit which has more durability for every day use than I need as a hobbyist. The $50-200 middle range seemed to be a minefield of imported pot metal junk that should cost much less or won’t hold up unless you only flare copper. I ended up buying a cal-van set for just over $100 that has nice deep clamps and even a hydraulic ram instead of a screw down mandril. It had good reviews so I’m hoping is works out for me. By the time I get this exhaust done I’ll be ready to plumb the transmission hard lines. I’m planning on all new brake hard lines too so there is plenty of plumbing to do which I am now looking forward to.
-
This is why I didn’t want to build headers- my exhaust welding always works but doesn’t get pretty till I’m almost done and get in a groove. There is enough left to do that I should see some improvement! Anyway, the downpipes need to angle 48° out because the collectors shoot in toward the oil pan and 24° back to clear the engine crossmember. It’s tight but not bad at all. I think the back half of the system needs to get mocked up so I can start having dots to connect. The stainless headers came with angled bolt up flanges with downpipe stubs but I don’t know why I would use them- they neck the 3” collector immediately down to 2 1/2” and my system goes from 3” to 3 1/2”.
-
Had to run home real quick- got a ups notification that my airbags came almost a week early! Go brown truck! They look nice. The bottom brackets are cut for a smaller axle than mine and have plenty of meat to shorten them and make them fit my 3” axle perfectly- my axle actually tapers so I’ll have to account for that.

-
Thanks GGdad! I got the rusty spring perches out then sandblasted and painted then chamfered and sanded the weld edges, spun the axle 180° and sanded to bare metal where it’ll be welded, and re-assembled it all. The perches are perfectly centered and I’m at ride height. The driveline (motor & trans) are at 1° down (driveway’s on an incline) and I am ready to preload the slappers, set the pinion angle, and tack the perches in. Then I ran out of time and found out it’s supposed to rain all tonite and tomorrow! I want to take my time and get it right next dry day I have some wrench time Should be ok...
-
Plymouthy that should do the trick to let out plenty of steam!
-
Started mocking up the exhaust too. It’s going to be a lot of pie cuts and welding but I think I have all the ingredients here
-
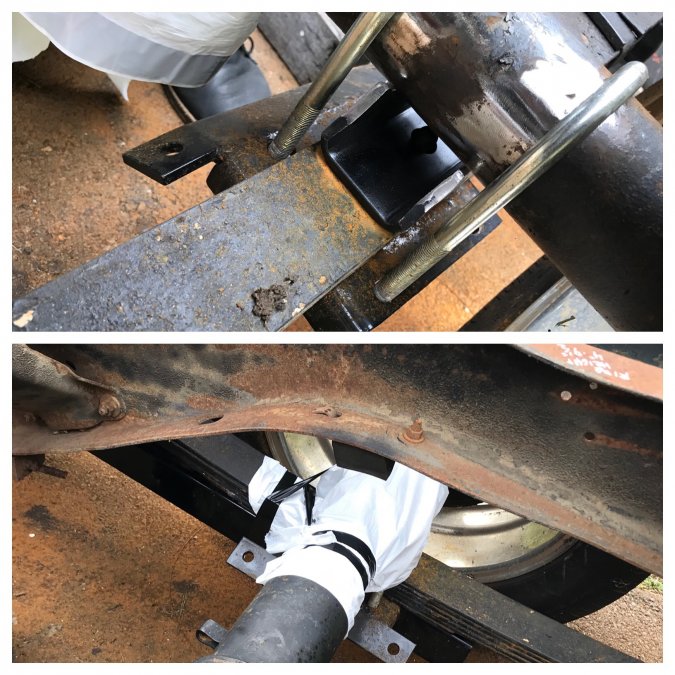
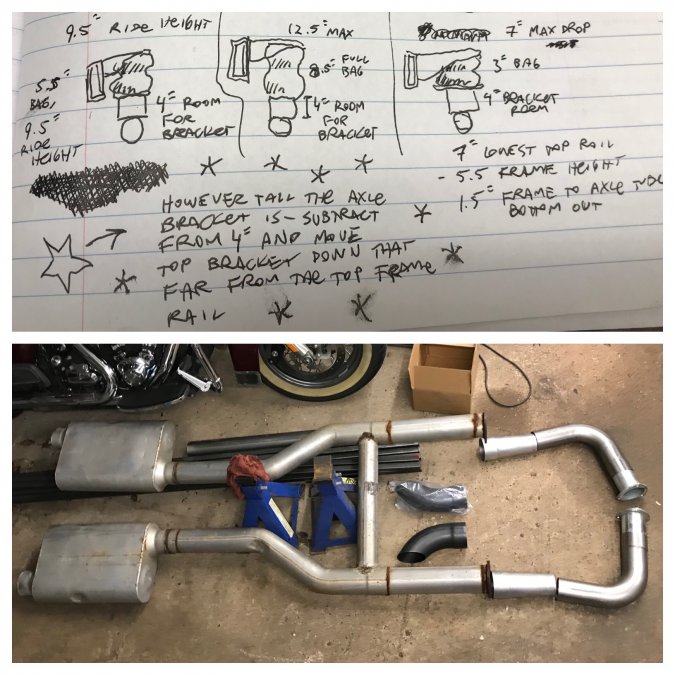
I sat in there with the shifter- it was only really comfy kind of butted up to the bench seat. I guess I will make it a little console or maybe hang it up on a gusseted pole like a mailbox. 1/2” or so clearance to the upholstry should keep rubbing wear to a minimum. It’ll be a while before I get to mount that anyway- floor first. I also got working on my air over leaf adjustable suspension with the 2500lb load leveler bags. I called the airbag manufacturer and got all the specs on the bags and brackets I ordered. First I dropped the rear down to the bump stops and measured the clearance, then measured at my proposed ride height, then at max extension before the leafs unload the tires. Then I knew how much travel the leafs ‘wanted’ before they would be fighting the bags. I sat down and drew a bunch of scale drawings of my ride height, frame height, and bracket positioning. It looks like if the lower bracket that sits on the axle tube is 4” tall then I can make the top bracket sit level with the top of the frame and everything will work out perfect. I’m anticipating it will be less than 4” so I’ll be able to drop the top bag bracket down by whatever the difference is. This bag placement should give me 1 1/2” clearance at the lowest and 7” at maximum psi/inflation. I’m looking for 4 or 4 1/4 gap at ride height but the beauty of it is I’ll be able to put it where ever I want. It’s supposed to arrive around halloween so I have plenty of time to mess with the pinion angle, leaf perches, and driveshaft before then. I want a front driveshaft loop too.
-
Small bites small bites