


Radarsonwheels
-
Posts
1,232 -
Joined
-
Last visited
-
Days Won
17
Content Type
Links Directory
Profiles
Articles
Forums
Downloads
Store
Gallery
Blogs
Events
Everything posted by Radarsonwheels
-
 I got my ratchet/detent shifter assembled, and bolted my brake pedal/mc setup together. Also chased the starter threads in the bellhousing, installed a stud in the top hole almost like stock but not 1/2 fine thread, and wrestled with the mini starter for a bit before realizing it was hitting because it had a wire stud extention bolted on to it for some other model mopar engine- probably a v6 or 5.2. Now that the starter is on I’ll know how to route the downpipe from the shorty header. One of the hardest things about the truck’s former incarnation was that I am over 6’ tall. It was always a workout bringing my knees to my chest to work the pedals. Since the bench seat can’t move back any farther without losing the springs and going with a hard thin foam over church pew or bucket race seats (ouch and barf) I am thinking about pushing the footwell forward a little bit to get more legroom. Now’s the time since I have to re-imagine the firewall. I’m going to frame it out with 1” .120 wall square tube and skin it with mostly flat panels of probably 16g. A little on the heavy side but it should be strong. I’m trying to decide if I want a support structure for a ‘floating’ shifter, or if I just want to build the trans tunnel up into a console. A cupholder is always a nice thing to have too but not so traditional. I found this pic of a pretty clean solution but I really have to sit in there with the bench seat column and shifter to see where my right hand wants to end up. And also to make sure I don’t punch the dashboard to go into Park.
-
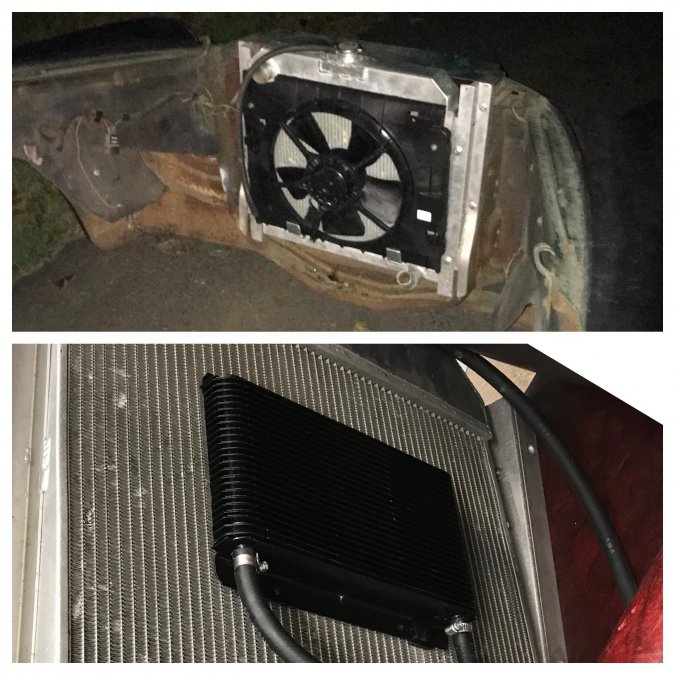
Got the shroud/fan sealed to the radiator with foam side rails and attached the B&M oil cooler to the front of it last night. Tonight I chased the 3/8” fine thread holes in the rad support with a tap, mounted the aluminum radiator brackets and hung the whole mess in the front clip.
-
Thanks. Summit & jegs had it in stock. I ordered from summit and they had it all in stock except the big tach which drop shipped from autometer.
-
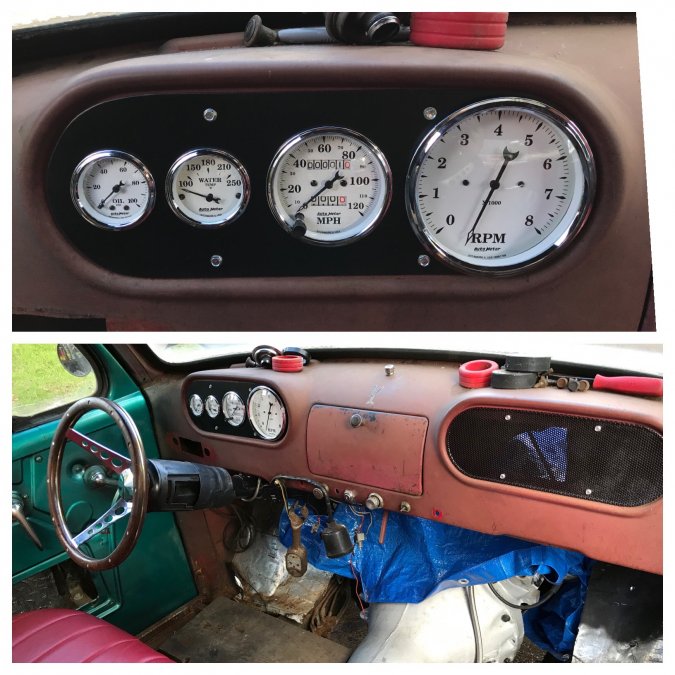
So I put up a new clock in my office today. I think the dash looks a little jarring like new white sneakers but I’ll get used to it and hopefully fix the place up a bunch so it looks less out of place.
-
That makes a lot of sense. Again- apologies and feel free to delete this thread. I’ll go clean it up too in case you want to leave it for other people that can’t find the classifieds.
-
-
Shoot I was just happy mine went all the way home and got tight- after the fight the old ones gave me coming out I wasn’t too sure of the condition of the bores and the new ones went in a little stiff too. I think they should be fine a little past snug? Sorry for the non-answer but I wouldn’t worry about it too much as long as it looks and feels right.
-
Ok I’m on an iPhone and on here you have to click the little menu bars on the top right of the screen then scroll down past sign out, account, leaderboard, etc. I was looking for a classified truck subforum or something like that on the main forum navigation. Stupid mobile versions of websites always suck for functionality vs the desktop version.
-
Hey I am not sure where the classified section is. Do you mean the craigslist ebay section from the main forums menu? Sorry for the dumb question.
-
1951 Fargo 400cid on Dakota chassis
Radarsonwheels replied to f_armer's topic in Mopar Flathead Truck Forum
Hey Farmer- I was messing with that radiator out of the car last nite- got some foam rails installed to seal the sides of the shroud and mounted my B&M trans cooler on the front side. It's definitely a champion rad, 21"by 22" or so. -
1951 Fargo 400cid on Dakota chassis
Radarsonwheels replied to f_armer's topic in Mopar Flathead Truck Forum
My buddy and I traded the truck back and forth a few times. The radiator and tig welded aluminum brackets were something he added. I think it’s a champion or ebay type deal- certainly not a be cool or fancy $$$ rad. It was overkill for the 230 flathead. I’m hoping with a good shroud it will be enough for my big block. I got the biggest B&M trans cooler to stick in front of it too. It doesn’t have an oil tank in the bottom since it was spec’d for a manual trans application. I found it fit the chevy HHR electrical fan and shroud perfectly and it also fits the rad opening perfectly in the sheetmetal. The drain is in a horrible spot and the centered cap is a pain too- I use a hose pressed onto a funnel to fill or top it off. There is a ton of room inside the grille- I’m sure you’ll come up with a good solution. -
1951 Fargo 400cid on Dakota chassis
Radarsonwheels replied to f_armer's topic in Mopar Flathead Truck Forum
That’s awesome! Are you putting the rad in front of the rad support main U structure/crossmember? I set my motor back a mile farther but I always wanted to do an engine setback because I always thought they were cool and I’m a glutton for punishment. I’m also doing an hhr fan- do you have room for a mechanical fan? That would be amazing.
-
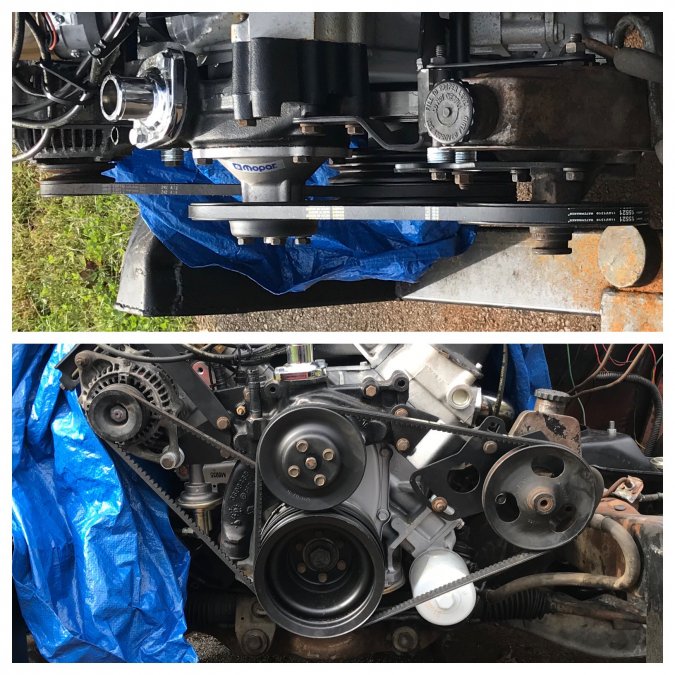
I have been dreading messing with the power steering pump. The one off the 400 had nice big block brackets that looked like they’d swap right over but sometimes ‘looks like’ bites your butt. Both pumps were maximum filthy! I scraped degreased sandblasted and painted the BB brackets and washed the dakota pump with a gasoline soaked rag (I know I know but it works the best and it is outside still attached to the rack & pinion). The dak pump did indeed take the painted brackets perfectly and after modifying the bracket to move the pump/pulley 1/2” forward it fit a 1977 d150 400cid non AC ps/wp v-belt just right. The alternator works great with a belt I had in my collection which has seen better days but still has part numbers very legible on it The alternator has to move another 1/4” or so to get the belt alignment perfect but that’s just juggling some washers since it’s all shimmed in there anyway. The amount of work left is still daunting but some details are starting to come together which is nice.
-
1951 Fargo 400cid on Dakota chassis
Radarsonwheels replied to f_armer's topic in Mopar Flathead Truck Forum
Looks good. You didn’t have to smash your #8 tube but the steering rack input is real close huh? Are you doing a third universal joint and DD shaft like me? My motor is 3/4” offset- where did yours end up? Nice out of the box thinking on the rack & pinion angle! A lot will depend on how you do your column and where that pokes thru the firewall. -
Well I think an 8.4 liter v8 should make a *little* bit of steam! I was planning on using a 750 double pumper that I had laying around but when I went to go through it I discovered it’s really a 950hp. Jeez I’m not old enough to be forgetting what parts I have laying around! Funny thing about the older holley 950 though- they actually have smaller bores than the holley 850 carb! I think there is some magic in the sculpting of the main body but they’re only supposed to flow 830 or so. The 950 label is just marketing hype to keep up with all the other manufacturor’s shiny exaggerations. The primaries should see plenty of signal from the big stroker to have decent manners. I’ve learned the hard way over the years how to wire down the idle feed restrictions for the transfer slot circuit and idle discharge holes to get a clean low throttle cruising afr on a race holley. As long as I don’t mind pedaling the car to warm it up with no choke I should be able to make it work on the street. Plus I don’t think a choke horn would help flow in my wierd dual snorkel carb hat air cleaner. I also kind of enjoy how the double pumpers can be ‘driven wrong’. They remind me of a shovelhead I had with an S&S super B carb. It was a great performance carb but had no accelerator pump so you had to ease into it just right until you got it singing- then you could whack at it and get amazing throttle response.
-
I’m all ears if anybody has other gauge suggestions. A little cheaper would be nice! The stewart warner stuff is also pretty expensive and I didn’t see much that had a nice vintage feel. Edit: I pulled the trigger and ordered this setup. Nobody else makes anything this good looking which also has rolling odo numbers. I can cut this truck up till the cows come home but I’ll never put a chevy motor or a digital readout in it!
-
Thanks! I used a stub of oem dipstick filled with silicone. I left just enough nub that I’ll be able to yank it if I ever want to (dunno why I would?). My rear sump offroad pan is an older one the screw in dipstick is on the passenger side. The pics of a similar pan on summit etc show a driver’s side bung on the pan. My pan also doesn’t seal the stock dipstick hole so it did need a plug. I’m playing with gauge ideas today. I would like modern gauges to protect my investment in the motor but I definitely want a vintage look. Here’s a mockup- it doesn’t get much more reliable than autometer. Mechanical Oil psi, electric water temp, mechanical speedo/odo.

-
I had a 950 classic hp series double pumper main body laying around so I rebuilt it and got a guess at a baseline tune for a big huge street motor- I used the stock rear metering block and a 750dp front block with timed vacuum for my distributor. I don’t know how much mechanical advance is in this distributor or if I will wind up welding up slots in it to get a decent amount of initial timing. Hopefully the inches will eat up enough duration to idle well with whatever I end up with. Carb settings 6.5 power valves 79 primary and 80 secondary mains IFRs slightly restricted with wire for clean cruising idle screws 1.5 turns out floats set new diaphrams in acc pumps, 37 squirters and pink cams on #1 hole. stock air bleeds The classic HP carbs are the old style that don’t have the idle-eze valve or billet metering blocks but they can still be tuned with wires or drilled for jets in the IFRs and PVCRs. Plus I didn’t have to spend any money!

-
Cabbage Hauler - WD-21 Build Thread
Radarsonwheels replied to Jomani's topic in Mopar Flathead Truck Forum
That’s what I did. $40 or so in 2x4s and allthread worked great but my truck floor was soggy. Your solution is awesome using the stock body mounts to lift it! Just gotta put the doors on last... -
Oh man I am happy to have the front suspension rebuild almost done. Passenger side bushings need a final torque at ride height and the balljoints need grease but it’s sitting back down on new springs shocks bushings and balljoints.

-
I think I got it. Man when you make this stuff up as you go along you sure can run into hornet’s nests of arcane knowledge. I’ve built motors and fixed & restored cars but this re-engineering every system in the truck is a learning experience! At least I kept the stock front suspension and steering geometry. Just replacing all the bushings and springs and ball joints is plenty of work. When the factory made the female stub on the bottom of the column U-joint it was a full 3/4” round for a couple inches before they formed flats in it for the female DD socket. When I shortened the column’s female stub I left just enough of that formed female DD section that it would key to my new 3/4” DD shaft and automatically index to proper phase- or so I naively thought. Turns out that phasing made the first two joints like the red/green in my above post’s diagram. I’m thinking the best solution is to cut off the formed female section of DD. Then I can re-orient the male shaft and weld and pin it 90° from it’s current position. I found more online about the out of phase on purpose thing- read a ton of hamb posts, parts manufacturer tech bullitins and FAQs, and even a patent proposal for a computer program to determine the optimal offset out of phase. It seems this is done to correct a situation where the column and steering box input’s vectors are not exactly parallel. One manufacturor of splined U-joints suggested just trying clocking the splines a few out of phase to correct a notchy feel. The one I screen shot and pasted above the red/green illustration from a different source says “15° to 45°”. I’m going to twist that DD bar 90° and cross my fingers that it is all close enough to feel good on the road and have decent feedback. I have no idea how many turns I have lock to lock or if the dakotas were over assisted with one finger steering effort like the 70s mopars I’ve had. Sorry for all the wordy thinking out loud and thanks again for helping out.
-
Thanks Bisquik- that might be the way to go? Or maybe it’s ok? Hafta mess with it more. Once I make a plate so the bottom of the column can bolt solid to the firewall I’ll really be able to see and feel how it acts before I finish making my connections. On mine I will be pinning and welding into the stock stubs as well, leaving one disconnect at the top of the new U-joint for disassembly or rod end replacement. I’m still claiming victory for getting the idler bracket fabricated and getting all the working angles as obtuse as possible, but I have more questions than answers about will this work...
-
Ok so I google-fu’d this- maybe I’m ok but I should probably figure out if the new u-joint needs to be turned 90°

-
Wierd! Good eye fellas thanks for watching my back! I didn’t even notice that or think to check- DD rod can only get installed one way right?! I went out and took pics and found one of the stock dakota setup- turns out it was 45° out on the stock dakota. Hafta ask ma mopar about that head scratcher. Here’s a pic stitch- the original column and linkage on the left, two details of the suspect 45° DD clocked isolator with u-joint and female rack and pinion shaft splines, then the stuff I added plugged into to the column which is 90° out- dunno if that needs fixing. So all I changed was to bend the routing around the header- the phase is still the same as it was stock on the 1989 dakota. Which isn’t to say that I have it all figured out and it’s fine! I didn’t even think to look at the phase but now I’m just confused. I understood the concept in the video already but it is a really good demonstration. I need to take this question to some folks that are smartener than me. Y’all definitely qualify if anybody has guesses or knowledge. You’re certainly better observationalyzers!

-
Also my moog springs came in. The first side was a pain to install- the spring compressor kept getting in the way and it was too long to just pry into the relaxed lower control arm. I ended up squeezing it up into the spring pocket using the spring compressor through the upper shock hole, going back and forth jacking up the UCA and compressing the spring until it popped home. Even with it strapped to the chassis and me safely away from it I didn’t like how the compressor slipped free when it popped home. With the truck set down on one old spring and shock and one new spring and shock I jumped on it a bunch to settle and test it. It is a touch higher on the new side but way stiffer in a good way! The passenger side is now safely disassembled and I get to clean and re-bush and ball joint the control arms. Of course the lower ball joint stud didn’t pop free of the knuckle until I warmed it with the ox/a torch. I made a pickle fork into a banana trying to pop it. The upper ball joint was the same as the other side- torched rippin hot and 6 foot breaker bar to budge it. So the steering shaft and column is all scienced out and the suspension rebuild is 3/4 done- it seems like I didn’t get much done but it was a pretty good day.

