


thebelvedereman
-
Posts
360 -
Joined
-
Last visited
-
Days Won
3
Content Type
Links Directory
Profiles
Articles
Forums
Downloads
Store
Gallery
Blogs
Events
Everything posted by thebelvedereman
-
I'm thinking down the road to convert to 12 volt with an HEI distributor, but just don't have the money to Shell out right now
-
Has anyone converted there Hardline vacuum advance to a rubber line advance, I've got an Autolite distributor in my 1948 Dodge, with the metal line Advance that bolts into the carburetor, I'm switching to a 32-36 carb from Langdon, and I'm pretty sure my vacuum advance is shot anyway, I was just wondering if there was a direct replacement soft hose vacuum advance for my distributor
-
Mine were really bad, dried out and cracked, and missing a whole bunch of the rubber, I took a flat chisel and chiseled the rest of It Off, and then hit them with a grinder and wire wheel, then I painted them with por-15, and then I put on 5 coats of spray on bedliner
-
Here's how mine turned out after the spray-on bedliner, I'm still waiting for my carpet which has been on backorder for 2 months, to install them in the car

-
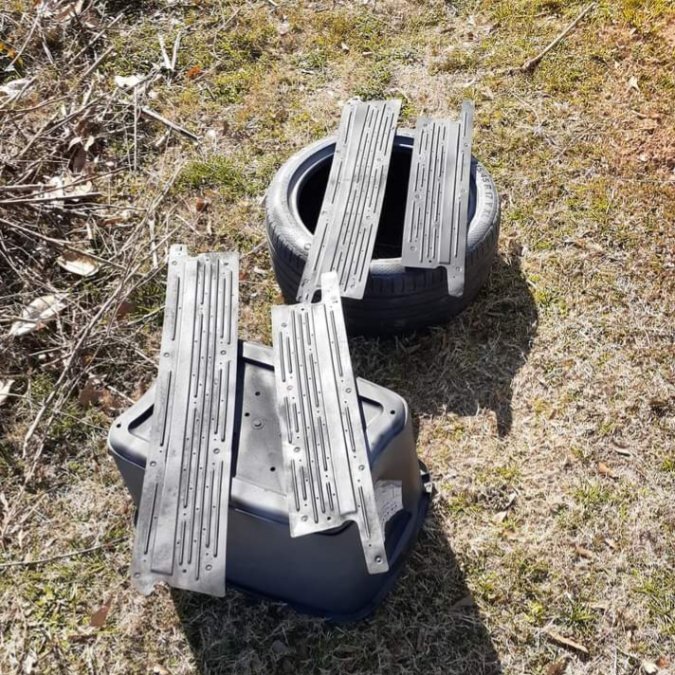
I'm sorry I hijacked your post a little bit LOL, that rubber looks like a really good idea, I actually just got done rebuilding my own sill plates, because I definitely didn't have the $600 for the new ones, the rubber was completely shot on my old ones, but the metal was still good, so I stripped off all of the old rubber with a wire wheel, then I painted them with por-15, then put five coats of spray in bedliner on them, they definitely don't look anywhere near is nice as the real ones, but they also only cost me about $30 total
-
These are the kicker panels, I plan on just screwing them on with the Chrome self tappers

-
I'm terrible at doing stuff like this too, but it was actually pretty easy and straightforward, I got the backer board from Home Depot, I probably could have got away with one 4x8 sheet, it would have been really close, but I also needed some to make new kicker panels, then I just took the old door panel laid it on top, traced it out with a sharpie, and put the Sharpie also in all the holes for the clips that hold the panels on, then I just cut them out with a razor knife, and used a drill bit to drill the holes for the clips, then I just got some 3M spray glue, and some cheap flannel material from Amazon, I think it was like $7 a yard, and just took a bit of time, and a lot of patience to get the material on fairly straight, it was a giant pain in the ass to put all those clips in, and make sure they were lined up perfectly with the holes in the door, so I cheated on the front, the rear ones are done with the original clips, but the front ones I just got some self tapping Chrome screws, and mounted them that way
-

-
I just made my own door panels for my 1948 Dodge sedan, I bought two sheets of 4 x 8 backer / panel boards from Home Depot, they were $19 each, I used the old door panels as templates, and they worked fantastic
-
Any chance you would have a part number on a Chinese yf or yfa that would fit our cars, also what are you doing about the linkage, just wondering, I've never even heard of yf
-
I just looked up the carburetor on Mike's carburetors, and that's exactly what he's doing, he's getting the carburetor from Daytona at dealer price, and then adding $100 to it, and selling it as his own
-
I honestly have no idea, I've never heard of Mike's carburetors, but I know Daytona are the makers of the carburetor, so if Mike's is selling them, he's just getting them from Daytona and renaming them
-
I've used langdon's Weber on a few of my cars, love them, but I recently came across Daytona carburetors, they have a replacement one barrel that basically bolts right on and uses the same linkage and everything, and they're supposed to be very good quality carburetors, it also has an adjustable main jet I contacted them and priced it out, and it's $299 which isn't great, but it's not that bad either, think I might give them a shot next time I need a carb , https://daytonaparts.com/universal-replacement-carburetor.html
-
I also rebuilt the sill plates, the rubber was completely shot, but the metal was still in excellent condition, and I don't currently have an extra $600 for a new set, so I hit them with my grinder and wire brush, then I coated them with por-15, and then I put 5 coats of spray on bedliner on them, they turned out really good, and cost about $30 total, I don't have a picture of them finished, but here's a picture of right after por-15
-
I might por-15 it, it's actually mostly dirt, the floor pan is beautiful, and has mostly original paint on it I really don't want to cover the original paint

-
It's been awhile, I don't get to the Forum too often, I've been slowly turning my d24 into a cruise night car, made myself new door panels, new kick panels, painted the dash and the steering column, new Wing window glass, and I started to sand the car down to get ready for paint, but then I found the original paint / primer underneath the horrible white paint that someone put on with a paintbrush, it's not in the greatest shape, but man does it have some cool looking patina, so I decided instead of painting the car, I'm just going to strip off the white paint, and Preserve what's left of the original with penetrol, I already have the roof done, anyway getting to the point of my post LOL, what paint do you guys use to restore the red on your hubcaps, I was going to use the original dog dish Dodge hubcaps, but they're pretty rough, but I have a really really nice set of 1950 – 1952 Plymouth hubcaps that I got from Plymouthy Adams about 14 years ago, but the red is faded on two of them


-
Small Phillips screwdriver, pair of needle-nose pliers, push back the door panel and the little chrome trim ring as allbizz49 said, push the end of the pin with the Phillips then pull it out with with the needle nose pliers, I should have took a video because I just did this yesterday when I took off the old door panels and put the new door panels on that I fabricated on my car
-
Floor shift concepts for Mopar column shift Transmssions
thebelvedereman commented on timkingsbury's blog entry in Keeping Up with the AoK boys
Cool , do you want to sell the Ansen and do you have any pictures, thanks -
It does
-
A little update I went out and messed with it a little in between raindrops, yes it was the relay / breaker on the back of the headlight switch, I took it apart took the wires off cleaned everything up put it all back together and it seems to be working okay, why it was drawing to the positive side I don't know, I thought maybe the generator polarity got reversed like someone said, but I checked it out with my voltage meter It is charging and it is reading towards the positive side, and it still runs when I disconnect the battery cable , and the ammeter goes to the discharge side when I turn the lights on without the car running, so I really don't know, but it seems okay, there is tons and tons of original wiring under the dashboard much of it is bare and crumbling, I will slowly rewire everything in my spare time
-
I just reworded it so it is less confusing, it was doing it as soon as the battery was connected, whether the car was running, or not, whether the ignition was turned on, or off, it just happened to be running in the video, it started out of nowhere yesterday after I started the car, and was still doing it after I shut the car off, and then I disconnected the battery, and reconnected the battery and it started doing it again, and then I disconnected the battery and went in the house, I came out a few hours later after I had finished the other things I was working on, connected the battery and it started all over again, I then crawled under the dashboard and started looking around and every time the ammeter pinned Sparks flew out of a small relay box so I tapped it with a screwdriver handle a few times and it stopped, it was too dark to see what the relay was connected to so I disconnected the battery again and went back in the house
-
As I stated before, it was doing it as soon as I hooked the battery up, running, not running, ignition turned on, and ignition turned off, it did exactly the same thing, but also as I stated it was a stuck relay under the dash that was causing the problem, after I traced where the noise was coming from and gave it a few taps with a screwdriver handle it stopped immediately, it was too dark to tell what relay it was, I'm going to check it out today
-
It's not wired wrong, it's been running perfectly since I put it back together, this just started today out of the blue, and like I said it was a stuck relay , I actually leave the battery cable off all the time, thanks though
-
So I just went out into the Dark night and messed around with it for a little while, didn't start it, just hooked the battery back up, climbed under the dash and followed the clicking noise, I should have brought a flashlight LOL but it turned out to be some type of relay or something that everytime it clicked Sparks shot out, I hit it a couple times with a screwdriver and it stopped, couldn't tell what it was hooked up to because it was too dark but I will investigate tomorrow during the daylight ?


