


Jocko_51_B3B
-
Posts
430 -
Joined
-
Last visited
-
Days Won
3
Content Type
Links Directory
Profiles
Articles
Forums
Downloads
Store
Gallery
Blogs
Events
Everything posted by Jocko_51_B3B
-
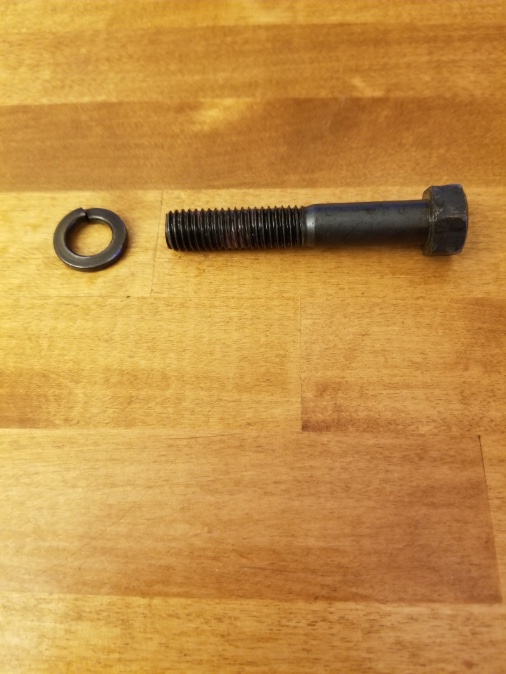
Bill, Thanks for the link to 10 tricks engineers need to know about fasteners. I will use the split washers just because Dodge put them there, but the article certainly calls their effectiveness into question. Not to start a side discussion about split washers, but if the theoretical purpose of split washers is to dig into both the bolt head and the work piece thus preventing loosening, then placing a flat plain washer under a split washer (which I see being done sometimes) to prevent digging into the work piece would seem to make the split washer even more ineffective.
-
Unfortunately I found coolant in the bottom of the oil pan and traced it to a cracked block. To make a long story short I found a good replacement block but upon disassembling it I discovered that all eight main bearing cap screws had split washers under the screw heads. Should they be there? Won't split washers affect the torque readings? I'm wondering if the washers were added by a previous owner. (The pistons are .030 oversize so work has been done on this engine before.)
-
Splash Shield Extension Rubber Seal
Jocko_51_B3B replied to Jocko_51_B3B's topic in Mopar Flathead Truck Forum
DCM Classics has something similar as well... https://dcmclassics.com/dust-and-air-seals/222-rw-186-door-windlace-black-or-brown-kit.html?search_query=186&results=3 Here's a photo from DCM's site: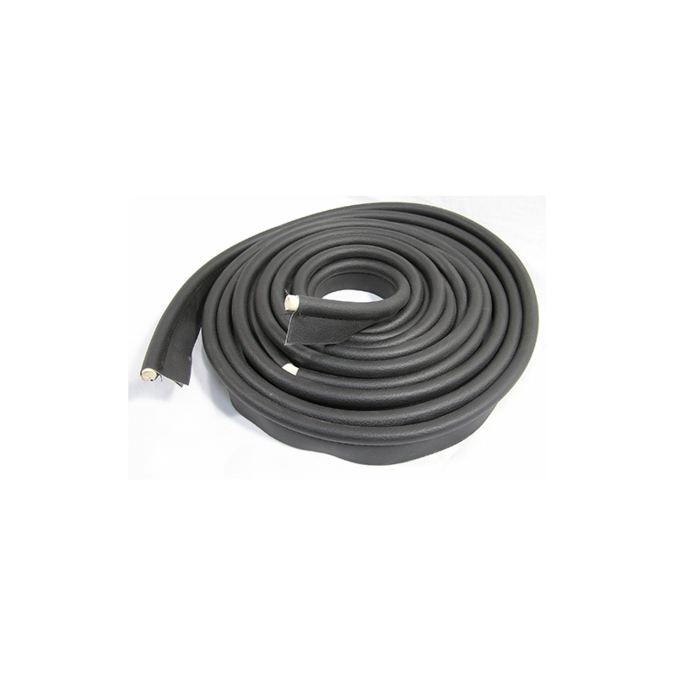
-
Splash Shield Extension Rubber Seal
Jocko_51_B3B replied to Jocko_51_B3B's topic in Mopar Flathead Truck Forum
I found it. Roberts has it. The round core is solid and the rubber-coated flange material is very similar in texture to the original Dodge material. This is the same stuff that came with my b3B when I bought the truck. https://www.robertsmotorparts.com/black-windlace-2-doors-dodge-trucks-plymouth-trucks-fargo-trucks-1928-1947-chrysler-dodge-desoto-plymouth-cars-1948-and-older-when-used-1-1 Here's a picture of it from Robert's website: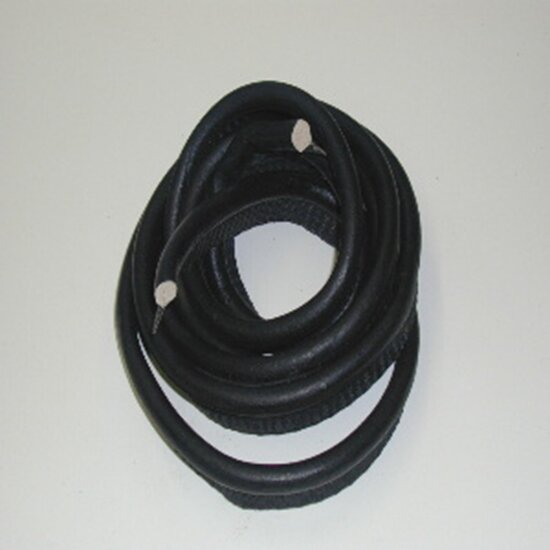
-
Splash Shield Extension Rubber Seal
Jocko_51_B3B replied to Jocko_51_B3B's topic in Mopar Flathead Truck Forum
McMaster-Carr has a solid round seal with a flange that might work, but it's not really like the original. https://www.mcmaster.com/rubber-seals/flange-mount-rubber-seals/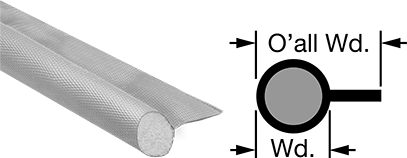
-
Splash Shield Extension Rubber Seal
Jocko_51_B3B replied to Jocko_51_B3B's topic in Mopar Flathead Truck Forum
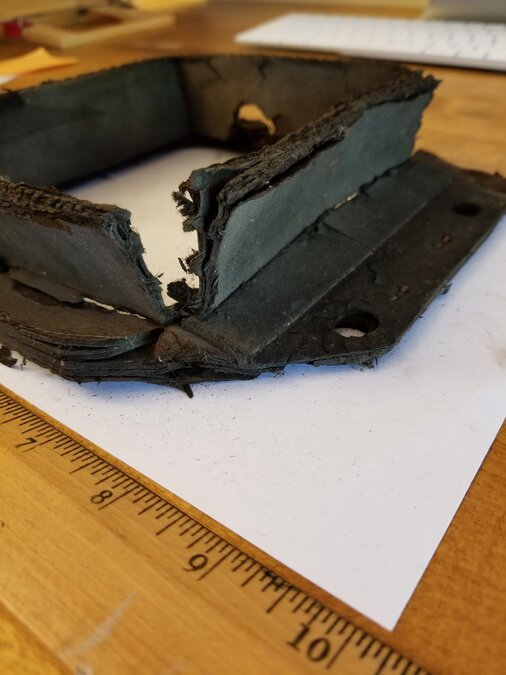
Here's what the repro material looks like. The pieces I have came with my B3B. The PO didn't tell me where he got them. Maybe someone on this site knows where to get it.
-
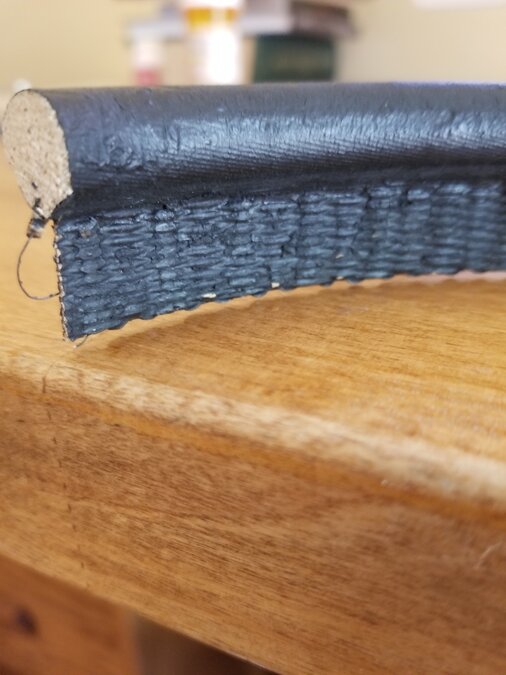
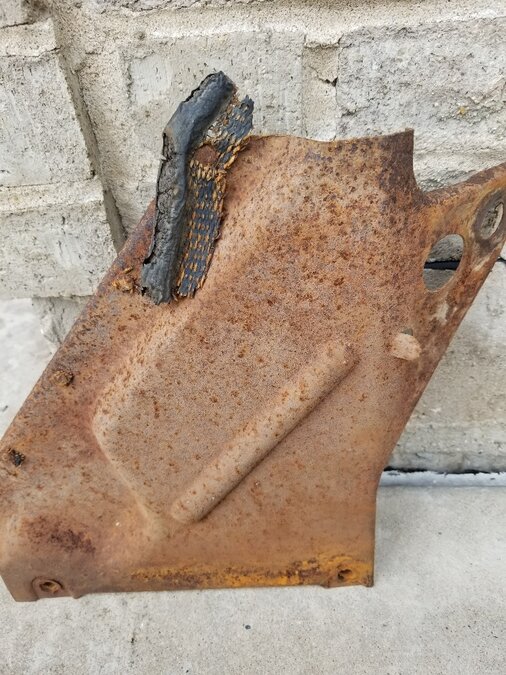
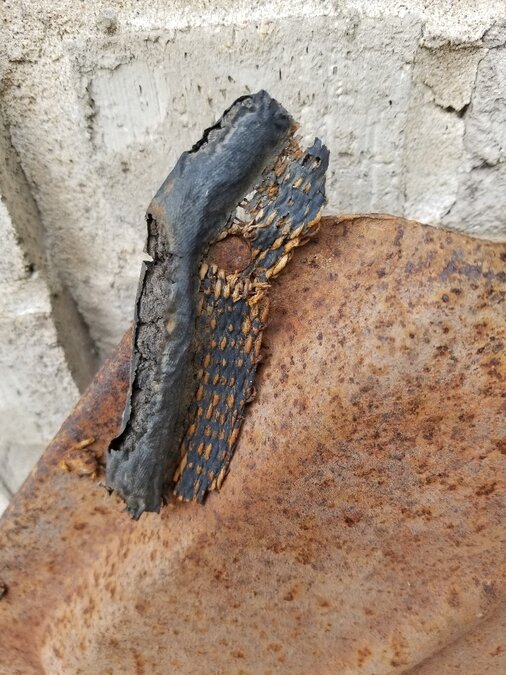
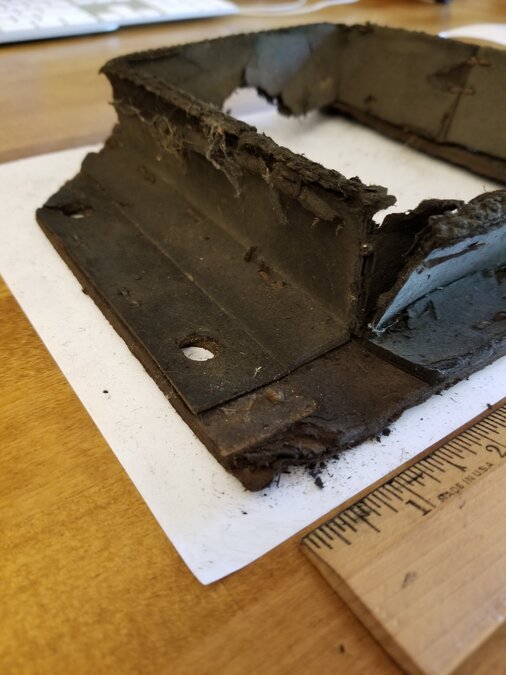
I took a rusty old splash shield extension from a '52 B3B parts truck and I noticed something interesting. The old extension has a piece of the original gasket material still split-riveted to it. It is hard to tell what this material is actually like from the picture in the parts manual, but here is a real life original sample. It has a loli-pop cross section. The round part is solid. The flange is a rough rubber coated material. There is a close reproduction material made. I have a couple pieces of it, enough to do the splash shield extensions.
-
53 Dodge pickup questions from a novice.
Jocko_51_B3B replied to 53dodgegirl's topic in Mopar Flathead Truck Forum
A fresh air shroud was included with my Model 65. It looks like it fits perfectly between the heater and the firewall. The holes match up with the holes in the firewall. The shroud I have is falling apart but I kept it as a reference piece in case I can somehow fabricate one in the future. It appears to be made of a very flimsy cardboard material stapled together. There's no way this type of thing could last more than a few years IMO. If I had all the pieces needed for the kit, I might try fabricating a new shroud out of 18 or 20 gage sheet metal along with a spongey edge of some kind to make it air tight.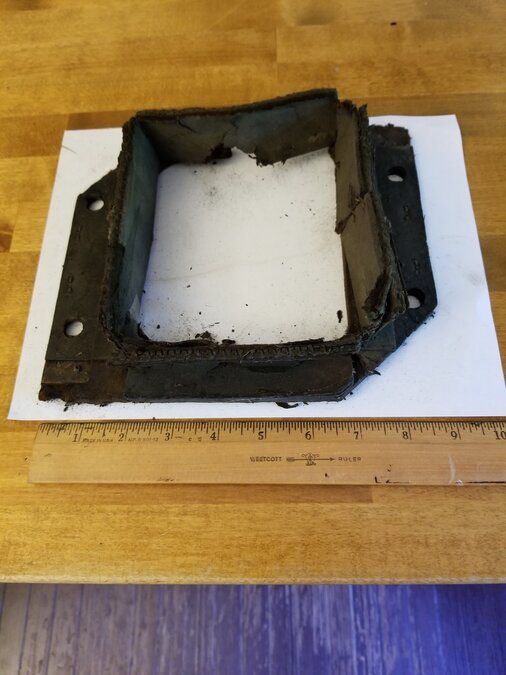
-
53 Dodge pickup questions from a novice.
Jocko_51_B3B replied to 53dodgegirl's topic in Mopar Flathead Truck Forum
It looks like you've got a nice solid truck. I hope you keep it close to original. The fact that it runs is great. The old style turn signals on the front fenders are another plus. Of course the front bumper is not original nor are the wheels from what I can see. If you're a purist, original wheels do come up on eBay sometimes. Most of the Pilothouse trucks do not have rear bumpers because they were optional. Your engine might be original based on the appearance of the thermostat housing. Your engine has the internal bypass cooling system, an improvement that was introduced in 1951. Your bed sides are the low version which is rarer than the high side beds. Your front parking light housing on the passenger side (the only side I can see) is original, but the lens and lens door have been replaced with something else. I believe the original lenses were all clear glass, but I could be wrong about this. When I bought my Pilothouse five years ago I didn't know very much about it. This site was a great help. I also bought a copy of Don Bunn's book, "Dodge B-Series Trucks" which contains a wealth of information that you will find not only useful, but very interesting. When it comes to finding parts for your truck, sheet metal is the biggest challenge. There are few reproduction stamped sheet metal parts except for bed sides, bed front, and tailgate. Most everything else must be found second-hand and repaired if necessary. New engine parts, brake parts, etc. are much easier to find and there are a number of good sources. Check out this thread: I rewired my '51 B3B with a new harness from Rhode Island Wiring. I've gotten engine and brake parts from Rock Auto and several other sources on the above list. I had my steering box rebuilt by Lares Corporation (But go through Rock Auto for this. It's much cheaper than sending a steering box straight to Lares.) For all kinds of other parts I've needed, I've had a lot of success dealing with DCM Classics in Michigan, but I've also used Roberts, Bernbaum, and Vintage Power Wagons. -
splt windshield installtion
Jocko_51_B3B replied to ruff1148kr's topic in Mopar Flathead Truck Forum
I was able to do mine myself after a couple of failed attempts. What worked for me was to install both pieces of glass into the rubber molding on a table making it a single assembly. Then I positioned the whole thing into the truck from the inside. The assembly tended to fall back inside the truck so I took a piece of packaging tape and strung it across from the left to the right side window pillars just to keep it from falling back into the cab. From there I was simply able to monkey the rubber molding into position little by little mostly just using my fingers and then installed the steel moldings. If you use a rope to jimmy the rubber into position, I remember reading somewhere that the plastic string used in weed whackers works quite well and doesn't create a lot of friction when pulling it around the rubber. -
DCM Classics might have them.
-
Transmission Identification Question
Jocko_51_B3B replied to Jocko_51_B3B's topic in Mopar Flathead Truck Forum
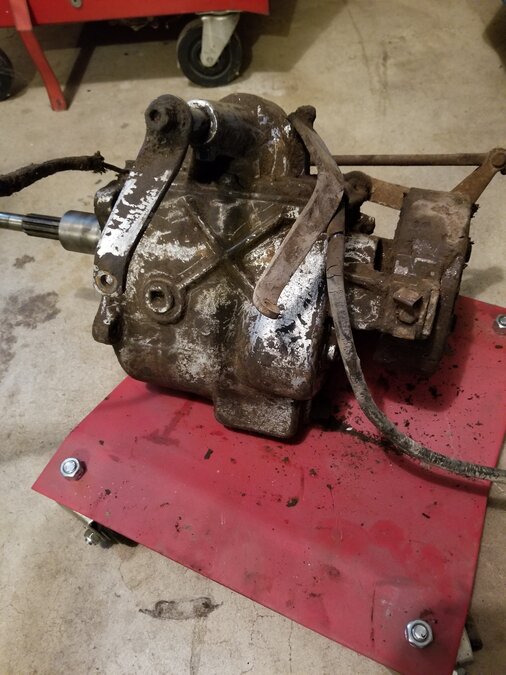
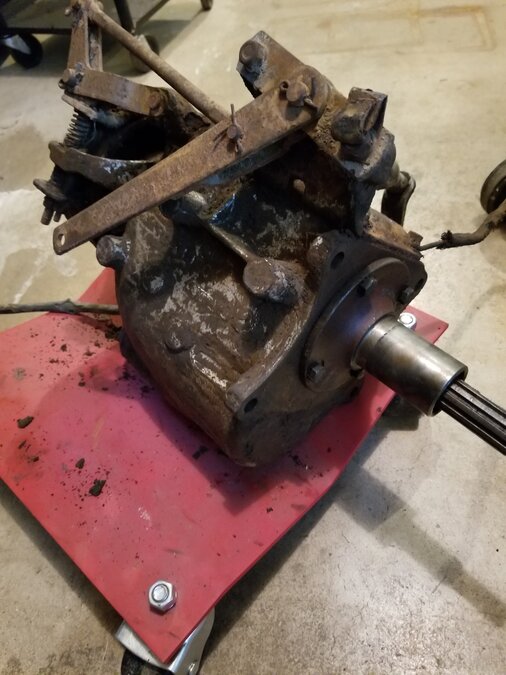
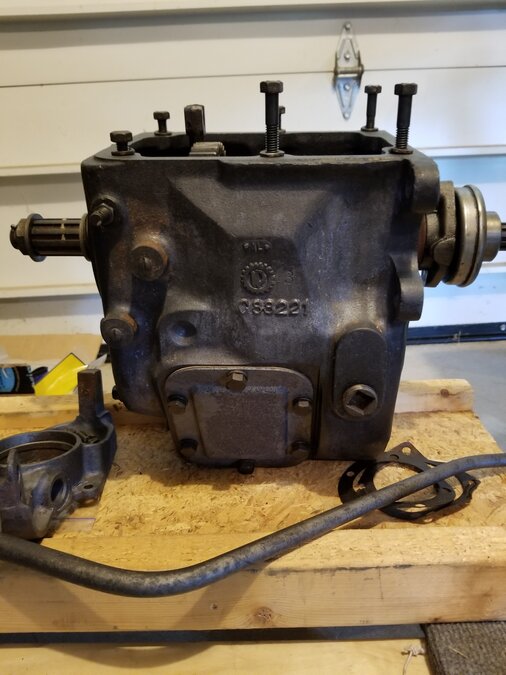
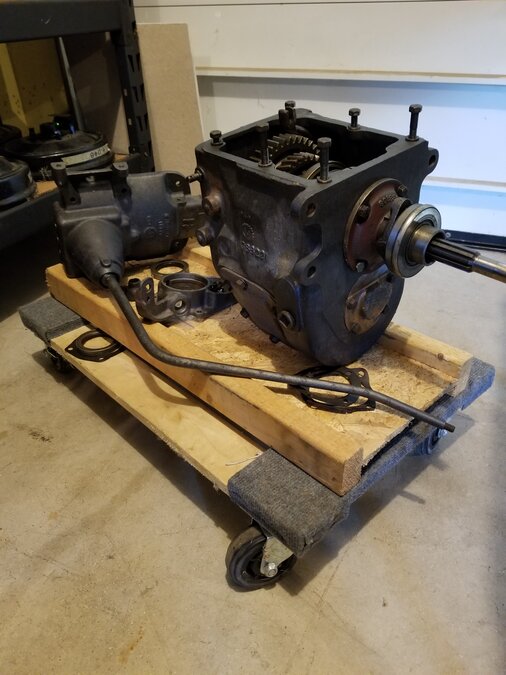
I agree, I was almost certain the first is a 3-speed and the second a 4-speed but I wanted a few other informed opinions. For kicks, I measured the lengths of both transmissions from the rear of the cast iron cases to the ends of the pinion shaft. The 3-speed measured 15 3/4 inches. The-4 speed measured 17 1/4. The reason I started this thread is because I'm pulling the engine on my B3B and I had a somewhat difficult time pulling the 4-speed transmission back far enough to be able to get the throwout bearing out of the way in order to drop the clutch and flywheel down and out. (I did finally succeed.) The extra 1 1/2 inches on the 4-speed makes the job harder. Now I'm wondering something else: Were all column shift transmissions 3-speed and all floor shift transmissions 4-speed? From what I've read it seems some owners get their transmissions out like 1-2-3 no problem. So I'm wondering if those guys have 3-speeds and if having a 4-speed always makes the job more difficult. I didn't want to pull the bell housing with the engine for several reasons: 1. It's big and heavy and probably harder to maneuver around everything else. 2. I would have to remove the brake and clutch pedals. 3. I would have to remove the steering column to get the clutch pedal out. 4. I would have to remove the steering wheel (and the turn signals) to get the steering column out. That's how I saw it anyway. -
The Dodge Truck Shop Manual talks about three speed, four speed, and five speed transmissions. Can someone identify the two transmissions I have? Are they 3,4, or 5 speed? Also, is reverse considered to be a "speed" or does "speed" always refer only to the number of forward gears? (I'm supposing it only refers to the forward gears.) Here's the first transmission which came from a '52 B3B with column shift. Here's the second one which came from a '50 B2B with floor shift.
-
I'm sorry to hear about the situation with your former wife. I can't think of anything more hurtful and dishonest. Best wishes to you in the future! But thank you for responding even though this thread is as old as it is. It would be nice if a comprehensive list could be compiled of every Pilothouse spring including dimensions, material thicknesses, etc. That way in the future it would be possible to reproduce them once again or at least make it easier to find similar replacements. From quickly going through the other posts, I gathered the following: 1. Gas Tank Spacer: 1.25 inches long, 13/32 hole diameter, 1/32 material thickness 2. Gas Tank Rear Bolts: 3/8 fine thread 3. Gas Tank Springs: .575 ID 4. Throttle Spring 14-14-4 (two sizes): .380 or .440 OD. My motivation: I have several missing springs on my B3B. Having factory dimensions would make it easy to find similar replacements if not exact ones.
-
I came across this nine year old thread today for the first time and it helped me realize that I had mounted the back end of my gas tank incorrectly. (The rear flange of my tank was below the mounting bracket instead of on top.) I'll fix that mistake later. But what became of the SS spring project? If all that good information about spring and spacer sizes, dimensions, and materials hasn't disappeared into the dustbin of history, it would be great to collect it into one place for future reference. Maybe then it could be added to the technical section of the site? Does anyone still have this data? I managed to grab some dimensions from postings, but not everything. Is anyone still making the parts from SS?
-
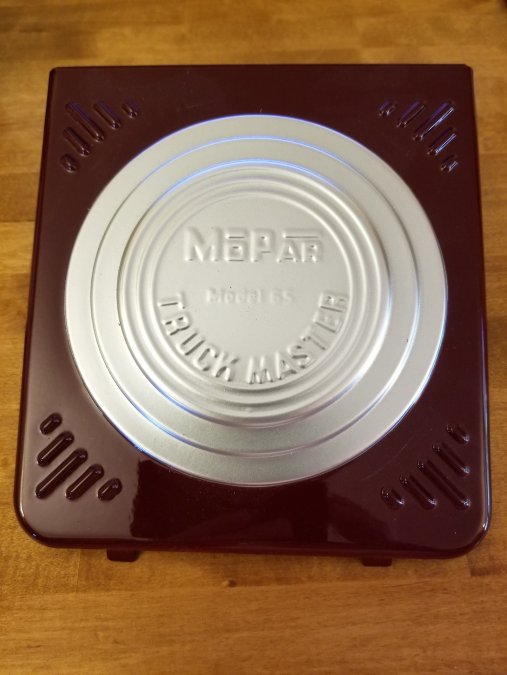
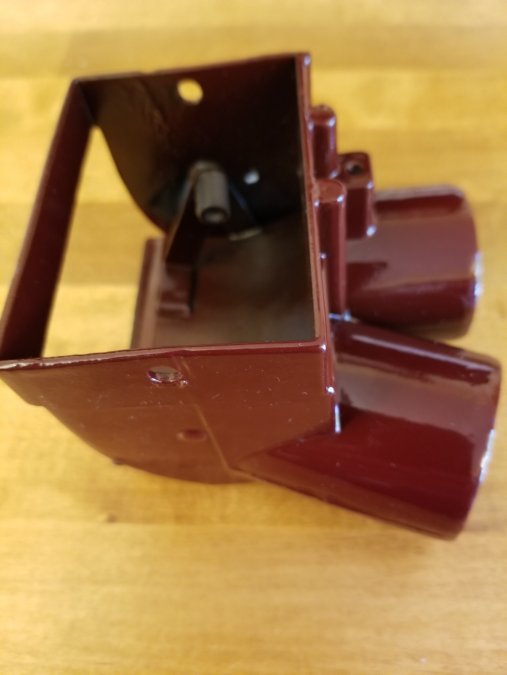
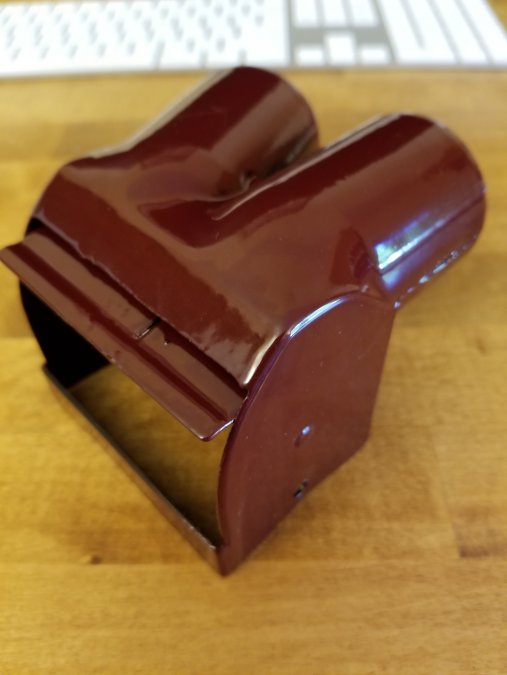
Model 65 Heater Defroster
Jocko_51_B3B replied to Jocko_51_B3B's topic in Mopar Flathead Truck Forum
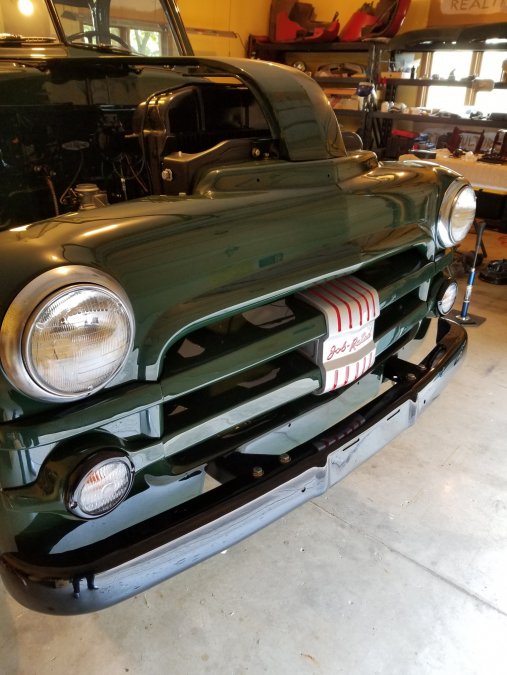
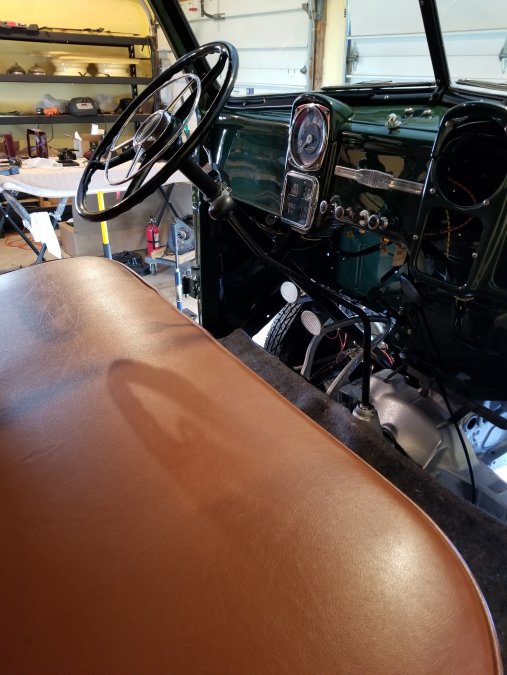
If my B3B had been in better shape when I bought it I might have kept it in a "patina" state of existence, but my truck was too far gone. It's been a five year rescue operation to be honest. The previous owner had painted it over with some gray stuff, the toe boards were missing, large holes were chopped in the rear fenders, the front fender brackets were rusted through (of course), original gauges were gone, brakes were totally non-functional, horn ring was gone, wiring was shot and needed total replacement, bed floor was trash, etc, etc. I had no choice but to take it back to factory original as much as possible. It's not 100% factory (none of them are I'm sure) as you can see from the tires. I also added turn signals. She's getting there...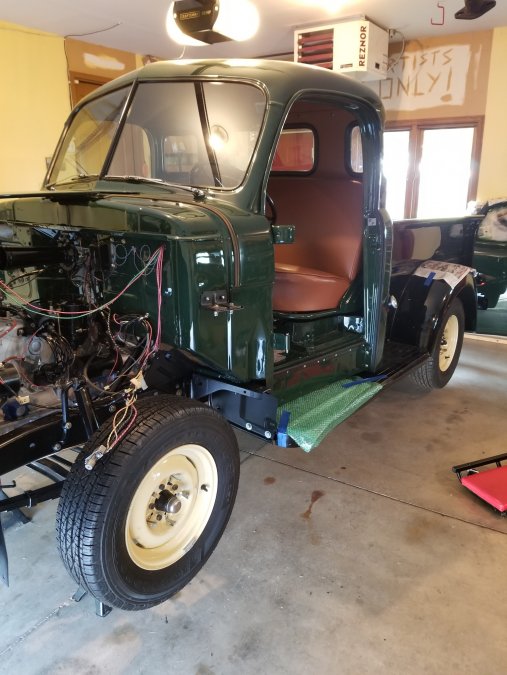

-
Model 65 Heater Defroster
Jocko_51_B3B replied to Jocko_51_B3B's topic in Mopar Flathead Truck Forum
Jeff, Thanks, good answer. I should have realized it's a diverter. I'm trying to put together a fresh air setup too. So far I only have the intake assembly so I keep checking eBay looking for a good valve, shroud, and hose support. As a side note I took my Model 65 to DCM Classics to have it disassembled and to have the parts blasted and repainted. I'm putting it back together at home in my garage. DCM not only supplies parts, but they also do very nice restoration work including sheet metal fabrication and paint. I really like their facility. It's clean, spacious, and well-organized. They're not paying me for my comments and I'm not an old friend or relative. Just offering my observations on the forum.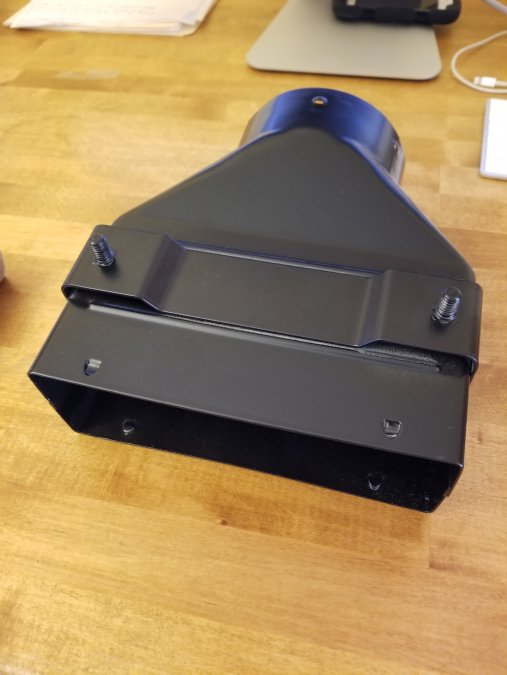
-
I have a Model 65 heater which I intend to install in my 51 B3B. I'm trying to figure out how the simple-looking defroster valve works. It seems to me the valve should open up when the defroster cable is pulled out and it should close when the cable is pushed in. From my perspective it looks like it would work opposite to that. Should the cable be threaded into the top of the hole in photo 2 or come up through the bottom? Should there be a spring somewhere to help close the valve or does the cable alone open and close it? I'm scratching my head on this one.

-
Starting my B2C restoration.
Jocko_51_B3B replied to Bdblazer1978's topic in Mopar Flathead Truck Forum
That water distribution tube is a real pain. It took me three days. Had the engine been worked on previously? Were the pistons oversize or original? Was the disc brake conversion difficult? So far I've kept mine stock mostly out of fear of messing something up. -
Old trucks with old front ends & old grease
Jocko_51_B3B replied to Los_Control's topic in Mopar Flathead Truck Forum
48 Dodger, That makes two of us, but me more than you. ☹️ I've watched most, if not all, of your videos and learned a lot. Now if I can just remember all that good stuff. Maybe I better go over 'em again so I don't reinvent the wheel. Jocko -
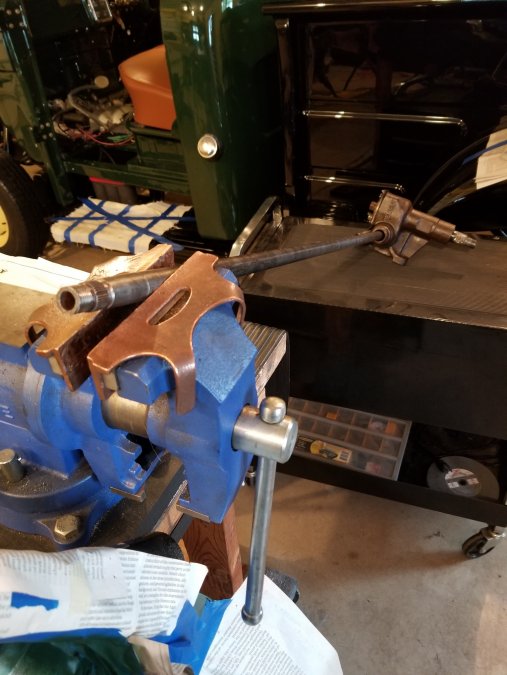
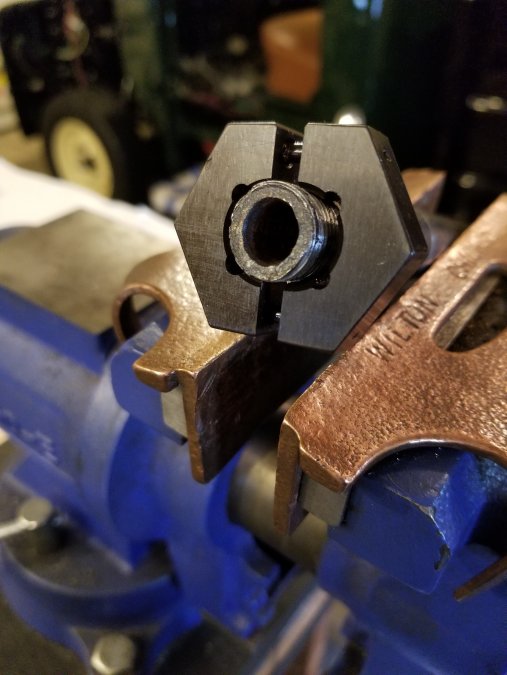
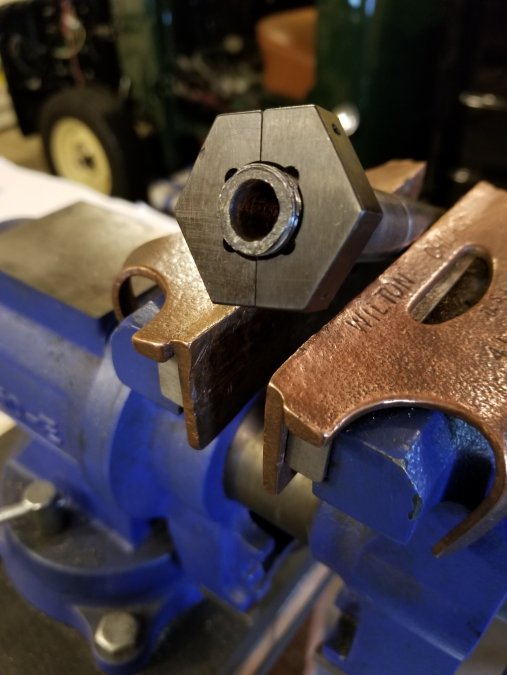
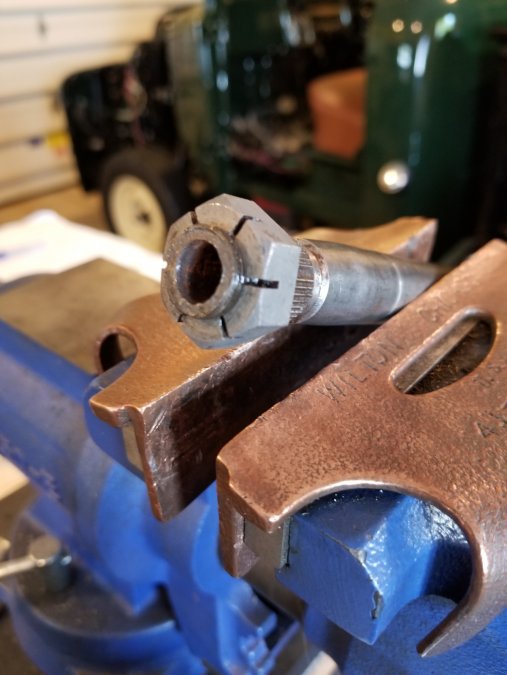
I have a used steering box and column I planned on installing in my '51. Unfortunately a PO must have taken a hammer to the threads at the end of the tube and worm assembly in an attempt (I guess) to remove the steering wheel. The end damage prevented the nut from threading onto the tube and worm assembly and I couldn't get a normal die onto the threads either. Mostly by accident while searching around on the internet for a solution, I came across a tool called a "split die" which I had never seen before. I ordered the correct size split die, put the die over the good threads below the damaged end threads, added a few drops of oil, and slowly worked the die back and forth toward the end of the threads using a socket and ratchet. The tool worked perfectly. Maybe this will help someone who has to restore damaged threads at the end of a bolt, shaft, or whatever. https://www.jmeinnovations.com
-
Clements Tailgate BBQ 14th Annual Event
Jocko_51_B3B commented on 48Dodger's event in Community Calendar
Brent, Yes I am going to try for 2021. I attended the BBQ about three years ago with my uncle who lives out in California. I'm still here in Illinois so it takes a little effort to get out there but seeing relatives, having a great time at the BBQ, and seeing all those Pilothouse trucks makes it worth the trip. Hope to see ya there! -
Clements Tailgate BBQ 14th Annual Event
Jocko_51_B3B commented on 48Dodger's event in Community Calendar
Thanks Tim. Looking forward to it. -
DJ, What can I say, but thanks! Yes, mechanical' sure is fun - and sometimes a little humbling' too.
-
I'm almost embarrassed to ask this question because I'm sure there's a simple answer to it, but right now I can't come up with it. I'm reinstalling my steering column, steering wheel, horn ring, horn button, etc. However, the horn wire path has me totally baffled. It looks to me like the wire from the horn button should go straight down the middle of the threaded steering shaft. But I can't see a way for it to exit the shaft at the bottom to be able to connect to the #14 green wire in my wiring harness. On the other hand, the steering column thin outer tube has a hole in it at the bottom where it clamps to the steering box. That hole looks like the horn wire should exit there, but how can it if it's inside the threaded steering shaft? Right now it's a big mystery. Can someone please straighten me out?

