Jocko_51_B3B
-
Posts
430 -
Joined
-
Last visited
-
Days Won
3
Content Type
Links Directory
Profiles
Articles
Forums
Downloads
Store
Gallery
Blogs
Events
Everything posted by Jocko_51_B3B
-
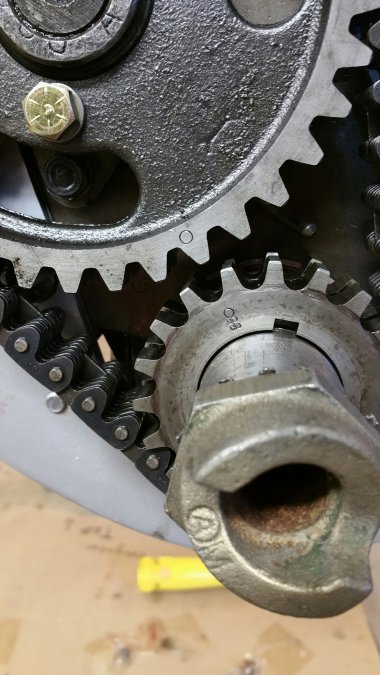
Merle, you're right. When I line my dots up like the picture below, it looks like my #1 is in firing position (going by how the cam lobes are positioned.) The #1 piston is now in firing position.


-
I'm rebuilding my engine and I apologize for bringing up yet another timing question. Please take a look at my pictures and let me know if I'm seeing things right.. I lined up the dot marks. The #1 piston is at TDC. But it looks to me like the #1 piston is NOT in firing position.


-
Paint - Base/Clear or Single Stage?
Jocko_51_B3B replied to Jocko_51_B3B's topic in Mopar Flathead Truck Forum
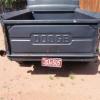
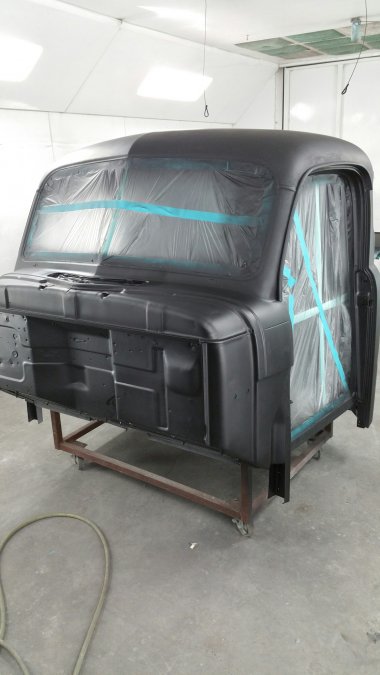
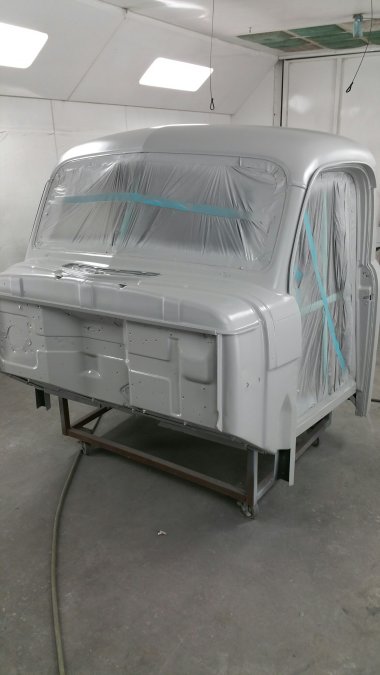
Here's where my '51 was at as of yesterday afternoon. The doors are almost ready for final painting too. I'm still doing filler work on the fenders and grill. The hood is in great shape and doesn't need as much attention. Haven't started work on the bed yet but it's going to be all black just like the factory made it. I had to buy replacements for the bed front panel and tailgate which weren't economical to repair. The front end color will be dark green. Green and black is how this truck came from San Leandro 67 years ago. The wheels are already painted in as close to original Dodge cream as I could make them. Of course before the cab got to this point, there was a certain amount of sheet metal and filler work. The passenger side of the floor was in the worst shape and I ended up replacing the entire passenger and driver sides. Earlier in the day I seam sealed the edge where the roof meets the back panel. Masked off the interior to avoid overspray... One coat of epoxy... Then two coats of high build primer...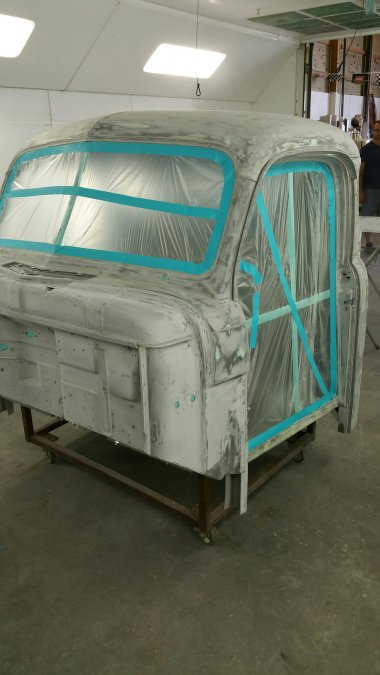
-
Paint - Base/Clear or Single Stage?
Jocko_51_B3B replied to Jocko_51_B3B's topic in Mopar Flathead Truck Forum
To answer the first reply to my original post, my very first search used the word "paint" and I realized right away how many replies exist that contain the word "paint", but I didn't see any replies that specifically addressed the question of comparing the two major paint systems. That's why I tried to be very specific in the title to my post. Although I am new to painting, I do know how to use the search function. Here's my situation. I have full access to a professional paint booth located in a professional body shop / classic car restoration business. My truck is located there now and I'm getting a lots of great advice from the owner, a friend of mine, who has been in business for over twenty years. Although I am new to car restoration, I have already spent many hours doing the filler work and sanding required to properly prepare my B3B for a very nice paint job. There were a few rust problems with my truck when I bought it. I have had all of those problems professionally corrected by having the bad spots cut out and replaced with new metal at the same shop. I have discussed the painting system to be used with the owner. He recommends BC/CC, but I want to consider all options before making a final decision which is why I appealed to other Pilothouse owners about their own personal experiences. I might or might not do the final paint. I've primed the doors and cab and am getting ready to prime the fenders and grill. So far, the priming looks great, but in the end, it's the paint that will be seen. I want to thank everyone who replied to my post but especially to those who replied with photos of their vehicles done in single stage. Those vehicles look great and I'm leaning toward SS myself. Thanks Again! -
I know it's a matter of personal preference, but I'm almost at the decision point regarding the type of paint to use on my '51 B3B. What type of paint have other Pilothouse owners used, and why did you choose it. Did you paint your truck yourself or have a professional shop do the work? Are you pleased with the outcome? Did you experience any problems? I've searched this site and haven't found any threads that really go into painting. I understand that each system has pros and cons. Any and all details are welcome.
-
austinsailor, How did your glass replacement go? Any updates or advice?
-
I'm rebuilding the 4-speed transmission in my B3B. The old bearings seem to be working smoothly but I want to clean them and replace the old grease. Can wheel bearing grease or multi-purpose grease be used or is there a special transmission bearing grease that is required? Also, any particular recommendations regarding brand or grade of gear oil for the transmission?
-
Will non-resistor spark plugs improve spark (and therefore performance) in our 218 flatheads? Is there a downside to resistive plugs?
-
You guys just solved a problem that drove me nuts for three days! I had bought one lonely standard brake line fitting just to see if it would thread into my rear brake cylinders directly. But nope. The fitting bound up after one turn so I knew the threads were mismatched. I figured the cylinder must have metric threads for some reason. So, yesterday I went running around to different auto parts stores looking for a metric thread for a 1/4 inch line. None were much help. I should have posted my problem here right away. I already have the brake hoses and, sure enough, the hose threads match the rear cylinder threads! All I need now is to get the adapters you guys mentioned. I bought my cylinders from Roberts so it's clear that Roberts, DCM, and Bernbaum are all getting their cylinders from one source (probably China). I'm going to call all three vendors and let them know that this situation exists. No one should have to scratch his head over something like this. Thanks Again Guys!
-
I'm getting ready to start making NiCopp lines for my '51 B3B and I'd greatly appreciate some advice before I order the fittings and line. Is 1/4 inch or 3/16 inch line correct? More importantly, I've replaced the front and rear wheel cylinders with new ones (from a source in China no doubt). Does anyone know the thread SIZE and TYPE (metric or standard) of the brake line fittings that screw into these new cylinders?
-
Crank Pulley Install Question
Jocko_51_B3B replied to Jocko_51_B3B's topic in Mopar Flathead Truck Forum
Making a tool to press on the pulley (or hub) looks like a good way to go. Two questions: 1. What diameter threaded stock was used to make the tool? It looks to me like 1 1/8 is close but I want to be sure before I order the stock. 2. How do you prevent the crank from turning as the pulley (or hub) is being pressed on? (I thought about heating the pulley as a previous post suggests, but I'm concerned about how that might affect the timing cover seal.) -
Door stays
Jocko_51_B3B replied to Brent B3B's topic in Dodge Truck Purists's Dodge Truck Purists Forum
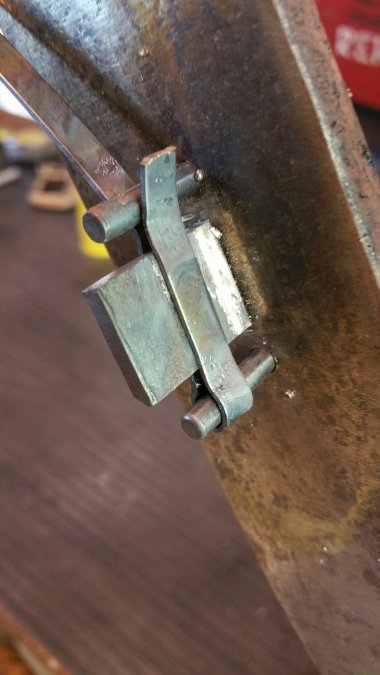
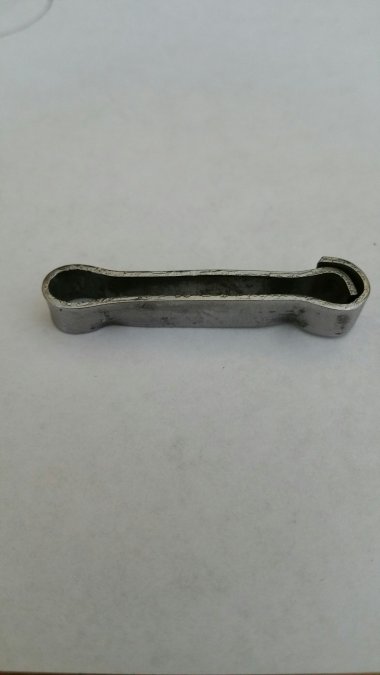
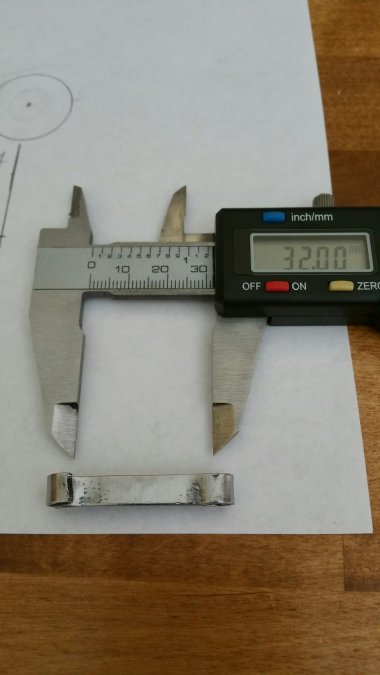
I decided to fabricate a clip myself using .042 thick spring steel (1/4 in. wide) from McMaster-Carr. The .062 material seems too thick to me. I asked M-C about getting a foot or two of sample material (which they wouldn't do), but they did something even better; I had to buy the whole 25 ft roll but M-C promised to take back what I didn't use and refund the money for the returned part of the coil. Can't beat that. Trying to find a shop to make the clips just sounds too hard. Most shops want big jobs. Anyway, here are a few pictures to show my approach. I drew up a simple schematic of the clip with my best guess as to the correct dimensions of the clip. The end result isn't perfect, but I think it will be close enough to hold the door open and stop it from swinging too far.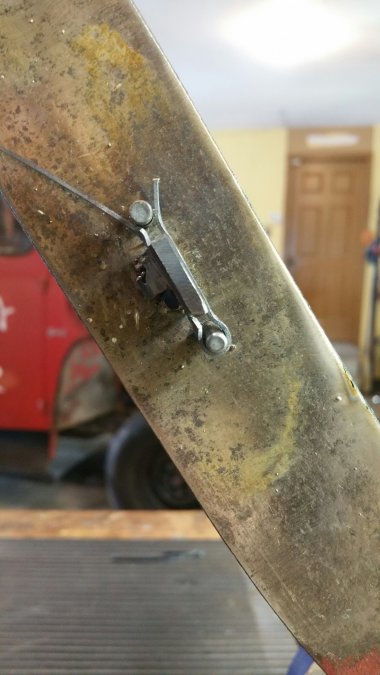

-
My new project: 1951 Dodge B3B 5-Window
Jocko_51_B3B replied to itek4bux's topic in Mopar Flathead Truck Forum
You found lots of 16" 5x4.5 Dodge wheels on Craigslist? I don't need any wheels, but which city are you finding them in. I thought they were rather hard to find. Also, original hub caps do come up on eBay now and then, but the trick is finding all four in good condition. Reproductions are available for about $75 each. Good Luck with your new truck. It looks good. Hope you stay original! -
The cold adjustment was just to get the tappets "in the ballpark". I'll re-do them hot once it's running.
-
I was fortunate to not have the oil pan mounted and my engine was still on a stand. All I did was turn the engine upside down and rotate the crankshaft until each cam lobe was pointing away from its tappet. Then I adjusted each of the gaps. Should have thought of this to begin with.
- 6 replies
-
- 1
-

-
- valve stem
- cold tappet adjustment
- (and 5 more)
-
Crank Pulley Install Question
Jocko_51_B3B replied to Jocko_51_B3B's topic in Mopar Flathead Truck Forum
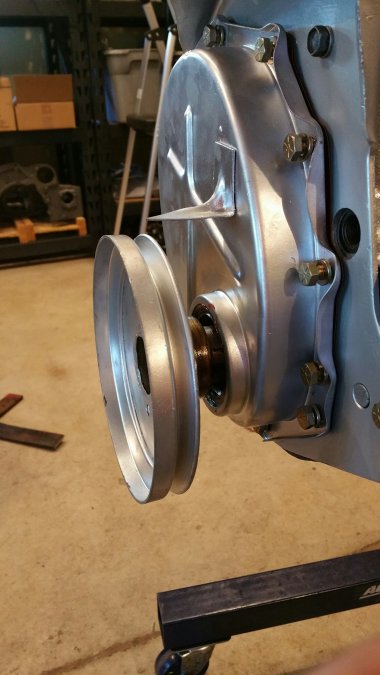
From Dodgeb4ya's pictures it looks like the bigger Dodge flatheads had the pulley bolting on to a hub (the part with the six tapped holes), but the smaller engines (like my 218) don't have a hub. Instead, the pulley is directly keyed to the crankshaft. Am I right about this? -
Crank Pulley Install Question
Jocko_51_B3B replied to Jocko_51_B3B's topic in Mopar Flathead Truck Forum
Dodgeb4ya, I see that your B3D engine is bigger than my B3B 218. My 218 only came with a pulley on the crankshaft. Yours has a much heavier looking flange with six tapped holes. Why the difference? I'm just interested, that's all. Thanks. And thanks to all who replied to my original post. When my new pulley arrives, I'll rig up a tool to press it on properly. -
Some PO beat on my crank pulley with a hammer so I'm ordering a new one from VPW. However, I noticed that the old pulley fits very tightly on the crank - so tightly that I would have to beat it on with a sledge hammer and a block of wood. Even then, I'm not sure it would go on. I'm wondering if Dodge designed these pulleys for an interference fit on the crank. Have other Pilothouse owners experienced the same problem? Another question: Are any special tools required to install the timing cover?

-
Fuel Sending Unit Erratic
Jocko_51_B3B replied to Jocko_51_B3B's topic in Mopar Flathead Truck Forum
I agree and if I ever find a NOS sender for sale I'll snap it up. The replacement I bought has China written all over it. For all kinds of reasons, we Americans better learn how to start making things here again. -
B3B Transmission Cover Plate
Jocko_51_B3B replied to Jocko_51_B3B's topic in Mopar Flathead Truck Forum
Sounds good. It seems that these plates don't come up for sale very often or I would have tried for the correct one. Thanks for the reply. -
The transmission cover plate was missing when I bought my B3B, but I found one in very good shape on eBay. Only problem is that the plate came from a '48, '49, or '50 and has the oblong hole in it for a floor mounted emergency brake handle. My '51's e-brake handle is under the dash. Does anyone have a photo of a transmission cover plate without that hole. Did Dodge put a plug into the hole for the last three years or simply stamp plates without the hole. I want to know how it should look if I decide to weld it up.

-
Door stays
Jocko_51_B3B replied to Brent B3B's topic in Dodge Truck Purists's Dodge Truck Purists Forum
That's a great suggestion. If I decide to try the thinner steel (.042) , I will definitely give it a try. -
I'm still in the engine rebuilding stage and it's time to do an initial cold engine tappet adjustment. After I get it running, I'll re-do the tappets hot. For now I just want them in the ballpark. How can I be sure the lobes on each cam are pointing straight down for each valve when I'm adjusting the gap? The book says the gap should be .014 cold for intakes and exhausts. ('51 B3B) I don't have the head on yet. Can cam lobe position be determined from piston height? Or timing gear position?
-
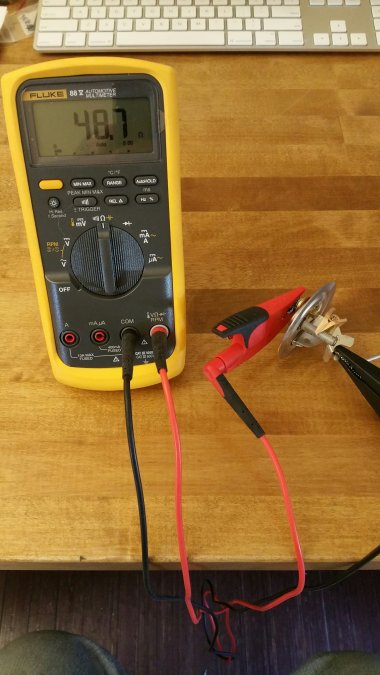
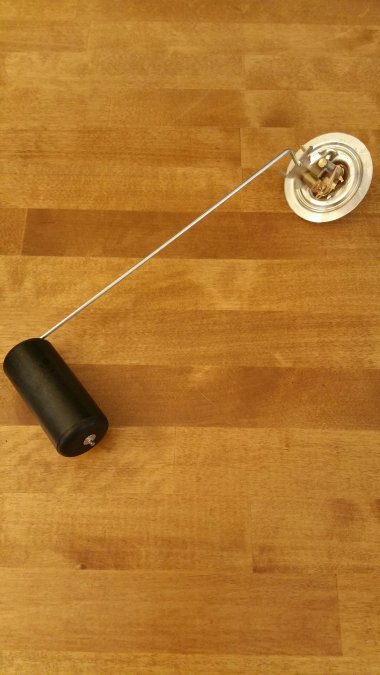
Here's what a fuel sending unit looks like inside. This post also shows why they can have problems...
-
I bought a brand new fuel gauge sending unit from one of the well known Pilothouse suppliers and decided to check it out with an ohmmeter before installing it. According to the supplier, the ohms for Pilothouse trucks should range roughly between 10 and 100 ohms as the wiper arm slides along the resistance wire. But all I got were completely erratic readings or no reading at all on my ohmmeter. I had purchased the part two years ago and the supplier wouldn't take it back so I decided to take the unit apart and see why it failed. There were two problems. First of all, the brass wiper arm was turned 180 degrees around and was making no contact with the coil of resistance wire! I turned the arm around to make contact with the wire coil. Second, the resistance wire was so loosely wound around the white nylon insulator that when the wiper arm moved up and down, the wire would move around with it! Because the resistance wire would not stay put, of course the resistance readings were totally erratic. Here's how I fixed it. First, I poked around on the loose resistance wire to try to space it out more or less evenly. Then, in order to prevent the wire from moving around, I got some crazy glue from Ace Hardware and dropped a bead along the bottom of the wire coil (opposite where the wiper arm contacts the wire of course). After that, I retested the unit and now get smooth variation from 10 to 86 ohms which should be close enough. I am not sure if most sending units work this way, but if they do, poor quality control in manufacturing can definitely cause erratic fuel quantity readings from brand new sending units. Is anything made with quality in the good old USA anymore?