


James_Douglas
-
Posts
1,923 -
Joined
-
Last visited
-
Days Won
23
Content Type
Links Directory
Profiles
Articles
Forums
Downloads
Store
Gallery
Blogs
Events
Everything posted by James_Douglas
-
Perhaps the webmaster will post this in the tech section. I have posted it before, but here it is again. I adjust my car to idle at about 475-500 rpm in gear with the fluid coupling. The various comments on fluid are all in various ways not correct. Read below. James Technical Note on MOPAR Fluid Couplings (Fluid Torque Couplings are NOT covered by this Technical Note) By James Douglas – San Francisco Having run several types of oil in MOPAR “Fluid Couplings” over the years and heard many recommendations, I decided to see if I could approach the issue of what lubricant to use in one of MOPAR’s Fluid Couplings by a more scientific method. As is well known, Chrysler instructed all owners to use “MOPAR Fluid Drive Fluid” only in their Fluid Couplings. Problem is, MOPAR stopped making it decades ago. My first stop was Chrysler Historical. After a month of looking, I was told that they do not have any of the original engineering information as to the specifications of the fluid. Then I headed off into internet land to hunt down anything I could find on the subject from ORIGINAL sources. I managed to find an original Chrysler Question and Answer sheet from 1939 about fluid drive from Chrysler Engineering. In it they stated: “…The proper fluid is a low viscosity mineral oil, which also servers to lubricate the bearing enclosed in the coupling. The pour point is such that the oil will pour at the lowest anticipated temperature, and has no corrosive effect on the steel parts of the unit.” All well and nice, but not enough to figure out exactly what they used as fluid. Later in the same document they talk about the types of metal used and the carbon-graphite seal. Hum, carbon-graphite seal. I did some more digging for a few months and turned up a can of unopened original MOPAR Fluid Drive Oil. An analysis of that oil, and some more literature I ran across, stated that the original fluid was a pure-base mineral oil with a Saybolt Viscosity of between 100 and 150. The fluid had a Viscosity Index of greater than 80. The fluid had anti-foaming and anti-oxidation additives. It specifically did NOT have any seal swelling agents as these can attack the carbon-graphite seal and the copper in the bellows. This last specification eliminates most modern transmission fluids. After finding several formulas to convert Saybolt Viscosities to Kinematic Viscosities, it appears that the best match to the original specification is ISO 22 or ISO 32 oil. However, the ISO 22 is just below 100 Saybolt and the ISO 32 is much higher than 100 Saybolt. Based on a period (c.1947) Lubrication Industry article on fluid couplings that had the following admonishment: “Contrary to popular supposition any attempt to use a higher viscosity fluid would actually reduce the torque transmitting ability of the coupling since torque-transmission is dependent upon a high circulation of fluid between the impeller and runner and is not caused by any viscous drag between the two.” During my continued research on the history of the Fluid Coupling, I ran across the fact that the original company that licensed the fluid coupling technology to Chrysler is still in business and still making fluid couplings for industrial applications. After a couple of weeks of digging, I found a senior engineer from that company that would have a long technical talk with me on fluid couplings. In essence, he agreed with the period information I quoted above. He added that the lowest viscosity oil that would still provide for bearing lubrication is the one to use in theory. However, he did say that unless the fluid coupling bearing has been replaced and is know to be very high quality then err on the heavy side viscosity wise. Just don’t over do it, he stated. I was also told that normal hydraulic fluid does not have large amounts of anti-foaming agents in them as they usually do not have large amounts of air in the systems to foam in the first place. A fluid coupling is only filled to 80% and as such has lots of air in it. Therefore, when looking for fluid coupling oil, one must look for an oil that is a “Circulating Oil” which has a lot of anti-foaming additives in it. I was also informed that the additives tend to have a shelf life in the can, or in use, of 5 to 7 years and it should be changed at that time. I was also told that the couplings are actually somewhat permeable and water vapor will work its way into and then back out, when hot, of a steel fluid coupling. Very little amounts, but apparently is does go on. I was also told to never use engine oil or ATF as both would cause problems in the long run. Based on the research and discussions I have come to the conclusion that ISO 32 hydraulic oil with the proper additives and VI (Viscosity Index) above 80 is a suitable replacement for the original MOPAR fluid drive fluid. ISO 22 would be a better exact match, but only if the quality and condition of the bearing is know in a particular coupling. The oil I have identified that meets the specification, with a higher general viscosity to deal with the age of the bearings, is: Mobile DTE light circulating oil ISO 32. This oil is available at Granger. I have run this oil for about six months in San Francisco city traffic as well as up steep mountains on very hot days. The coupling works well. I have noticed, and other car people have as well, that the car seems to move out from a dead stop to 10 MPH better with the fluid. Only a before and after session on a dynamometer would tell for sure, but I feel that it moves out much faster. Classic car owners are advised to use this information at their own risk. I am not a fluid coupling engineer, a bearing engineer, or a lubrication engineer. I have done my best to find out what was in the original MOPAR Fluid Drive Fluid. This effort is in essence industrial archeology and should be carefully considered prior to use. As a post scrip in 2014. I ran across and old Gyrol book that talks about the filling of the fluid couplings. In short, how much you fill it affects the torque-stall curve. Chrysler set that by the position of the hole in the bell housing. However, if one is to fill it a little less or a little more one can change the curve. Do so at you own risk and never fill it past 90% so it has air in it to compress less you blow the thing up!. James Douglas San Francisco
-
Tod, You can always come up to SF and use mine...James
-
Congrats on the nice car. I have a question. By chance does the rear window (plastic) have a bottom zipper and come out? On my 1949 Desoto it appears that the original tops had zip out rear windows. I have a service bulletin on it. But, I have never been able to find an original top to get photos of it. Best, James
-
Hi Don, I have been busy with non-car things. I see that the electric will get in the way of the shift rod. In a year or so when I do mine, it should work as I am going to put in a torqueflite with push buttons... The drivers side heater box may be a problem though. ***** To the other guys asking about rack & pinion. I looked into it and I could not find a unit that had the "pivot" in the correct place so as to not have an issue with bump steer. I checked with the guys at flaming river and the other custom rack makers and non of them make one for a car over 3500-4000 pounds. A fully loaded Desoto long wheel base (LWB) suburban can top that. ***** The new electric assist I think will work for me, but as Don found out you have to do something about the shifter rod... Keep us posted with photos Don. Best, James
-
I REALLY looked into this. The basic problem would be 10 years down the road in some small town and having a engine hard part go. A long way to get parts...
-
Hi all, Thanks for all the interesting thoughts. I kind of like the idea or challenge of seeing if I can get a HP increase and more reliability-drivability using the stock block as a base. I was up in Santa Rosa, CA and ran across a local motor head and we talked about the issues. One thought was to talk to Earl Edgerton about his OV head and using that in a FI-Turbo set up. I think I will check in with him and see what he has to say about one of those heads. James
-
I did look into that as a possibility. The problem is the old bump steer. The inside ball sockets of a rack must be in the exact "right spot" and the pinion also needs to be close to the "right" spot to fit. None of the larger new truck racks have the geometry that is needed. But, thanks for thinking about it as not too many people know that they are making large racks. Someone else may be working on a project where the stock dimensions may be just right for their project!
-
-
Tod, I wonder if you used Inconel valves and...My friend Don with the T&C has a inline 8 on the floor. Interesting in that they used a series of tubes and pressure feed the lifters oil wise. What if one used the same idea, but pointed sprays at the top of the valve springs. This would oil the shafts of the valves and thus help pull away the heat. Perhaps the combination of modern valve material and the extra cooling would do the trick. Of course this is all speculation at this point. The pumping loss due to the restriction of the exhaust does not bother me as much as using a 4 to 5 pound turbo will no doubt make up for that. If you find that reference and it shows how much loss of power they had at higher rpms, do let me know. James
-
Hi all, Let me respond to all the thoughts. 1. Steering. It appears from my talks with Uni-Steer and Flaming River that the racks themselves are not built to take the loads of cars over 4000 pounds no matter what mounting one uses. All other steering boxes are to big to fit inside the frame unless you go to a front clip. The car does steer very good, so I am planning in using one of the new ELECTRIC power assists that splice in under the dash. (http://www.youtube.com/watch?v=UnIxjjSnDo8) 2. Brakes not an issue. Power Disc. Fronts on the car for years now. Rears done, waiting to go on car. Power booster on shelf. 3. Power. I know that there is only so much I can do with a flathead six. If I can get it a little more power and make it more usable with better cold starting and self adjusting over the mountains (Fuel injection) then perhaps it can be more livable in todays hurried traffic. Do remember this car is very heavy. 4. The exhaust heat. Leave it to Tod to find a real problem to be dealt with. I had not thought about the exhaust heat issue. That will need some reading and digging. With a turbo, it would make that problem even worse. The only thing I can think of at first blush is bronze valve guides and if I can find them sodium valves. This one item could be a project killer as far as swapping intake and exhaust goes. In general, I will not cut and put a new clip on the car. If I have to go that far, I will sell it and buy something like a 1955/6 Desoto with a V8 and go from there. I do like the '47 a lot and so I am trying to have my cake and eat it as well. James
-
Re-engineering a Flathead Six. So, after talking with Flaming River and Uni-Steer and FatMan... It turns out that nobody makes a power rack and pinion steering that is engineered to work with a car over 4000 pounds. All their people advise against it. Since my '47 Desoto Suburban is much more than that...I cannot do a V8 conversion unless I want to rip out the entire front clip to get a V8 in with power steering. Yes it can be done with a center pull rack, but not be safe. So, back to the drawing board. I need more power. I had a talk with a guy who has built a lot of motors. We discussed a very far out idea. I thought I would bring it up here and see what the collective wisdom had to say. A turbo charged computerized fuel injected flathead six. To overcome the issue of Siamesed Ports on the intake and the resultant problem with injector placement, what about swapping the intake with the exhaust ports? With the turbo, the flow should work with larger intake and smaller exhaust. With the ports swapped, the problem of the injectors is overcome. Making a CAM is no big deal nor making the intake and exhaust runners. There may be a scavenging issue with smaller exhaust and the peak torque would move up the RPM range. But with a torque converter with a modern automatic, that may be a wash low-end power wise. Anyone have any thoughts to this concept? Best, James
-
What I do is.... I have a guy that builds very high quality AM Modulators. These sit under the dash. They us an antenna "Y". They have a single mono RCA plug. You set DIP switches in the modulator. You set the radio to the frequency you set on the DIP, and you plug whatever you want into the RCA plug. I use XM radio or an iPod. Some of the older models of Delphi XM receivers were actually 6 volt. There is some outfit now making small units, but they are junk sound wise. My guy is a antique radio guy and his units have gain, compression, output and other controls so you can match the unit to your radios particulars. I use these on my 1947 and 1949 Desoto. All stock 6 volt. I have friends using them on 1930's & 1950's Cads. The units are not cheep at about $275, plus what ever you need to feed them. But a XM digital signal with that warm tube amplifier and when listening to "The Shadow" you would think it was 1945! If interested drop me a note at my email and I will hook you up. James
-
Anyone know of a 1946 to 1948 Chrysler or Desoto that has a V8 and maintained the original steering in it? I am looking to talk with anyone who has done this particular conversion. Thanks, James
-
A couple of people asked me some time back to post the Carter Jet Chart. I ran across it last week, it had gotten misfiled, while sorting through some stuff. Best, James

-
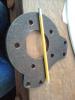
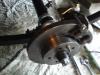
The TSM rear kit does not work on the late 1940's early 1950's MOPARS. They have not provision for holding the seal. I designed and made a plate and used the part of their kit from that plate to the calipers. I am using the eldo calipers with the mechanical built in parking brake. I had a set of cables made up by Control Cables in LA, using their junction plate between the single cable and the two cables to the wheels. I also had my machine shop do the following WHICH IS NECESSARY if you want the rears to work correctly: You need to take the rear hub (without the drum) and the axle and put it into a lathe. The nut needs to be tight and torqued. Then the face of the hub needs to be turned to be a parpendicular to the axle as possible. Then bolt on the rotor and make sure it is perpendicular as well. I also had my guy make two "rivet alingment bolts". What this part does is replace the alightment stud with a new stude with a small hole across it for screwing into and holding the rotor in place. It also allows you to hang the wheel until you get the bolts in. On my Desoto's the rear fenders hang down so low that with studs getting a wheel and tire on would be a pain unless the body is lifted up a long way. With the original bolts there is a bunch more clearance. The reason for the machine work is that the tapper on the axle makes getting the rotor to spin true an issue. If it has any runout left to right the brakes will pulse. I know of several shops that will not build kits to do rear conversions on these due to this issue. Once done, you have to keep the rotor and axle as a matched set. New rotor and you may have to do it again. One last thing. The mechanical advantage on the 1949 Desoto parking brake handle is not enough to lock the eldo calipers. I have power brakes on this car and I need to press the brake down and then pull the handle to get it to lock. Keep in mind I am in San Franisco and test this on a VERY steep hill. I am planning on making a bell-crank to increase the mechanical advantage. I just have not gotten around to it yet. My machinist may still have the rear plates in his computer. He jet cut them. Best, James

-
I have changed the seal three times and it still leaks. All of them are from Best Gasket which is what Egge sells. This engine has a NOS crankshaft which was checked and polished. It is the later block with the 2 part seal. I have sourced a NOS MOPAR and a NORS Victor 2 part seal. They are much more heavy duty than the Egge (Best) ones and are different design wise. I will get around in a couple of months to trying one of those. My 1949 Desoto with the engine rebuilt in 1963 by a big auto rebuilder hardly leaks at all. (the car sat from 1966 until the last few months). Go figure. James
-
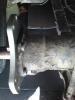
I have a very expensive water pump that was rebuilt by a shop here in northern California in my 1947 Desoto Suburban. The man that owns the shop is into Dodge trucks and had a run of brass impellers made that can be used in the MOPAR flathead pumps. They do need machine work to fit the particular application. (He runs a big pump outfit). These impellers seem to flow more at low rpm. Good in traffic and will never rust out. The only problem is that he will not sell the impellers. So you have to send him a core. You get a very good sealed shaft and bearing and the brass impeller, but it costs like $250. I did one and it has worked great for 6000 miles. HOWEVER, in the last week I pulled on the fan and guess what? It is moving. No leaks but something at the shaft level is not correct. I am pulling in when I get off the computer today. As to the hole or no hole issue. You can see below that my original 1947 did not have the hole and the NAPA (Airtex) does. I just welded up the hole and this type of backing plate has been fine for like 10 years.
-
In about 8-9 years we will be fully retired ---I hope. We plan on doing a lot of traveling around the US and Canada. We will be pulling a vintage trailer of some kind. We want to use the 1947 long wheelbase Desoto Suburban. The flathead six can do the job. However, the point of the traveling is to enjoy. The problem is that people with modern cars do not have a sense of grace. As such, they will be very impatient and do stupid things as we slowly accelerate with a flathead six and fluid drive towing a trailer. The mix of low horsepower and todays cars just would not make the driving fun. It would also be nice to have AC and be able to plug in the electronics without the usual issues with 6VPOS. SO, I am thinking of putting a V8 into the Desoto. I saw a very nice job of a SBC in a 1947 Plymouth yesterday. They did not have to cut the firewall or the inner fenders to fit it in. They used power rack and pinion steering. I could not tell if they had to make a new front floor board to clear the transmission. What I would like to ask of the people on the forum is the following: Would everyone over the next few months keep an eye out for people that have done V8 conversions on 1946-1948 Chryslers and Desoto's. If you see one, take any photos you can get of the engine bay and their steering arrangements. If you happen to get a chance to get photos of the underside and the mounts, cross members and the like that would be a plus. If you get anything, post them to this thread or email them directly to me at JDD@8bells.com. I want to see what others have done and add it to the mix for figuring out what I want to do. Thank you all, James
-
Here you go: http://www.jgrelining.com/about.html Best, James
-

Water in Oil flathead six 1949 Desoto
James_Douglas replied to James_Douglas's topic in P15-D24 Forum
Thanks Tom, My schematic shows them not going through, but that does not say much...that is why I asked. I am trying to figure out where the water is coming in at. I may have to take a leak down chuck and pressurize each cylinder and see if I hear anything in the cooling system. One of the few places where the water jacket and the oil galleries seem to come close is near those stud holes. If it turns out not to be a head gasket, then that is an area I will have to look at. I may pull the side covers next week and see if I can see any evidence of water in any or all of the lifter oil pools. Thanks, James -
There is a guy out there that will re-line a brake drum. It is very expensive. One thing that really does work to help with heat and fade is to send the drums to CH Topping for the vent holes to be drilled. James
-
I am going to relay a conversation I had many years ago. DO NOT assume it is correct. Many years ago I got the chance to talk with a man that was an engineer at Chrysler. He stated that he spent most of his working years after WWII in the brake engineering department. I asked him about drums and oversize. He stated that when they designed the drums that maximum oversize was cut in 1/2 and then 1/2 again for legal reasons. So 60 is really 120 with a 100% margin. Now he advised that that was for a new drum. He told me that he would feel comfortable going to 100 on an old drum that did not have any other obvious issues like heat hard spots and the like. The above conversation is for historical "oral tradition reasons" and not to be confused as any kind of recommendation. It is just an account of an interesting conversation. James
-
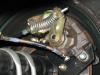
I have a kit on the front from ECI and the rear*** I built myself. I use a Midland-Ross remote power brake booster with a stock MC with linkage and pedal from a 1952 Chrysler that came from the factory with power steering. The Pedal ratio and the linkage are different. ***The big issue of rear disc's is getting the disc to run true on the tapper. The only way I have found, other than dumb luck, is to pull the axle and have the disc-hub trued on a long lathe using the axle shaft centers. Even then, you have to make them left-right and if you change the disc you have to do it again. If you true the face of the hub first with the axle, you get 90% of the way there. The rear uses Cad calipers with the mechanical parking brake that acts directly on the disc pads. Since this is a fluid drive car one must always use the parking brake. So the Cad caliper issues of going out of adjustment never happens as every time you stop you pull on the cable. The system works really well. Stopping power is almost scary. The only problem is that the mechanical ratio of the stock parking brake handle and the Cad Calipers is too low. On an extreme hill here in San Francisco the parking brake will not hold. The car mushes down the hill at 5 MPH. If I press on the brakes, with the power assist hard, then set the parking brake it holds fine. An indication that the mechanical advantage is not enough. I will build this winter a double link pivot under the frame that will increase the mechanical advantage and that should take care of the issue. I use all DOT Russell racing stainless lines and all new hard lines since I am using the stock MC. James
-
Water in Oil flathead six 1949 Desoto
James_Douglas replied to James_Douglas's topic in P15-D24 Forum
Hi Guys, it looks like I am still getting some water into the oil. It is slow and taking time, but I see some bubbles visually and using the tea spoon test. If anyone has a large Chrysler/Desoto block out, would you check the LOWER exhaust manifold stud holes for me? I want to know if any of those are drilled-tapped into the water jacket? I have Chryco service manual with a very good high res cross section down the middle of one of these blocks. It shows the lower stud and not entering the water or oil passages. That said, when I first fired the engine up, I noted a water drip someplace down there. I tightened up the manifold bolts and it went away. BUT, perhaps it is crossing the water-oil passages or has a crack in there someplace. I checked the sparkplugs and they look OK, so I am thinking it may not be a head gasket. I may have to pull the heater unit and the manifolds and see what is going on with the studs to make sure that it is not the source of the leak. If I do that, I can use compressed air into the stud holes and if I get anything making noise in the oil system then I will have a smoking gun. Thanks all, James -
Water in Oil flathead six 1949 Desoto
James_Douglas replied to James_Douglas's topic in P15-D24 Forum
I just took the car for a 50 mile drive. Did some Freeway running at 65 MPH and pulled some very steep hills at 20 MPH off of stop signs here in SF. I just put the car into the garage and will let the oil sit for an hour then pull the dip stick and take a look. I will also let the dip stick drip into a spoon and see if I get bubbles when heated up with a match. Wish me luck. James


