


James_Douglas
-
Posts
1,923 -
Joined
-
Last visited
-
Days Won
23
Content Type
Links Directory
Profiles
Articles
Forums
Downloads
Store
Gallery
Blogs
Events
Everything posted by James_Douglas
-
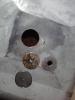
Working on the punch list on this problem. One thing I decided to do was to cut open the bottom of the tank. Although it is not the problem, it may have contributed. I am glad I did as you can see in the photo. The 1949 tank, I can not talk about my 1947 tank as I tossed it and had a stainless on made up, uses a 3 inch sintered bronze filter. It was 80% clogged up. If this restricted fuel flow, not enough to starve the engine, but to cause it to lean out at high load, that would drive exhaust gas temperatures up which, if it is a valve growth issue, would not help. {What a run on...you would think I never went to school!} In any event, thought people may like to see the actual pick up in the tank. Best, James
-
Hi Guys, I have not done anything on my punch list yet on this problem...but, I did decide to cut a 3" hole directly below the gas tank pick up since the tank is out. We know it is not THE problem, as if you remember I tested it with my old restored mercury outboard tank and the problem came back. But, if there is any restriction at high demand it is possible that the engine leaned out a bit and that would cause a lean condition which even if not enough to cause the kind of problems I had with the '47 Desoto it would increase exhaust gas temps. That in turn could cause an issue if a couple of valves are too tight. The inside of the tank with the round can pickup (the tube comes in of the side of this can) has a sintered brass filter. This thing was not only clogged with years of use, it had tank sealant on it. So I removed it. I will clean is all up and weld a round patch on the bottom. So much fun. James
-
Hi Guys, I have given myself a few days of not working on the '49 to clear my head. I will pick it up again on Sunday or Monday. The fuel lines have all been blown with 90 PSI air several times... The one thing I did today, since it is warm here, no fog, on the coast side of SF is to hook up the water hose to the fuel line fitting in the gas tank. It is out of the car. I then opened it up full blast and looked inside. It appears to be flowing ok even though I cannot see the bottom of the pick up. Given I still have the problem with the Mercury outboard tank in the car...I think I do not need to open up my and play with my original gas tank. The suggestions on hooking up some gauges is a good one. If after I do everything else it still does it...I will add gauges and see what I can see. One interesting thing. In the 1949 Desoto Service manual it has a " SERVICE DIAGNOSIS" section. The 4th item in the list under "ENGINE STALLS" is Insufficient Valve Clearance. In a few days I will do everything and let you guys know how it goes. James
-
Well, Guess what? It did NOT solve the problem. Over the last couple of weeks I have been test driving the car and the problem is back. It seems to take an hour or so of driving for it to happen. Here is what has been done. 1. Replaced carburetor with a different one. 2. Replaced spark plugs. 3. Replaced condenser & check inside of dizzy. 4. Took off Carter Electric Pump and replaced it with a new mechanical engine driven pump. 5. Changed fuel filter. 6. Took out gas tank and used my mercury outboard (restored) tank. 7. Checked every nut and bolt on the engine that could be vacuum related. 8. Replaced the coil. 9. Checked to make sure we have 6 volts at the coil. The other day we drove the car north out of San Francisco on the US 101. We went to Geyserville some 75 miles north. We then cut up to Calistoga and then over a mountain with steep uphill grades back to Santa Rosa, CA. This included 70 MPH freeway, back 2 lane curvy roads and steep hills. The car ran just great for the entire two hours. Then we shut it down in Santa Rosa for about 20 minutes, a pee break, and took off again. Not 10 minutes after we took off the car started to sputter and cut out on any kind of hard acceleration (load). If I took off real slow and easy I could keep going. On level ground if I took it easy it ran ok. Trying to go up any grade or small raise that required leaning into the throttle and it would start to cut out. It did this off and on all the way to San Francisco. We had to stop multiple times for 20-40 minutes. We nursed it down back roads and avoided steep hills and then went through Sausalito and up the back way to the GG Bridge as I could use 1st-2nd gear. It sputtered but made it. Once on flat level ground with light throttle we cruised across the bridge and back home. I have talked to all my car friends here in SF as well as a couple of professionals that work primarily on classic cars. We are all scratching our heads. I have a short list of a couple of other things to try based on conversations. They are: A. Open up the valve clearances in case when they get real hot and heat soak they are being held open and causing a power loss... B. Replace the disc brake vacuum can check valve in case it is failing and allows the vacuum can to "suck" on the intake manifold under a load which would cause the carburetor step up piston to pull down and cut off fuel (remember the 1947 problem thread) C. I have a couple of new, but not replaced fuel hoses that I want to replace just in the chance that there is an internal problem that I cannot see. D. I will change the Taylor spark plug cables with new/other ones. I am using them on the big '47 Desoto and have been for 10 years without any issue. But, you never know. Does anyone have any other ideas? One thought is that somehow, and I do not know how that would be, that the Tip-Toe-Shift (M6) interrupter switch is causing the coil to be shorted...but, at light throttle I do not see how that could happen. I am taking the day off and going to go look at a '63 Chrysler... Best, James
-
Don, The UTF #134 has hardly any anti-foaming agents in it compared to "circulating fluid". I have to respectfully disagree with you on your recommendation. The thing that makes the oil relatively more or less expansive are the additives. The DTE Mobil Circulating oil costs so much more than UTF #143 precisely due to the higher level of the additives to keep the stuff from foaming. A tractor by and large is using hydraulic cylinders which do not circulate in open cavities and as have no need for a lot of anti-foaming agents. The fluid couplings do as they are only 80% full. Hope all is well. James
-
I really wish the forum master would place this in its entirety into the tech section of the website...that way every couple of years I do not have to paste it into a message again.... ***************************************************************************************** Technical Note on MOPAR Fluid Couplings (Fluid Torque Couplings are NOT covered by this Technical Note. Copy/Publish at will so long as you copy the entire note.) By James Douglas – San Francisco Having run several types of oil in MOPAR “Fluid Couplings” over the years and heard many recommendations, I decided to see if I could approach the issue of what lubricant to use in one of MOPAR’s Fluid Couplings by a more scientific method. As is well known, Chrysler instructed all owners to use “MOPAR Fluid Drive Fluid” only in their Fluid Couplings. Problem is, MOPAR stopped making it decades ago. My first stop was Chrysler Historical. After a month of looking, I was told that they do not have any of the original engineering information as to the specifications of the fluid. Then I headed off into internet land to hunt down anything I could find on the subject from ORIGINAL sources. I managed to find an original Chrysler Question and Answer sheet from 1939 about fluid drive from Chrysler Engineering. In it they stated: “…The proper fluid is a low viscosity mineral oil, which also servers to lubricate the bearing enclosed in the coupling. The pour point is such that the oil will pour at the lowest anticipated temperature, and has no corrosive effect on the steel parts of the unit.” All well and nice, but not enough to figure out exactly what they used as fluid. Later in the same document they talk about the types of metal used and the carbon-graphite seal. Hum, carbon-graphite seal. I did some more digging for a few months and turned up a can of unopened original MOPAR Fluid Drive Oil. An analysis of that oil, and some more literature I ran across, stated that the original fluid was a pure-base mineral oil with a Saybolt Viscosity of between 100 and 150. The fluid had a Viscosity Index of greater than 80. The fluid had anti-foaming and anti-oxidation additives. It specifically did NOT have any seal swelling agents as these can attack the carbon-graphite seal and the copper in the bellows. This last specification eliminates most modern transmission fluids. After finding several formulas to convert Saybolt Viscosities to Kinematic Viscosities, it appears that the best match to the original specification is ISO 22 or ISO 32 oil. However, the ISO 22 is just below 100 Saybolt and the ISO 32 is much higher than 100 Saybolt. Based on a period (c.1947) Lubrication Industry article on fluid couplings that had the following admonishment: “Contrary to popular supposition any attempt to use a higher viscosity fluid would actually reduce the torque transmitting ability of the coupling since torque-transmission is dependent upon a high circulation of fluid between the impeller and runner and is not caused by any viscous drag between the two.” During my continued research on the history of the Fluid Coupling, I ran across the fact that the original company that licensed the fluid coupling technology to Chrysler is still in business and still making fluid couplings for industrial applications. After a couple of weeks of digging, I found a senior engineer from that company that would have a long technical talk with me on fluid couplings. In essence, he agreed with the period information I quoted above. He added that the lowest viscosity oil that would still provide for bearing lubrication is the one to use in theory. However, he did say that unless the fluid coupling bearing has been replaced and is know to be very high quality then err on the heavy side viscosity wise. Just don’t over do it, he stated. I was also told that normal hydraulic fluid does not have large amounts of anti-foaming agents in them as they usually do not have large amounts of air in the systems to foam in the first place. A fluid coupling is only filled to 80% and as such has lots of air in it. Therefore, when looking for fluid coupling oil, one must look for an oil that is a “Circulating Oil” which has a lot of anti-foaming additives in it. I was also informed that the additives tend to have a shelf life in the can, or in use, of 5 to 7 years and it should be changed at that time. I was also told that the couplings are actually somewhat permeable and water vapor will work its way into and then back out, when hot, of a steel fluid coupling. Very little amounts, but apparently is does go on. I was also told to never use engine oil or ATF as both would cause problems in the long run. Based on the research and discussions I have come to the conclusion that ISO 32 hydraulic oil with the proper additives and VI (Viscosity Index) above 80 is a suitable replacement for the original MOPAR fluid drive fluid. ISO 22 would be a better exact match, but only if the quality and condition of the bearing is know in a particular coupling. The oil I have identified that meets the specification, with a higher general viscosity to deal with the age of the bearings, is: Mobile DTE light circulating oil ISO 32. This oil is available at Granger. I have run this oil for about six months in San Francisco city traffic as well as up steep mountains on very hot days. The coupling works well. I have noticed, and other car people have as well, that the car seems to move out from a dead stop to 10 MPH better with the fluid. Only a before and after session on a dynamometer would tell for sure, but I feel that it moves out much faster. Classic car owners are advised to use this information at their own risk. I am not a fluid coupling engineer, a bearing engineer, or a lubrication engineer. I have done my best to find out what was in the original MOPAR Fluid Drive Fluid. This effort is in essence industrial archeology and should be carefully considered prior to use. As a post scrip in 2014. I ran across and old Gyrol book that talks about the filling of the fluid couplings. In short, how much you fill it affects the torque-stall curve. Chrysler set that by the position of the hole in the bell housing. However, if one is to fill it a little less or a little more one can change the curve. Do so at you own risk and never fill it past 90% so it has air in it to compress less you blow the thing up!. James Douglas San Francisco
-
In the Master Parts book it does list two sets of rear springs for the car. One is a standard spring and the other is a "Commercial and Heavy Duty Service" spring. I am assuming that the load and rate ratings Eaton is providing they took directly off of the original MOPAR blueprints. James
-
Hey Don, My Suburban is too low in the back. Does yours have the commercial springs in it? They would be the 9 Spring Version. Eaton pulled the blueprints on the springs for the 1946 to 1949 Desoto Suburban's: The standard spring: Has 8 leafs with a load of 880 lbs and a rate of 98 lbs. The heavy duty Spring: Has 9 leafs with a load of 800 lbs and the rate if 140 lbs. I asked about the load ratings and was told that it is a combination of the two load and rate that matters not just the load number. Best, James James
-

Carter BB Accelerator Pump Link Arm - FYI
James_Douglas replied to James_Douglas's topic in P15-D24 Forum
Hi Jeff, I use the center hole. Here in SF it is always 65F. Winter and Summer. The inside hole is the Short Stroke and the outside hole is the Long Stroke. The things is, if the arm has been monkeyed with, the relative positions of the pump will be off. What I am doing is making sure that on the Long Stroke hole (Throttle closed) that the Link Arm makes the flat arm that goes up into the carburetor is as far up as it can go. Pick a different link arm or bend it so that is all the way up. Once this is correct, then as you move the link to the center hole or the inner hole you can customize the pump stroke to your particular engine/car load and local temperature. The other thing I found is that there are some differences in the accelerator pump jet diameters. The linkage adjustment is how much gas total goes through the jet. The jet sets the RATE at which that amount of gas is added into the airstream. I had a carb with the wrong jet number. Probably a rebuilder years ago put the wrong one in. Back in the day people did play with such things for one reason or the other. Also, back in the day, carb rebuilders took hundreds of carbs and tore them down and put all the parts in a bin. They then reassembled them from the bins. The jets look the same, only if you take a magnifying glass and read the number can you tell the difference. I suspect that some carbs were rebuilt with wrong parts. Since this jet requires taking an aluminum plug out, it rarely gets checked by people these days. Best, James -
As part of my problem on the 1949 Desoto cutting out I ran across an interesting thing. Turns out the on the 1946 to 1954 Carter BB (1BBL) carbs that Carter used a few different arms on the Accelerator pump. I went through the listings, in my 4 inch think original carter catalog, for Desoto and Chrysler and came up with 2 part numbers for 90% of the carbs and then a couple more used on just one or two odd applications. The interesting thing is that I pulled all of them off my 9 carb cores, all versions from 1946 to 1954 and guess what? All most all of them were different. Some had obviously been bent by people thinking they were going to solve some problem. Some were in fact just different in either shape or length by a lot.. The link holes that the arm goes into are supposed to be the only way to adjust the pump stroke. I switched carbs on the '49 while dealing with the pump/filter/tank problem and this car was bogging at take off. When I had the top of the car off and pushed down on the pump I got a good squirt. When I put it all together and opened the throttle I did not. Drove me nuts until I realized that the arm was not the correct one. Now it work fine. My point of making this post is that some of you may have arms that are incorrect and/or have been played with. Be advised. The only way to really check it is to put it on the bench and make sure that when the arm is in the hole for the longest stroke that the flat arm that pulls up the plunger goes all the way up. The as you move the arm to the other two holes it should not go up as far. Learn something new every day. Best, James
-
To close the loop on this thread... I got the new fuel filters to day for the Fram HP1. I put the filter in and took it for a ride. I could not get it to cutout/die. I ran the car up in 3rd gear and held it at an uncomfortable RPM. Boy, do these things make noise when held at high RPM. It just screamed away. The outside air temperature was much cooler the last few days and there is always the chance that it is somehow heat/resistance related, but I doubt it. I will run it hard over the next week and lets hope that is it. I will carry a spare filter in the trunk from now on! Even though it was a pain in the ass, I learned at least what the vane carter pumps really put out as part of this process. Thanks all, James
-
I have a set in the garage that I got off of a parts car. The car was a 1948 Chrysler. It is Jiffy Jet, out it works off of vacuum not a floor pump. It also had "modern" style squirt noses on the cowl not the one off of the center windshield bar. I need to clean everything up...and figure out how the thing works using vacuum... James
-
I prefer to have a machine shop not ream the bushings unless they have a very good reamer with new blades. I have had many of them reamed that came out too loose. Find a shop that has a "Sunnen Machine" that they use to line hone things like connecting rods. Some shops have "Long" Sunnen hones that can do the bushings in the spindle. A line hone will give you a much better job than a reamer. Remember, any play in the bushings will mean less quality steering. In my case the local machinist did not have the correct hone size for my spindles. He had broken that one many years before and never replaced it. I got one used off of ebay for $40 and gave it to him. Now I get my spindles honed for free! Good luck, James
-
Jeff, The margin may not be as much as one would think. The main metering jets are about 320 CC/minute or about 0.70 Pints a minute. I have the step up jet hole size (0.0413) but not the flow rate. It is big, close to 1/2 the main jet size. So assume another 0.35 for sake of argument. Then add in the accelerator pump stroke coming out of the fuel bowl. If you take off and hold it open you are using something on the order of 1.0 to 1.5 pints a minute. I could get three pints plus or minus a little bit. In theory, it is fine. But if anything causes an issue, like a slightly clogged filter, a kink in a line or some such and I can see where a problem could develop. It will be interesting to see how it runs after I get the new filters. James
-
Hi Guys, I just got a call from the support people at Federal-Mogul. They are supporting the Carter products for six more months and that is it for them. The new group that purchased Carter...who knows. Apparently and to his surprise is that the published data (which Speedway, Jegs, and all the rest use) of Up to 73 Gallons an Hour and 6 PSI are all "Free Flow" numbers. Worthless to measure for car guys. The support man said that the engineer told him that... The 6 Volt Carter pumps with a fuel pressure gauge stuck on the output of the pump is 2 to 3 PSI. The volume is 25-30 GPH or 3.3 to 4 pints per minute. I got 3.25 PSI at the carburetor and a little less than 3.0 pints in a minute. With a fresh filter, one without junk in it, I will see what I get. It looks like however that the pump is fine. I was correct that the specifications were odd and misleading. James
-
Hi Guys, The on car pressure test was without the return line.... The plot thickens. I thought that it was due to some stuff in the carb and perhaps a float sticking. I stuck another carb on it, same type also rebuilt by me, and took it out for a ride. Same thing happened after about 15-20 minutes of running. Got the car home and pulled the sending unit and looked into the tank. Looked fine. I hate those big fixed round pickup screens as you cannot see the actual screen on these. In any event, I pulled the Fram HP1 gas filter so I could shoot air back into the tank. The filter is just ahead of the pump about 2-3 feet from the tank on the inside frame rail. When I pulled the filter out of the housing boy was I surprised. A lot of gunk in the bottom. Now keep in mind that the tank was acid dipped and then lined by the same guy that has been doing my tanks since the 1970's. We put the filter in a pan and poured fresh gas over and through it and a lot of crap cam out. Including some fine glass bead. Now this tank had sat in this car untouched since 1966. Only the diesel fuel that was put in to pickle it. When we got it back it looked great. I am wondering if one of the workers at the shop hit it with some glass bead to "help it along" before putting it into the acid tank. I am also wondering if the pick up disc and line in the tank had some junk in it as well that did not clean out. A 1000 miles of driving with fuel with alcohol in it may have "cleaned" it out and it all washed into the filter. I suspect that the pump may not be able to keep up under running conditions. An obstructions on the suction side is much harder on a pump than on the pressure side. Perhaps the pump was getting warm and dropping volume just enough so that after the car warmed up when I needed more power that was it. On the way back after it acted up and I let it sit for an hour, I could induce the cut out by going high RPM in 3rd gear. It felt like someone just squeezed the fuel line. If I let up as soon as I noticed it, it would not stall and I could drive along fine at a slower RPM. We also changed to a spare coil before the return trip. I ordered a few of the filers, I used the last one on the '47 last week that I had on the shelf, and will try it again mid week once they come in. If that solves the problem, boy and I going to have a talk with the shop that did the tank! James
-
New guy with 1950 DeSoto - starting issue
James_Douglas replied to Wilf DeSoto's topic in P15-D24 Forum
Hi, You go to a shop and buy an air chuck (fitting). Once you have gotten all the porcelain out of a sparkplug you can take a Tap and make threads in it and screw the air chuck into it. Alternatively, you can stick the threaded end of the air chuck into the hollowed out sparkplug and have someone with a gas welder braze it onto the sparkplug. Then you screw it into the cylinder and connect your air hose to it. ************************ Before I rebuild by Desoto 10 years ago it ran just fine. It however did not have much power. The compression was in the 60 pound range HOT. ************************ You REALLY need to go here: http://www.imperialclub.com/Repair/Lit/Master/index.htm And read booklet numbers 1, 2, 10,12 and 36. *********************** Good luck, James -
1954 dodge royal 500 convertible Pacecar restoraton part 1
James_Douglas replied to dodge59's topic in P15-D24 Forum
John, Great project. I just spent 3 years restoring my '49 convert. I doubt I can be of any specific help on your model...but don't hesitate to ask. I can be reached directly at JDD@8bells.com. I did go to some lengths to copy the original blue-gay paint that they used on the underside of the hood, trunk, and inner fenders on my '49. If your car was originally painted with the MOPAR blue-gray in the inner and bottom, let me know and I can send you a paint formula. I have a NOS inner fender for my '47 and we used that to scan and tweak the paint codes to get a color. Good luck, James -
1954 dodge royal 500 convertible Pacecar restoraton part 1
James_Douglas replied to dodge59's topic in P15-D24 Forum
Hey Young Ed, Looks like a '49 or '50 in the back of that row. Where is this place as I need a '49-'50 windshield center bar and a core convertible top pump. I think the vertical style pumps may have been used up to 1953. James -
New guy with 1950 DeSoto - starting issue
James_Douglas replied to Wilf DeSoto's topic in P15-D24 Forum
Wilf, Take an old spark plug. Cut off the insulator and the ground tip. Drill out all the insulator. Then tap and screw in an air chuck or weld an air chuck into it. Then screw it into #1. Make sure that your are at TDC on #1. Listen for air out the exhaust and at the oil filler tube. If your rings are leaking bad it will blow into the oil pan. If you hear a lot of air in the exhaust then you know the #1 exhaust valve is open. If you head it loud at the carb your know #1 intake is open. Follow on down the firing order and check each hole. If any of the valves are stuck open, this will find it. Just in case the cars electrical system has an issue. Hot Wire the car. Run a wire from the battery directly to the coil and try and start it. Just remember that you have to pull the wire to stop it. The key will not kill it. Good luck, James -
Hi all, I was testing the fuel pump more out of curiosity than anything else. Just to rule it out. I put on another carb I have which I rebuilt a while back and it started fine. I cannot road test until they finish the construction on the street in from of my place. The pumps are all new. The one in the car is a year and a half old and has 1000 miles on it. The one on the bench is new out of the box purchased last month. The rotary vane pumps are real pumps with an impeller. No diaphragm to go bad. The testing procedure I used is as specified in the carter literature. I left a message at Carter HQ asking to talk with someone that actually knows what the 6 volt pump specs are. We shall see if they call back.
-
On my 1949 Desoto I removed the factory mechanical pump and installed a Carter Rotor Vane electric. As instructed by Carter, I ran a return line to the tank with a 3/32" fitting. I was told that the pumps needed about 5 gallons an hour flowing through them to keep the motor cool. I was told that the smaller engine classic cars that did not have the return line could overheat the pumps in parades and serious stop and go traffic and the return line is the optimum solution. So, I have about 1000 miles on the car. I had a fuel problem the other day. I suspect it is in the carburetor and I am working on cleaning and checking that carburetor. As part of my check, I decided to see if what the fuel pressure is doing. I stuck a gauge on the end of the line were the "T" is to the inlet of the carburetor and the return line. When I turned on the pump I got between 3-1/4 and 3-1/2 pounds of pressure. The original mechanical pumps are supposed to be between 3-1/2 and 5 pounds. I thought that is a little on the light side, but once the generator is going, I guess the voltage will come up a bit and it will probably top 3-1/2 pounds. I then did a flow test. I put a graduated pale in the engine pay and ran the pump for one minute. I got 3 Pints. This is where things get odd. The pumps according to Carter are supposed to put out between 6 to 8 PSI and up to 72 GPH. That would be 9.6 Pints a minute. I called Carter and got a lot of double talk. I hit my 1957 Carter Master book which is 5 inches thick. In the back they have both the old Carter mechanical fuel pumps and the older larger vane electric fuel pumps. In the section on the mechanical pumps they show how to test them. They show their mechanical pumps, like the MOPAR manual, as having between 3-1/2 and 5 PSI. They also show that the mechanical pumps are supposed to: "Volume: One quart {2 pints} of fuel in one minute or less at 500 RPM" In the section in the book on Testing, Removing, and Overhauling the older style electric Carter fuel pumps, it states: "If the fuel pressure gauge is not less than the following the pump is satisfactory: 3 Pounds for a 24 Volt Pump. 2-1/2 Pounds for a 12 Volt Pump. 1-3/4 Pounds for a 6 Volt Pump." If I use the old original Carter specifications, my newer style vane pump is just fine. I have 3.25 PSI and 3 Pints a minute. When I talked with the people at the service center, they just mouth the 6 to 8 PSI and 72 GPH song. When I asked for a PSI chart via voltage they tell me they do not have one. I ask that surely the 6 volt, 12 volt, 24 volt versions have different outputs. Nope, they are all the same I am told. When I ask what the minimum volume output is they tell me they do not know. I ask them how then will they determine if a pump is defective if they do not know what to measure. They don't know. Now, I purchased the pump via Amazon about a year and a half ago when restoring the '49. About three weeks ago, since it looked like the fuel system was working ok, I purchased another pump to have a spare on the road with me. I got this one via my local speed shop and the local warehouse. I took that unit out of the box and put 18" of rubber hose on it. I took 3 feet of #12 wire and connected it. I stuck the fuel gauge on the output of the pump. I put the end of the hose in the pale with the 3 pints of gas I took from the car test. I turned it on. Guess what, 3 PSI. It is obvious to me that the published specifications are garbage. From Carter to American Car and Foundry (ACF) to Federal-Mogul to now some outfit named Castle Automotive. I think over the years that the original specifications have been lost at the service end of things and all that is quoted is the ones for the 24 volt version. I called back later and talk to another person. I explain what is going on. I asked for them to call up the food chain and confirm the minimum and maximum design parameters for pressure and flow for the six volt pumps. I am waiting on a response. I very much doubt that 2 pumps via 2 distribution channels a year apart are both "failing" in exactly the same way output pressure wise. If anyone has any thoughts, other then toss it and put the mechanical pump back in :-), or any experience actually testing for pressure and volume on fuel pumps for the flathead engines, please chime in. Best, James
-
Hi All, I wanted to swing back to this post to let you all know I got the car back together this weekend. Took it for a long ride down south to a car show and it ran fine. Spent a good part of the day talking with Tod Fitch. I am going to pull a plug and see what she reads today. By the way. There were several different high load - high speed jets on the BB. I got one of the larger ones and I am using that. If you have added a hot cam or are in need of a more rich mixture under higher loads, look into it. This is the jet that the rod goes into, not the main metering jet. ************* QUESTION. Are both the "nuts" 9/16" on the tappets? I know one of the are as I just set them last week. I want to buy a set of tappet wrenches, but I just don't remember if I grabbed two 9/16" open ends or one 9/16" and something else. Thanks, James
-
Don, Make sure you take a moment and look over my post on the steering bushings (Chrysler & Desoto and really only on the big heavy cars like Dons) on the Desoto club site. With power steering you may want to order a set of the harder ones early Monday before they make mine... James
-
Hey Ken, I never thought about that! :-) James


