


James_Douglas
-
Posts
1,923 -
Joined
-
Last visited
-
Days Won
23
Content Type
Links Directory
Profiles
Articles
Forums
Downloads
Store
Gallery
Blogs
Events
Everything posted by James_Douglas
-
Anyone that lives in the area of St. Louis MO, that knows of a good top flight classic car repair or restoration house? I may need to get (pay) a professional to go look at a Chrysler I am interested in that area. I cannot get out of San Francisco right now. If anyone has any leads, i would appreciate it. James.
-
I agree. As someone who has rebuilt several of these transmissions... I have found that the oil pumps tend to get worn but still produce enough pressure. I have seen in a couple of instances that the problem being described is not the oil pump but a bad shuttle valve. The spring is bad for the valve or bore had issues so it does not slide properly. The Direct speed blocker ring, the clutch it goes into and the input shaft are well documented. If they get messed up, the thing will never work correct. One thing to add. The clearances listed in the repair books ARE CRITICAL to having a very good functioning transmission versus just and OK functioning one. If something calls for a particular clearance, try to get it right in the middle of the specification range and not on either edge of it. Contact me directly and I can email you a bunch of items that may help. James.
-
There is an other long lost way to time and engine without anything other than a glass of water. You fill clear glass cup with water. Place it flat on the head. Start the engine. Note the wave pattern in the cup while turning the distributor in both directions. Keep doing this until you get an even wave form, like dropping a rock in the middle of a dead still pond and the ripples are even. I learned this technique from an old timer when I was a kid and had no money for a timing light. When you get good at it, usually you can get to within a few degrees of using a timing light. *********** Now all that said if this is a new engine, have you done a compression and leak down test to make sure the rings are sealing? James.
-
Anyone know why they made two different thickness of balancers? Was one for a stick and the other fluid drive? I have both in my parts bins, and I always wondered what was up with that. James.
-
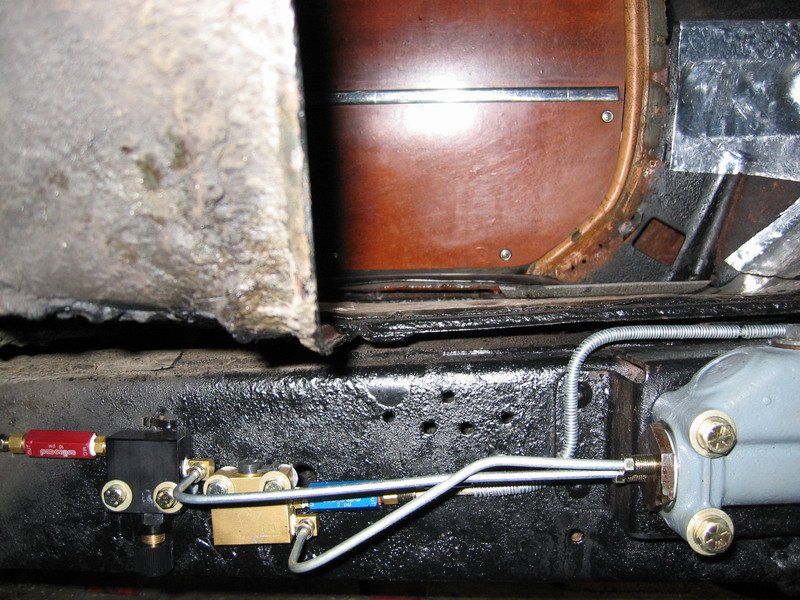
I cannot remember if I used a Wilwood or something else. But here a photos of it and I have been using it for a decade. Also, the rear plug on the master cylinder will screw into the top. If a single hole plug you just round a line up to the fire wall and you attach a remote fill of your choice. If a two hole, you can plug one and use the the other. James.
-
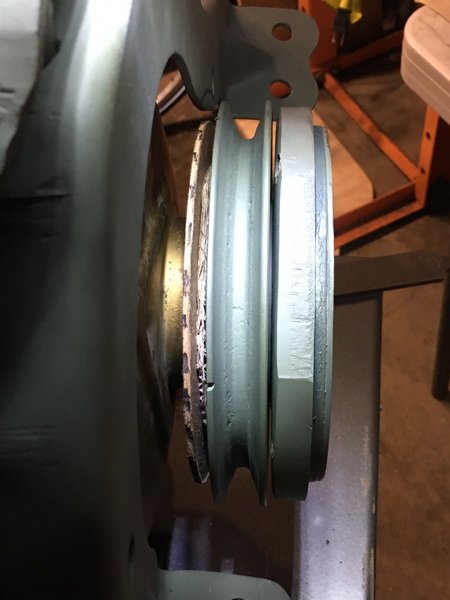
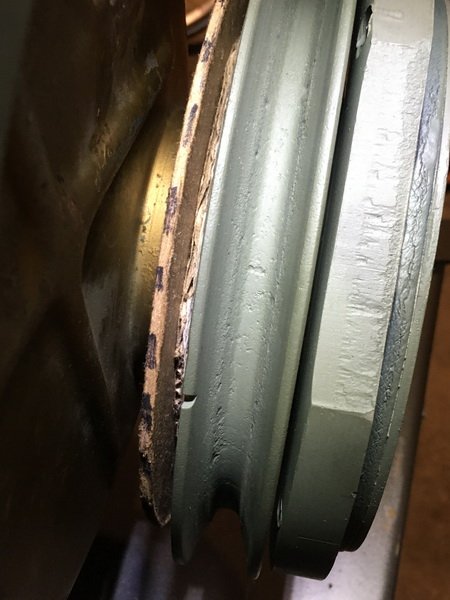
I have been advised that I need to keep 1/2 inch between the chopper wheel and the pulley to make sure that the steel of the pulley does not interfere with the sensor. James.
-
The issue as I understand it is "wall loading" of fuel when using injectors. A carburetor mixes the air and fuel by the time it leaves the base. In TBI it mixes down further. The "accelerator pump" of fuel injection is in part the fuel that sticks to the walls of the manifold from the injection The revision from the Siamese Ports can cause issues with that. The guys in England doing FI on those MBC engines with Siamese ports had issues. Given my time line it is likely that you will get out of the gate long before I do. Keep me posted. James
-
I actually talked with someone years ago that knew the family and the car. The 2020's are not the 1950's and 1960's. Lower octane gas and a lot less traffic. Also, people back then had a sense of grace and would go around and give someone a break in an older car. Not today.
-
Well. As someone who has been driving a flathead six as MY ONLY driver for 20 years, I think I am in a position to talk about the reliability of the stock design. In general, they are reliable as is. In my particular case however, I will be using the car in retirement to travel the USA in it. I t also comes in at 5000 pounds and going over the mountain means power loss at altitude. That is why I want FI. If I was going to use my '49 Convertible to travel the USA, I would not bother. The 1000 pound lower weight means there is more than enough power to keep up with traffic over the mountains. In the '47 Suburban it is just not their. It is all about power to weight ratio. I can tell you that many parts are becoming hard to get or junk. SMP Bluestreak moved its production of ignition products to Mexico from NY about 8 years ago. Since then the points have been junk, with multiple sets I have had to send back. When my system is done, I will buy two or three engine controllers, magnetic pick ups, and coil packs, throttle position sensors and the like. That stock will last until I am about 150 years old :-) Everything else is steel and should last forever. James.
-
So, exactly how are you going to use TBI if I may ask? What manifold? My plan is not strictly port injection nor is it TBI. I have spent months reading and talking with people who do FI to figure out the best way to do it with the flathead and the Siamese ports. Since I own the Edmunds and have a lot of Carter BB's I tore apart for spare parts...I have bunch of bases. I looked at a half dozen air valves and it would be a lot of work to get those to work with a lot of custom machining. I also looked at all the available TBI from Holley and the like and none of them are rated to work down below 150 HP. I looked at a couple of people making custom units for guys like us with low HP cars...but they cost a ton and leave too much for the customer to figure out. In the end, I think that if one can source a two 1BBL manifold and strip two dead carters for the base part...get George Asche linkage...and find a place to insert bugs...in the end it will be less work at the mechanical end. The real work is going to be making the fuel maps. Self learning is not going to work well with Siamese ports. A lot of issues there that will have to be addressed. I suggest that you pick up a copy of Greg Banish's book on fuel injection systems and read it 3 or 4 times like I did. The fuel mapping is going to be a lot more complicated and expensive than one thinks to get it correct. Spending money on a loading chassis dyno is going to be a must. James.
-
No. The aluminum is not nearly as strong as the cast iron. If I did I think it would crack.
-
Hi all, I am managing to get a little work done in the garage. I spend most of my day cleaning and cooking. Sondra is playing Russian Roulette at work every day in the ICU here in San Francisco. Over the last couple of days I have mocked up the first try at a crankshaft trigger for a flathead six in cardboard. I am thinking of a somewhat thin plate that would go between the hub and pulley, just like the small second pulley on my industrial block. Then a spacer that goes over the edge of the hub (represented by 3 little pieces of cardboard) then the thicker steel wheel with the teeth on it. It looks like the wheel will fit. I think I may trim the engine mount just a bit so that if the motor mount were to flex a little too much it would still clear the chopper wheel. I will have to make a new pointer as the Industrial thick belt pulley is 7 inch, but that is ok as it will raise the RPM for the accessories. I will also have to make a bracket on the timing cover for the magnetic pickup. I may move the timing on the harmonic balance to the opposite side so I can make one bracket for the pointer and to hold the magnet. I am sending the balancer to get rebuilt, so, moving the outer ring to a new point would not be a big deal. I included a couple of photos of the Edmunds Intake with the dual exhaust. I am going to use two Carter 1BBL bases as the throttle valves. They are steel and fit perfect. With Asche linkage I have the "air valve" package basically ready to go. I will rebuild them so the throttle shafts fit nice and I will solder the little holes closed in the valves. I will need to make a couple of short stakes that go up to an air cleaner. Not a big deal, just time and money. One thing is that between the Edmunds and the Headers there is a lot of "core shift" the standard washers to mount them will not work. I will have to make a custom set to bridge the gaps which are not the same on either side. Also, the Edmunds is thicker than the cast iron exhaust so one side of the custom washer will have to be thinner than the other. On the Edmunds Intake, the plan is to drill and put bugs in the base of each runner. Use one Fuel Injector in each and double wire them. I have checked with MS3/Pro (Megasquirt) folks and they say that is no problem. This way each injector fill fire directly at the base of the intake runners in the block...yet...far enough back so air will have some time to mix. Only trying it will tell. That is it for now. Wish us luck. The peak wave is due to hit SF Hospitals about the 28th of the month. I hope Sondra and I make it thought this. She is the consummate professional, 26 or so months from retirement. Lets hope we both make it to it. Best, James PS. One thing I forgot to mention. Even though the Langdon manifolds do not fit all that well with reference to the distance of the flanges to the studs, I stuck my finger down the valve holes in the block and felt around and the runners line up well with the block. I will scribe it from the top to port match them, but once I saw the flanges I thought I was screwed out the money. Turns out not. I purchased them from someone who bought them and sold the car and never used them.


-
I am resurrecting this thread as I just mocked up for the first time my Langdons Exhaust Manifolds for the 25 inch Desoto Block and my Edmunds intake. I noted that one of the holes was drilled a little off and the holes were "right on" the stud size. I drilled them the next (numbered) size up to give them a little expansion clearance on the studs. The inner side of each manifold was tight against the stud, on one side it would not go on. I checked a stock manifold and they are "dimpled" there for clearance. Then I looked at the opposite side when I put the edmunds on and it is so far away from the stud that a factory washer will not even touch it. His manifolds are also thinner than the Edmunds and as such a washer would site cocked like someone else noted. I was worried that these exhaust manifolds had bad core shift. Since I am using a bare block, I could stick my finger down and feel the block to manifold face. It is not too bad and about just as off as a stock one. I will wait until I get the 265 block ready and then I will make it on that one in case that block is a little off from my test bock. I will then port match them. For the life of me, I don't know why when folks make parts like this they don't give you more meat on things like flanges. You can always grind it off to get what you need. The casting shift on the flanges on both sides with the outer's not even being able to take a stock washer is bad. I will make a set of four special washers to deal with the gap and the thickness issues. I cannot go grip at Tom as I purchased these from someone who had gotten them and never used them. I don't know if they knew the problems and dumped them on me or they never new. I can make them work with a little spit and polish. The mock up, no photos yet, with the edumnd's set up with two carter 1BB bases as air valves and George's linkage is starting to look good. I am not going to drill the Edmunds for the Injector Bugs until I am sure everything else will physically work. I hope everyone is well. With Sondra in and out of work in the ICU every day...we are playing a real world version of Russian Roulette. James.
-
One thing that people do not do that is a good idea... If you are going to pull a trans or the fluid drive unit is to place 4 small wedge shaped blocks with a slit in the end of them between the housing and the clutch plate (mini flywheel). The take bailing wire and wrap it around the wedges and twist it to tighten. What this does is make sure that any rocking of the plate does not cause the carbon seal to crack. It has happened. In the "old days" the shops that rebuilt them all shipped them this way. I had one done by Northwest many years ago and it started to leak after a 24 months. I had used Daco which is who Frank Mitchel used and I think Andy used. But, they are out of business. In the big '47 Desoto Suburban, I had the NW Trans one in it when it failed. I was in a hurry and I found a 1951 coupling out of an Imperial Coupe. I don't remember if it was a six or an eight. I do remember that we had to move the ring gear a 1/4 inch to get it to line up. Not hard to do. I have been using it for years now. I have like 4 or 5 couplings. Some I know are bad, some I have no idea. I have all the tools to rebuild them. I just do not have a lathe large enough to hold them to cut them open. I had not heard about just cutting open the end to get to the bearing. Perhaps I will look into that. James.
-

New Fuel Sender Issue - leaks - Anyone else
James_Douglas replied to James_Douglas's topic in P15-D24 Forum
Sam, Just make sure you put a tag on it that says "no longer for aircraft use"...you would not want the man from the local FSDO to see that without it placarded :-) -
New Fuel Sender Issue - leaks - Anyone else
James_Douglas replied to James_Douglas's topic in P15-D24 Forum
I have found that such a large "hole" does not seal well over the long term with fuel tank sealant. If I did anything to it, I would drill out the pop rivets and place solid rivets in their place. I have been using 545 loctite on the threads for the screws...since little lead washers are hard to find..and it works great. But, it will not fill a gap the size of a rivet hole. I found that the amount of fuel coming out and vaporizing was enough to warrant a safety issue. If someone filled up a car and parked it in a garage for a week...it amount of vapor would be a nuisance and could be a safety issue. One of my factory units I sent to Atwater Kent for rebuilding and they used pop rivets with gas tank sealer between the two parts. It leaked. I took out the rivets, made a gasket, used fuel gasket sealant and out in solid rivets and then it did not leak. The issue is the resistor died a year or so ago. That is why I purchased a new one thinking I would not have to screw with it. I am pulling it out later today and putting in a factor unit for the time being. Better not to have working sender than a leaking one. James. -
Hi All, I installed a new manufacture fuel sender in my Desoto. One of the two wire thrmo types used in Desoto and Chrysler. I got it off of one of the usual suspects on ebay. The problem is that it is leaking. Not at the seal and not at the threads. It is leaking from the two pop rivets that hold the thing together. It leaks a lot after you fill up the tank. In the 1946 to 1950 Desoto's and I assume Chrysler's the filler neck is fairly high above the top of the tank. A gas station pump handle only goes in about 5 inches when you fill it up. So the final fuel level is above the tank top. The pressure is pushing out a fair amount of fuel through the rivet centers. What I want to know is anyone else having this issue? I suspect it is a design issue and not a malfunction. The factory used solid rivets on the their senders... James.
-
Just use 90W and if need be keep it filled. My 1947 Desoto that I drive every day here in San Francisco has a slow leak and I have a new seal in it! I just stay on top of it. When I check the oils once a month, I check that. People use the grease in the boxes, I personally do not think it is appropriate and does not put a good oil film on the bearings or the gears. Also, go here and read booklet number 28: http://www.imperialclub.com/Repair/Lit/Master/index.htm
-
Hi All, Has anyone used something other then the 5 inch (measured in the base of the pulley v groove) standard pulley and had it clear the cutout in the front frame or not drop when the engine gets a good bounce? I have one that is 7 inch (OD, probably 6-1/4 at the base) off of my "combine" 265 engine and before I pull the radiator on the '47 Desoto to see if it will clear for the new rebuild...I thought I would ask if anyone has gotten a larger one that would clear...in particular with a Desoto or a Chrysler frame. Thanks all, James.
-
Coles notes on 12 volt conversion please...
James_Douglas replied to laynrubber's topic in P15-D24 Forum
Thanks Wes, this will do the trick for me. For the price I can carry a couple of spares. The only down side is I assume it is not regulated on the output side. James. -
I like this PMW solution. I think I will get a couple of Don Coatney's 12 volt blower motors...take my switch apart and jump all the lead to just create and on-off power switch and use the PMW with the pigtail switch to control the motor speed. That should then allow me to use a Power Stream Buck-Boost converters PST-DC/1260-11to run the 6 volt wipers. Everything else will be 12 volt so I have a complete solution. James.
-
Coles notes on 12 volt conversion please...
James_Douglas replied to laynrubber's topic in P15-D24 Forum
When I put in M79308 for the motor at NAPA it does not show up. What was the application? James. -
Dual master cylinder - for stock drum brakes
James_Douglas replied to Thomba48's topic in P15-D24 Forum
I have never had a master cylinder fail. I have had a wheel cylinder fail, like I said, it was new one from NAPA. I had a fairly new hose failing...I replaced them all with Russell Racing Steel Braided. In most instances with a single master system, there is a telltale sign that something is wrong. I am comfortable with a single cylinder, but I check the fluid level every week and inspect the underside of the car every quarter. Once every 5 years I replace all the fluid in the system. Once every decade or so I replace all the seals and check the guts. I drive the 1947 in the hills of San Francisco and only that bad new wheel cylinder is let me down. All of the cars my family had as kids had single master cylinders and they never had an issues at 100K or more miles on them. I really do think that the reason the feds went to ordering dual cylinders was that as cars got older and went to second or third owners that may not have properly maintained them and they started to see failures. A properly maintained single system is not unreasonable from a safety perspective. My 1949 has 4 wheel disc brakes, the only major non-stock thing on this car, with a single cylinder and a Midland-Ross remote power brake booster. Car stops TOO good. The rear calipers have the Cad-Eldo rears with the cable operated parking brake. It will slow the car just as good as a failed dual cylinder operating on two wheels. James. -
Custom dual master cylinder mount. Clearance concern
James_Douglas replied to 40desoto's topic in P15-D24 Forum
That is why I have an umbrella policy.... -
Custom dual master cylinder mount. Clearance concern
James_Douglas replied to 40desoto's topic in P15-D24 Forum
Funny you should say that... I have been reading over Dud Davisson's articles in Sport Aviation on welding. I have not done much welding since High School. I was taught both gas and stick at that time. We are going to the AAA in Iowa this fall to figure out what old aircraft we want to go looking for. When I was in high school I built a Hot Rod '31 Model "A" coupe. One of the things I did was put a Mustang Steering box in it. I had been through a couple of bad professional welders at that point in time doing things I did not feel up to doing. After going through a few welders I tan across a guy that had been one of the army of people that got downsized by the close of the Apollo Program. This man moved into Northern California and started a welding shop. He did welds on the Lunar Lander. He know his profession better than anyone I have met since. The one thing he told me was that welding on forged parts takes a rigorous approach. He cut and shortened the pitman arm for this car. It took 2 hours. After preparing the thing and heating it in a500F oven he would then heat it until red-orange with his torch. He would then make a single pass on one side, then flip it over and make a single pass on the other. Then stop, chip and wire brush both sides, heat it up and make another pass. All this took about an hour and a half. He then put it back into the oven and told to come back in later. He had me have it x-rayed and he looked over the results. Only then would he allow me to put it on the car. I have never to this day seen anyone else go through such a careful process when cutting and welding forged auto parts. I once asked Fatman about dropped spindles and their process. I did not like their answer. For the last few decades I found a man here in San Francisco that was as good a welder as the ex-NASA ( Grumman ) welder. He died a couple of years back and I have not found anyone to replace him. So, I have decided I need to get back to welding myself. I am ordering up a set of equipment both for Gas (hence reading Budd Davisson closely) and MIG. I am hoping the many years of helping and observing both the NASA Welder and my friend will come in handy. Both of them told me that prep and procedure was the name of the game and the actual welding is just practice, practice, practice. James.
