


bkahler
-
Posts
1,952 -
Joined
-
Last visited
-
Days Won
39
Content Type
Links Directory
Profiles
Articles
Forums
Downloads
Store
Gallery
Blogs
Events
Everything posted by bkahler
-
CHS Ricardo Cavallero S.R.L manual steering boxes
bkahler replied to bkahler's topic in Mopar Flathead Truck Forum
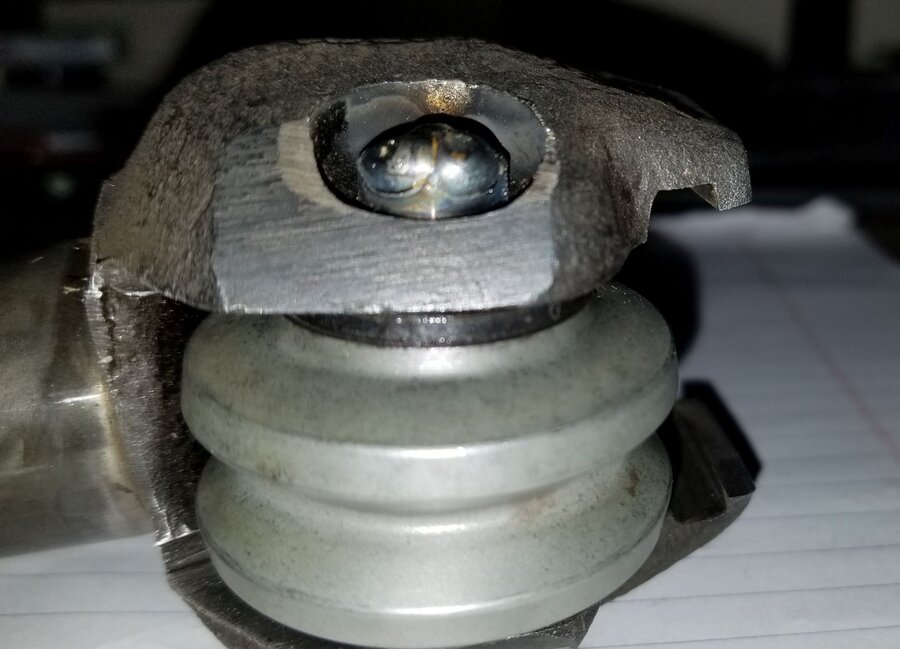
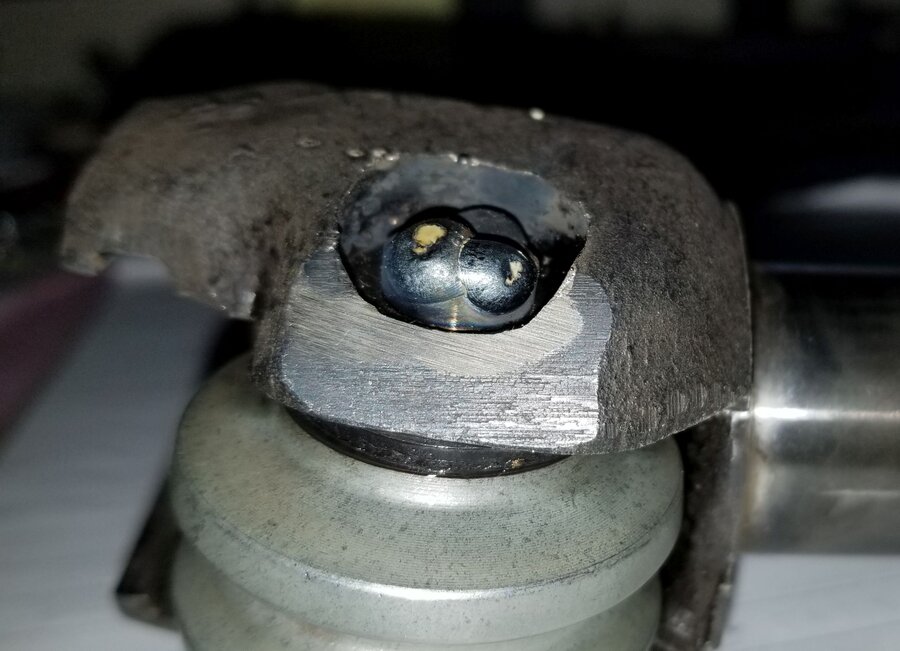
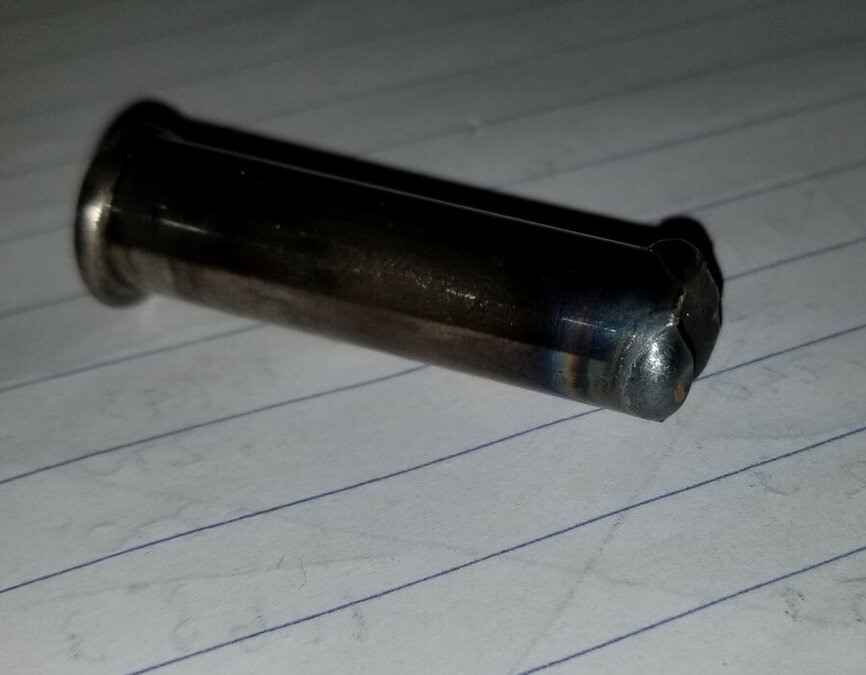
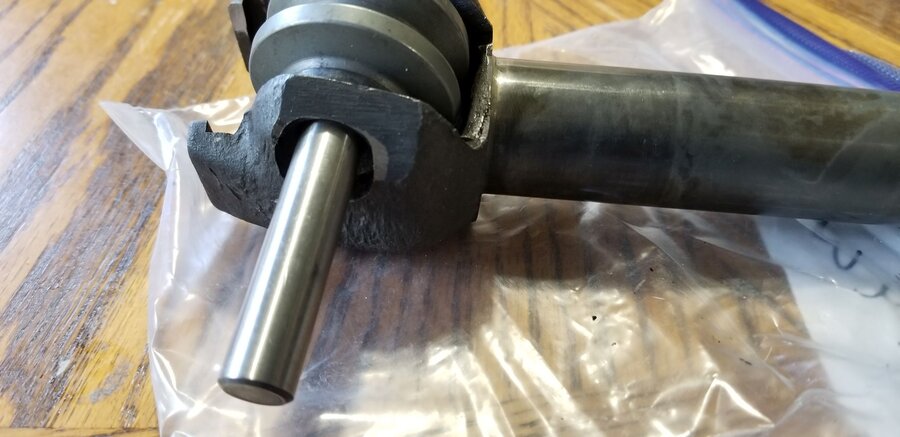
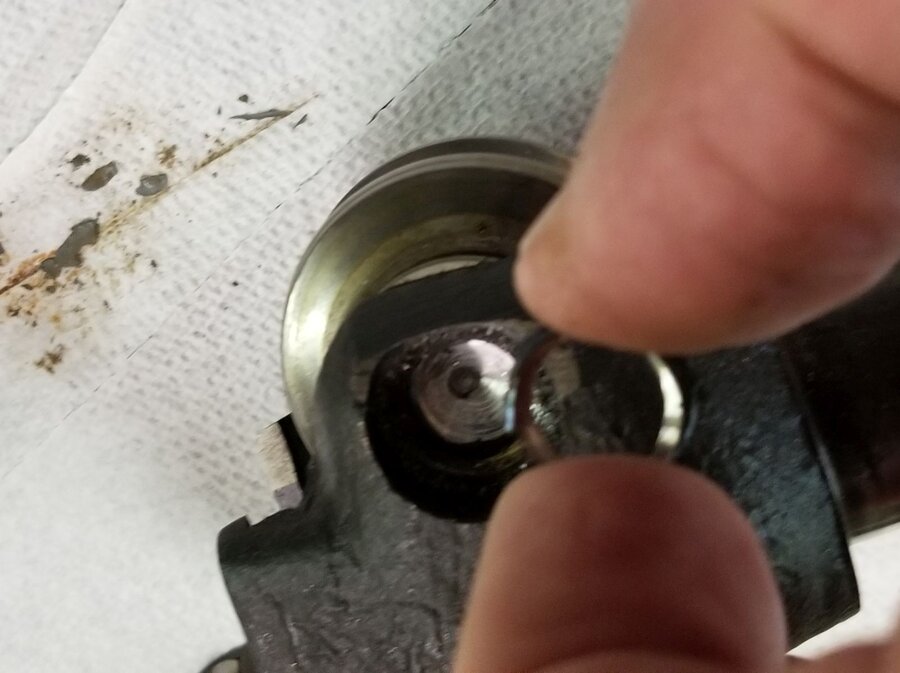
Yesterday morning I came to realize I was I trying to over analyze things and I was making this task harder than it needed to be. Unfortunately over analyzing things seems to be something I'm really good at So, putting aside all thoughts of screwing things up I clamped the old pin in the vice and powered up my mig welder. I set the power level for 3/16" metal and applied a few test beads to the top of pin. I was satisfied with the results of the beads on the original pin so throwing caution to the wind I proceeded with welding beads on the new pin. Before I installed the new pin and roller I took the roller bearings out and greased them with some wheel bearing grease. Below you can see the welding results on the new pin. The steering gear housing is currently soaking in solvent and once it's clean I'll do an initial assembly to see how things look. Brad
-
CHS Ricardo Cavallero S.R.L manual steering boxes
bkahler replied to bkahler's topic in Mopar Flathead Truck Forum
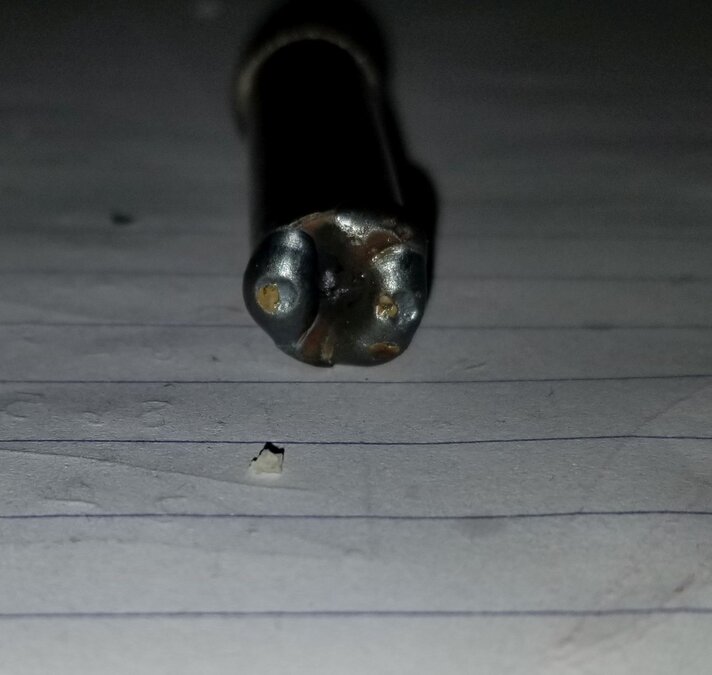
John, I'm with you, about what would happen passing the welding current through the shaft and bearings. Watching the video I don't believe there would be any real deformation of the pin heads from force, it would have to all be done via welding. The original pin was definitely riveted in place using a hydraulic press of some sort. I can see the dimpling affect in the tip of the original pin. My guess is during original manufacturing the assembled sector was placed in a jig and a press stamped the pin from both ends at the same time. Like you said, several per minute! Thanks, Brad -
CHS Ricardo Cavallero S.R.L manual steering boxes
bkahler replied to bkahler's topic in Mopar Flathead Truck Forum
I'm going to keep the circlip idea on the back burner. I think welding the ends of the pin is going to be the easiest and least expensive of the options. I'm going to practice on the original pin using my extremely minimal TIG welding skills and see if I can produce a good enough bead that would keep the pin from sliding through. Assuming I'm successful on the practice pin then I'll attempt it on the new pin. -
CHS Ricardo Cavallero S.R.L manual steering boxes
bkahler replied to bkahler's topic in Mopar Flathead Truck Forum
JB, after reading your post I went back and re-read their instructions and I definitely misinterpreted what they were saying. For whatever reason I had inferred that the pin was to be welded to the cast iron sector housing. That definitely isn't the case! I probably would have messed things up big time if I had tried that. Their instructions say to: "Fix it with a little welding point on each end of the roller pin". The way I interpret this is to weld around the end of the pin such that it can't slip or be pushed through the sector housing. I don't think I would need to hammer on because there is enough of the pin accessible to reach the edge. Thanks! Brad -
CHS Ricardo Cavallero S.R.L manual steering boxes
bkahler replied to bkahler's topic in Mopar Flathead Truck Forum
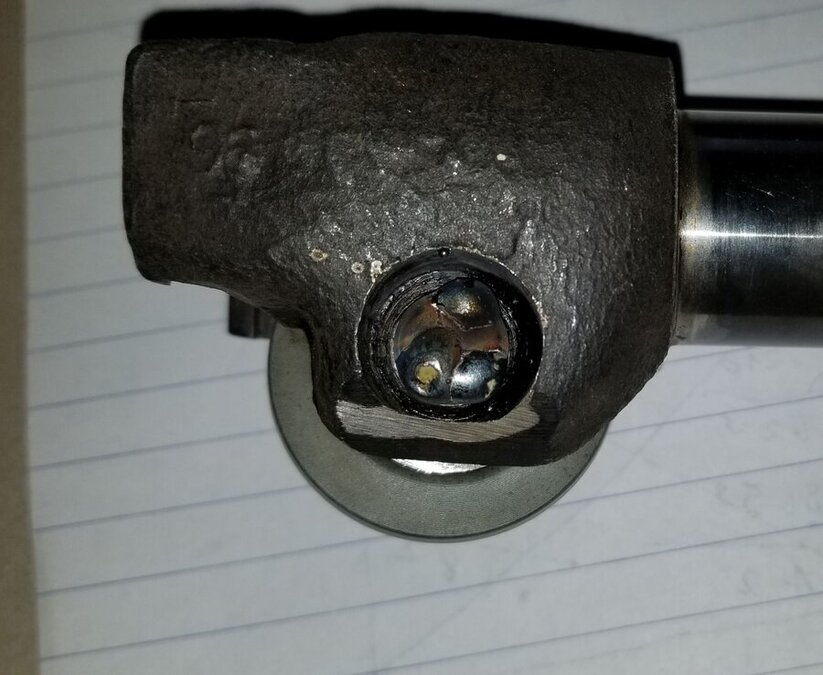
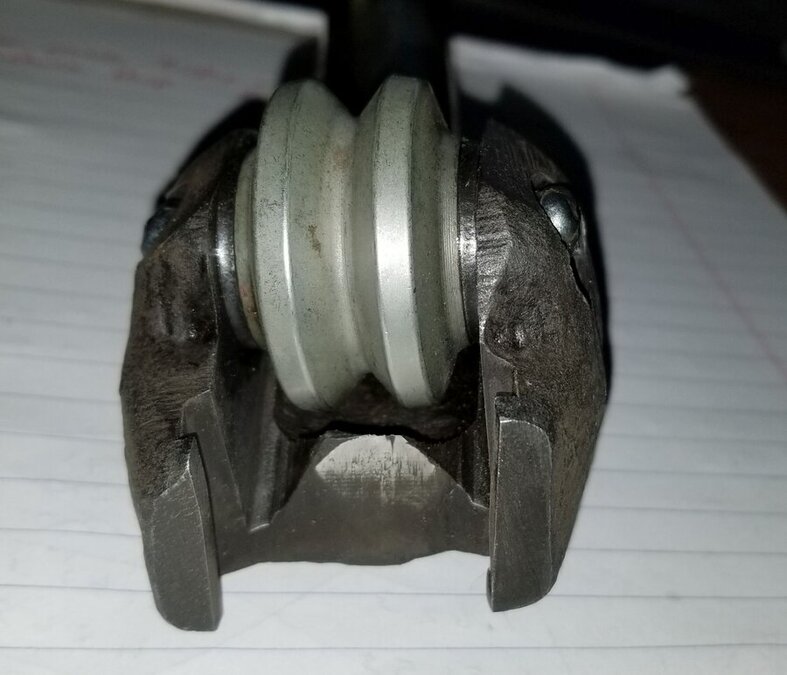
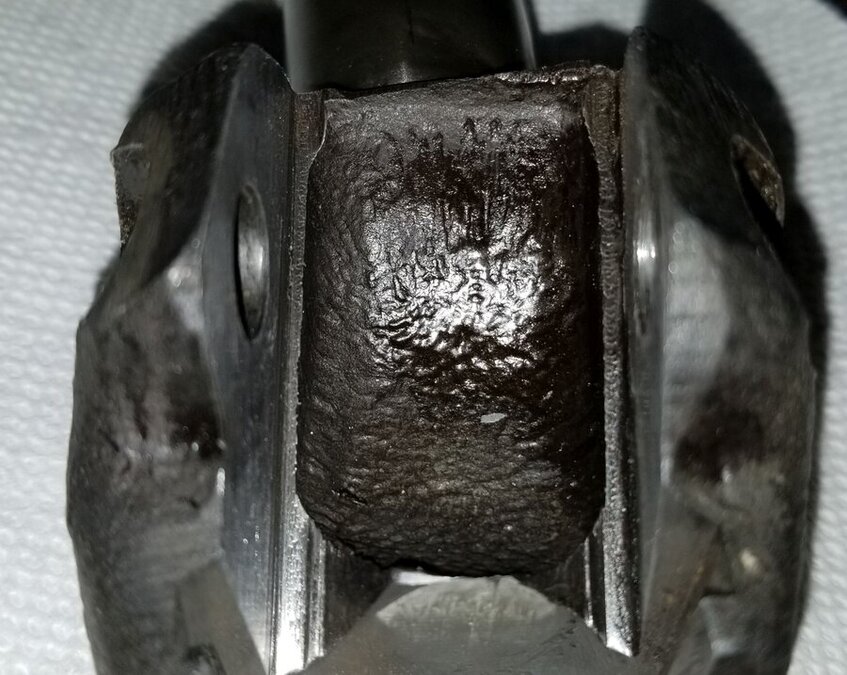
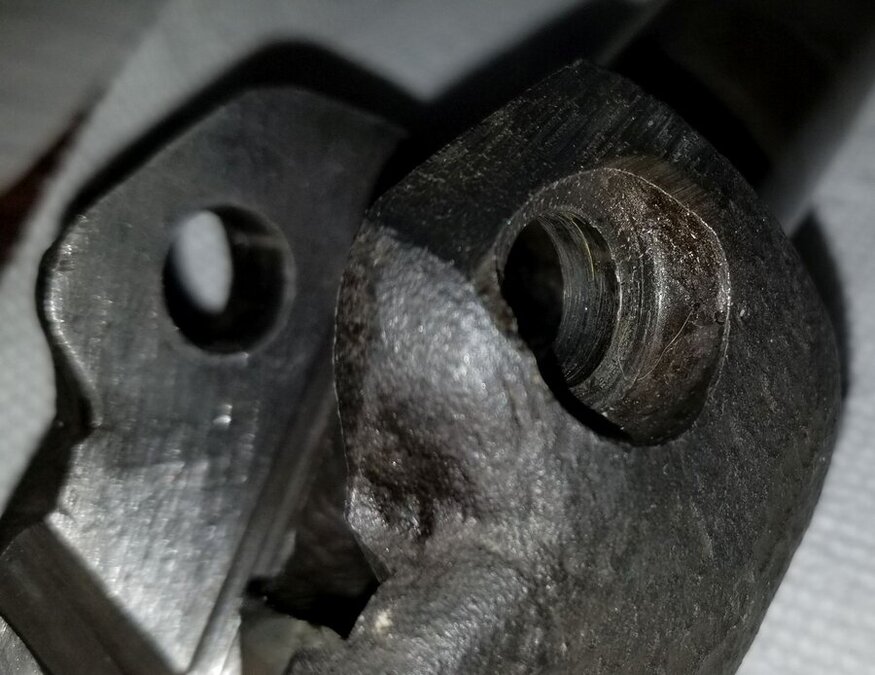
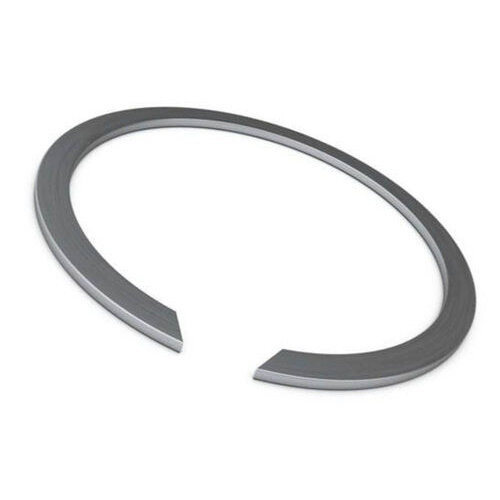
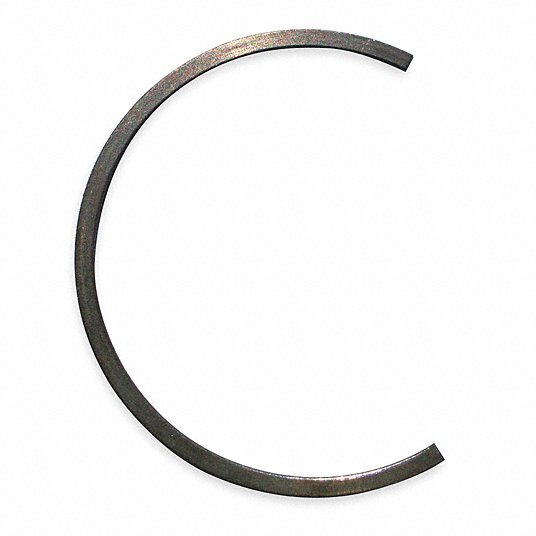
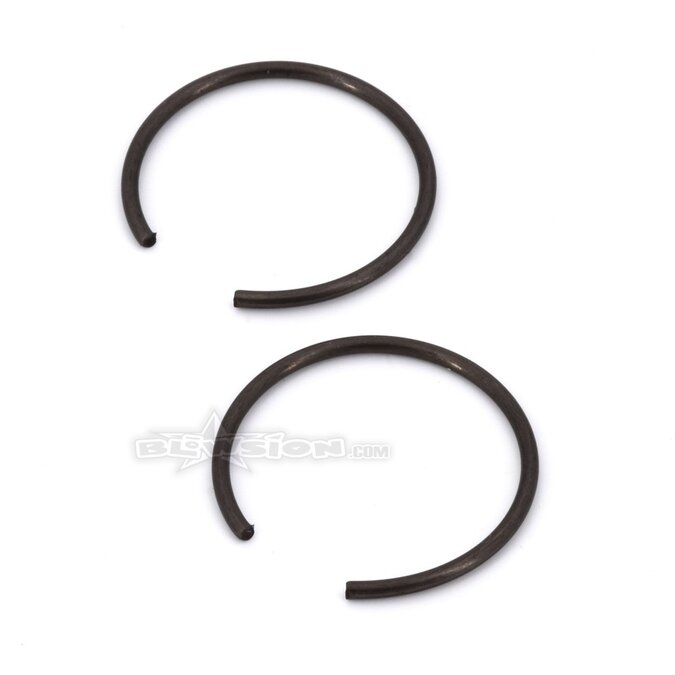
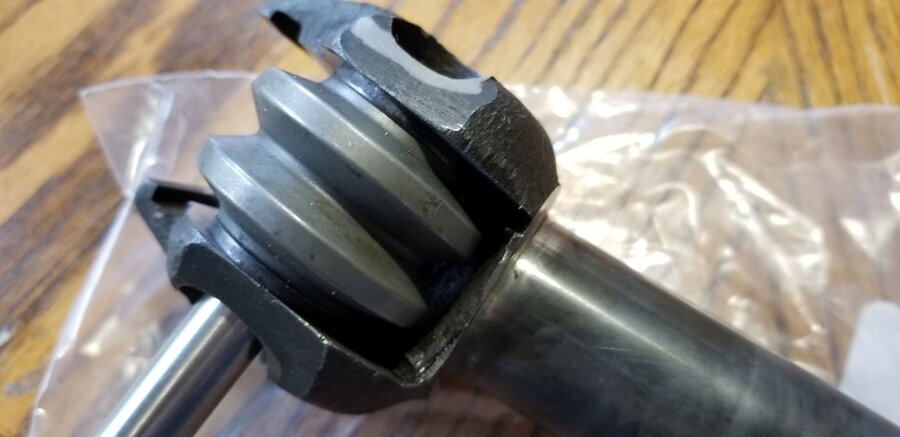
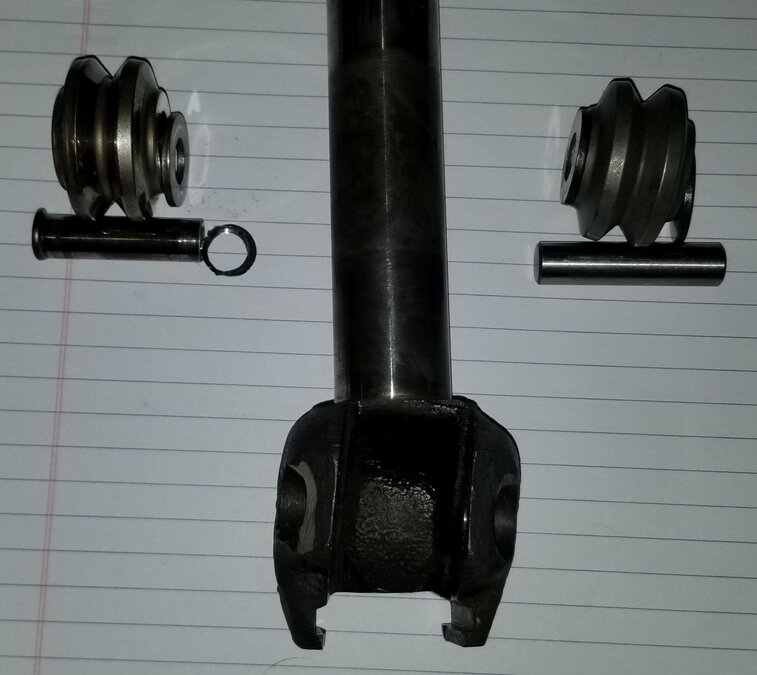
Looking things over the use of a C clip or circlip might be feasible. I think the typical style of clip that uses snap ring pliers likely won't work due to clearance issues. Probably the best chance of success would be to use clips similar to these. A Clips made from round wire might actually be the best choice. I believe the grooves in the pins would be easier to make and the roundness of the wire will help with the concave openings where the pin was originally mushroomed. As mentioned above the pockets in the sector housing are not flat, they are somewhat concave which would work well for a pin that is riveted into place. The next question is whether or not the pin is long enough to have enough protrude from each end so a clip could be installed. Installing one clip before pressing the pin into place will help but it still will be a tight fit on the other end trying to get the clip installed. Another thought I had was the possibility of drilling and tapping the ends of the shaft and using a socket head cap screw with a washer on each end of the shaft to keep it retained. What I don't know as yet is whether there is room inside the housing for the additional length of the SHCS. Maybe a button head would work? Still another thought was the possibility of welding one end of the pin to create a ridge which would mean I would only have to weld the other end once it's pressed into the sector. By the way, the pin is not a slip fit in the sector housing, its a press (or hammer) fit. This complicates things a little because it makes trial and error fits more or less impossible. Needless to say I have lots of measuring still to do. Here's a couple of pictures to show why I needed to replace the worm and sector roller.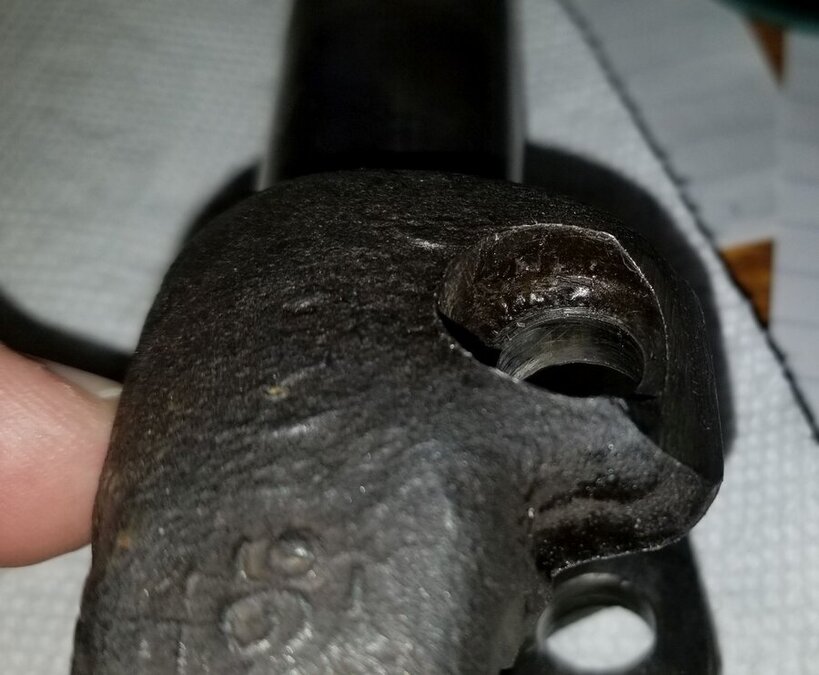


-
CHS Ricardo Cavallero S.R.L manual steering boxes
bkahler replied to bkahler's topic in Mopar Flathead Truck Forum
Interesting thought and one that I hadn't considered before. The shaft might be long enough to allow for some sort of C clip, what I'm not sure of is if there is room to actually install the C clip. This brings up an important question, would it matter if the shaft is allowed to slide side to side up to as much as .125" or more and would that be a precursor to failure? I'll try and post some close up pictures sometime today. Thanks! Brad -
CHS Ricardo Cavallero S.R.L manual steering boxes
bkahler replied to bkahler's topic in Mopar Flathead Truck Forum
I picked up the two resized spacers today. He did a great job of getting the new roller to fit perfect in the opening, no slop but free turning. Now that I've had a chance to look the sector shaft over I realize there is no room for set screws to be installed. The area of a bore where you would normally expect to see a set screw is only 1/8" wide which is nowhere near enough surface area to work with. So I guess it's going to be plan B to retain the shaft in the housing and that's spot welding. Now I need to decide if I can use my MIG to do the job or if I should TIG it. The problem with using TIG is I've only had it for a short time and haven't done much more than power it on a few times. So if I use TIG I'm going to first have to learn how to use it! Brad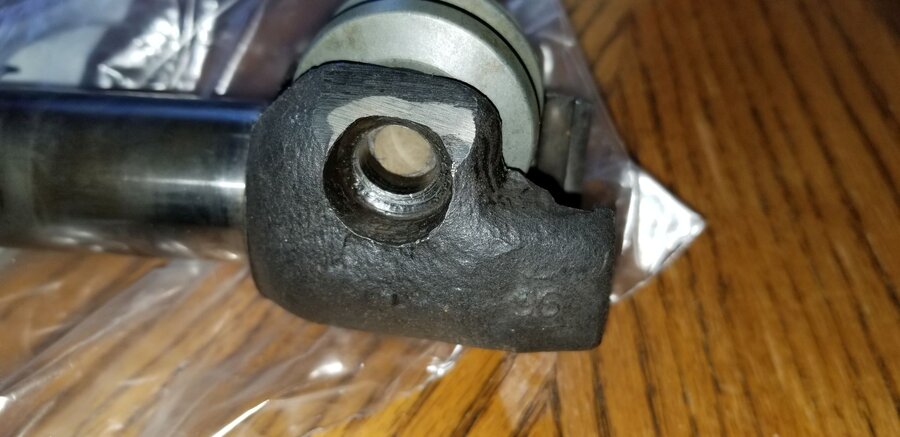
-
I believe he is looking for the cam SPECS and not a cam. Sounds like he's looking to grind his own cam. Brad
-
CHS Ricardo Cavallero S.R.L manual steering boxes
bkahler replied to bkahler's topic in Mopar Flathead Truck Forum
I finished modifying the hydraulic press and managed to get the worm pressed onto the shaft, just barely that is! I added a 1-1/4" x 3" steel channel suspended below the frame as shown in the pictures. This arrangement worked good until the last 3/8". The channel was bowing to much for the worm to press on any farther. I then laid a 2" x 6" chunk of steel channel on top of the 3" channel and that added just enough rigidity to the setup to allow for the last bit of movement. Next weekend I'll see if I can figure out how to add set screws to the sector shaft. Brad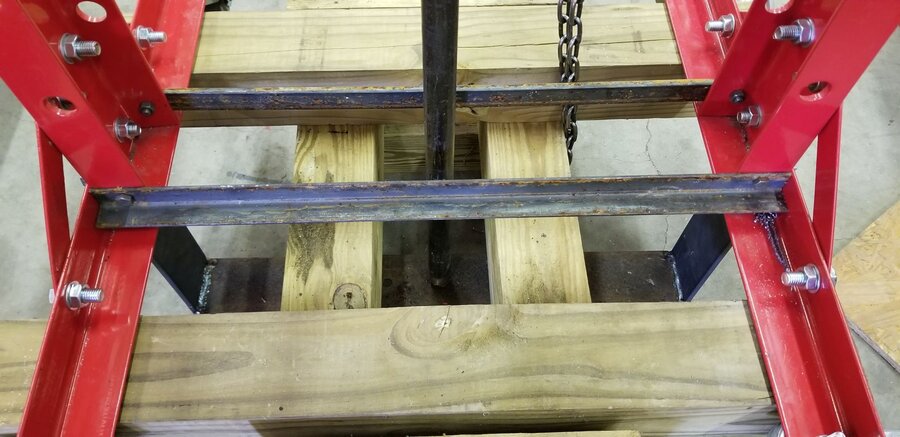


-
CHS Ricardo Cavallero S.R.L manual steering boxes
bkahler replied to bkahler's topic in Mopar Flathead Truck Forum
Yeah, that's a good reminder. One thing of note, the new roller bearings are about twice the diameter of the older bearings. Not sure if that makes any difference, I guess I'll find out if it does It would have been nice if they had riveted one end of the shaft prior to shipping the kit. I think the amount of effort it would take to come up with a riveting jig would be rather large, especially if drilling and tapping a couple of holes is a viable option. In this case the shaft never rotates. The original riveting guaranteed the shaft was fixed in one position. I should have the shims back from the machinist later this week and will tackle the set screws after that. Brad -
CHS Ricardo Cavallero S.R.L manual steering boxes
bkahler replied to bkahler's topic in Mopar Flathead Truck Forum
It's going to be interesting because the roller bearings are not caged, however the did come pre inserted in the roller with a small cardboard tube holding them in place. I believe when the shaft gets pushed through the roller the cardboard tube will push out the other end. I'm just about done modifying my press so I can press the worm on. That task should be completed tomorrow. I got to thinking about how to rivet the ends of the shaft and had the idea of using set screws instead. My thought is to drill and tap holes, maybe 10/32 or 1/4-20, and then grind divots in the shaft in the appropriate spots for the set screws to screw into. At the moment I can't think of any downside to doing this. Maybe someone else can poke holes in this idea Brad -
Evan, I updated the CHS Ricardo Cavallero thread with the progress I made on installing their kit. Brad
-
CHS Ricardo Cavallero S.R.L manual steering boxes
bkahler replied to bkahler's topic in Mopar Flathead Truck Forum
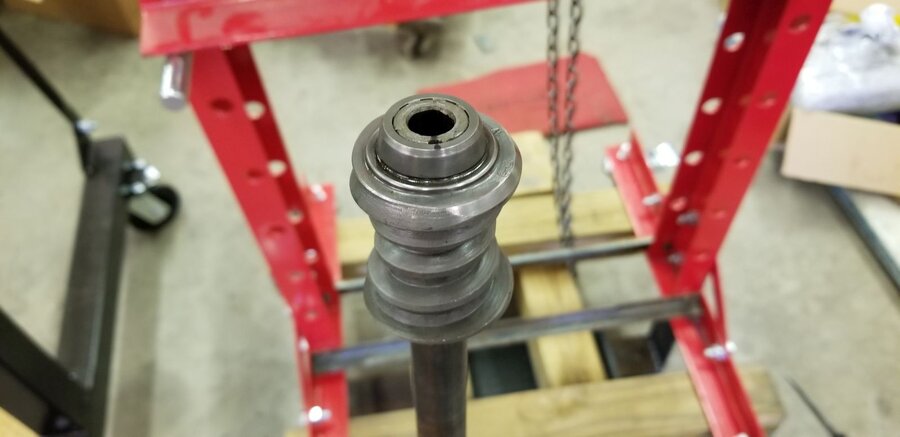
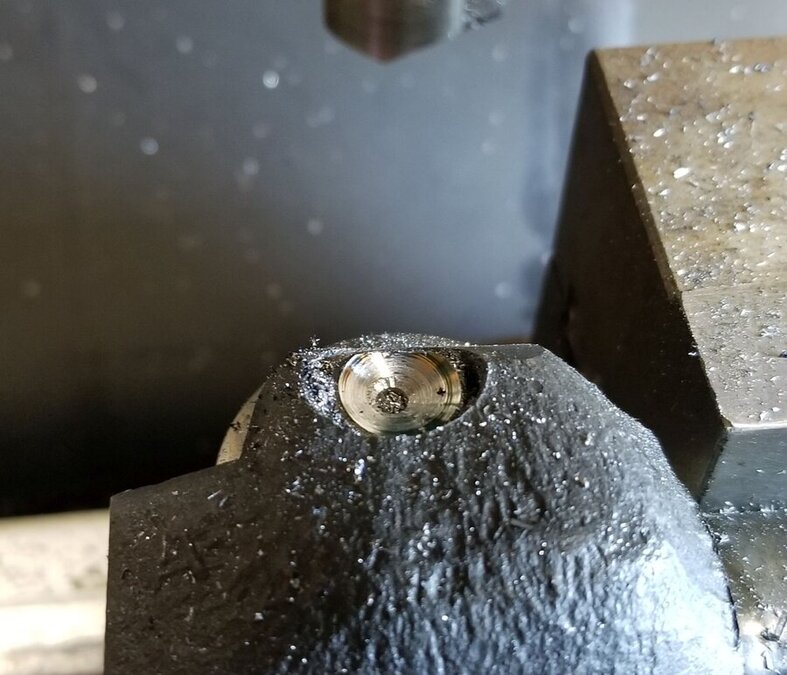
Last night I machined a push pin on the lathe so I could press the worm gear off the shaft. I'm happy to report the job went well. I lifted my hydraulic press with the gantry crane and set it on a wood frame made from 4x6s and 4x4s that I had made previously for a different job. The worm gear removal went well, it didn't take the full 20 tons but it definitely let go with a bang and moved about 1/8". After that it didn't take much effort to press it out the rest of the way. Next I tackled the sector shaft roller replacement. The pin that the roller rides on is basically riveted in place on both ends. I'm not sure how much tonnage it takes to rivet a 1/2" diameter hardened pin but I'm sure it's a bunch. Removing the old pin was a challenge. There is no part of the sector shaft that is flat, square, parallel or perpendicular. I ended up clamping it in my milling machine vice and with a center drill in the quill I did my best to eyeball the center of the pin. At the same time I had to level the top of the pin so it was parallel with the table. This was not the easiest thing to do but I actually succeeded surprisingly well! I was able to start a hole in the center of the pin with the center drill After that I tried a HSS endmill and found out rather quickly just how hard the pin was. My second attempt was with a 1/2" carbide drill bit that I've had kicking around my tool box for over 30 years. I bought it for one job and never used it again until today. I believe it will need to be sharpened before I can use it again. But , it did its job. I almost hit the center of the pin dead nuts. You can tell by the metal ring that snapped off when I started pressing the out the pin. I doubt that I could get that lucky again if I tried. On the left is the original roller, pin and shims. On the right are the replacement parts. The kit states that the thickness of the replacement parts is slightly larger to account for wear and warns that the roller needs to be centered in the housing to work properly. Herein lies the next problem. My original roller and shims measured 1.1345" in overall width. The replacement roller and shims measure 1.152". The new parts are .0175" wider than the original. The fit of the original was nice and snug in the pocket and spun smoothly. The new parts aren't close to fitting. I measured the individual width of the rollers and the original was .969" and the new one is .977" which is .008" wider. This means I can't swap shims to makes things fit. The only option I can come up with is to take the new roller and shims to the machinist down the street and have him surface grind the two new shims to remove .0087" from each shim. Once all that is done I'm left with one last problem which is how to fix the new pin in place. The kit instructions suggest that if I don't have a riveting press handy to rivet the pin in place I can weld each end to the sector housing. I have a feeling that's the approach I'm going to have to take. I'll update things as I make progress. Oh yeah, one more minor problem! With my current hydraulic press configuration I don't know how I can press the worm onto the steering shaft. The bottom of the shaft needs to be press against a solid surface that is part of the press. Looks like I'm going to have to do some jury rigging to my press to get the job done. Needless to say this job is not a simple take the old parts off and put the new parts on type of job! Brad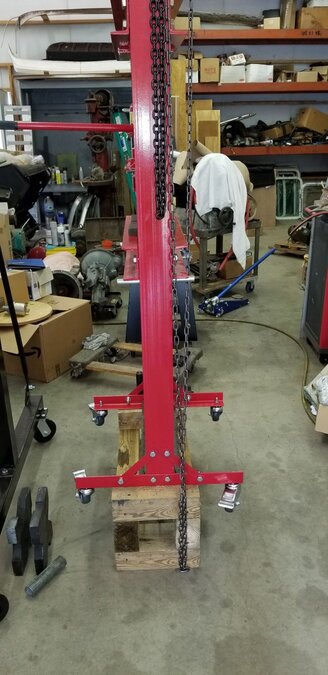

-
I won't sell it to you, but you can have it
-
I will try and get the worm installed this weekend along with the new sector roller. I just got done modifying my hydraulic press so that I can handle the long steering shaft. I had to place it on 8" blocks and add two support angles along the bottom so I could remove the bottom center brace. The center brace was keeping a long shaft from being placed in the press. Tomorrow I hope to turn the press pin on the lathe that I'll use to push down through the worm. I'll post the results of the install on my original thread. Sorry it's taken this long. Brad
-
I believe JB has a photographic memory......
-
I may have missed it but does anyone know how to tell the differences in the NP420? I have a NP420 installed in my truck that I bought many years ago. I don't remember if I was told what model year truck it was from. Knowing what syncros would work as replacements if needed would be nice to know.
-
If it was assembled you could tell if there was some sloppiness. I could easily detect that in mine when it it was off the truck. One of the many reasons I went ahead and bought the kit was I really hate sloppy steering. I find it extremely annoying!
-
Even, It's not just pitting that needs to be worried about, it's also how much wear does the worm have. Even though the worm might be smooth and shiny if it is worn then the sloppiness will still be present in your steering. I only drove my truck for maybe a grand total of one block before it was parked. In that short drive I was able to see just how bad the steering was. The wheel would literally turn almost a quarter turn before the truck would change direction. It was quite the adventure! Brad
-
53 Dodge pickup questions from a novice.
bkahler replied to 53dodgegirl's topic in Mopar Flathead Truck Forum
My 51 had the same heater with fresh air and the mine was medal with rubber seal as well. -
I've had the amazon nut on order for quite some time with no ship date given as yet. I didn't even think of checking with McMaster. I'll go ahead and order from McMaster so I can get the oil line ran. Thanks! Brad
-
Is this the special nut being discussed?
-
That would be a lot of chips Thanks for the idea.
-
I really like that brass filter housing to carburetor adapter! I currently have PVC that I machine to fit. I just might have to find a some large brass tubing Thanks, Brad
-
51 1/2 ton is the same as your 1 ton.


