Eneto-55
-
Posts
1,901 -
Joined
-
Last visited
-
Days Won
5
Content Type
Links Directory
Profiles
Articles
Forums
Downloads
Store
Gallery
Blogs
Events
Everything posted by Eneto-55
-
So, 4 of the taller ones and 2 of the thin ones make a set?
-
verticle vent window rubber seal for 52 plymouth ?
Eneto-55 replied to Dartgame's topic in P15-D24 Forum
Thanks for the info. I defer to experience, but I would think that the effect of oil on rubber will not stop, but continue until eventually the rubber turns into a gooey mess. I've seen rubber turn to a runny glue, but that was in the tropics, and I always figured it was a bacterial growth, not oil per se. But there are also certain natural oils (like copaiba) that dissolve plastics. Obviously some rubber products are made to be exposed to oil on a constant basis, but I wonder if it isn't a different composition. -
verticle vent window rubber seal for 52 plymouth ?
Eneto-55 replied to Dartgame's topic in P15-D24 Forum
Thanks for the reply. Do you just rub the hand cleaner onto the rubber, and what brand? I don't remember for sure what I did (because it was over 35 years ago), but my body mount "bisquets" were caked in tar & road dirt, grease, etc., and I may have used gasoline to clean them first, and I kinda' remember buffing them on the wire wheel (on the bench grinder). Anyway, now they are badly deteriorated, cracked, and kinda' look like at some time over the last 35 + years (while the car sat in my Dad's shop) they oozed. So this means I will need to replace them now, before I finish the car. (We lived overseas for 18 years, then moved here to Ohio, and i just now got my car moved here from Oklahoma.) -
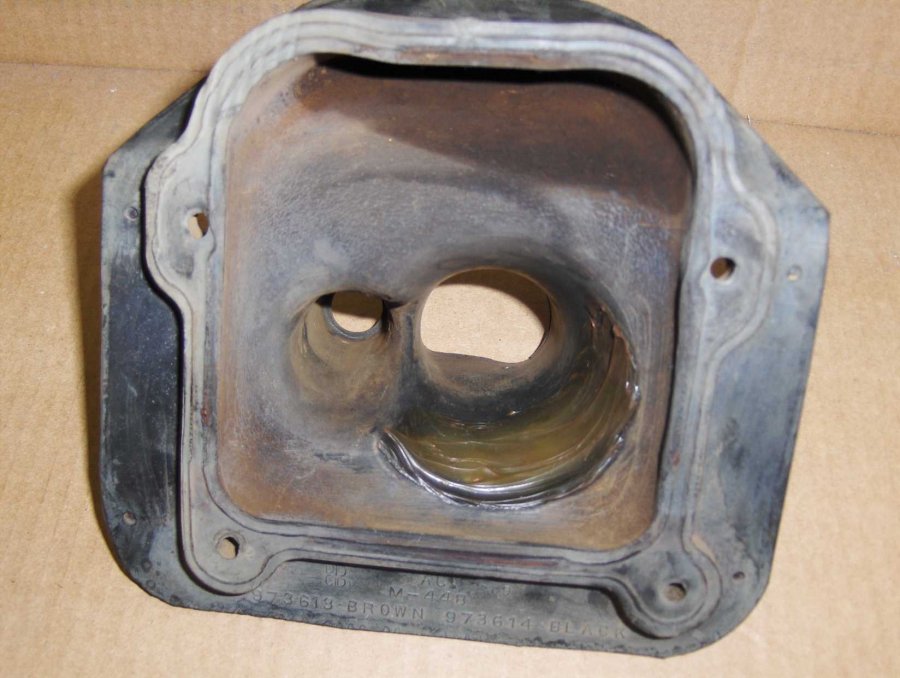
Thank you DeSoto139 & BobT. Yes, I did see the word 'brown' on the bottom of my piece, but hadn't read the rest of it, and thought maybe they considered this piece to be brown, although it sure looks black to me. I see now that both numbers are on it. As far as I know this is an original one. It was on the car when I bought it in 1980, although the car was already partly dismantled, and the body may have already been off of the frame. (It was loose, anyway.) I did look at Berbaum, and they have it in both colors. I suspect that there is a steel piece molded inside this, but nothing shows on the outside. I wonder if anyone on here has one that was so deteriorated that they could describe how the steel piece is shaped. I guess one could ask these re-manufacturers if there was some steel support in the original, and if their reproduction also has it. As far as pricing goes, I don't know what is reasonable, but I can say one thing for sure - there sure are a LOT more reproduction parts available now than there were back in 1980, when I started on this car. Like the door sill plates. Back then my idea was to just made do with the old ones, or make something out of a rubber mat. (I never thought of making a metal plate, as some here have done.) I didn't even put all of the holes back in when I repaired the sheet metal, although I did put in the recessed areas where the holes would be. Back then I was just building it as a daily driver (and then got carried away with one thing leading to another, till I really had it all in pieces), but now that would be different, especially living here in the Ohio 'salt belt'. ADDED: I just thought to check with a magnet, and there IS steel inside the steering column piece, both in the base, and in the top flat area.
-
OK, thanks. I see that hole now. Speedometer cable too, possibly? It's just inside the recessed area of the fire wall (on left side here in the US - same there?). (I hadn't seen it because it being set back in that area. It is almost 40 years since I painted the firewall, so didn't remember this hole, but once you said what went through it, I easily found it. So I'm missing the bracket that clamps this rubber grommet to the firewall. Have to look back through the boxes of parts...)
-
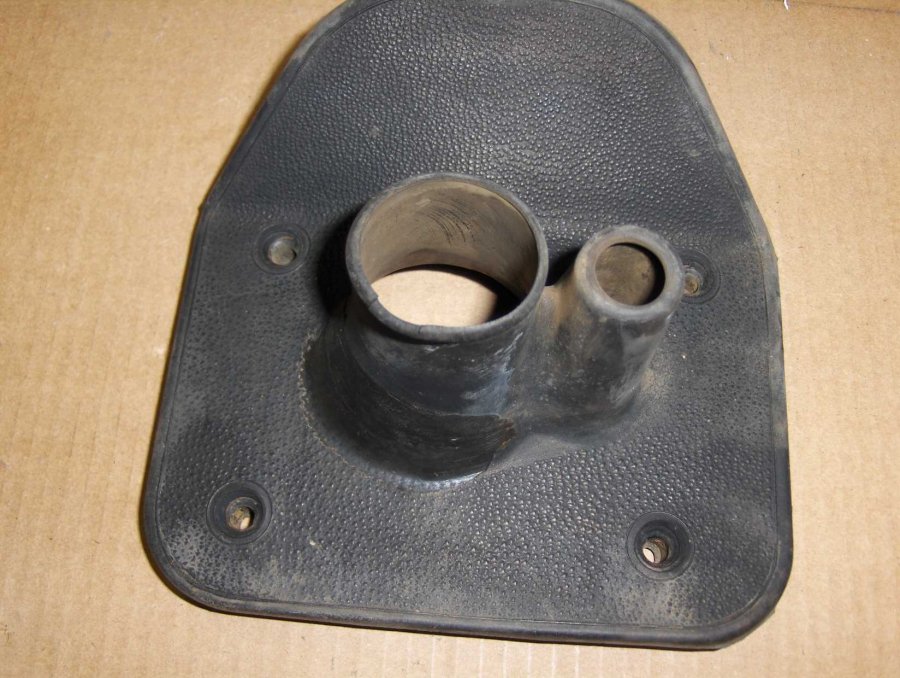
Here is a rubber part that I don't know where it goes, although I think it is a firewall grommet. (It isn't the one where the wire harness goes through - that one has a larger hole.) I should have set a ruler beside it for perspective, but it is 2 1/2" x 1 1/2" x 3/8" thick.
-
Here is a comparative photo of the Kombi rubber bumper, and a Plymouth one that is in better shape than the other I had here before. (The VW Kombi one is on the left. You can see that it is more crown shaped than the original one.)

-
Steering Column Boot (bottom & top) I checked on Roberts, and didn't find it listed or shown. As you can see, this one has been repaired in the past, where it was cracked or torn. (Possibly I repaired it when I took it off of the car in the early 80's.) It's in fair shape otherwise, but it is also torn a bit where the steering column goes through, & I don't think the silicone rubber patch will hold long term. (And it would be a bit of work to change this later.)


-
Since I bought my car with the fenders already off (and that was back in 1980), I just want to make sure how many of these bumpers are used, and how many sizes there are. It appears from your description that there are four of the taller bumpers (2 each side) toward the rear, and then two at the front, which are shorter in height. Is this correct? I can't quite read your ruler. Are the front ones about half the height of the rear ones (ie, 3/32")?
-
verticle vent window rubber seal for 52 plymouth ?
Eneto-55 replied to Dartgame's topic in P15-D24 Forum
How do you do this, and how did it turn out this time? -
Is this contact information still current?
-
On 3/5/2016 at 12:53 PM, knuckleharley said: Was there ever a response to this question, perhaps by PM?
-
Is the question regarding the price of a set for the four door, or as to whether he also makes them for the four door? (35 + years ago, when I started the restoration work on my 46, I was going to reuse the ones I have, but lost of things are available now that were just a dream back in 1980.) So I might be interested in a four door set, but just now getting started on my car again, after getting it moved to Ohio from Oklahoma, where it sat since I stopped working on it in 82 or 83.
-
I'm the odd guy out who likes to work on the floor. Always have, and my grandpa often did as well. (My current FaceBook picture is of my brother & I with him, all of us squatting on the ground eating watermelon in the back yard. Grandpa would have been in his upper 60's by then.) That way I can use my feet to hold stuff down, etc. When I was working as a carpenter years ago, and needed an additional hand to hold the board I was cutting, I squatted up on top of the saw horses, holding the board with my foot. The boss thought it was really funny. Then later we lived with Indians in the Amazon, and everyone worked on the ground. I still tend to do this even now, at 62, but I admit that it is becoming more difficult to get up again afterwards.
-
Can someone photoshop one in, PLEASE?
-
But watch out if it back fires..... (You're toast.) Oh, wait, you weren't dribbling the gas in out of an open can. Misread it at first.
-
I have rewound motors before, so I'm not afraid to dig into it, but I did do that under the eye of an old timer who taught me how to do it. Not being able to tell how it is put together, however, puts me off a bit. It does appear that the brush plate is riveted to the end of the case, through the end. Maybe there is enough wire there that it was fastened first, then the coil plates pressed in. But that would still mean that I would probably need to drill out the rivets, because I don't think I could solder down inside that small motor case. (I can't see that well anymore, and have to use a magnifying glass for close work, even though I wear tri-focals.)
-
I think the jacks that engaged the bumper via a slot started in around 1968 or so. (I know that my 72 Coronet had that type, and my previous car, a 62 Chrysler, did not. So I'm kinda' going by memory-guess work.)
-
Maybe would be best (to move it, or just delete it here, as I reposted it to the P15 side later) and move this post as well. Question: Can the inside of the motor be removed w/o ruining something in the process? If so, how? Looking into the motor case, it appears to me that the brush assembly is fixed to the inside of the case in some way. I can't see in there very well, but I don't see anything that it is attached to the plate-coil assembly. Otherwise, I will just try to get shrink tube down in there as far as possible, w/o disturbing any more of the wire, so as to break more of the wire coating. I'm wondering, though, if I can remove that part of the motor from its case, if I shouldn't use some of that special wire that has heat resistant coating for at least that part of it.
-
-
Sorry, I just realized that I posted this in the truck forum. I have a Plymouth P15. (I found this through the search function, and didn't notice that it was for trucks. Hope this is not a problem....)
-
I also have the problem with brittle wire cloth casing. The positive wire was much longer than necessary, and they had wrapped it around the intake ribs, and no matter how carefully I unwrapped it, it broke every place I had to bend it. The wires are so dried out that I cannot tell what color they were. The P15 wiring diagram does not show the heater (an option, maybe?), but the diagrams for P17 & 18, etc all show the wire going to the switch as being black. The P17 & 18 show it as being 12 ga, and the P22 & 23, and the P24 & 25 show 14 ga. So if that wire is black, what color should the positive (ground) wire be? (Do I have this right? The fan motor positive goes to ground?) It looks faintly lighter in color, but I cannot tell what color it might have been, and certainly could not tell if it had a tracer color. (I have the MoPar Deluxe Model 36 heater. Anyone else here have that one?) Anyway, I am going to have to replace the wire all the way back into the motor. I opened the motor to oil the bushings, but I'm not sure if I can get the coil part out of that half of the housing w/o destroying something. I would like to replace the wire all the way back to the coils, but I have to remove it to do so. Or I could solder on new wire at that point right inside the housing, and slide shrink tube down into the side of the case to cover them as far as I can get it in. But does that shrink tube hold up OK in the heat generated by the motor? (Maybe there is special heat-resistant tubing, but then how could you shrink it?!?)
-
I have dismantled my heater, and was thinking of doing this, but was wondering if this would provide about the right amount of pressure. Good to know this works. (Thanks!)
-
I believe that the melting point of brass is such that a more complex part could be cast, using a torch to heat the metal. The problem, if I understand it correctly, is that prolonged melting of brass changes the composition, as the tin melts at a much lower temperature than the copper content, and the tin content drops. (Corrections welcome.) But just working down an existing piece of brass seems a better option. Also, you might find some random piece of brass that has almost the correct shape, like something off of an old faucet. (Hence my weakness for collecting all sorts of odd bits....) Aluminum could also be cast, then plated chrome (as suggested above).
-
[Above is from a thread in the truck forum by Royhldn called "Bully".] Question: Is there a 6 volt temp gauge that can be converted for use in a P15? If I recall correctly, '55 was the first year for 12 volt systems. [I have a '55 engine in my 46, and rebuilt it with the late model head before I realized that it does not accept the mechanical sending temperature unit. I do have the head from a '49 1st series, so I could swap them out, but I did a lot of work on this later model head - vatted it, bead blasted, and cad plated - so hate to loose that work. If I can't go the electric route, then I will probably have the head drilled & taped for the larger diameter fitting used in the P15 head. I didn't want to convert to 12 volts, but I know that would be another option.]