Merle Coggins
-
Posts
9,400 -
Joined
-
Last visited
-
Days Won
87
Everything posted by Merle Coggins
-
My '50 truck axle also seals on the axle shaft like what Pete's shows. I too was able to get inner and outer seals from Napa. There was one that they didn't have in their books. I think it may have been the front seals, but they were able to cross the number from the original seal for a match. As for the puller, I used a 3 jaw slide hammer puller to get my inner seals out. It crushed the seals, but it worked. Merle
-
Dan, I don't remember what year truck you have, but on my '50 B series truck I rigged up a temporary control panel so I could run the truck while the body is off. I clamped a piece of plywood to the steering column tube and attached the voltage regulator to it. I also installed a simple toggle switch and an inexpensive set of gauges for amps, oil press, and temp. I just wired it all up using the wiring diagram in my service manual as a guide. It works great. It's hard to see in this pic, but you can see that it's possible to run the engine without any cab electrics. If you just need to run the engine you could just run a jumper wire from the starter lug to the coil with an alligator clip at at least one end, and disconnect any wires feeding the cab. It won't charge if you disconnect everything, but there's less chance for a Car-B-Q. Or you could hot wire the regulator too so it'll still charge the battery. Merle
-

Oil bath air filter question
Merle Coggins replied to Mario Loya B1B's topic in Mopar Flathead Truck Forum
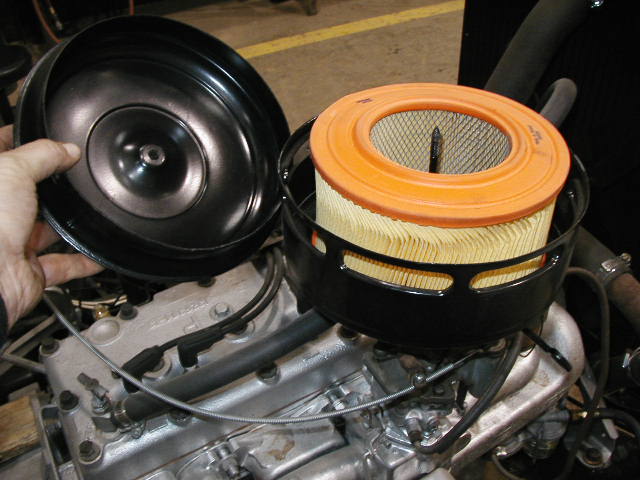
Mario, I too am trying to keep my truck mostly original, but my air filter was rusted badly on the inside due to it being stored in the bed of the truck and getting filled with rain water. Following Norms info from his web site, I did a similar conversion. I gutted the upper section and cut it shorter to allow good air flow, but you have to look very close to see any of the paper element when it's assembled. I cut a donut shaped plate and set it in the bottom with RTV silicone to get a flat surface for the filter to seal against. I found a Napa 542193 element that fits pretty good. Merle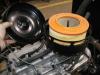

-
World of wheels in Green Bay WI
Merle Coggins replied to Todd B's topic in Mopar Flathead Truck Forum
Good deal Todd. You had the Semi shined up nicely at that show. Is that show at the Resch center next to Lambeau? I wish I could get up there, but it's not likely. I'm in North Carolina this week and won't get home until late Friday. And I have a fairly busy weekend planned when I get home. For the rest of you, I have been lucky enough to see his truck in person, and it is nicely done. His camper is also very nice. Although the truck it self displays it's original petina, it fits with the overall outside apearance of the camper. It has a very rustic look on the outside. And the inside is very nicely done. He did a wonderful job on this rig too. Merle -
OUCH!!! I too had a farily nasty reck, about 14 years ago now. Not quite as bad as your's Dennis, but a broken femor and a shattered bone in my hand. 3 weeks in the hospital and rehab center, then a few more months of physical therapy. It wasn't much fun, but it didn't take me away from them yet. Your's sounded MUCH worse. Glad to hear you made it through it all. I have since become an MSF Rider Coach and ride much safer now. (most of the time) Here was garage cleaning day a couple of years ago. The "fleet" has since changed a little, but the count is the same. Merle

-
I have a 1 and 1/2 car garage, but I have yet to be able to get even 1 car into it. It's full of motorcycle stuff. I feel your pain. Merle
-
AJ, I agree with you on the engine. If it turns over, it's probably saveable. I'd be a bit pesimistic about that though. If it's down near the Gulf, don't you have a lot of salty air down around there? I gues it depends on where it's been stored. However,my truck engine was seized up tight when I got it, and was 1/2 dissasembled in the truck. (basket case) I was able to get it apart, send it out to a local machine shop for a .030" over bore job among other things, and had it back purring again for around $1500. Also, if it's been sitting for a long time, it'll probably be needing brake work and the like. However, they are pretty simple beasts when it comes down to it. It'll probably share similar driveline components with your Coronet. Have a good look at the body. You may not have the rusting problems down there that we have up here, but check it over none the less. Look at the bottoms of the doors, the back corners of the cab where the floor meets the cab shell, and the front fenders where they're rivited to the upper rear mount. These are, from my limited experience, the most likely rust problem areas. It's all repairable, except for the door bottoms, if you're even a little bit handy with a welder and body filler (or so I'm learning). And even the doors pop up on ebay from time to time. I say go for it. It can't be all that bad. Merle
-
Nice job Harvey. That's one sweet looing truck. I hope mine turns out even close to that nice. Merle
-
Don't we all, Ed
-
I know what you mean Norm. It was just an idea that I was toying with. I wasn't really crazy about the look of the one in the earlier post, but still entertained the idea of doing some kind of accents. Nice thing about vinyl, it comes off fairly easy without any mounting holes left over. I probably won't do it, but I do thing MaryAnn's truck looks tough in the diamond plate looking wrap. As for the bed wood, that's another thing that's been tormenting me. I too like the look of the oak, but I also like the original all black look. I'm still torn on that one. Merle
-
Recently there was a post with a picture of a truck with diamond plate on the sides of the bed. Well today I had a chance to stop in by my friends shop and got a good look at her truck. I saw it when I dropped off my gauges for her to make new face decals, but it was dark out. Her husband showed me a left over piece of vinyl that she used to wrap the truck in. It's printed on reflective vinyl and it really pops when lights hit it. I had thought about having her do something like that to sections of my bed once I'm finished with my truck. But that's a ways off, so who knows.
-
Is there something wrong with it? If it's working, I'd leave it alone. Merle ps. In the future, take your posts to the Pilot-House section. You may see more activity.
-
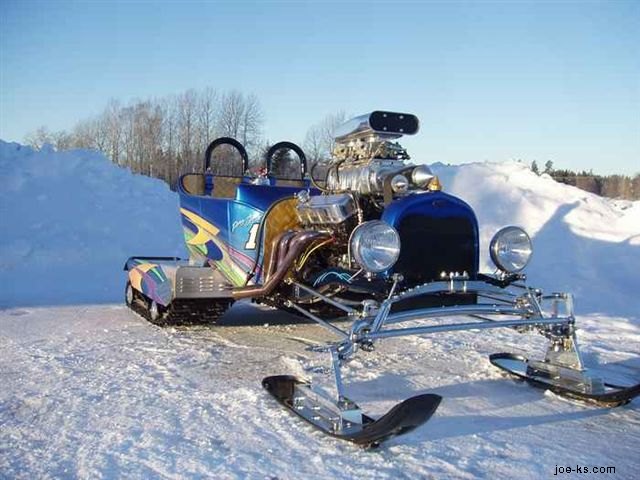
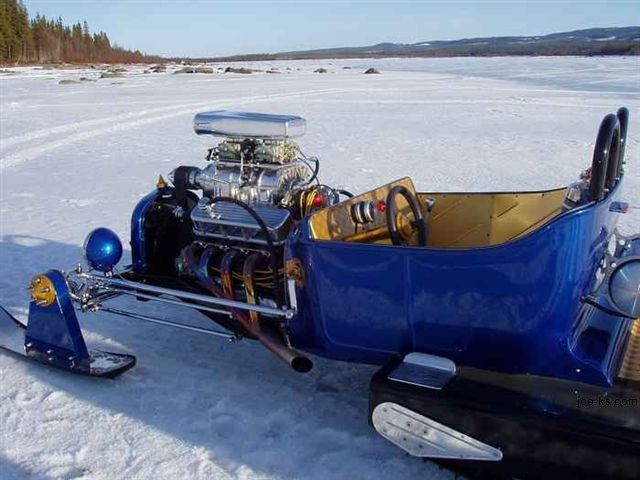
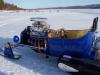
A while back someone posted pics of a Nash Metropolitan turned into a snowmobile. Well how 'bout this one? Merle

-
I like the Permatex #9 "Tack & Seal". It resembles pipe thread sealant, but it's different. It stays flexible and tacky, and seals very well. It's great for gaskets that tend to move around during assemble because it is quite tacky. It won't squish out like RTV silicone. A good pipe thread sealer (A.K.A. Pipe Dope) would probably work fine for you too. Should be available whereever plumbing supplies are sold. That's what I used on all of my bolts and studs that went into the water jacket. So far so good. Merle
-
Brian, The Negative side of the coil is the power source from your ignition switch. The Positive side goes to the distributor and the points. (if your truck is Pos ground) The points open and close the ground on the coil circuit. Check that you have voltage at the Neg side with the key on. Then if you have Ohm meter, or other type of continuity meter, check the Positive wire for a ground. Disconnect the wire from the coil and connect your meter to that wire and a good ground. Turn over the engine and you should see continuity to ground when the points are closed, and no continuity when the points are open. If you never have continuity you have an open circuit such as broken wire, bad points, or distributor isn't grounding to the block. If you always have continuity you have a short in the wire or points system. The coil works as follows; When the points close it completes the circuit for the coil which energizes the coil creating a magnetic field (becomes an electromagnet). When the points open that magnetic collapses which induces a high voltage spike within the coil. This high voltage gets discharged through the coil wire, which gets distributed through the cap and rotor to a spark plug. Spark plug arcs, gas goes BANG, and engine runs. If any of this doesn't happen... no BANG. Good luck Merle
-
Nice looking truck Dutch. Have you found a good way to get it back home? Merle
-
After reading about what the level was for, I remembered an email that I got a few days ago. Read and enjoy. COMMON TOOLS AND THEIR USE: DRILL PRESS: A tall upright machine useful for suddenly snatching flat metal bar stock out of your hands so that it smacks you in the chest and flings your beer across the room, splattering it against that freshly-stained heirloom piece you were drying. WIRE WHEEL: Cleans paint off bolts and then throws them somewhere under the workbench with the speed of light. Also removes fingerprints and hard-earned guitar calluses from fingers in about the time it takes you to say, "Oh sh--...." ELECTRIC HAND DRILL: Normally used for spinning pop rivets in their holes until you die of old age. SKILL SAW: A portable cutting tool used to make studs too short. PLIERS: Used to round off bolt heads. Sometimes used in the creation of blood-blisters. The most often the tool used by all women. BELT SANDER: An electric sanding tool commonly used to convert minor touch-up jobs into major refinishing jobs. HACKSAW: One of a family of cutting tools built on the Ouija board principle. It transforms human energy into a crooked, unpredictable motion, and the more you attempt to influence its course, the more dismal your future becomes. VISE-GRIPS: Generally used after pliers to completely round off bolt heads. If nothing else is available, they can also be used to transfer intense welding heat to the palm of your hand. WELDING GLOVES: Heavy duty leather gloves used to prolong the conduction of intense welding heat to the palm of your hand. OXYACETYLENE TORCH: Used almost entirely for lighting various flammable objects in your shop on fire. Also handy for igniting the grease inside the wheel hub you want the bearing race out of. WHITWORTH SOCKETS: Once used for working on older British cars and motorcycles, they are now used mainly for impersonating that 9/16 or 15/16 socket you've been searching for the last 45 minutes. TABLE SAW: A large stationary power tool commonly used to launch wood projectiles for testing wall integrity. HYDRAULIC FLOOR JACK: Used for lowering an automobile to the ground after you have installed your new brake shoes, trapping the jack handle firmly under the bumper. EIGHT-FOOT LONG YELLOW PINE 2X4: Used for levering an automobile upward off of a trapped hydraulic jack handle TWEEZERS: A tool for removing wood splinters and wire wheel debris. E-Z OUT BOLT AND STUD EXTRACTOR: A tool ten times harder than any known drill bit that snaps neatly off in bolt holes thereby ending any possible future use. RADIAL ARM SAW: A large stationary power saw primarily used by most shops to scare neophytes into choosing another line of work. TWO-TON ENGINE HOIST: A tool for testing the maximum tensile strength of everything you forgot to disconnect. CRAFTSMAN 1/2 x 24-INCH SCREWDRIVER: A very large pry bar that inexplicably has an accurately machined screwdriver tip on the end opposite the handle. AVIATION METAL SNIPS: See hacksaw. TROUBLE LIGHT: The home mechanic's own tanning booth. Sometimes called a drop light, it is a good source of vitamin D, "the sunshine vitamin," which is not otherwise found under cars at night. Health benefits aside, its main purpose is to consume 40-watt light bulbs at about the same rate that 105mm howitzer shells might be used during, say, the first few hours of the Battle of the Bulge. More often dark than light, its name is somewhat misleading. PHILLIPS SCREWDRIVER: Normally used to stab the vacuum seals under lids and for opening old-style paper-and-tin oil cans and splashing oil on your shirt; but can also be used, as the name implies, to strip out Phillips screw heads. Women excel at using this tool. FLAT-HEAD SCREWDRIVER: A tool for opening paint cans. Often used to convert common slotted screws into non-removable screws. AIR COMPRESSOR: A machine that takes energy produced in a coal-burning power plant 200 miles away and transforms it into compressed air that travels by hose to a Chicago Pneumatic impact wrench that grips rusty bolts which were last over tightened 30 years ago by someone at Ford, and instantly rounds off their heads. Also used to quickly snap off lug nuts. PRY BAR: A tool used to crumple the metal surrounding that clip or bracket you needed to remove in order to replace a 50 cent part. HOSE CUTTER: A tool used to make hoses too short. HAMMER: Originally employed as a weapon of war, the hammer nowadays is used as a kind of divining rod to locate the most expensive parts adjacent the object we are trying to hit. Women primarily use it to make gaping holes in walls when hanging pictures. POCKET KNIFE: Used to slice through the contents within cardboard cartons delivered to your front door; works particularly well on contents such as car seats, vinyl, liquids in plastic bottles, collector magazines, refund checks, and rubber or plastic parts. Especially useful for slicing work clothes, but only while being worn. DAMMIT TOOL: Any handy tool that you grab and throw across the garage while yelling "DAMMIT" at the top of your lungs. It is also, most often, the next tool that you will need. MICROMETER...A precision tool made for measuring objects in increments of one thousand of an inch. In emergency situations it can double as a "C" clamp. CRESCENT WRENCH: Adjustable wrench used in place of proper tool. Generally rounds off bolts slower than pliers, but with same effect. Also used as hammering device, usually on concrete followed by loud cursing.
-
What's he use the plunger for?
-
What makes the best chassis replacement for 53 pickup ?
Merle Coggins replied to a topic in Mopar Flathead Truck Forum
They may have changed some in '54. The B series 1/2 ton trucks measure 108" wheel base. -
WOW!!! I could sell mine and help fund my project. But then again, what would I hang my mirror on when I get done? Merle
-
Actually, if you want to get technical, a pump only produces flow. It's the resistance to flow that creates the pressure. That's Basic Hydraulics 101. So if there is too much clearance between the bearings and the journals, there is less resistance to the flow, hence the lower peressure. Higher RPM produces higher flow which will increase the pressure against the same resistance. Or it could be a weak pressure relief spring too. It's a heck of a lot easier to add a shim to the spring, than to pull the engine apart. Start with the easy things first. Good luck, Merle
-
Mike, don't fret the 3/4 ton thing. Pretty much everything is the same between them except for the 8" length difference and slightly stiffer springs. They share the same drivetrain components, cab, engine, etc. The only real difference is the length of the bed. If you're going to rod it, you may be changing the rear axle anyway, so you can adjust the spring package as needed for a smother ride. Good luck, Merle
-
Welcome aboard Mike, Looks like a B1C. As in "B" Series Dodge Truck, "1" indicates '48 & '49 model years, and the ""C" means 3/4 ton. I am speculating on the 3/4 ton, but from the photo, the length of running board between the back of the cab and the rear fenders appears to match the 3/4 ton trucks. To confirm this there are 2 easy ways to tell, besides the vehicle ID tag. 1/2 ton trucks have 108" wheel base and 16" wheels, and the 3/4 ton trucks have 116" wheel base with 15" wheels. As for your Hydro-matic question, as Ed says, that's a GM thing. In '53 Dodge introduced the "Truck-o-matic" which was the truck version of the "semi-automatic" transmission used in Mopar cars of the age. In '50 they introduced the "Fluid Drive". This is a fluid coupling between the crankshaft and the clutch. It will allow the driver to hold the truck at a stop with his foot on the brake and the clutch engaged in gear. It works similar to the torque converter in an auto trans. If it is a '49 model year, it wouldn't have that option. If the trans shifter is on the floor, it probably is the 4 speed. Otherwise it would probably have a column shift 3 speed. $500 would be a great price if you can get it running without major work. Engine parts are available from many sources, so if it turns over freely, and has a fair amount of compression, it should run. The lower grill bar is missing, as are the trim rings around the lights up front, but otherwise it looks like a quick "DuPont Overhaul" would make it presentable again. Also looks like the hood may not be fully attached. Something looks off there. Go for it, and enjoy. Merle
-
Dutch, go to your local pharmacy, or what wver you have there that would have medical/first aid supplies, and get some latex gloves. They'll keep that paint off of your fingers. It'll take a couple of days to wear it all off. Until then you'll have silver fingers. Latex gloves, or look like the Tin Man, Your call. Merle
-
Front Achor Bolt Adjustment
Merle Coggins replied to grey beard's topic in Mopar Flathead Truck Forum
Good idea Dave. I was able to loosen the nuts and reinsert a new cotter pin (without bending over the ends). Then when I turned the nuts with a wrench, it also turned the adjusters. Once adjusted, I removed the cotter pin, tightened the nuts and reinstalled the cotter pins. I did, however, remove the drum again to hold the adjustment pins while tightening the nuts, as a precaution. Merle