-
Posts
7,176 -
Joined
-
Last visited
-
Days Won
79
Content Type
Links Directory
Profiles
Articles
Forums
Downloads
Store
Gallery
Blogs
Events
Everything posted by JBNeal
-
VINTAGEPIC: spotted the tail end of this Pilot-House parked on the street on the FB
-
VINTAGEPIC: saw this C-series wrecker on the FB
-
VINTAGEPIC: saw these big Dodges meat wagons on the FB
-
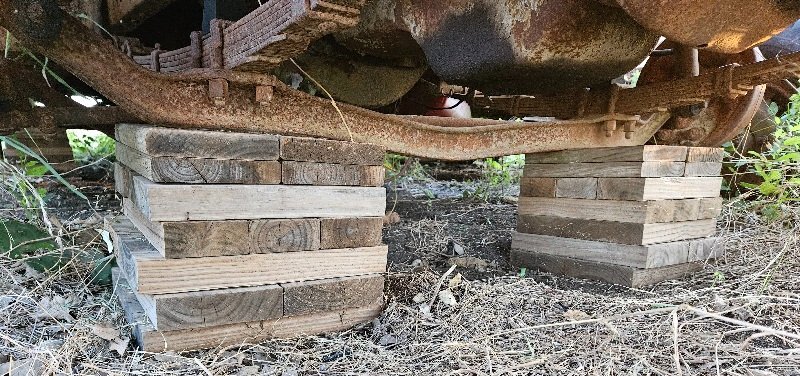
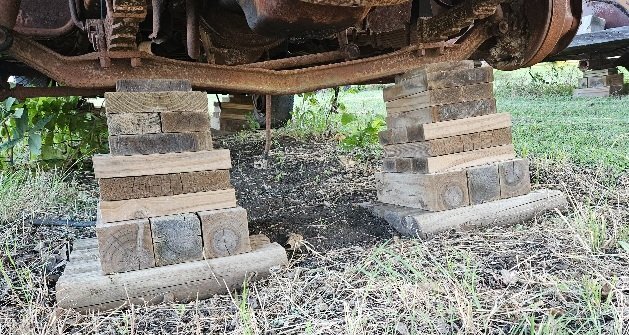
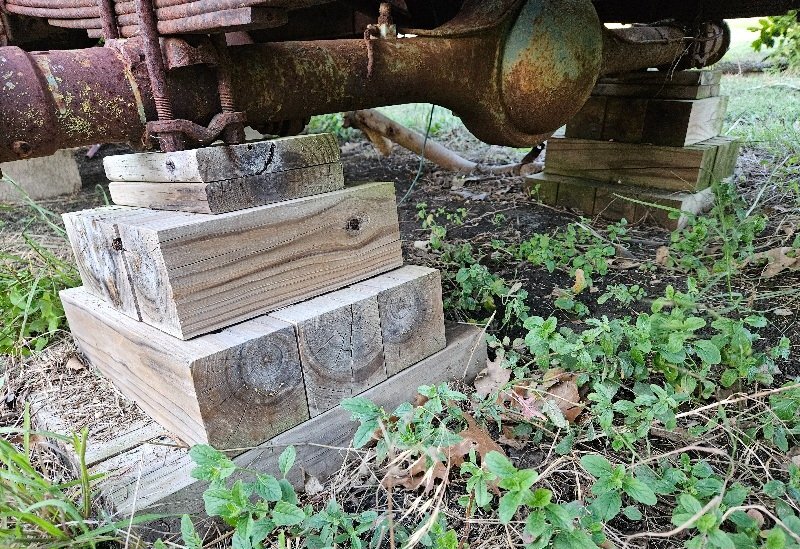
all the lumber used for my jack stands is pressure treated...the 4x4s were twisted and split 8' sticks that the cashier thought I was crazy for buying a pickup load, nor could she wrap her brain around the concept of cutting them sticks into short pieces that were usable...her "whatevs" included the eyeroll as she handed me the receipt...bless her heart
-
The light duty nature of the minivan engine suggests that a good nylon-reinforced fuel injection rubber hose rated upwards of 100 psi could handle this work load effortlessly. That steel braided stuff is primarily used on heavy duty applications where high heat and vibrations require external reinforcement to extend hose life.
-
There's an advantage to letting the jungle encroach on private property: Mother Nature is constantly playing security guard, with skeeters, yellow jackets, and slithery reptiles...nosey trespassers may think they're adept at sneaking around when they think nobody's looking, but Mother Nature's enforcers exact their toll, no matter what 🐝🐍
-
Teflon should work when exposed to gasoline, though that rubber fuel line looks a little long in tooth. When I apply the Teflon tape, I try to go 3 circuits, starting at the tip of the threads and overlapping 1/3 the tape width...this adds additional taper to the mechanical connection and shuts off any possible leak path.
-
Home Depot sells warped, split, and twisted lumber at 70% off, and the frugal carpenter sees that flawed lumber as having potential. Cutting these sticks into shorter pieces can yield shelving reinforcement, trailer jack pads, and custom jack stands. The basic 2×6 jack stand is cube shaped, very difficult to tip over but takes up valuable space if ya need to do work nearby. The tall pyramid jack stand comes in handy when ya need space to maneuver, but not as stable as the cube...it can be tipped over, but not easily. The short pyramid is a good general purpose lumber jack stand...difficult to tip over, gives more room to work than the cube. I recall figuring that each of these lumber jack stands cost less than 2 bucks in materials when I built them during lockdown.
-
Yeah I reckon he did not get forearms like that from Bible-thumpin VINTAGEPIC: saw this B-series snow-packed curbside at the movie theater on the FB
-
VINTAGEPIC: saw this big Job-Rated truck guarded by its driver on the FB
-
VINTAGEPIC: saw this Big Rig Dodge spilled over on the FB
-
VINTAGEPIC: saw these B-1or2 Dodges at the dealer service department up on the FB
-
this may or may not help...the #4 bearing oil passage used for the oil psi gauge shown is a problem in practice as the starter might interfere with the elbow in that port. The truck flathead oil psi gauge is tapped into #2 bearing oil passage. The filter shown is the now obsolete and practically extinct disposable canister; some aftermarket replaceable element type housings are plumbed similar, some are plumbed with pressure feeding the canister from the bottom.
-
How'bout a link to what article you're a-talkin'bout...all I could find was a reference to the article in the process of being written from back in October, nothing since 🤔
-
VINTAGEPIC: saw these Dodge COE car haulers on the FB
-
Second on the DeWalt...already have several DeWalt batt.power tools, the 3/8" impact came with a cordless drill, got a coupon from Ace that saved a few bucks on the higher capacity batteries, which are definitely needed when doing heavy work. I thought the impact was gonna be a weenie but it has surprised me with its sustained torque availability with the bigger batteries. As I've had to explain to some ppl about cordless power tools, stuff they bought 10-20yrs ago is now obsolete and is no longer supported. Batt.tech has vastly improved, and imo the quality cordless stuff mostly comes out of the same building in china. They don't want to spend the $$$ on new stuff, but replacement obsolete batteries cost more than these new tool sets they run on special at the hardware stores end of the year...and the new tools are much lighter and more powerful than the obsolete tools. These folks are not reliant on their cordless tools to put food on the table, so eventually their hardheaded whining fades away as they upgrade to stuff that works and they can handle, myself included. I recently bid adieu to my 2000 model Black & Decker cordless drill, as it was coming apart and the batteries were no longer charging. The 1970s Black & Decker corded impact is in semi-retirement as the brush retainers kept popping out. The Dewalt replacements have taken the baton and done nicely, especially when working in tight spaces with low light.
-
Not being critical of your installation, but I don't reckon that hardline pigtail is required when hooking up to a rubber hose. On truck engines, I have seen oil filter pressure from the oil gallery elbow as shown, and another oil pressure gallery elbow to the left of the distributor, behind the oil filler tube, as the psi source for the oil psi gauge. This hardline angles to the right of the coil bracket, held in place with a simple metal tab that can be fabricated easily.
-
VINTAGEPIC: saw this dually Dodge plowing streets on the FB
-
VINTAGEPIC: saw this appliance repair Route Van on the FB
-
Fram's slogan should be "better than nothing...but not by much!" 🏆
-
Installing new window channel is a chore akin to a monkey on a football, working in a tight space at awkward viewing angles and by feel. It's been decades since I did this last, so I'm a li'l fuzzy on the details. I was careful in removing the old channel, as it was mostly just a metal skeleton with little remnants of rubber. I'm not sure if what I did was the best way, but it worked, no adhesive needed. This installation method is for doors with vent windows; I reckon full door glass would be similar. •remove access panel and door glass for full access to channel track •lay the rubber in the sun for an hour or so to get it more flexible •install the new metal clip tabs into the door slots: horizontal tabs point towards the door latch, vertical tabs towards the running board [I cheated here a tad by bending the tabs slightly so they were harder to install but less likely to pop out of the door slots] •feed the new channel into door, either through the top or the access hole •place the new rubber end against the vent window rubber and work the channel into the track by squeezing the opening together. I made a working tool out of some scrap plywood panel (about the thickness of the door glass) that was hand-width with a slight curve on the smoothed working edge to seat the channel into the guide evenly. •while one hand is working the channel into the track, the other hand should be holding the remainder, and kinda applying a little pressure against the working direction so that the new rubber does not stretch. •making the turn from horizontal to vertical becomes tricky as ya have to work the rubber in the window opening with one hand while supporting/pushing the remainder through the access hole with the other...gotta take your time here and work by feel. •working the last few vertical inches is totally by feel since both hands are working through the access hole. I think when I was done, the new channel was just shy of the end of the guide...either Roberts shipped me replacement rubber that was a tad shorter than original or I had put so much effort into keeping the replacement from stretching that it bunched up a li'l bit. Getting the replacement seated into the horizontal to vertical curve is critical so that the door glass will close properly. With new window channel installed, the door glass will be tight in the track; this is how I realized that my setting tape was faulty as the glass kept popping out of the regulator channel when the window was rolled down. I do recall re-using some of the original clips as I broke a few of the new ones getting started. Getting that first one installed was a chore, but by the time I got to the 2nd, 3rd, 4th, it was not that hard with the tool I made, so there is a learning curve here.
-
VINTAGEPIC: spotted this Pilot-House Panel on the FB...that broasted chicken sounds like a meal
-
VINTAGEPIC: saw this Dodge COE car hauler loaded with jeeps on the FB
-
VINTAGEPIC: spotted this C-3 wrecker on the FB...maybe that racecar driver shopped at Ward's too
-
smaller engine stands work well on smooth concrete floors with smooth deliberate work applied...rough floors and impatient jerky action are a recipe for disaster as these smaller stands' top heavy nature rears its ugly head. To maximize my hobby budget, I have had to make concessions such as opting for the 1000# engine stand and being careful while using it. On more than one occasion, it meant using the engine hoist to set the flathead block on the 2x4 stand to get some leverage. Neither takes up a lot of space nor costs much and both got the job done. additional information - 2x4 engine stand additional information - flathead engine stand mounting


